Mississippi FD - 383CI Forged LS1 Stroker Build


 12-05-11, 08:59 AM
#105
Stitchler, FDWarrior, and GtoRx7. Thanks. I really appreciate the kind words.
mannykiller - Don't beat yourself up. I've scrapped more DI-NOC than I care to admit Keep up the good work.
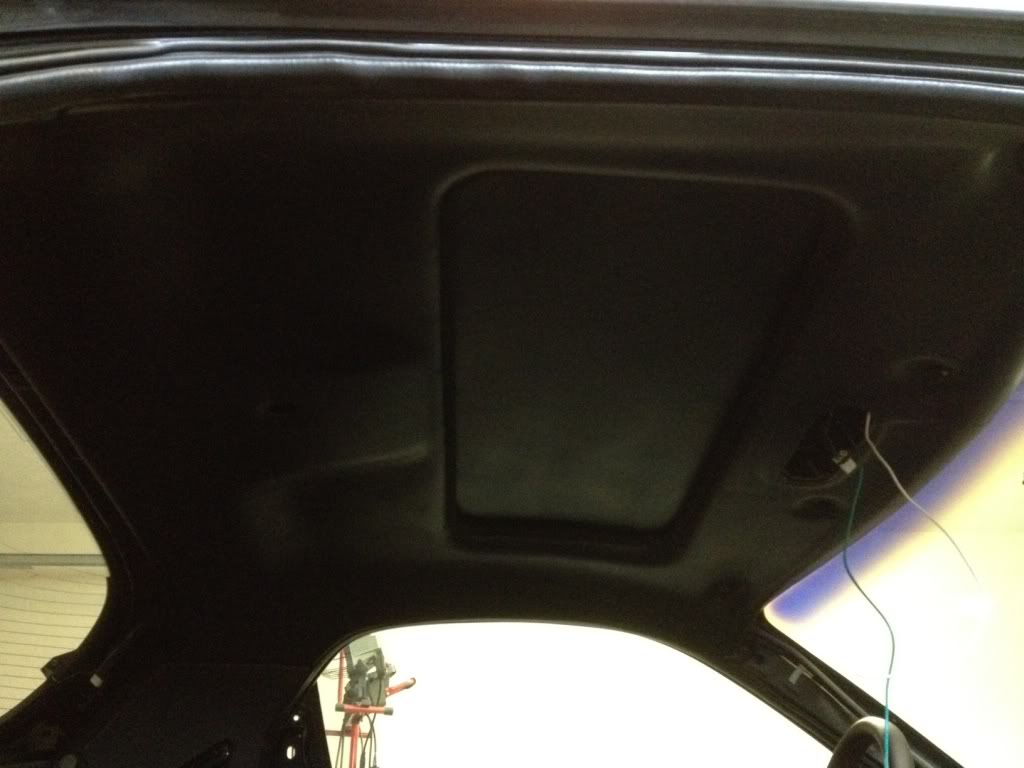
After my headliner upholstery disaster my buddy Jimmy (gmtech1978) stepped in and hooked me up with a free tan headliner. I am soooo happy to have it. Shipping these things are a royal PITA, so having somebody local with one laying around was a life saver!
I've heard good things about VHT vinyl dye, so I gave it a shot:
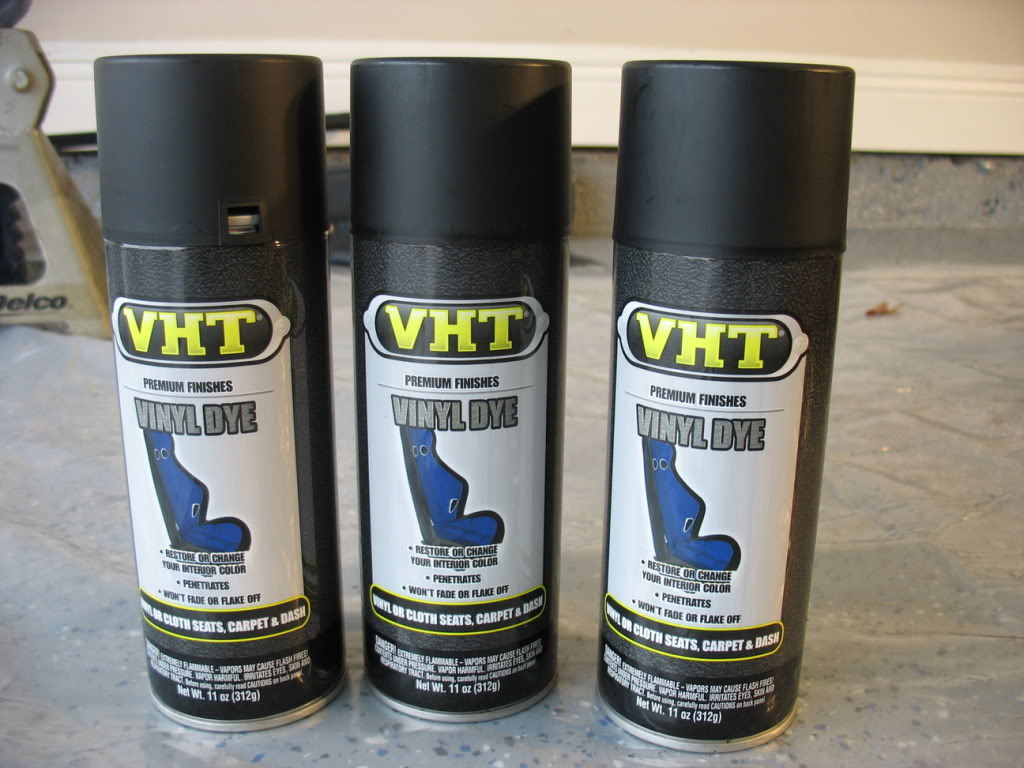
Each can is good for a medium coat. I put down 3 medium coats.
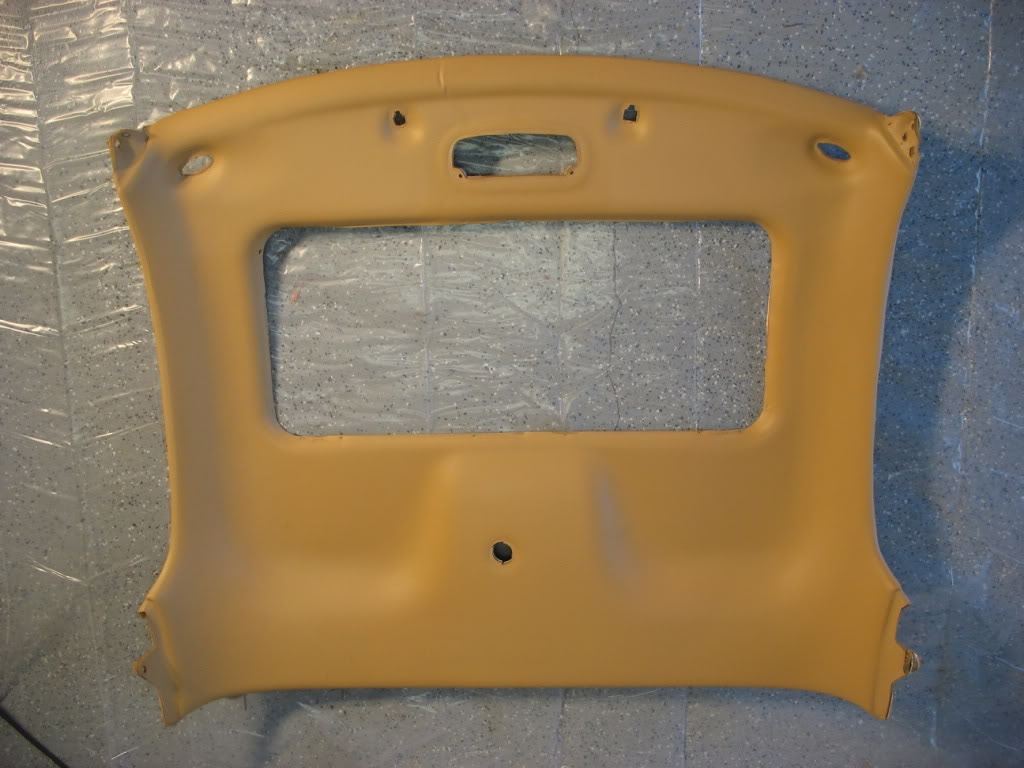
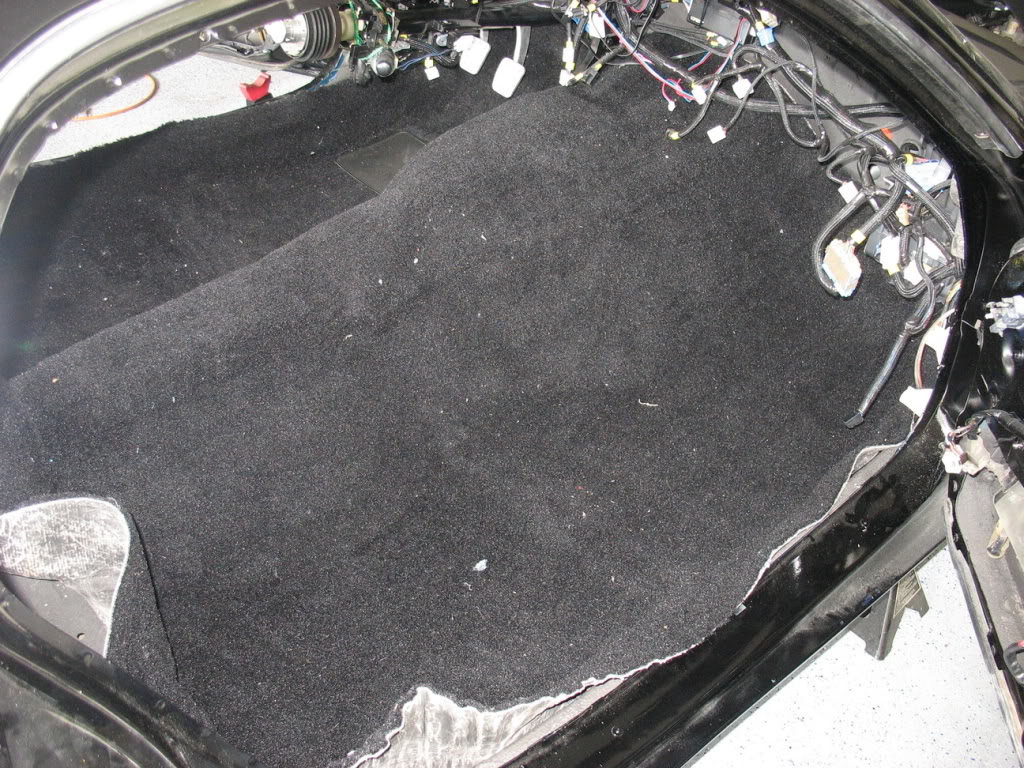
What I started with
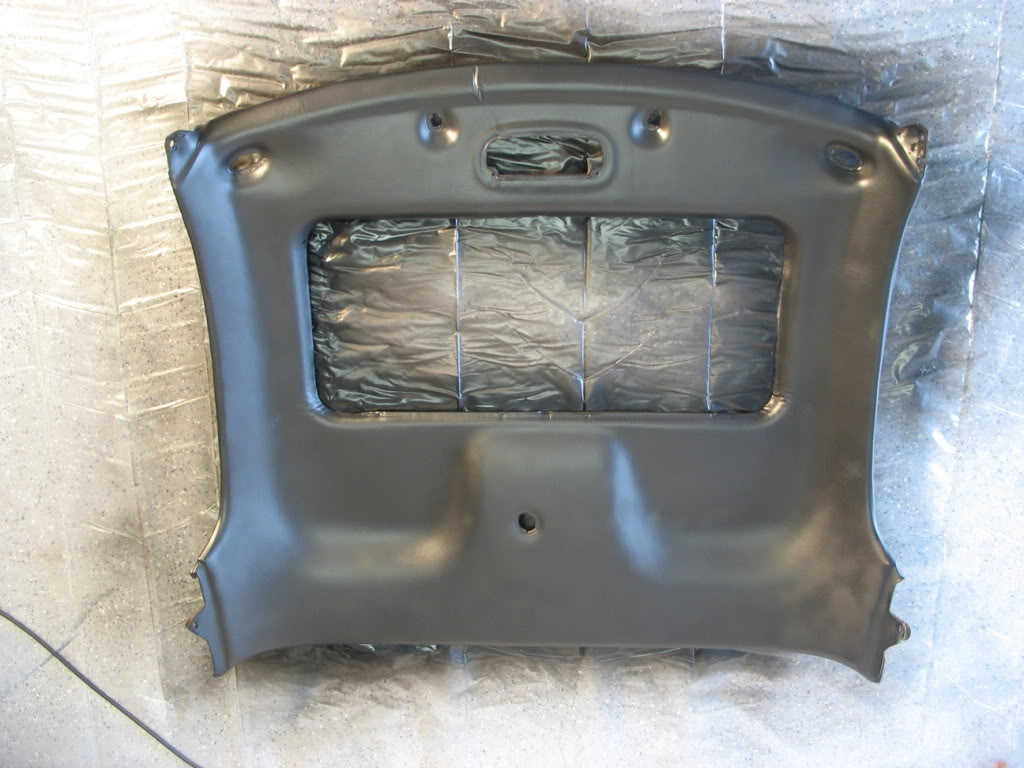
2 coats down. Hopefully the 3rd coat will take care of the splotchyness in the bottom right hand corner
Thanks again Jimmy!
Lane
mannykiller - Don't beat yourself up. I've scrapped more DI-NOC than I care to admit
Keep up the good work.After my headliner upholstery disaster my buddy Jimmy (gmtech1978) stepped in and hooked me up with a free tan headliner. I am soooo happy to have it. Shipping these things are a royal PITA, so having somebody local with one laying around was a life saver!
I've heard good things about VHT vinyl dye, so I gave it a shot:
Each can is good for a medium coat. I put down 3 medium coats.
What I started with
2 coats down. Hopefully the 3rd coat will take care of the splotchyness in the bottom right hand corner
Thanks again Jimmy!
Lane
12-14-11, 02:52 PM
#106
My paint guy told me today that he's looking to shoot the car next WEEK! Very excited!
He was successfully able to remove the rear window's molding and the aftermarket molding he's going to replace it with looks fantastic!
Also wrapped up a few more parts in DI-NOC
Kick panels, Map Pocket (Modded as one piece (Who uses the pocket anyway?)), and the little gas door/trunk pop panel. The gas door / trunk pop was actually the hardest of the 4.
Lane
04-18-12, 06:08 PM
#107
Well, as you can probably imagine. I didn't get my car back a few days after my last post 
It turns out that while my paint was curing back in December it developed a defect that made the paint look like it has fine lines running through it. It's hard to explain since it's very very fine lines and not something you can feel with your fingertip. It baffled my paint guy. He says the only thing he's seen that's similar to it was with a car he repainted that had fresher paint than he realized (fresh enough that it had not fully cured) and that after he painted it again and baked it the paint underneath contracted and expanded at a different rate than the paint on top. The painter said he'd like to let mr car cure for a month then he'd sand it down and try again using the paint with problems as the sealer. A month's come and gone so I went by and talked to him a few days ago and he said he was planning on getting started this week. He's still pretty gun shy about the whole thing, but at least he's covering all the extra expense. I just hope it comes out right this time. I expect it'll be another month before the car's actually out.
I haven't been too anxious about it. I've been doing a Gen3 3SGTE engine build over the past month and I'm still in the process of installing it in my brother's mr2.
In the realm or RX7 related news, I did get some time to install my new one-of-a-kind (well 2-of-a-kind technically) RedLineGoods passenger side handle leather wrapped made custom for me in Poland. I wrapped installed it on my SakeBombGarage aluminum passenger handle. It's an awesome feel and it's going to match all the rest of my redlinegoods swag!
[img width=800 height=600]http://i917.photobucket.com/albums/ad14/halfspec/handle2.jpg[/img]

[img width=800 height=600]http://i917.photobucket.com/albums/ad14/halfspec/handle3.jpg[/img]
The handle on the left is actually a stock handle proto-wrapped by redlinegoods. The handle on the right is my aluminum handle wrapped by myself. The wraps should be available on redlinegood's website for about $53 shipped or less soon I think (hopefully less).
Lane
It turns out that while my paint was curing back in December it developed a defect that made the paint look like it has fine lines running through it. It's hard to explain since it's very very fine lines and not something you can feel with your fingertip. It baffled my paint guy. He says the only thing he's seen that's similar to it was with a car he repainted that had fresher paint than he realized (fresh enough that it had not fully cured) and that after he painted it again and baked it the paint underneath contracted and expanded at a different rate than the paint on top. The painter said he'd like to let mr car cure for a month then he'd sand it down and try again using the paint with problems as the sealer. A month's come and gone so I went by and talked to him a few days ago and he said he was planning on getting started this week. He's still pretty gun shy about the whole thing, but at least he's covering all the extra expense. I just hope it comes out right this time. I expect it'll be another month before the car's actually out.
I haven't been too anxious about it. I've been doing a Gen3 3SGTE engine build over the past month and I'm still in the process of installing it in my brother's mr2.
In the realm or RX7 related news, I did get some time to install my new one-of-a-kind (well 2-of-a-kind technically) RedLineGoods passenger side handle leather wrapped made custom for me in Poland. I wrapped installed it on my SakeBombGarage aluminum passenger handle. It's an awesome feel and it's going to match all the rest of my redlinegoods swag!
[img width=800 height=600]http://i917.photobucket.com/albums/ad14/halfspec/handle2.jpg[/img]
[img width=800 height=600]http://i917.photobucket.com/albums/ad14/halfspec/handle3.jpg[/img]
The handle on the left is actually a stock handle proto-wrapped by redlinegoods. The handle on the right is my aluminum handle wrapped by myself. The wraps should be available on redlinegood's website for about $53 shipped or less soon I think (hopefully less).
Lane
04-18-12, 06:09 PM
#108
This project isn't completely dead... I've had a lot going on. I got engaged right after Christmas, so I've been busy with prepping/paying for that. Thankfully its a pretty simple deal since we're doing a weddingmoon in Jamaica at Sandals resort with only our parents attending. I just have to pay for it :P
After Christmas I also pulled the engine out of my brothers mr2, rebuilt a gen3 3SGTE, then installed the gen3 back in my bro's 2. It was an involved build, which I did all by myself and I took my time like I'm taking my time with this build I just finished the mr2 build 3 weeks ago. Since then I've closed on a new house, painted every room in it (2000 sq feet) and moved all of my fiance's stuff in. So.. Yeah, I haven't really been pressuring or even checking in on the paint guys much because I haven't had the time or money to get started again.
As for the RX7, I checked in on it in the middle of February since my painter said he'd like to let the paint cure over January in hopes that the defect removal would have a higher chance of success. When I checked in, he agreed it was time to get started. After two weeks I stopped by again to find that he was sanding the hatch's clear coat because he now strongly suspected the defect was in the clear coat. Another week and he had clear coated the hatch again. When I came by to inspect it, the defects were very faint but still there and he knew it and wasn't trying to hide the fact. He said he probably didn't cut deep enough into the clear coat, but that he still thinks it's salvageable without having to strip the clear coat. At that point I could tell he had lost just about all his motivation to get the job done and he once again offered to let me take the car home and get it finished up and he would get it finished up when I finished up. I've been hesitant to take my painter up on his offer to let me finish the car while he takes a break, but seeing that he's burnt out on the project and hasn't been making progress for weeks I decided it was time to get the car back. Perf0rmance's bump made me realize the car's been in the shop for 7 months now. It's time...
Today I went by and told him I'd be coming by tomorrow to pick the car up. He won't accept any form of payment until the car is finished, so I'm just going to get it home and start working on getting my interior put back in.
I expect I'll have the interior and exterior put back together in a month or less. After that I'm not sure what the plan is to get the back 1/2 of the car repainted or recleared. He did finish cutting everything in so he said I could put as much back together on the car as I wanted.
Should have a picture update tomorrow when I pick up the car
Lane
After Christmas I also pulled the engine out of my brothers mr2, rebuilt a gen3 3SGTE, then installed the gen3 back in my bro's 2. It was an involved build, which I did all by myself and I took my time like I'm taking my time with this build
I just finished the mr2 build 3 weeks ago. Since then I've closed on a new house, painted every room in it (2000 sq feet) and moved all of my fiance's stuff in. So.. Yeah, I haven't really been pressuring or even checking in on the paint guys much because I haven't had the time or money to get started again.As for the RX7, I checked in on it in the middle of February since my painter said he'd like to let the paint cure over January in hopes that the defect removal would have a higher chance of success. When I checked in, he agreed it was time to get started. After two weeks I stopped by again to find that he was sanding the hatch's clear coat because he now strongly suspected the defect was in the clear coat. Another week and he had clear coated the hatch again. When I came by to inspect it, the defects were very faint but still there and he knew it and wasn't trying to hide the fact. He said he probably didn't cut deep enough into the clear coat, but that he still thinks it's salvageable without having to strip the clear coat. At that point I could tell he had lost just about all his motivation to get the job done and he once again offered to let me take the car home and get it finished up and he would get it finished up when I finished up. I've been hesitant to take my painter up on his offer to let me finish the car while he takes a break, but seeing that he's burnt out on the project and hasn't been making progress for weeks I decided it was time to get the car back. Perf0rmance's bump made me realize the car's been in the shop for 7 months now. It's time...
Today I went by and told him I'd be coming by tomorrow to pick the car up. He won't accept any form of payment until the car is finished, so I'm just going to get it home and start working on getting my interior put back in.
I expect I'll have the interior and exterior put back together in a month or less. After that I'm not sure what the plan is to get the back 1/2 of the car repainted or recleared. He did finish cutting everything in so he said I could put as much back together on the car as I wanted.
Should have a picture update tomorrow when I pick up the car
Lane
04-18-12, 06:10 PM
#109
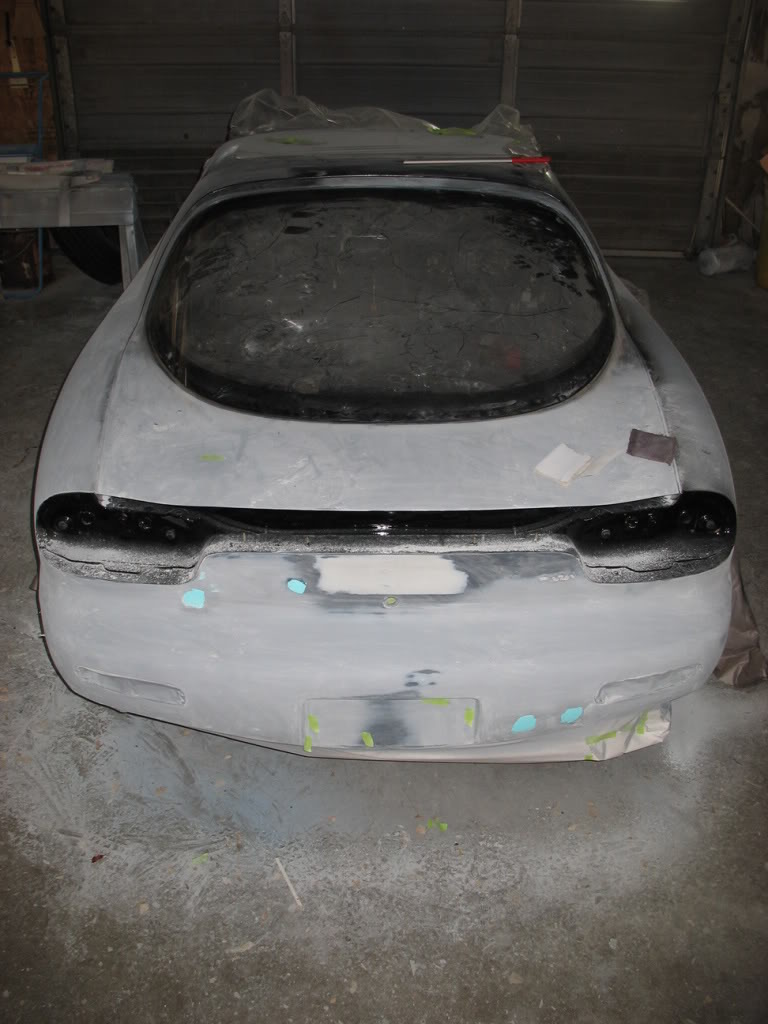
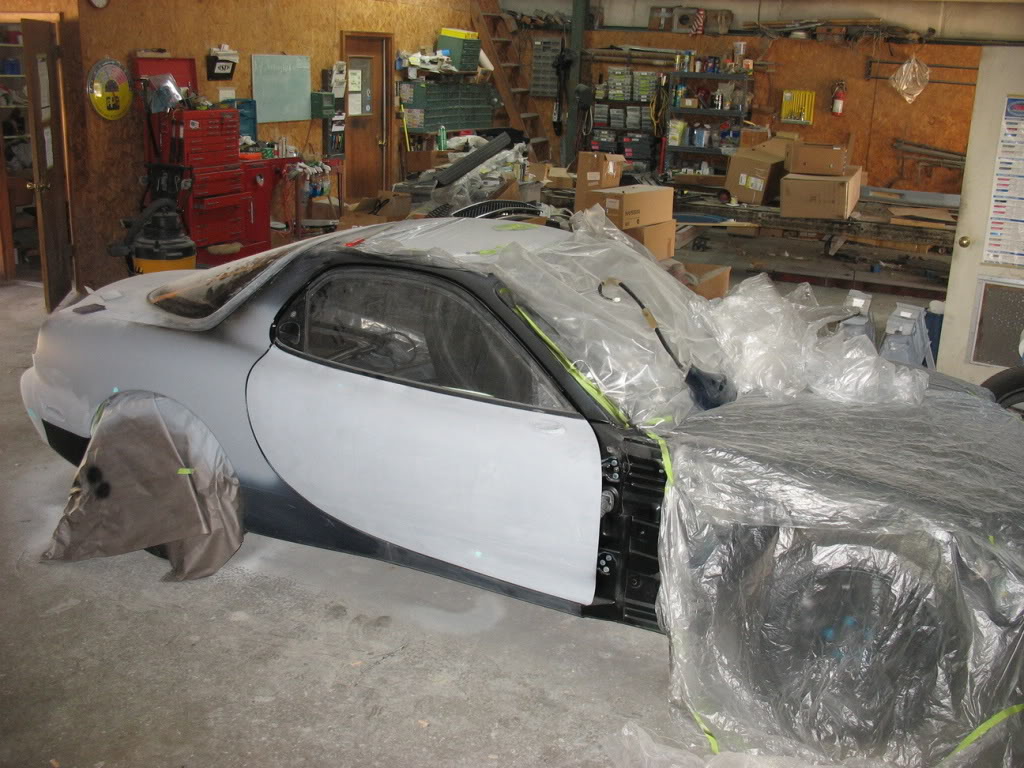
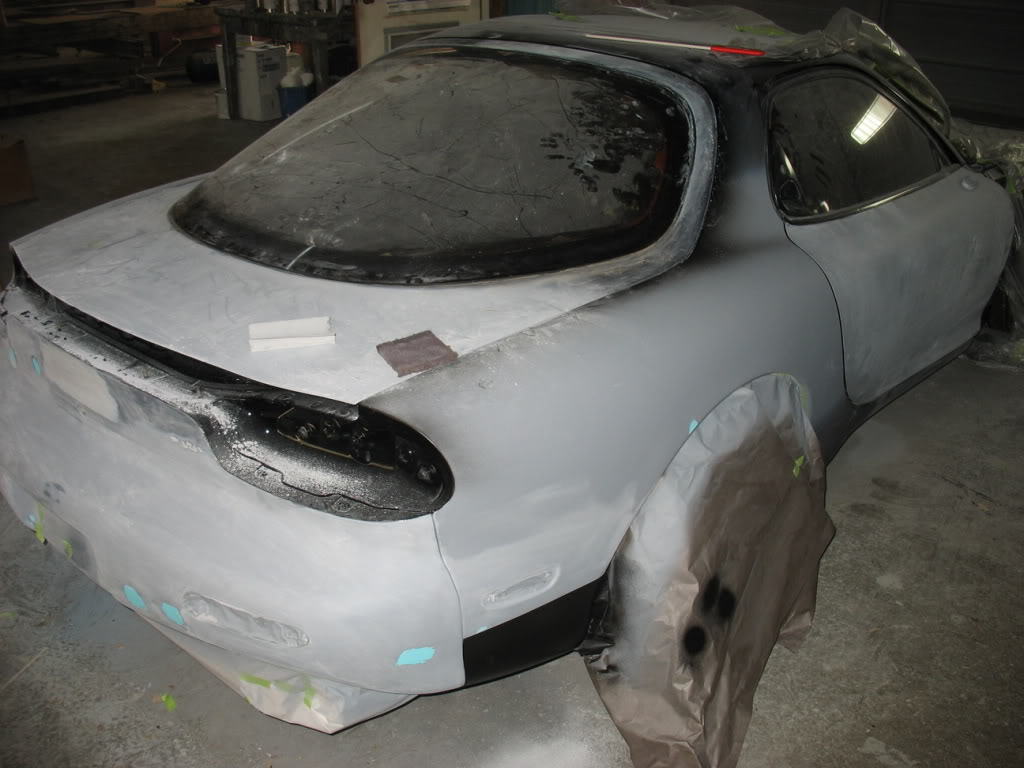
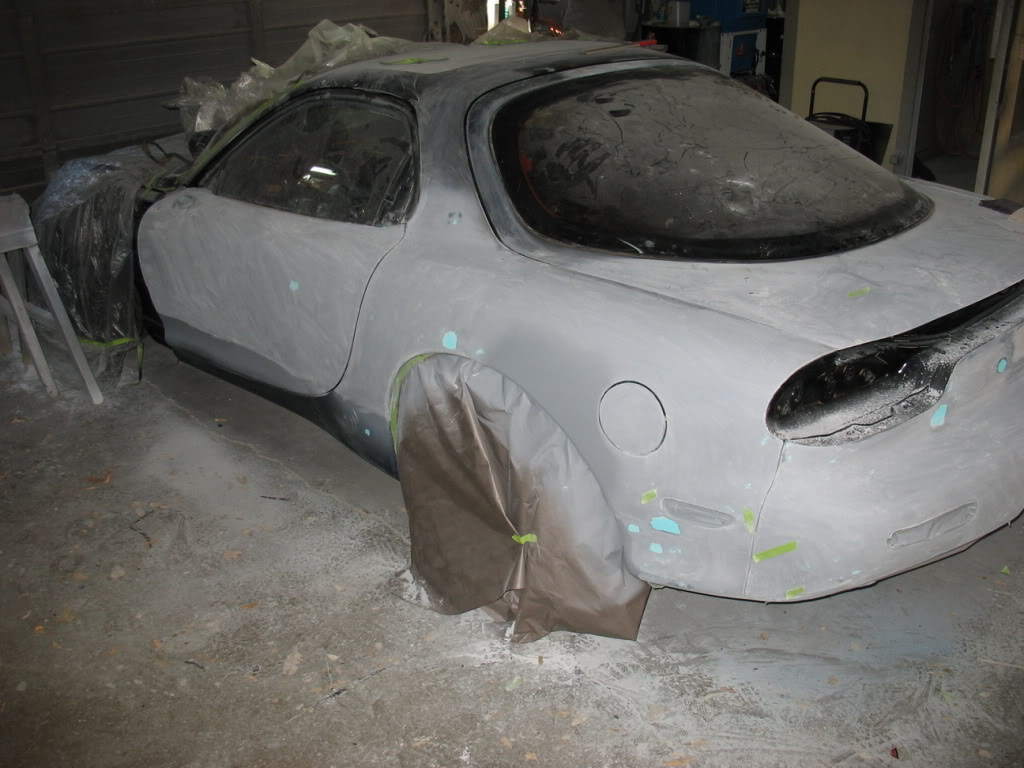
It's baaaaack
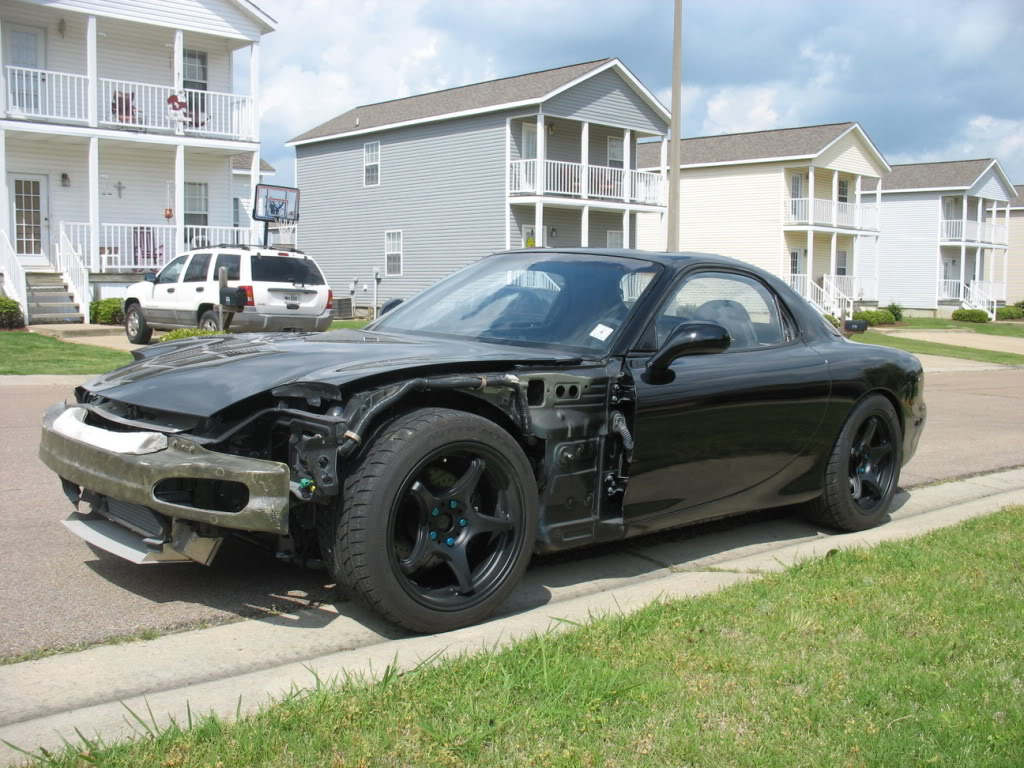
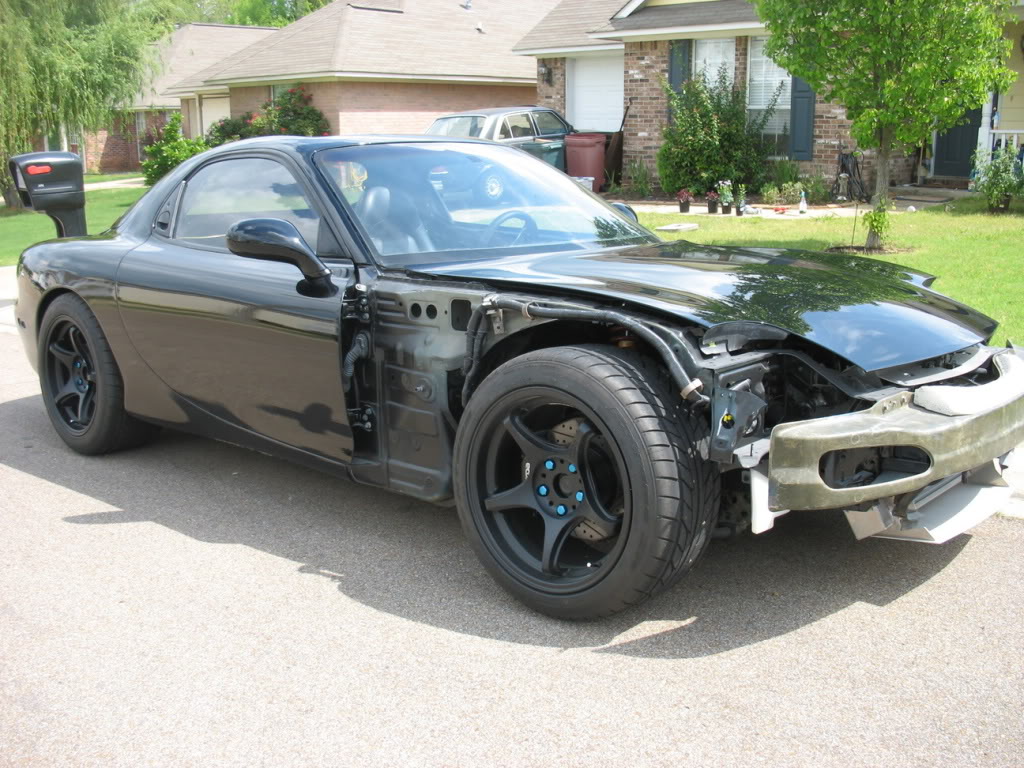
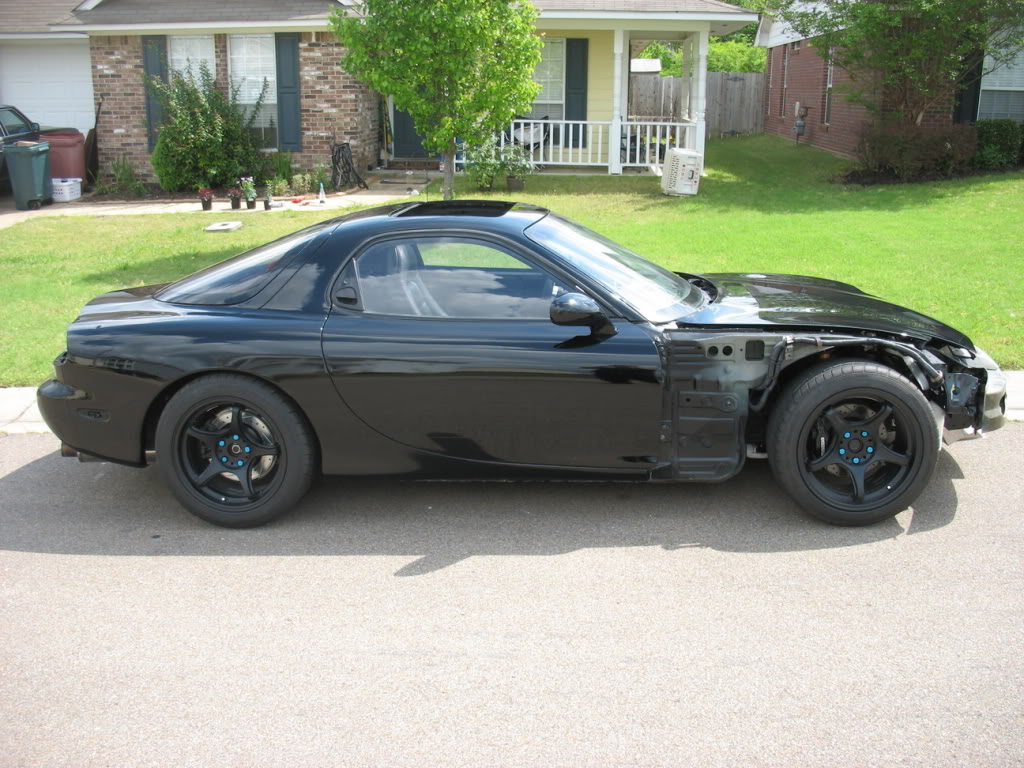
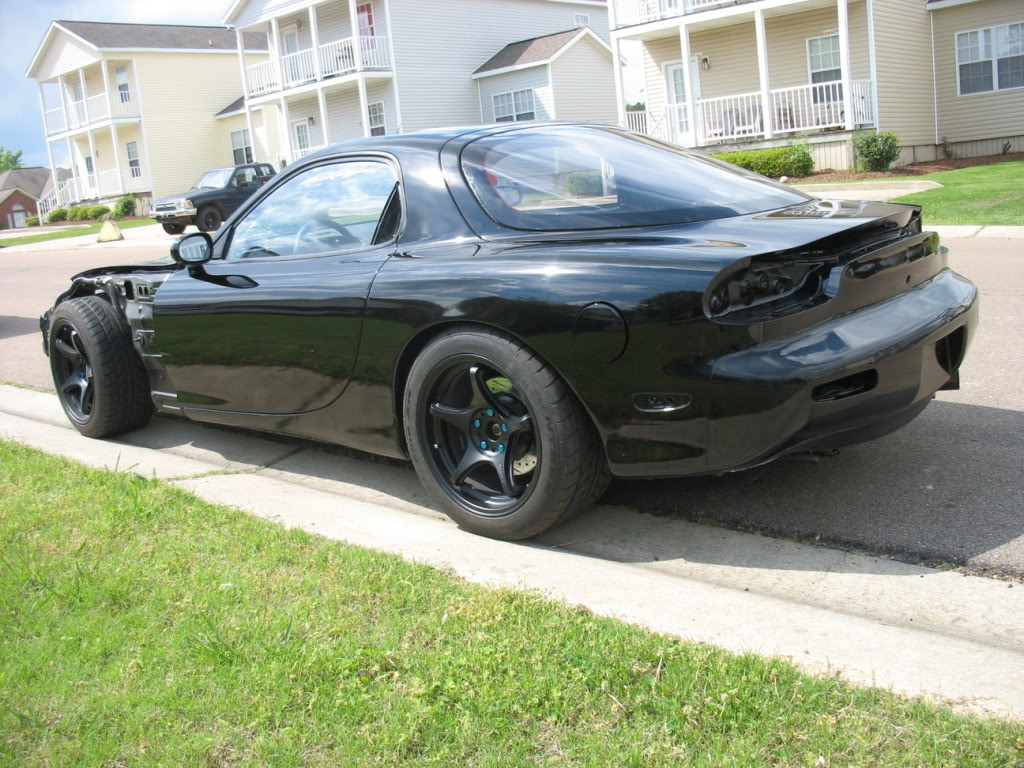
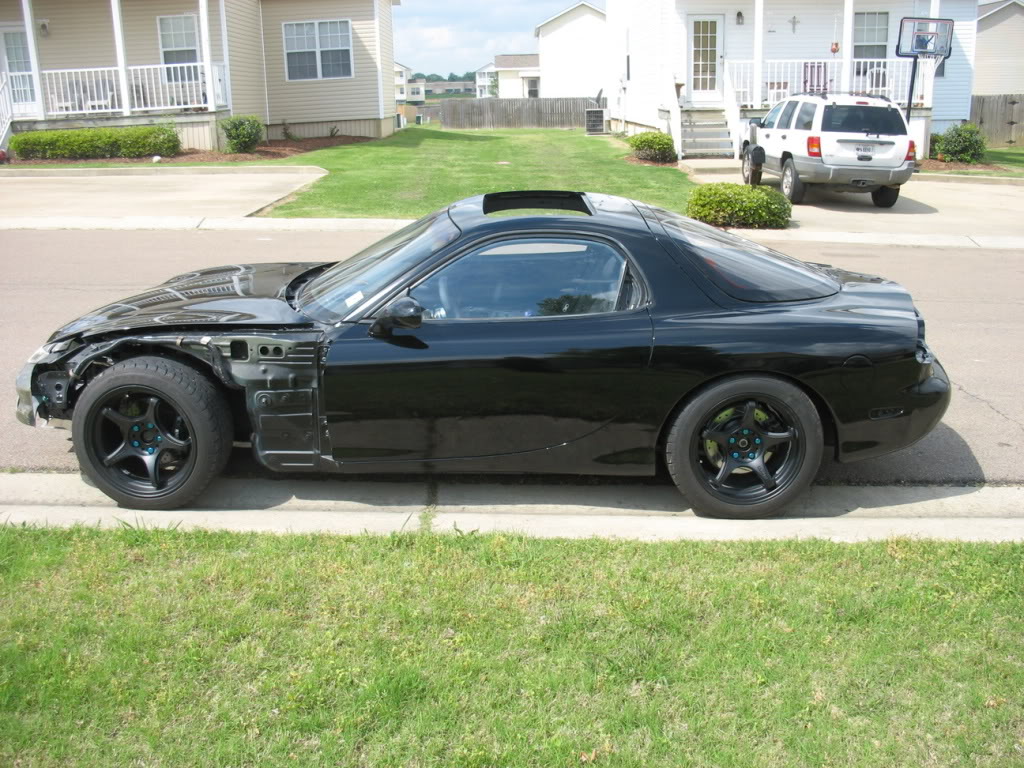
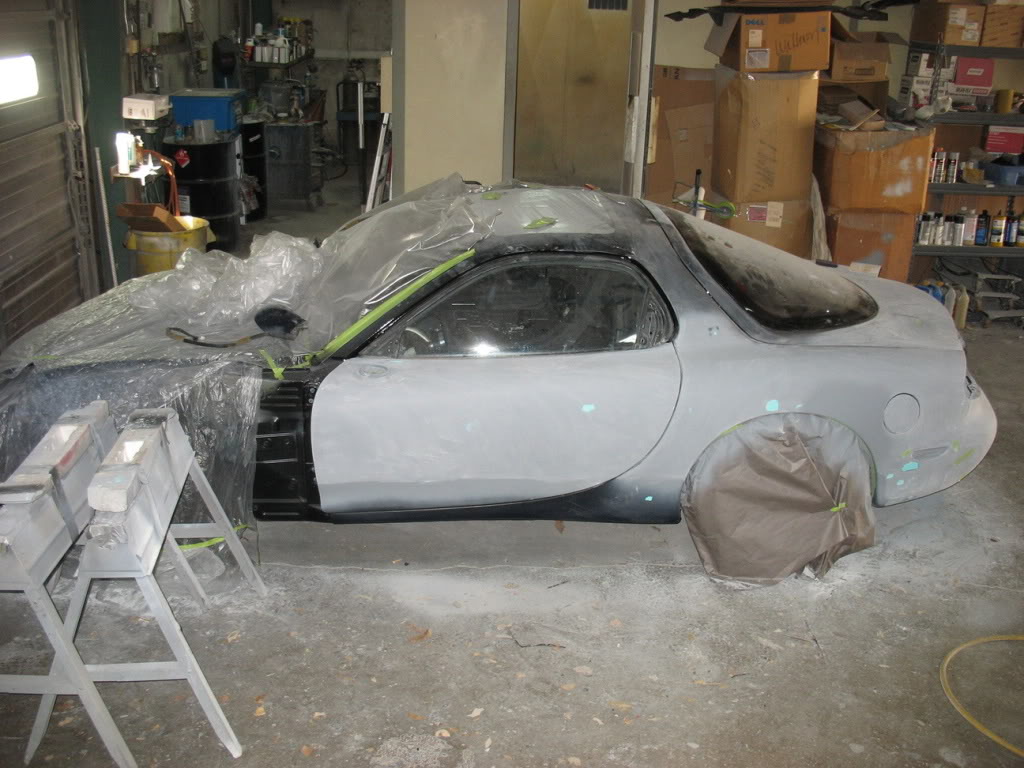
Doesn't look too bad from a distance does it?
Here's a close up on one of the worst problem spots that affect the doors, rear quarter, rear bumper, and hatch.

I'll have to live with it until I can get those parts repainted.
Happy its home though. Let the build resume!
Lane
Doesn't look too bad from a distance does it?
Here's a close up on one of the worst problem spots that affect the doors, rear quarter, rear bumper, and hatch.
I'll have to live with it until I can get those parts repainted.
Happy its home though. Let the build resume!
Lane
04-18-12, 06:12 PM
#110
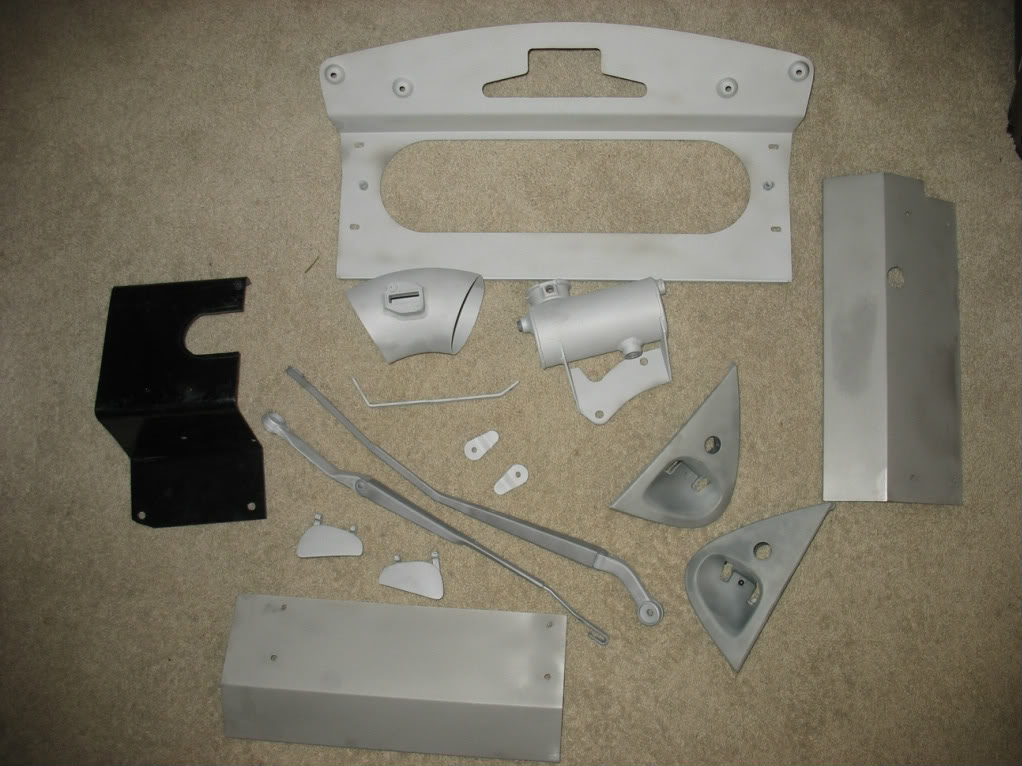
Getting some parts together to send out for powdercoating
20% Gloss Black
Door Handles
Door Handle Bezels
Windshield Wipers
5% Gloss Black
Surge Tank
Intake Pipe
Coil Covers
Radiator Cover
Radiator Cover tabs (2)
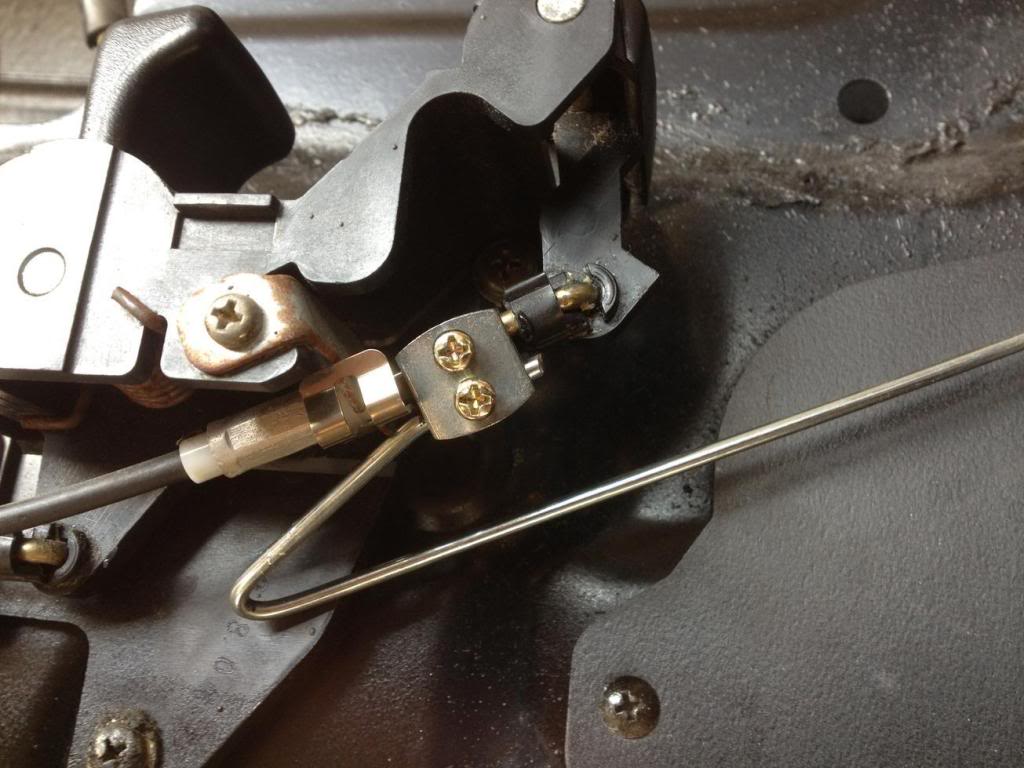
Fuse Box Bracket
Fuse Box Bracket Support Rod (center of picture).
Lane
04-18-12, 06:14 PM
#111
Made a little progress this weekend.
First I took out my dash to deal with my 'leaky' heater core. Took it apart and checked to make sure it was really the problem.
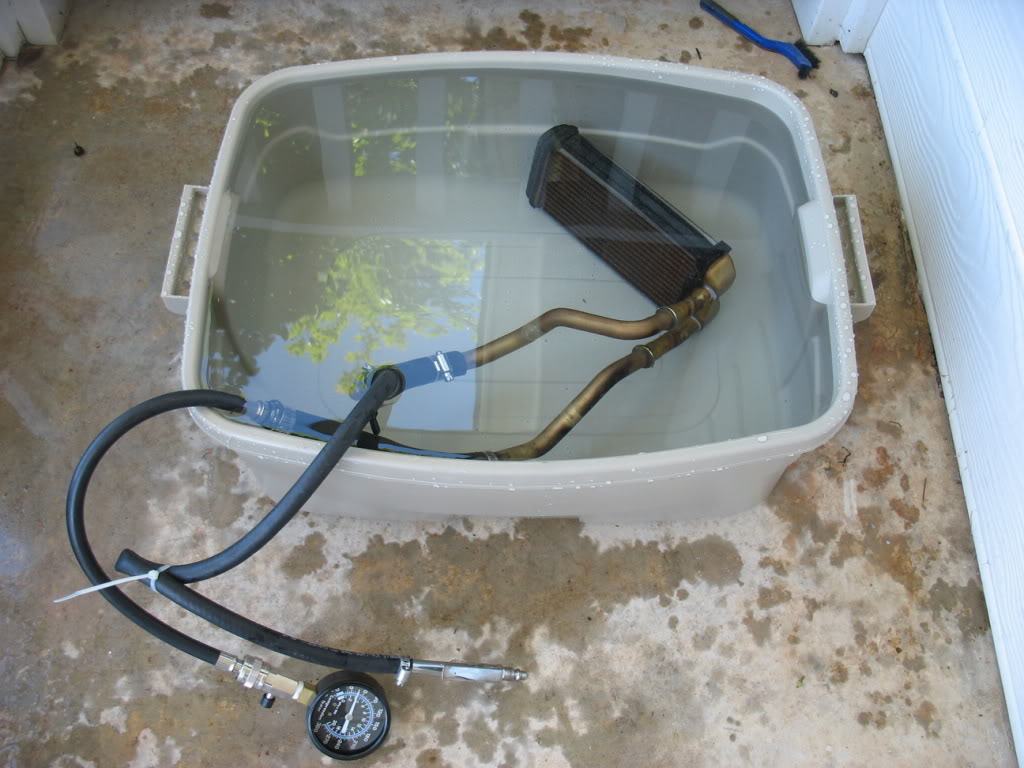
If this b!tch was going back in my car she'd have to hold it together underwater.

Turns out she could. Held ~ 45psi for over 3 hrs while I worked on other things. I pumped it up, sealed it, then put it underwater the whole time with an in-line modified compression gauge (removed schrader valve) to monitor it. I guess my leaks must have come from around the inlet and outlet pipes. Doh!
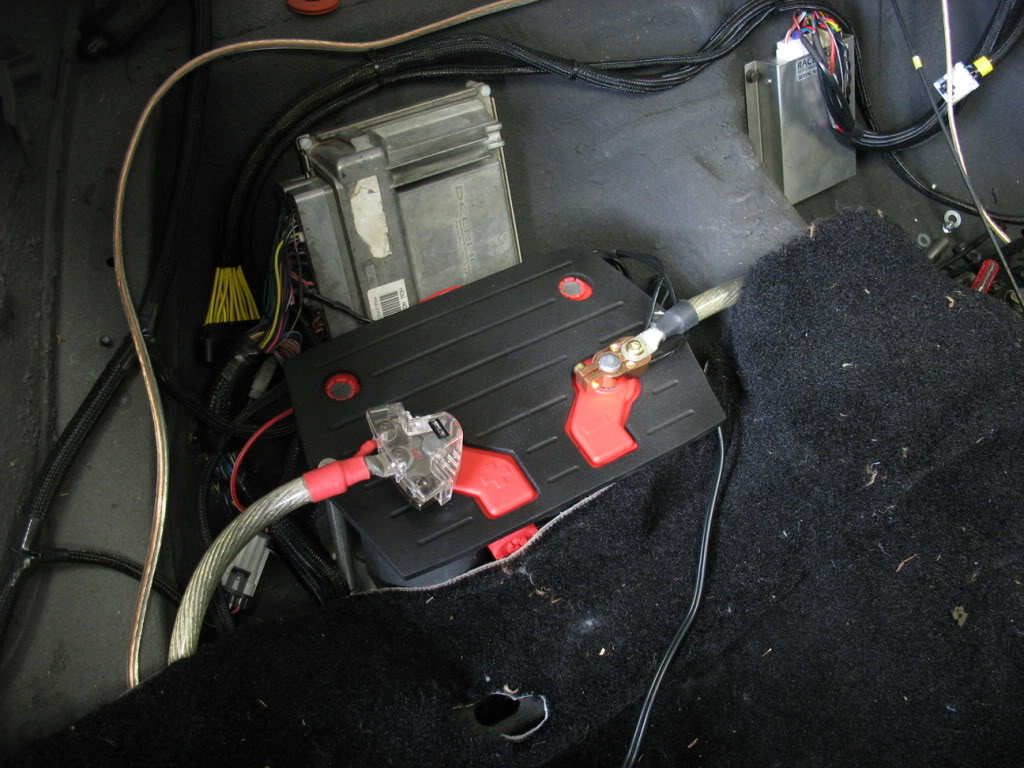
I also returned my optima battery this weekend. After spending 7 months in the shop, and deep cycling despite me telling the guys to keep it on its trickle charger, I couldn't get it to hold charge even with the parallel charger + good battery trick. Thankfully I bought it locally and O'Reillys didn't give me any trouble.
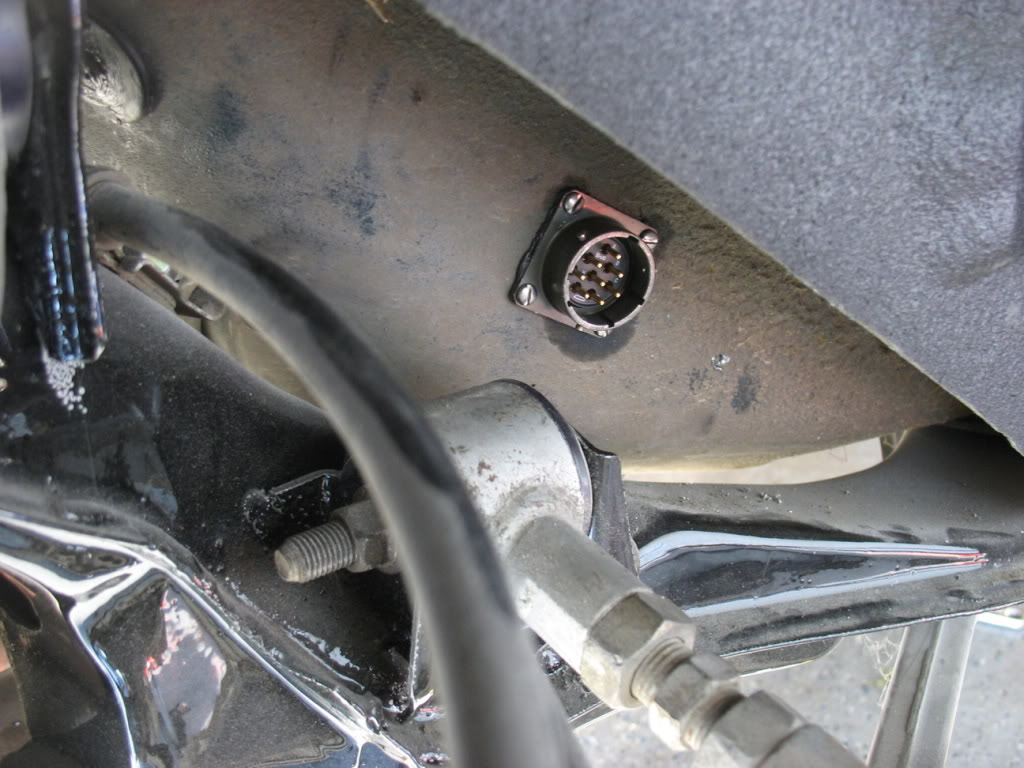
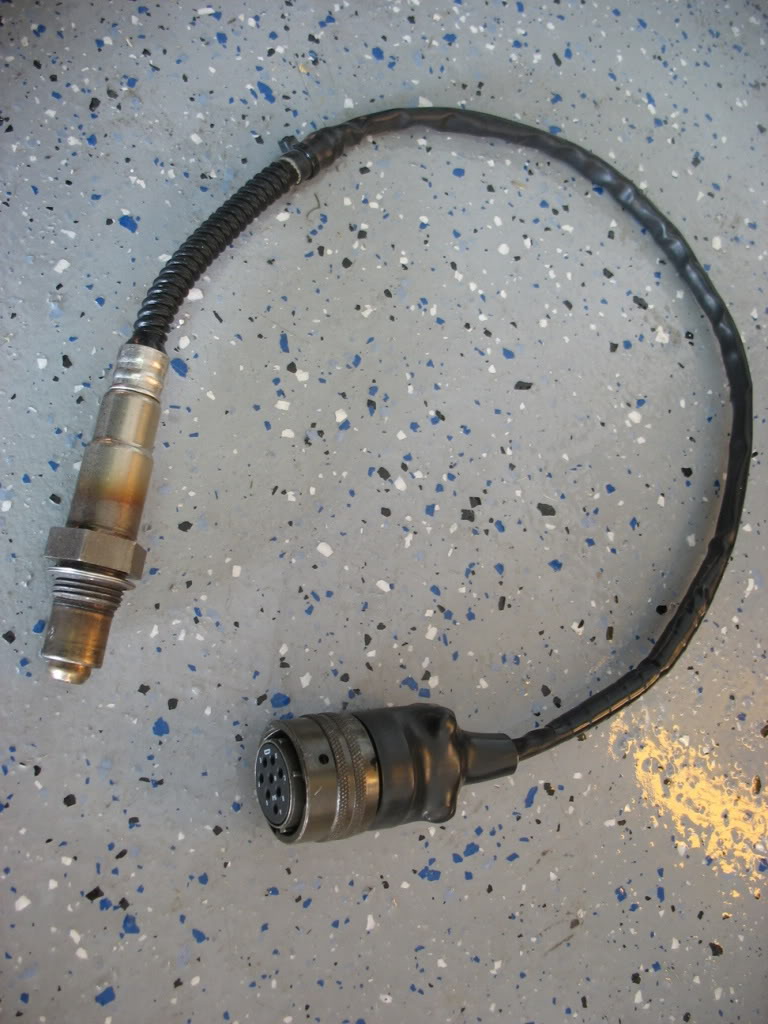
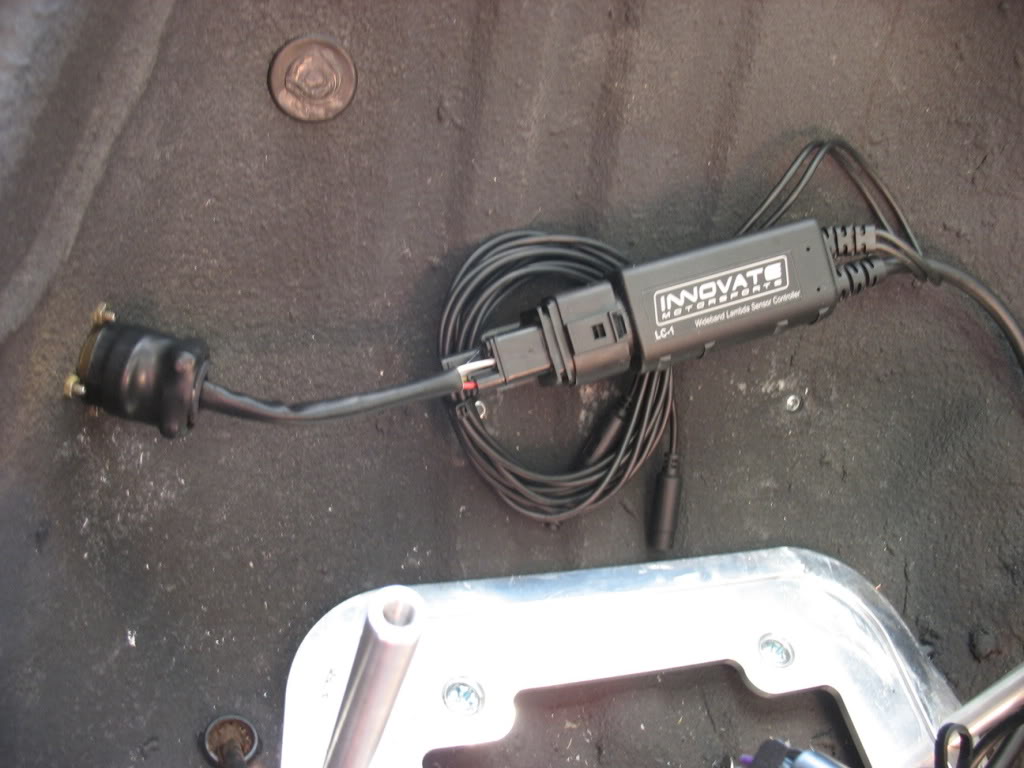
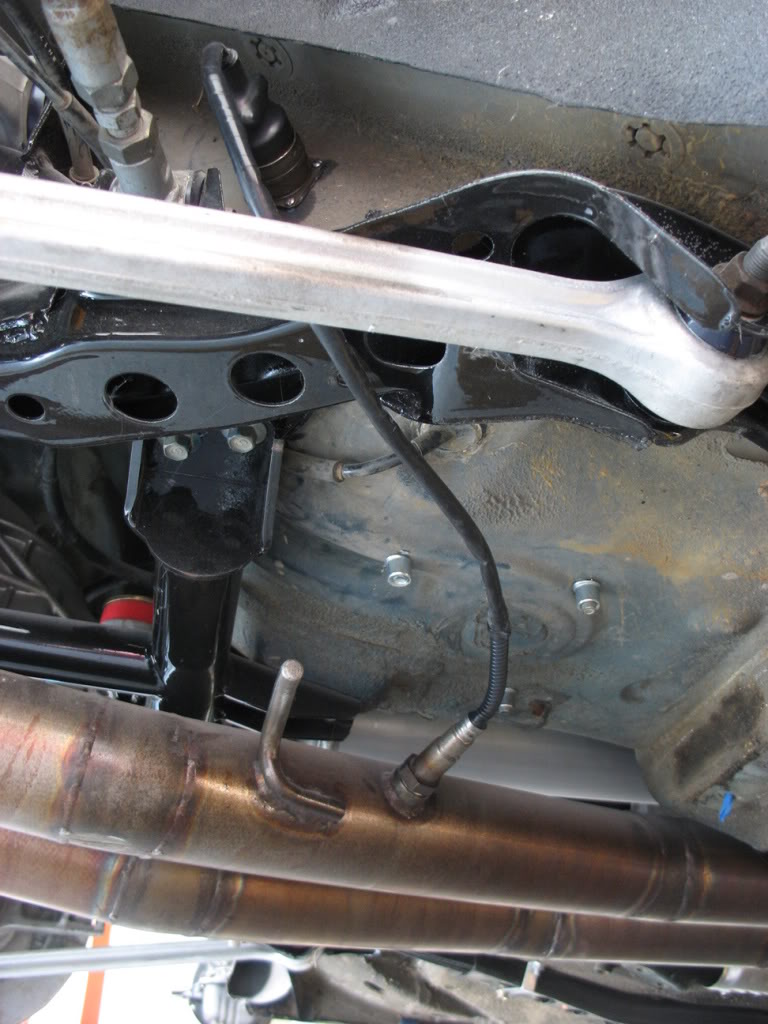
While I had my battery out I decided to go ahead any install the mil spec bulkhead connector I'd bought to make my wideband sensor install / uninstall easier for open air calibrations:
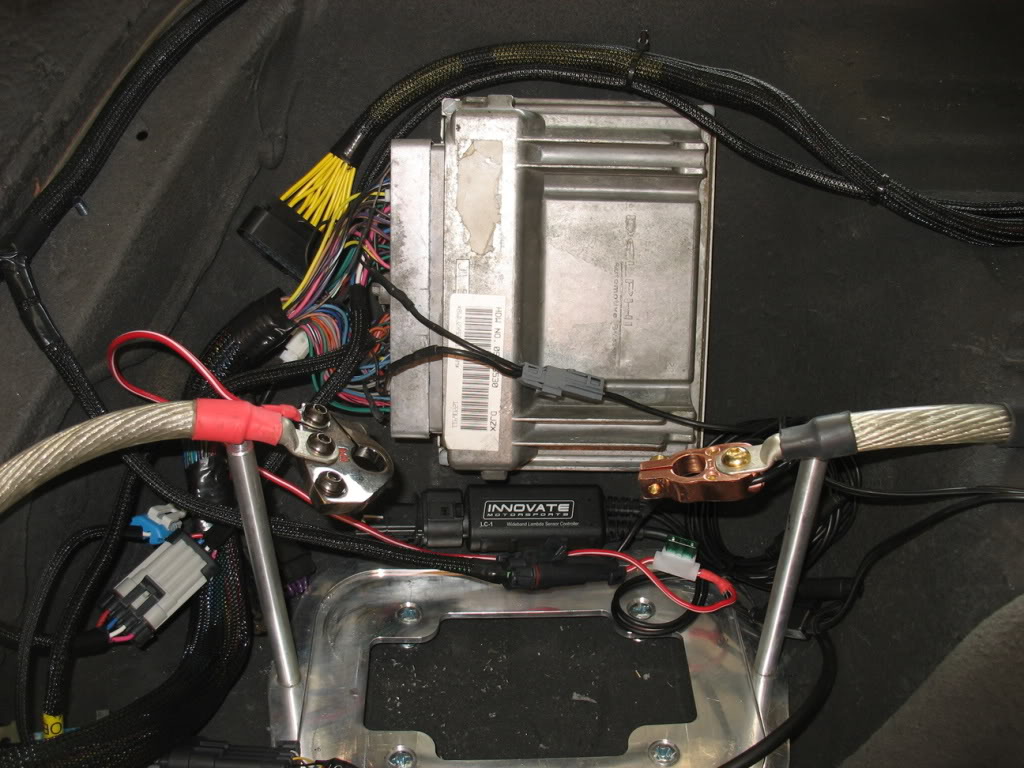
I also went ahead and coated the top of my battery holder with Plasti Dip because I just about **** a brick every time I work around it because I'm afraid the terminal clamps may accidentally touch the plate and short out. The plasti dip is rougher than I'd like, but it's a good insulator and supposedly it peels off if I end up not liking it:
First I took out my dash to deal with my 'leaky' heater core. Took it apart and checked to make sure it was really the problem.
If this b!tch was going back in my car she'd have to hold it together underwater.
Turns out she could. Held ~ 45psi for over 3 hrs while I worked on other things. I pumped it up, sealed it, then put it underwater the whole time with an in-line modified compression gauge (removed schrader valve) to monitor it. I guess my leaks must have come from around the inlet and outlet pipes. Doh!
I also returned my optima battery this weekend. After spending 7 months in the shop, and deep cycling despite me telling the guys to keep it on its trickle charger, I couldn't get it to hold charge even with the parallel charger + good battery trick. Thankfully I bought it locally and O'Reillys didn't give me any trouble.
While I had my battery out I decided to go ahead any install the mil spec bulkhead connector I'd bought to make my wideband sensor install / uninstall easier for open air calibrations:
I also went ahead and coated the top of my battery holder with Plasti Dip because I just about **** a brick every time I work around it because I'm afraid the terminal clamps may accidentally touch the plate and short out. The plasti dip is rougher than I'd like, but it's a good insulator and supposedly it peels off if I end up not liking it:
04-18-12, 06:15 PM
#112
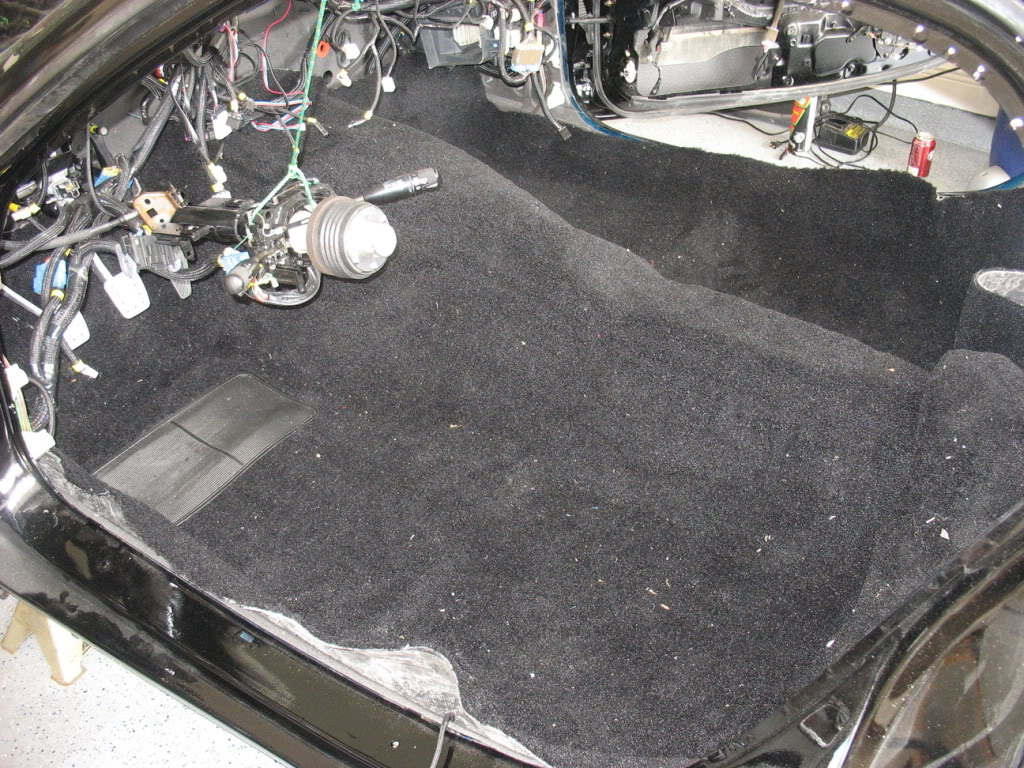
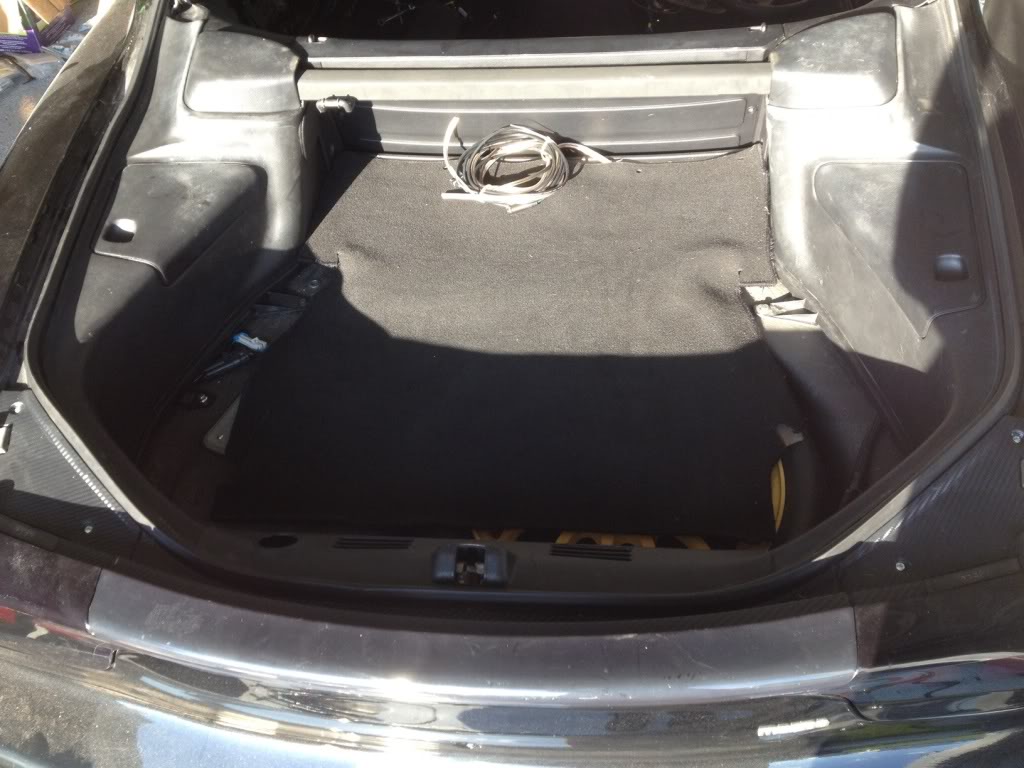
Also started installing my AAC aftermarket carpet. It's been in my attic for over a year but it still makes my car smell brand new + It's SOFT! I can't tell you how many cuts and deep punctures I've got from working inside the freakin cage of a cabin with so much exposed / sharp metal edges. I'm so glad to have a little padding again
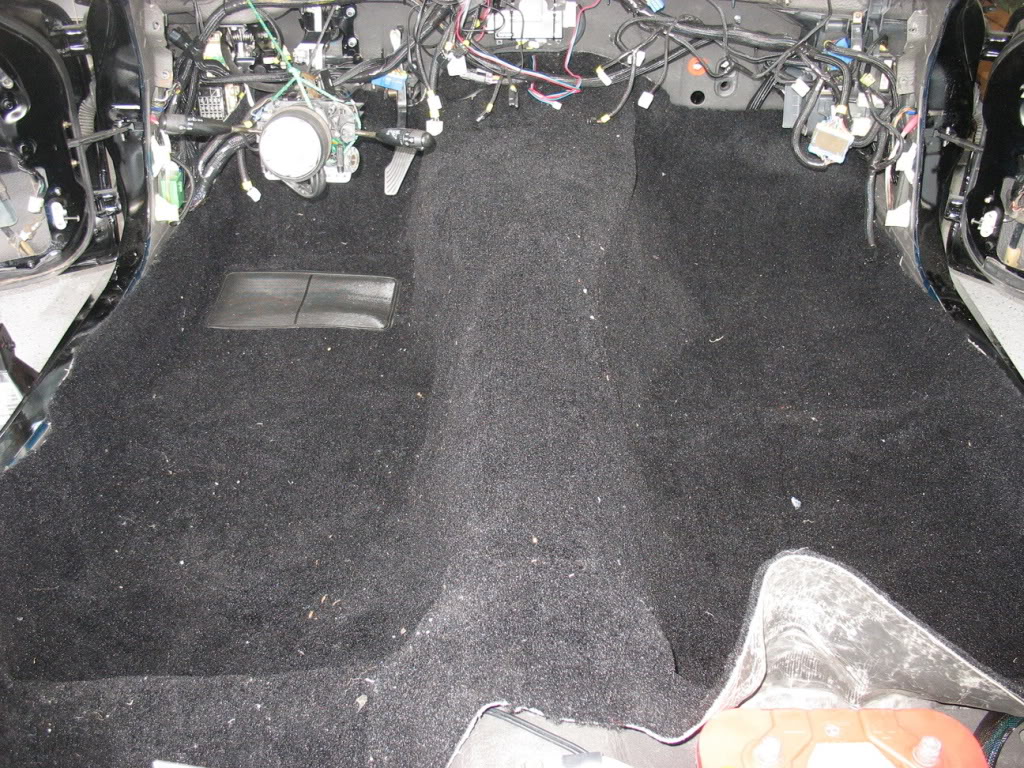
This was my method for marking my holes to be cut with chalk:
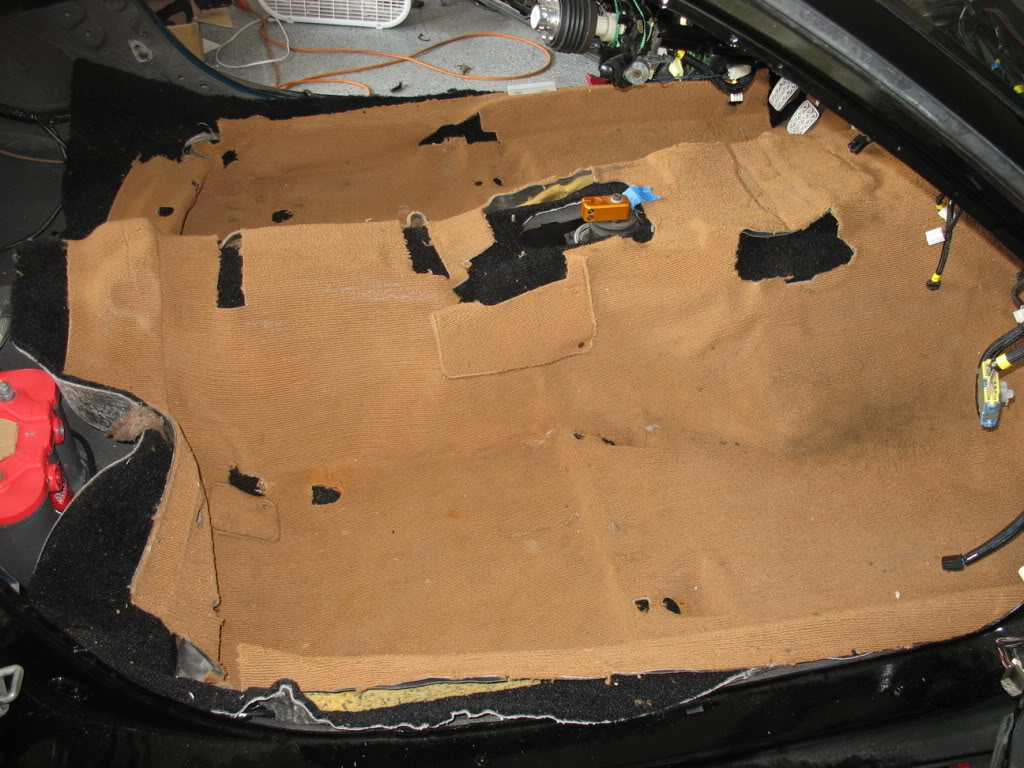
Here's the install at ~ 80 % complete. I'd cut all the holes at this point and was installing padding. I still haven't trimmed the perimeter though:
Sorry. I didn't get any more shots, but they'll be coming when I finish.
After I got the carpet mostly in I started second guessing some of my electronics since getting the carpet in makes changes significantly harder, so I started verifying my alarm setup. Up till this point I haven't worked on my door locks because my doors have been disconnected. Well I got them hooked up and was astonished to find that the stock door lock system only used a solenoid in the passenger side door I even missed it with the diagram shouting in my face the whole time. Oh well, I've got a solenoid on order and I'll get it fixed up, but it's a pita to have to work on the alarm wiring at this stage.
I've got an actuator and a pulse generator on the way to me:
http://www.amazon.com/dp/B0009SWLE6/...C1_cs_sce_dp_2
http://www.amazon.com/dp/B0009SUEW2/...C1_cs_sce_dp_1
I'm hoping to install it like this:
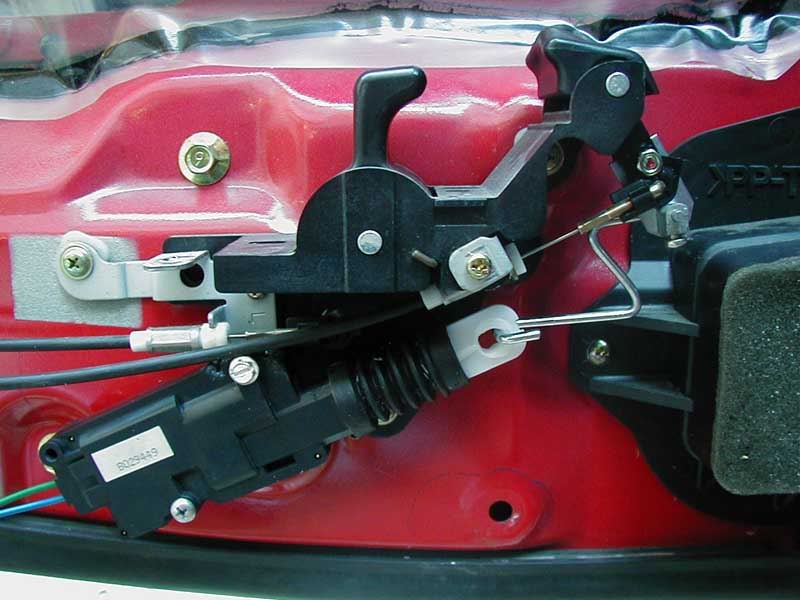
or this
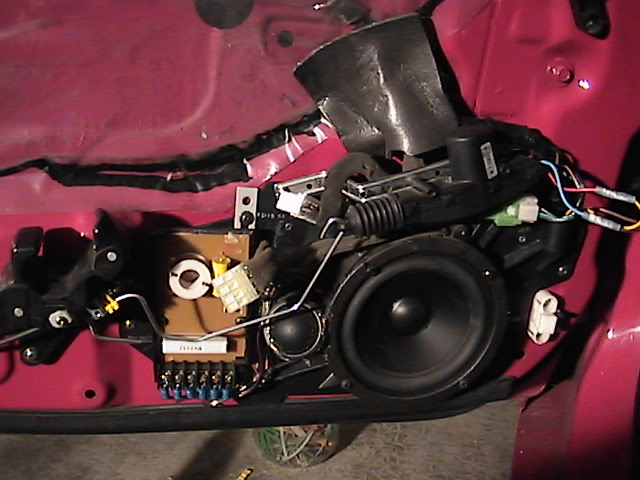
I actually prefer the second method better as I've seen a better install pic in that location (just can't seem to find it) and I think they'll be more room there. I've ordered a set of speaker adapters that I hope will give me even more clearance:
http://car-speaker-adapters.com/items.php?id=SAK068
I should be able to re-purpose existing wiring to wire the actuator. Specifically, the Bose speaker's shield and power wires
The pulse generator isn't very well documented, but I'm hoping it can take a two wire switched input and change it to lock / unlock pulses. The reason I need it is because the stock driver's switch is a hard switch that provides a ground to the lock wire and an open to the unlock wire when locked, and an open to the lock wire and ground to the unlock wire when unlocked. The stock system works with hard switches to ground and seems to work ok with pulses from my alarm (for the passenger door). The problem is that when the switch is in either position it hold ground on that position. I.E., when it's in the lock position, the lock wire is stuck at ground. So when I hit lock on my alarm, and it sends a grd pulse it does nothing and the door lock controller doesn't even try to switch states because the lock wire is already ground. I'm hoping that the pulse generator can make it so I can make a network to the lock controller where either the alarm or the switch can send lock and unlock signals without bothering each other. If I can't get the stock lock controller to play nice I'll just use two relays:
http://www.the12volt.com/doorlocks/page3.asp#arp
Lane
This was my method for marking my holes to be cut with chalk:
Here's the install at ~ 80 % complete. I'd cut all the holes at this point and was installing padding. I still haven't trimmed the perimeter though:
Sorry. I didn't get any more shots, but they'll be coming when I finish.
After I got the carpet mostly in I started second guessing some of my electronics since getting the carpet in makes changes significantly harder, so I started verifying my alarm setup. Up till this point I haven't worked on my door locks because my doors have been disconnected. Well I got them hooked up and was astonished to find that the stock door lock system only used a solenoid in the passenger side door
I even missed it with the diagram shouting in my face the whole time. Oh well, I've got a solenoid on order and I'll get it fixed up, but it's a pita to have to work on the alarm wiring at this stage.I've got an actuator and a pulse generator on the way to me:
http://www.amazon.com/dp/B0009SWLE6/...C1_cs_sce_dp_2
http://www.amazon.com/dp/B0009SUEW2/...C1_cs_sce_dp_1
I'm hoping to install it like this:
or this
I actually prefer the second method better as I've seen a better install pic in that location (just can't seem to find it) and I think they'll be more room there. I've ordered a set of speaker adapters that I hope will give me even more clearance:
http://car-speaker-adapters.com/items.php?id=SAK068
I should be able to re-purpose existing wiring to wire the actuator. Specifically, the Bose speaker's shield and power wires
The pulse generator isn't very well documented, but I'm hoping it can take a two wire switched input and change it to lock / unlock pulses. The reason I need it is because the stock driver's switch is a hard switch that provides a ground to the lock wire and an open to the unlock wire when locked, and an open to the lock wire and ground to the unlock wire when unlocked. The stock system works with hard switches to ground and seems to work ok with pulses from my alarm (for the passenger door). The problem is that when the switch is in either position it hold ground on that position. I.E., when it's in the lock position, the lock wire is stuck at ground. So when I hit lock on my alarm, and it sends a grd pulse it does nothing and the door lock controller doesn't even try to switch states because the lock wire is already ground. I'm hoping that the pulse generator can make it so I can make a network to the lock controller where either the alarm or the switch can send lock and unlock signals without bothering each other. If I can't get the stock lock controller to play nice I'll just use two relays:
http://www.the12volt.com/doorlocks/page3.asp#arp
Lane
 05-07-12, 04:08 PM
#115
Thanks guys.
I'll be posting more instructions on how I did my door lock actuators but it may be more involved than most people want to deal with since I disabled the stock 'mimmic the driver side door lock' functionality (its manual and alarm actuated only now), ditched the stock door actuator control box, and added two relays, but it uses existing wiring so it takes the headache out of fishing wires through the door jambs.
Lane
 05-08-12, 01:07 AM
#118
I have seen a good bit of talk on the subject of using JDM door lock assemblies with the actuators to create a more OEM solution. While I'm a big OEM guy I just couldn't justify the expense (neighborhood of $200 if I remember correctly) to do something that's boils down to convenience when a $15 actuator and two $5 relays will do the job properly. My definition of properly is actuating the actual lock lever and not the rod that connects to it since people say they break rather easily.
Locking/Unlocking both doors with the remote is what I'm after and I'm hoping to have my solution working in the next couple of days. I'm keeping CPU2 and disabling the alarm with my aftermarket alarms factory disarm function. I could just as well remove it I guess, but then I wouldn't have that awesome key reminder tone when I forget to take out my key and open the door
Lane
05-24-12, 03:40 PM
#120
Alright kids. Since it was requested, here's how I did my driver's side actuator:
Here are the parts a quantities you will need:
(2) - http://www.amazon.com/Absolute-SRS10...7888729&sr=1-1
(2) - http://www.mouser.com/ProductDetail/...%252bwGA%3d%3d
(1) - http://www.amazon.com/dp/B0009SWLE6/...C1_cs_sce_dp_2
(1 - Set) - http://car-speaker-adapters.com/items.php?id=SAK068
(1) - Alarm of your choice as long as it supports lock/unlock with negative pulses
Wiring next


On the factory diagram, all you are really working with is two connectors. K2-01 which is in the drivers side kick panel and plugs into the factory lock controller (which is green) and J4-08 which is a connector on the upper left hand side of the driver's door circled in red below:
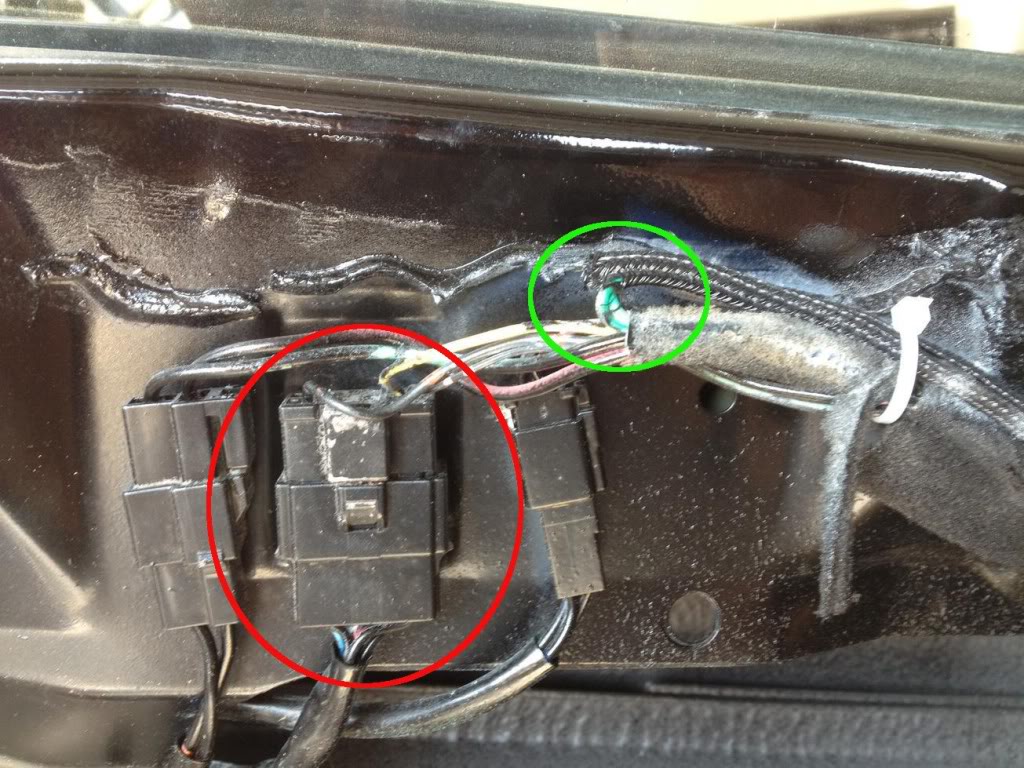
The green circle shows where the wiring starts which leads to my new actuator in the door. I just depinned the green/yellow and green/red wires from J4-08 and ran them to the new actuator. One thing I didn't keep track of is the polarity of the green/red and green/yellow wires in respect with the new actuators. If you finish and your driver's side locks when your passenger side unlocks, you'll simply have to switch the wires of the actuator.
Alright, that handles the wiring through the door using existing wiring and not having to deal with the f&#$n stupid X-20 connector. Now comes the fun part.
Go ahead and chop off the connector of K2-01 and throw away the OEM green lock controller. Connect the Green/Red wire to the Orange wire wire and connect both to the unlock relay output shown in blue at the bottom of the second diagram. Likewise, connect the Green/Yellow wire to the Green wire and hook it to the lock relay output shown in purple at the bottom of the second diagram. This basically ties the existing actuator and new actuators together and hands their control over to the new relay system. Connect the 12v wires in the relay diagram to the Blue wire from K2-01. Connect the GND wires from the relay diagram to the Black wire from K2-01. Now all that's left is to connect your lock and unlock wires from your alarm system to the lock and unlock inputs on the relay diagram. When you're done you should have used all the wires that ran to K2-01.
The pros of wiring it this way is that you get rid of the old lock controller and replace it with brand new relays. You also don't have to do any wiring through the door connector. The cons of wiring it this way is that you lose the passenger side mimmic of the driver's side lock / unlock latch. I.E., if you lock your driver's door manually with the latch, the passenger side lock will not actuate to lock like it used to with the OEM system.
Alright, now on to more install pics:
Here's how I mounted the actuator:
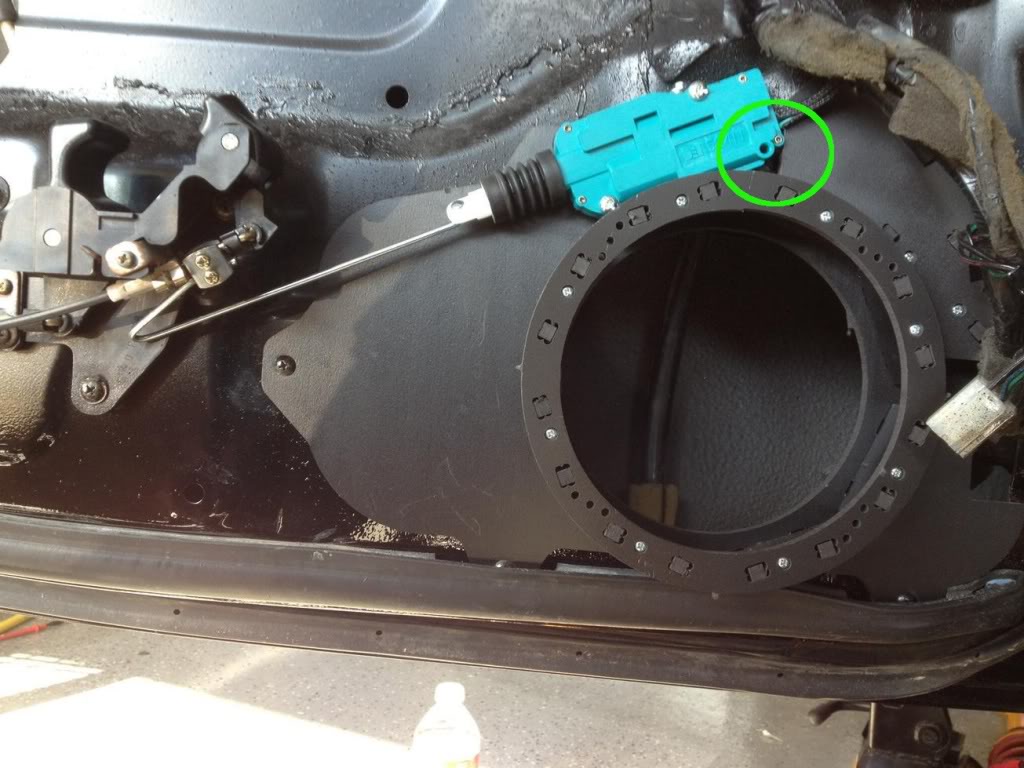
The green circle shows a good reference point for mounting the actuator. Its basically a level change in the new speaker panels. Just butt the actuator up against that and you should be golden. The actual mounting the actuator was acomplished by a nutsert in the door skin, and a bolt + nut that went throught the speaker panel.

Here's a view from above. You want to keep the actuator arm as close as possible to the door skin so it doesn't interfere with the window switch that will occupy a lot of this space later on.
Here's a view of how I connected the actuator rod to the latch assembly. All of this hardware comes with the actuator. When installing, you'll want to manually move the actuator in and out to make sure the push and pull's throw is correct for actuating the latch. If you do it wrong, you'll end up putting pressure on a lot of parts and you'll probably break something later on.
Finally, this is where I mounted my new relays.
System works VERY well. I'm happy now :yay:
Lane
Here are the parts a quantities you will need:
(2) - http://www.amazon.com/Absolute-SRS10...7888729&sr=1-1
(2) - http://www.mouser.com/ProductDetail/...%252bwGA%3d%3d
(1) - http://www.amazon.com/dp/B0009SWLE6/...C1_cs_sce_dp_2
(1 - Set) - http://car-speaker-adapters.com/items.php?id=SAK068
(1) - Alarm of your choice as long as it supports lock/unlock with negative pulses
Wiring next
On the factory diagram, all you are really working with is two connectors. K2-01 which is in the drivers side kick panel and plugs into the factory lock controller (which is green) and J4-08 which is a connector on the upper left hand side of the driver's door circled in red below:
The green circle shows where the wiring starts which leads to my new actuator in the door. I just depinned the green/yellow and green/red wires from J4-08 and ran them to the new actuator. One thing I didn't keep track of is the polarity of the green/red and green/yellow wires in respect with the new actuators. If you finish and your driver's side locks when your passenger side unlocks, you'll simply have to switch the wires of the actuator.
Alright, that handles the wiring through the door using existing wiring and not having to deal with the f&#$n stupid X-20 connector. Now comes the fun part.
Go ahead and chop off the connector of K2-01 and throw away the OEM green lock controller. Connect the Green/Red wire to the Orange wire wire and connect both to the unlock relay output shown in blue at the bottom of the second diagram. Likewise, connect the Green/Yellow wire to the Green wire and hook it to the lock relay output shown in purple at the bottom of the second diagram. This basically ties the existing actuator and new actuators together and hands their control over to the new relay system. Connect the 12v wires in the relay diagram to the Blue wire from K2-01. Connect the GND wires from the relay diagram to the Black wire from K2-01. Now all that's left is to connect your lock and unlock wires from your alarm system to the lock and unlock inputs on the relay diagram. When you're done you should have used all the wires that ran to K2-01.
The pros of wiring it this way is that you get rid of the old lock controller and replace it with brand new relays. You also don't have to do any wiring through the door connector. The cons of wiring it this way is that you lose the passenger side mimmic of the driver's side lock / unlock latch. I.E., if you lock your driver's door manually with the latch, the passenger side lock will not actuate to lock like it used to with the OEM system.
Alright, now on to more install pics:
Here's how I mounted the actuator:
The green circle shows a good reference point for mounting the actuator. Its basically a level change in the new speaker panels. Just butt the actuator up against that and you should be golden. The actual mounting the actuator was acomplished by a nutsert in the door skin, and a bolt + nut that went throught the speaker panel.
Here's a view from above. You want to keep the actuator arm as close as possible to the door skin so it doesn't interfere with the window switch that will occupy a lot of this space later on.
Here's a view of how I connected the actuator rod to the latch assembly. All of this hardware comes with the actuator. When installing, you'll want to manually move the actuator in and out to make sure the push and pull's throw is correct for actuating the latch. If you do it wrong, you'll end up putting pressure on a lot of parts and you'll probably break something later on.
Finally, this is where I mounted my new relays.
System works VERY well. I'm happy now :yay:
Lane
08-09-12, 01:29 PM
#121
I always try and space out my updates here because it always puts my photobucket account on its knees
Anyway, here’s what’s been going on over the last two months or so:
---------------------------
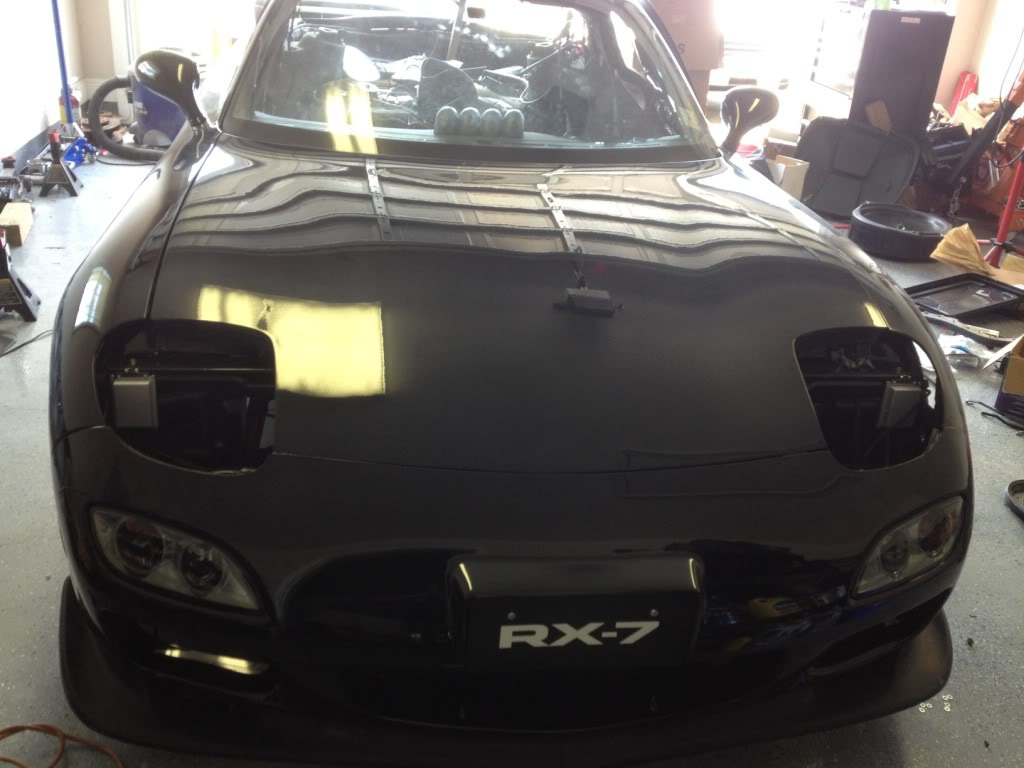
Well this weekend was a rush. I just turned 30, and I've officially had this project car since I was 27 so some anxiety set in. Also, I'm getting married this Friday, so wrapping up the car is really becoming a huge priority now.
Trimming up my 93 bumper support for my 99 spec bumper

Support structure transferred, bumper installed, and lip installed

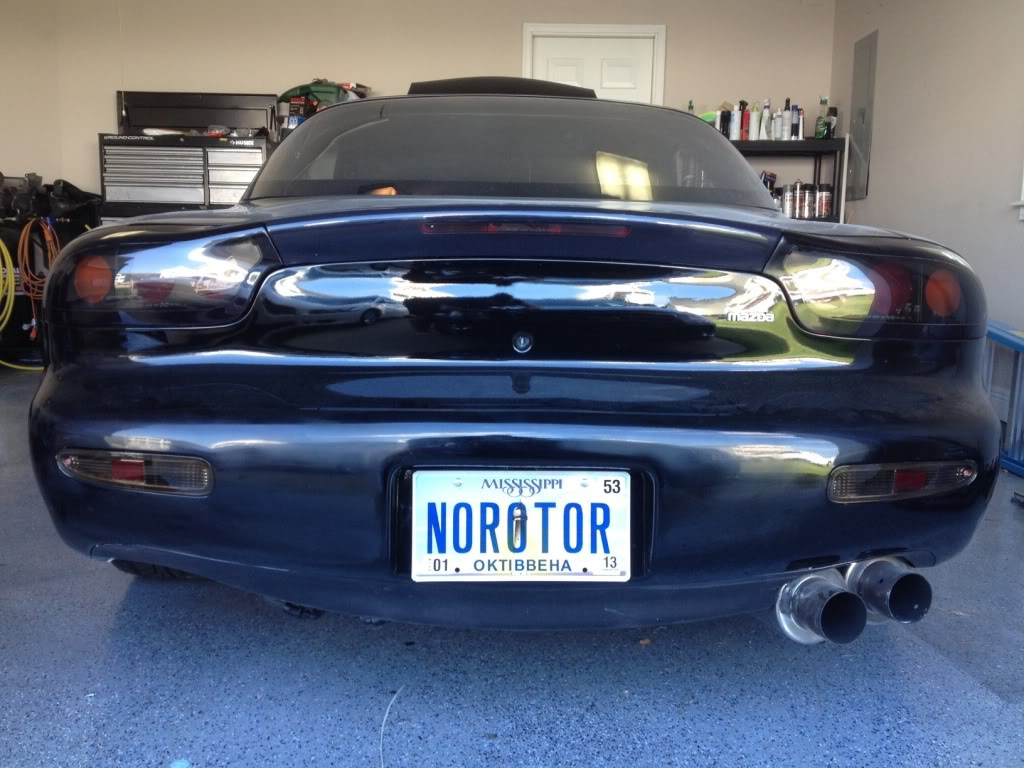
Installed all my rear lights. Everything works!
Anyway, here’s what’s been going on over the last two months or so:
---------------------------
Well this weekend was a rush. I just turned 30, and I've officially had this project car since I was 27 so some anxiety set in. Also, I'm getting married this Friday, so wrapping up the car is really becoming a huge priority now.
Trimming up my 93 bumper support for my 99 spec bumper
Support structure transferred, bumper installed, and lip installed
Installed all my rear lights. Everything works!
08-09-12, 01:30 PM
#122
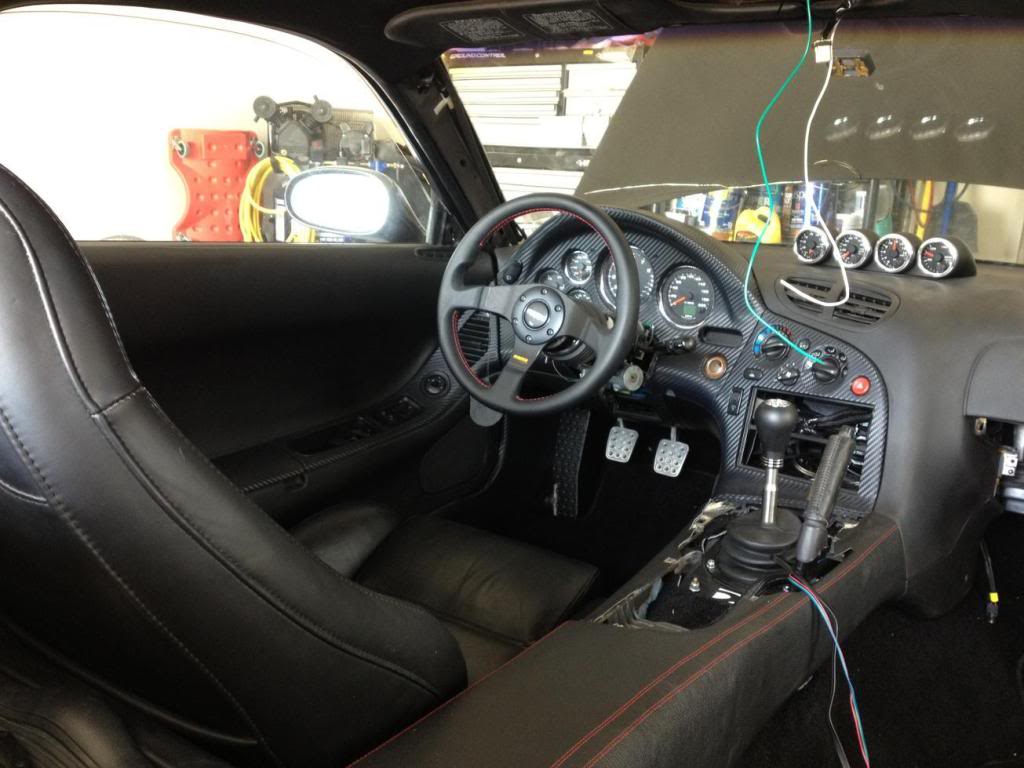
Started throwing my trim back in
See any Dinoc yet?
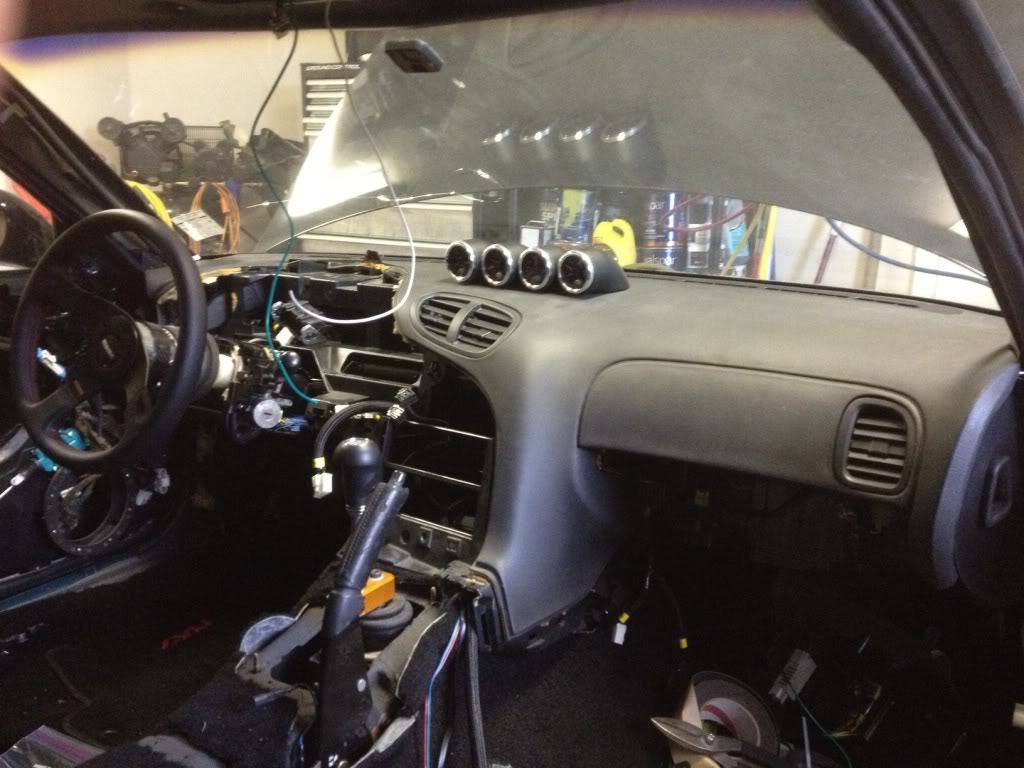
Dash still has a ways to go. The green and white wires hanging from the roof are a switched 12v source I'm tucking in with the dome light in case I ever want to run a radar detector
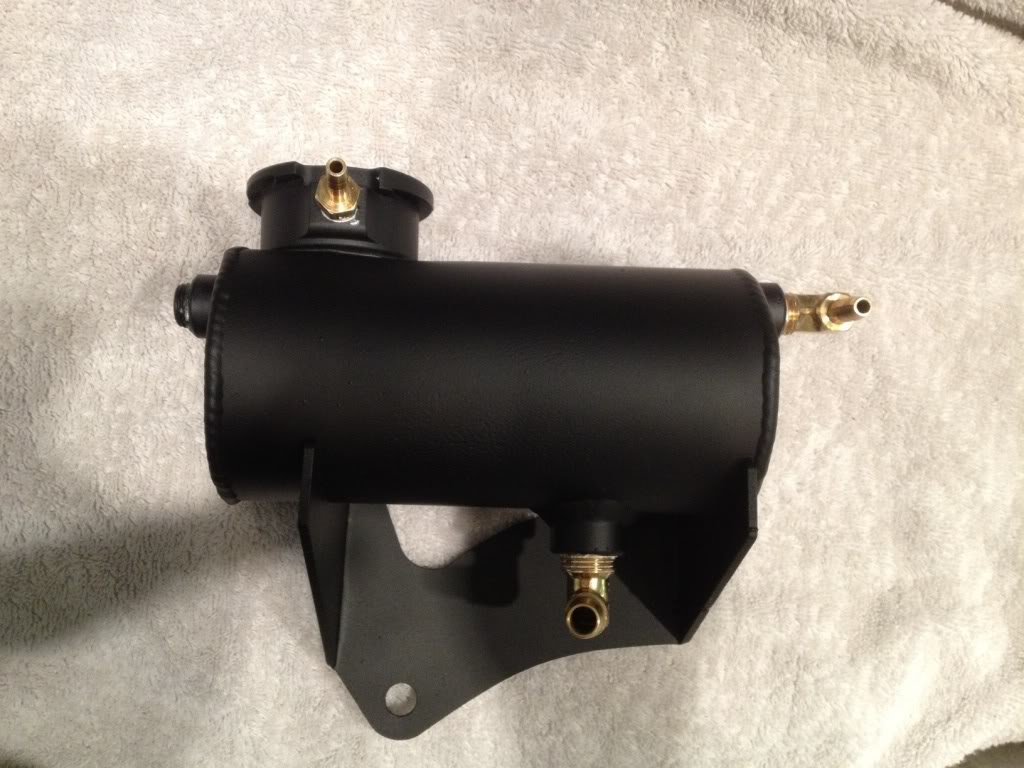
Random shot of my surge tank back from powdercoating (65Imp)
Really proud of these. A friend loaned me his beadlock crimper so I was able to get them finished last week. Also sleeved these in DEI Firesleeve.
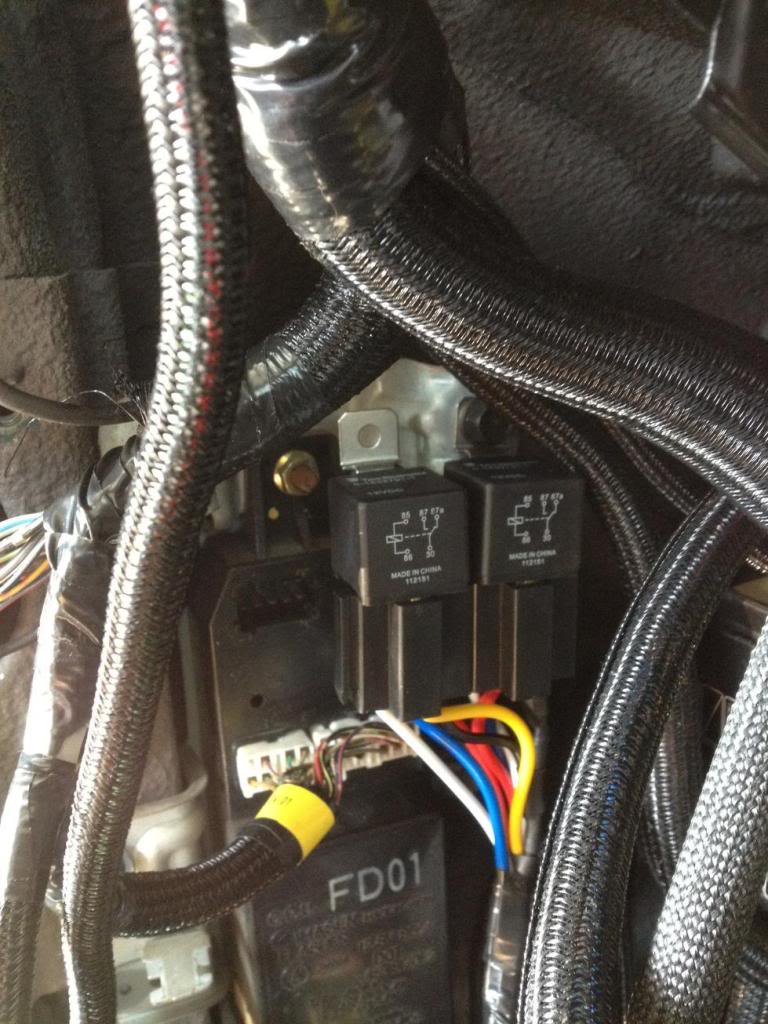
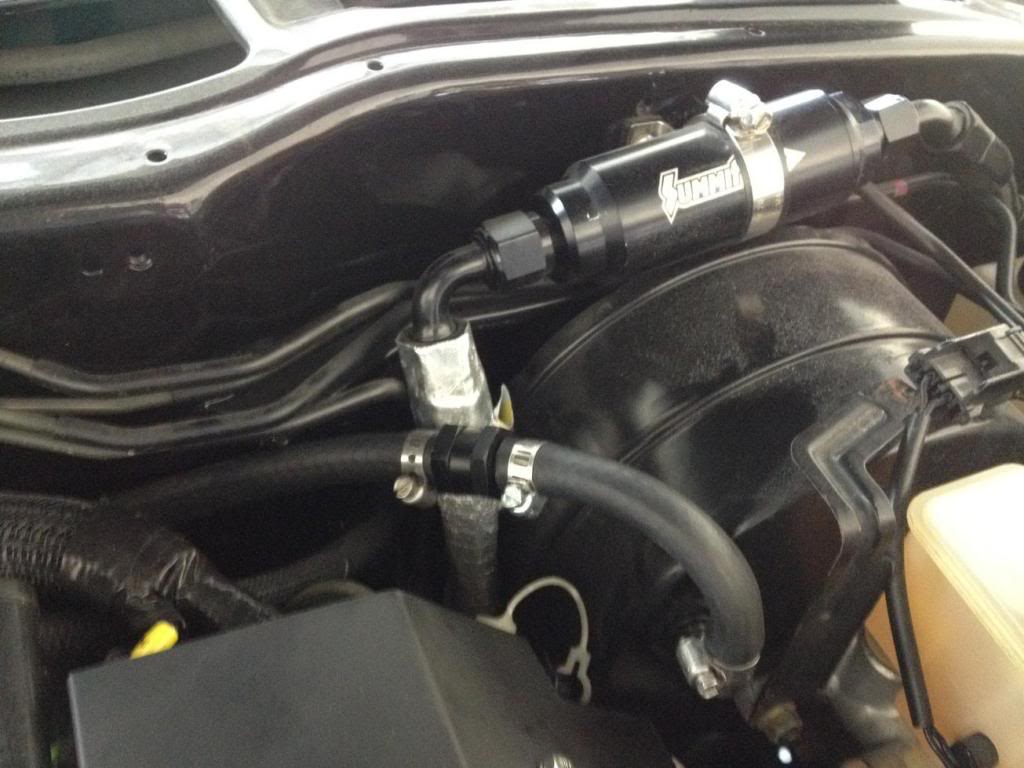
Here's a few shots of how I routed things and where I put my dryer. The dryer is something I scoured datasheets for. It has a M10 schrader fitting built in that accommodates the GM pressure sensor so I didn't have to build the fitting into my softlines. More info on the lines will come soon.
08-09-12, 01:30 PM
#123
And here's where I'm leaving it while I head to Jamaica for my Wedding and Honeymoon.
----------------------------------------
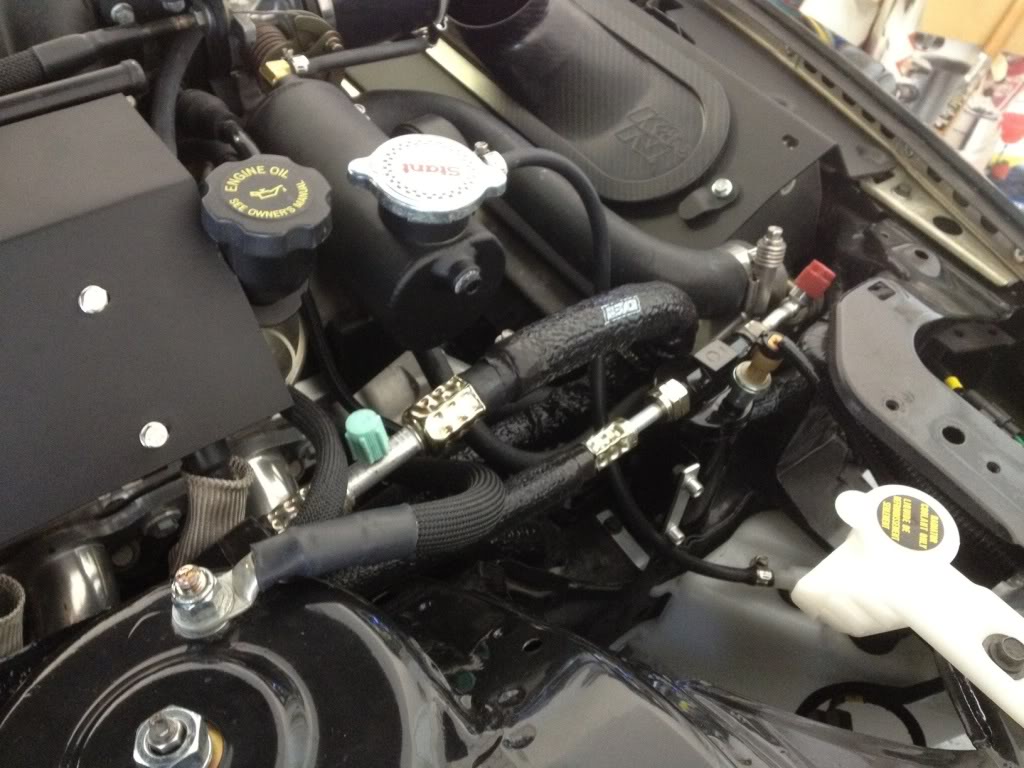
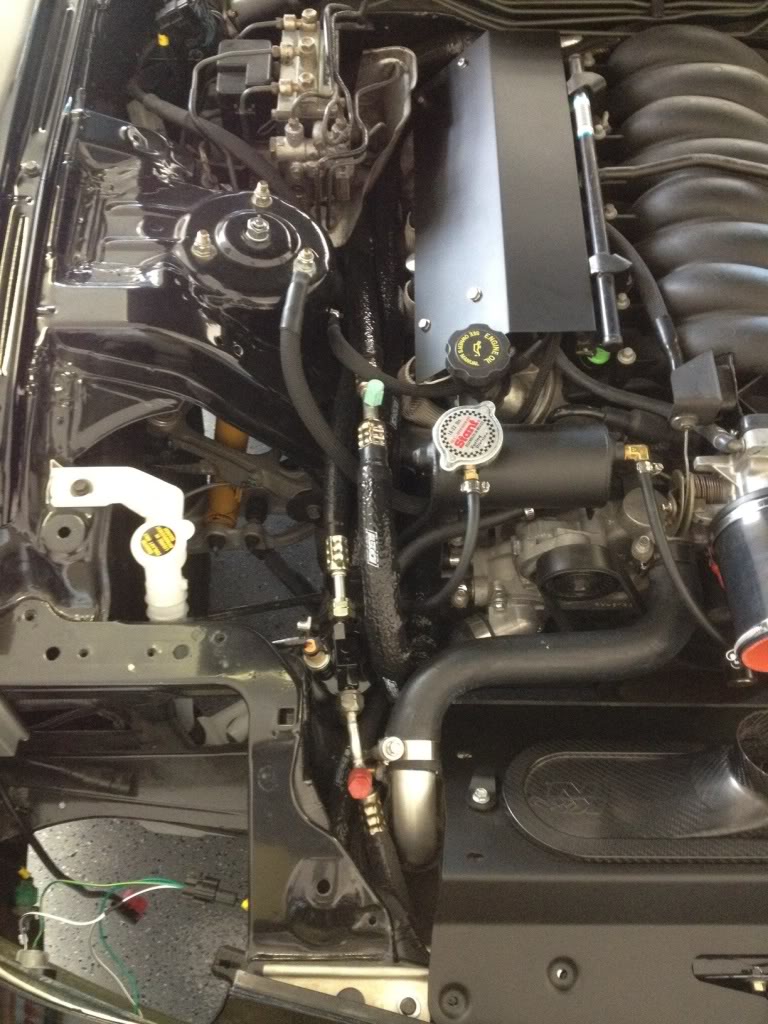
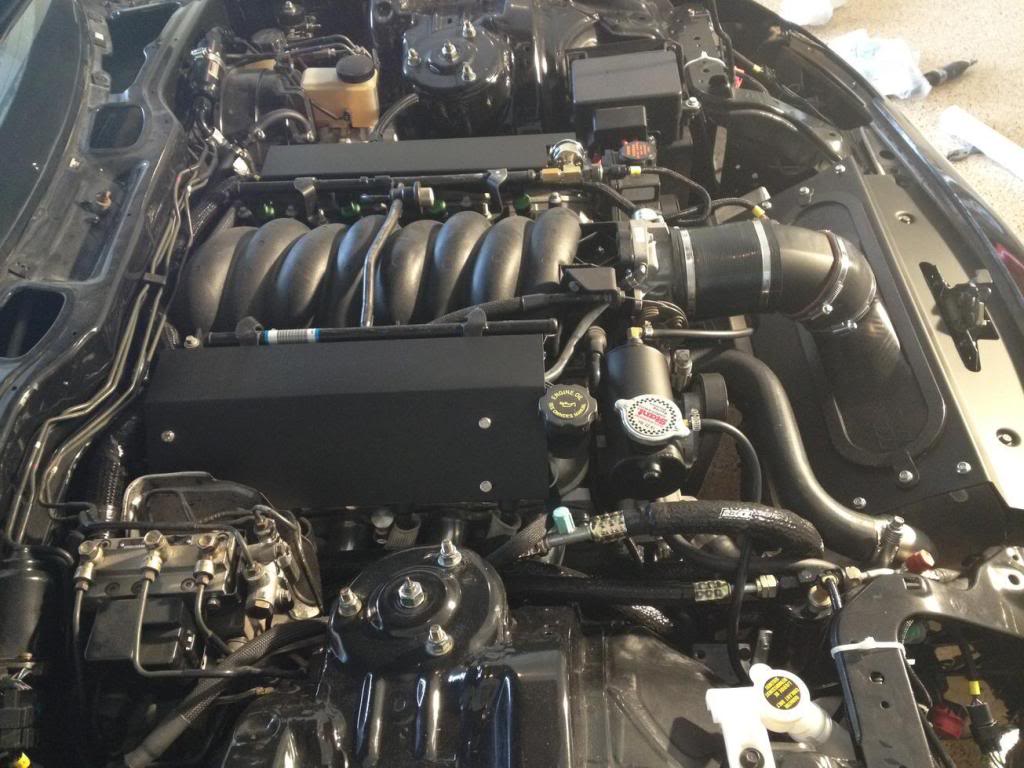
Got a little more work done in the engine bay:

Finally bought a nice little aluminum check valve for the brake booster.
Installed with my fabulous worm clamps! Alright!
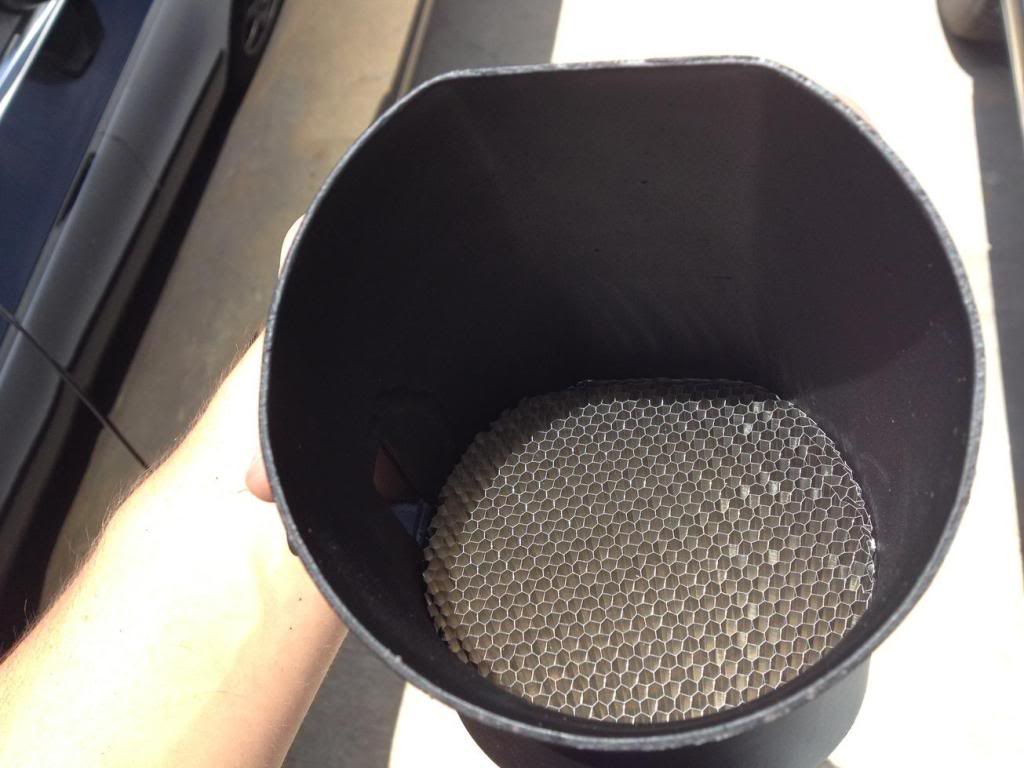
Honeycombed my intake pipe to ease MAF tuning.
I'm actually 99% done with my engine bay. Apart from moving my grounds I really can't think of anything I need to do except charge my AC. I'll post pictures after I move the ground since I don't want to be ridiculed again :yay:
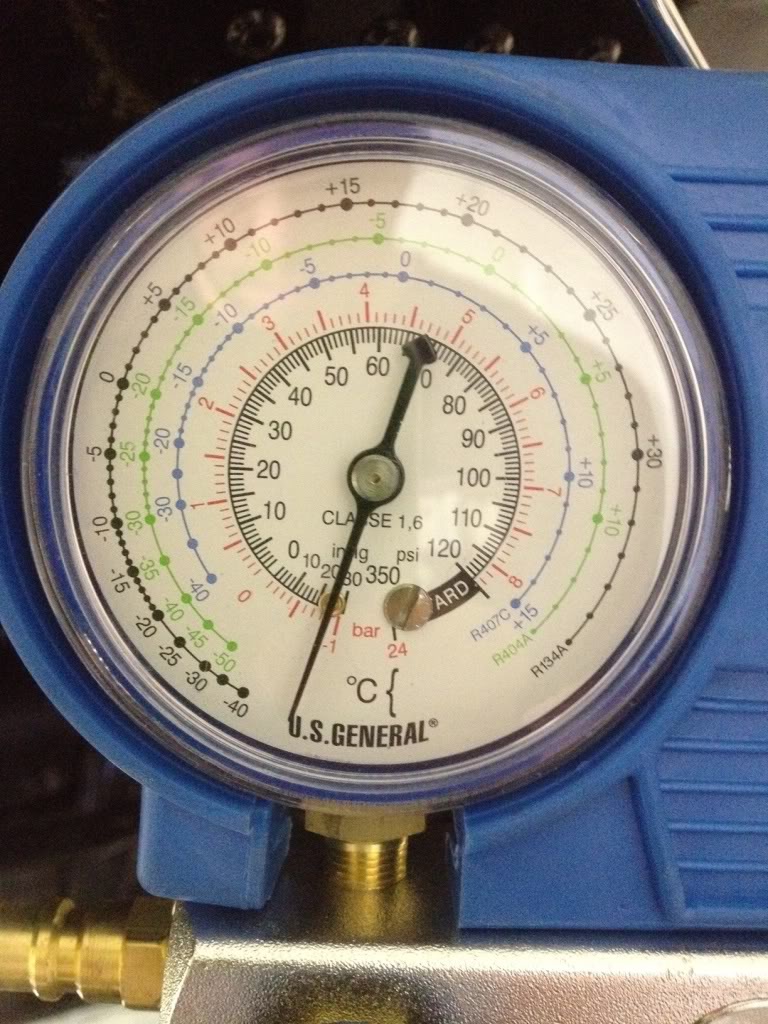
I've been running the engine again. My fuel pressure has moved around several times in between cranks. Its rock solid when I rev and when it idles, but I'm getting changes in-between cranks. It may have something to do with my working on the engine and/or fuel tank (fuel level gauge calibration), but its something I'm confused about and am monitoring constantly. Overall the car is running very good with the commanded idle at 900rpms. It still stumbles a little coming off of the gas into an idle condition, but the higher idle speed helps things out for the most part. Hopefully I can iron it out when I have time to tune the car.
I've also been throwing in the interior:
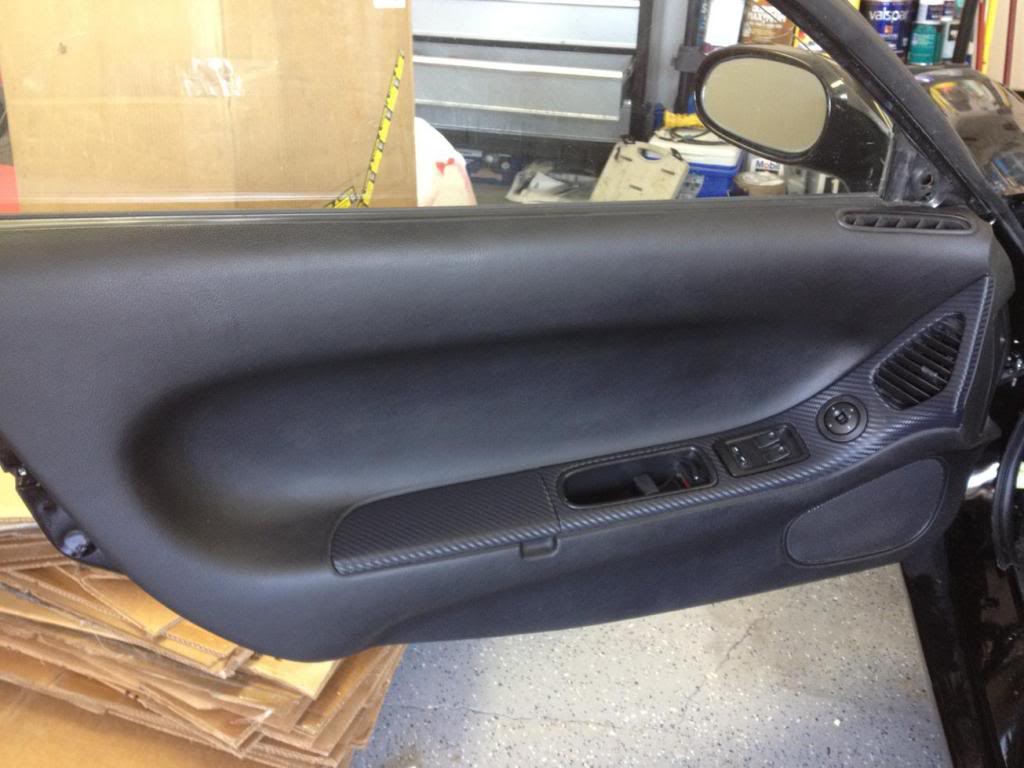
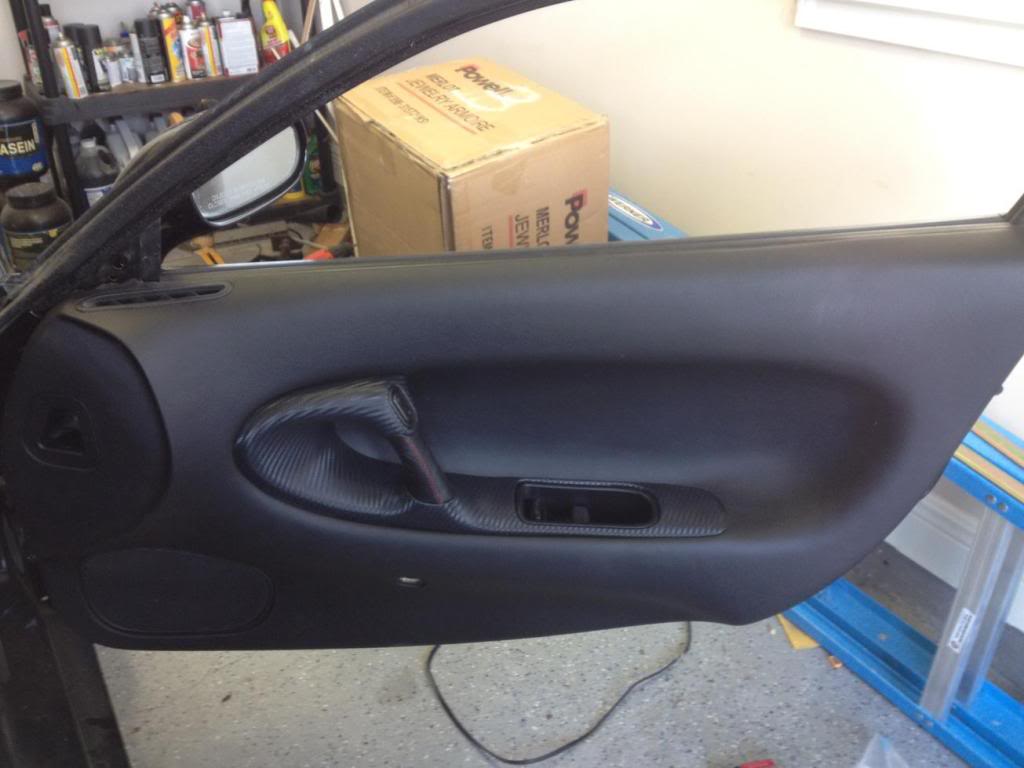
Door panels
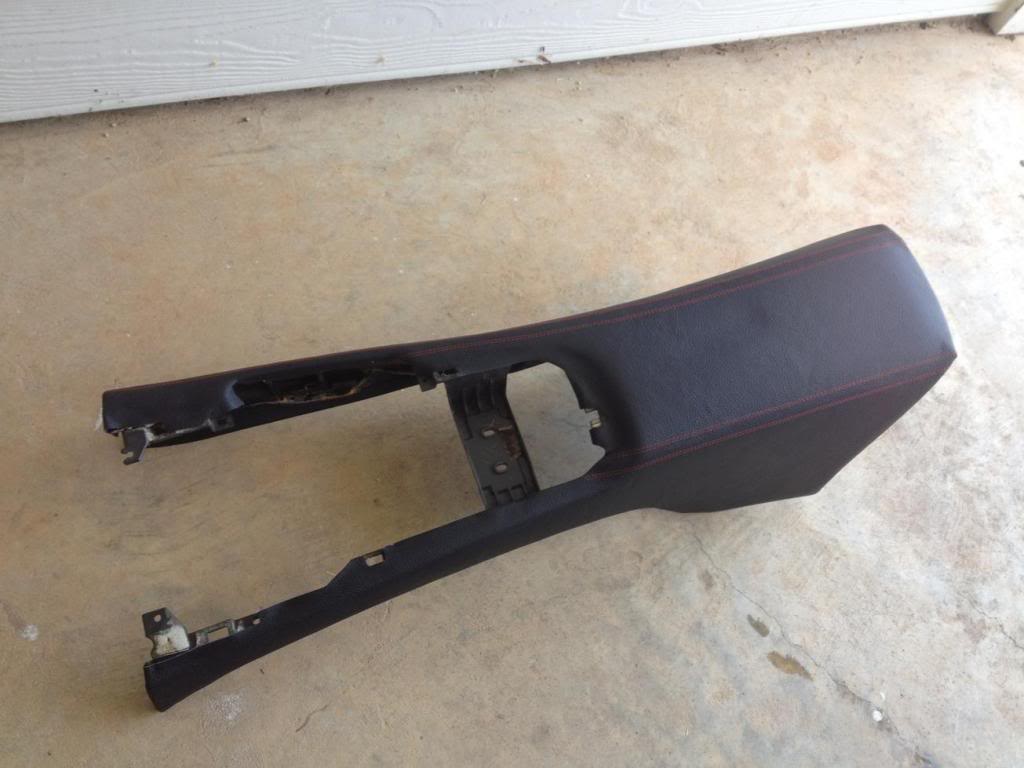
Center Console wrapped in redline leather
08-09-12, 01:31 PM
#124
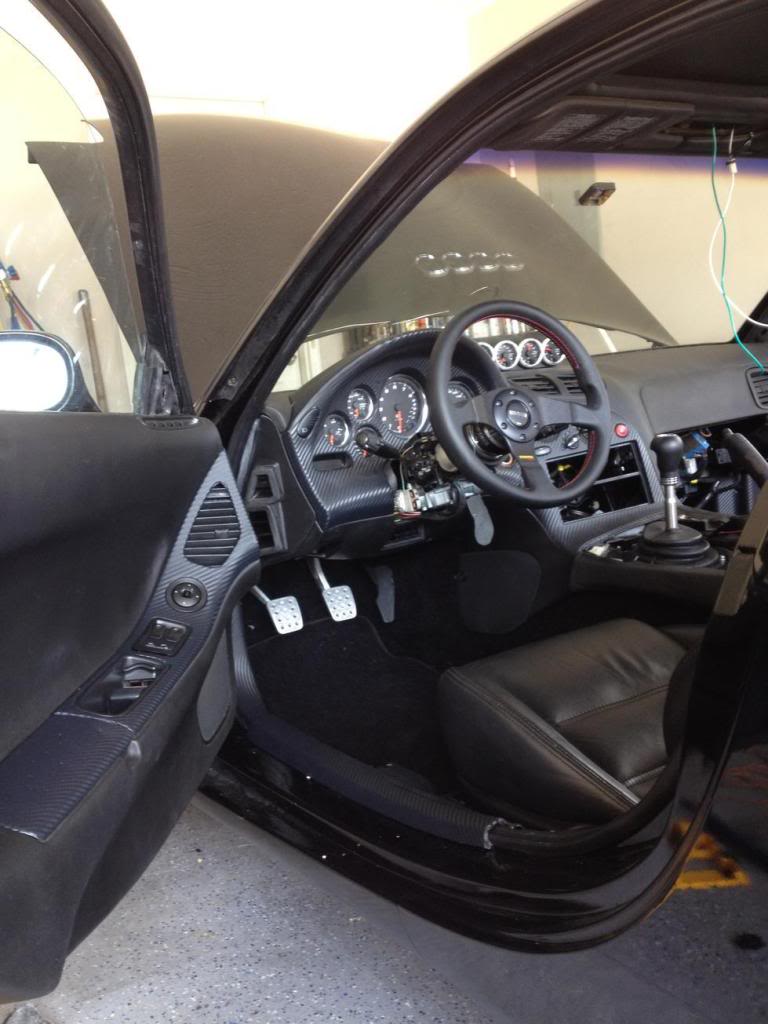
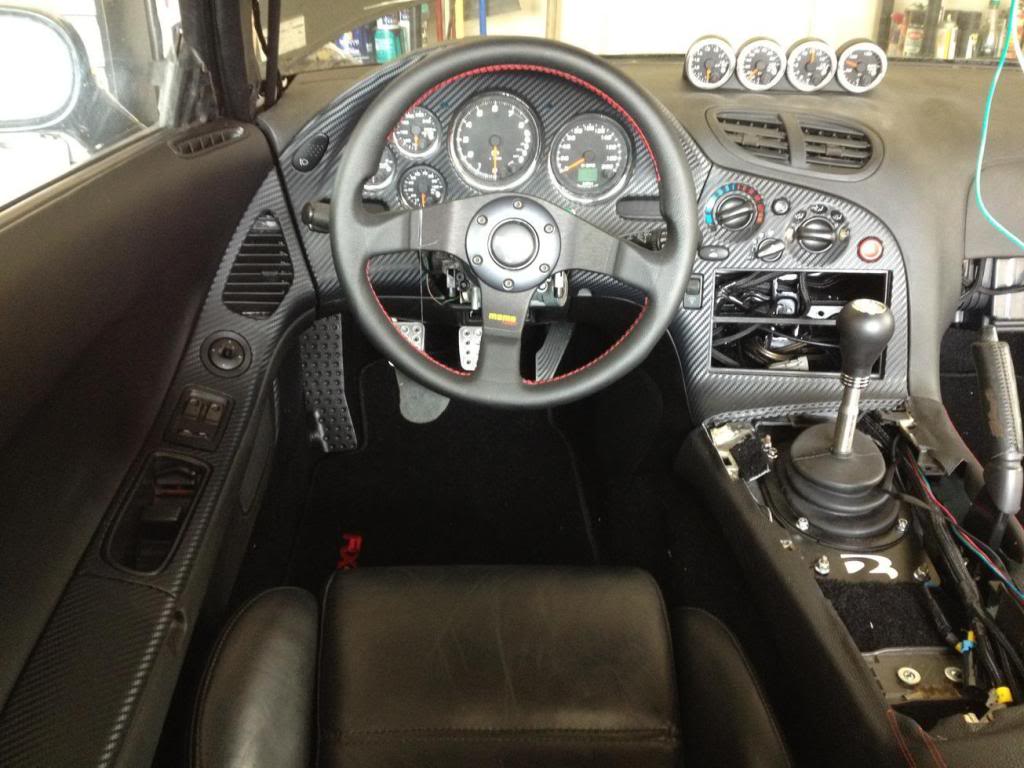
Dash
It’s coming along nicely. I'm actually planning on driving the car 5 miles to its new home tomorrow afternoon. Hopefully I won't have any issues. It'll be the furthest I've ever driven it
-------------------------------------
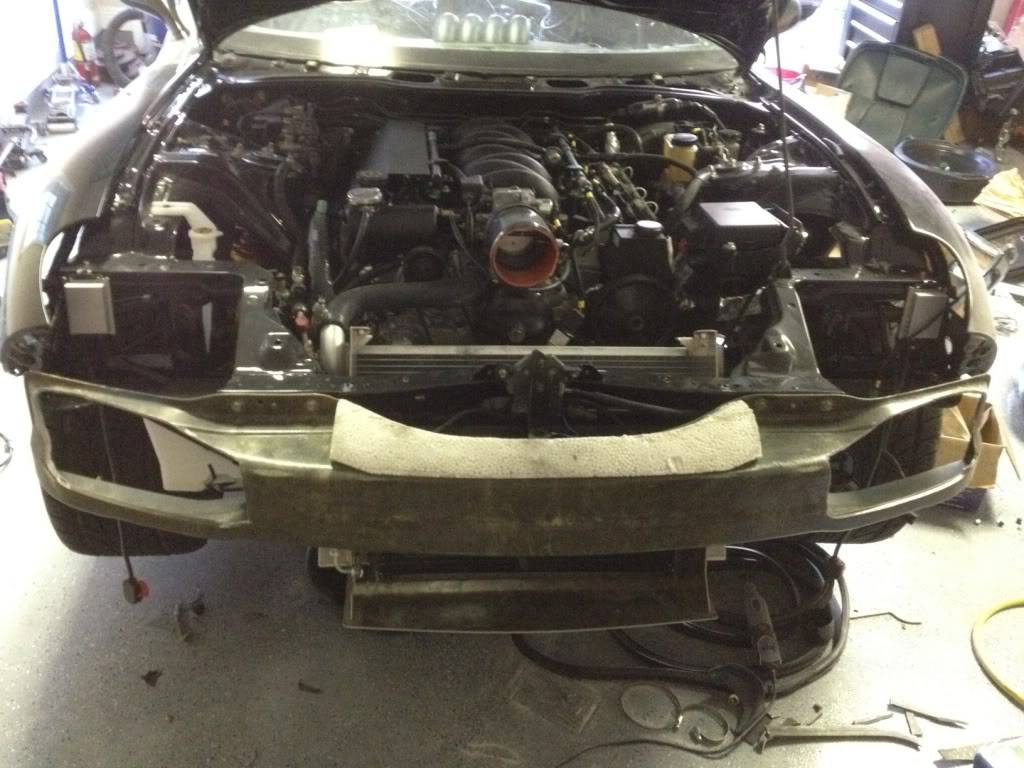
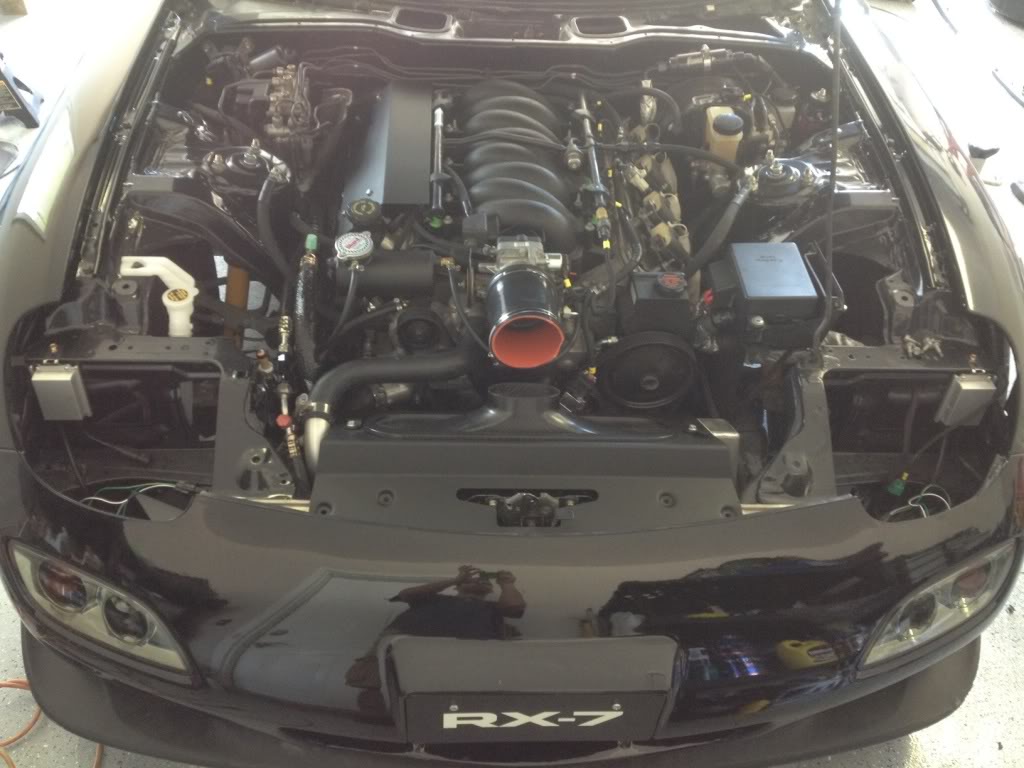
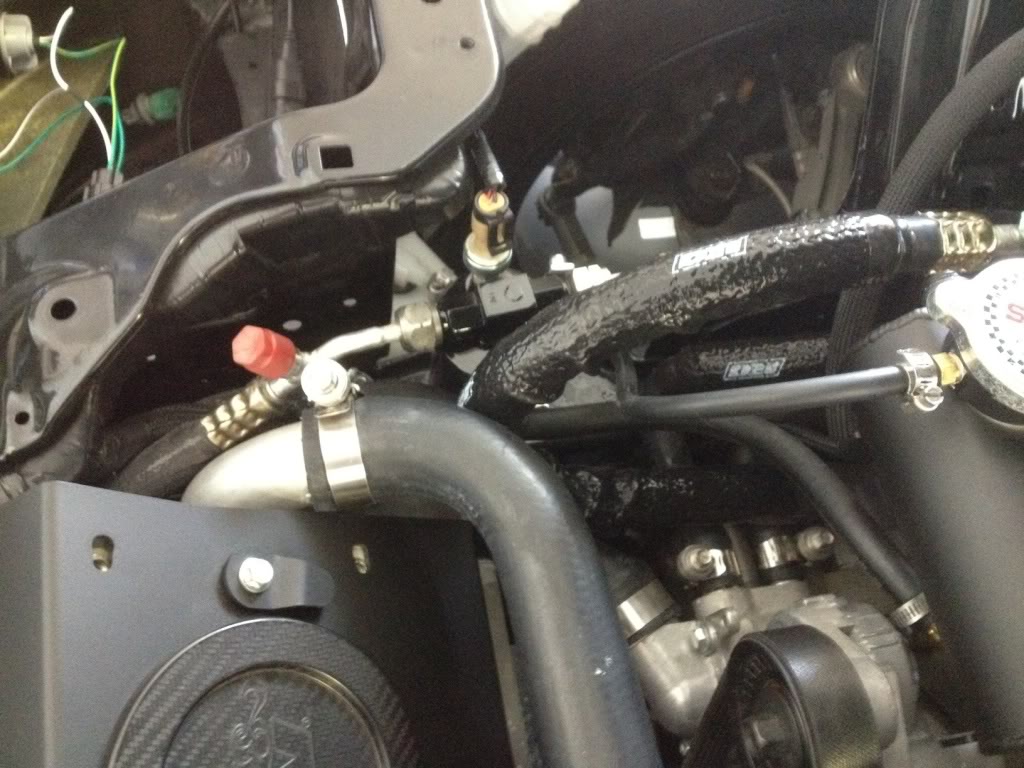
Here's a look at my completed engine bay with relocated grounds:
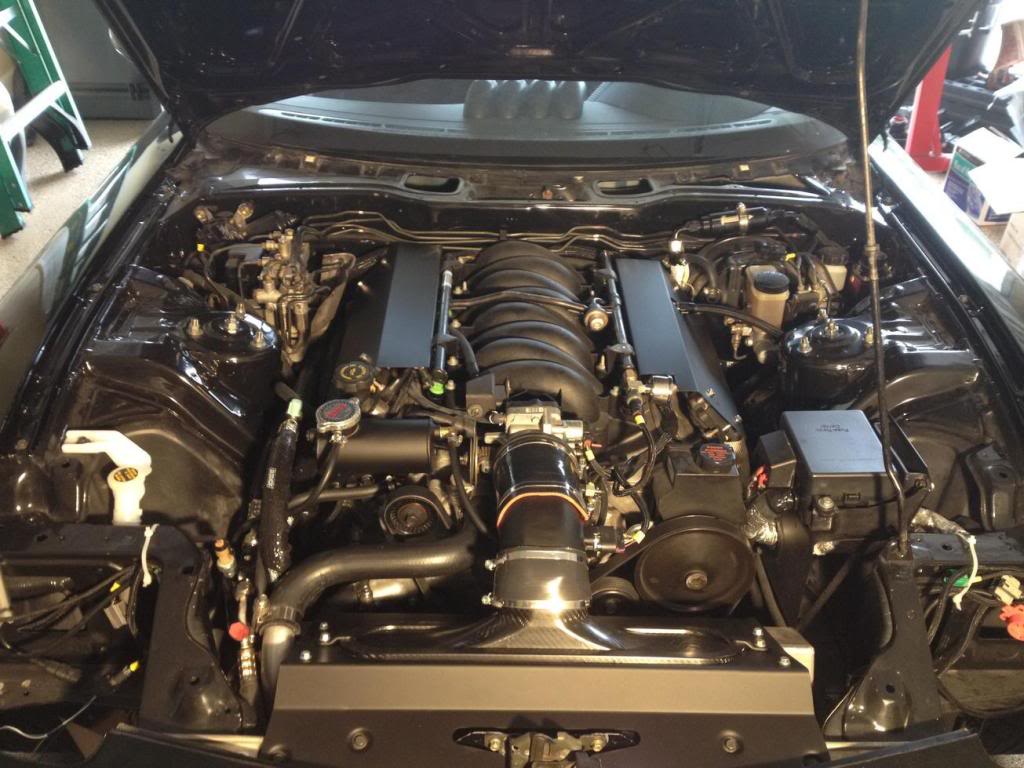
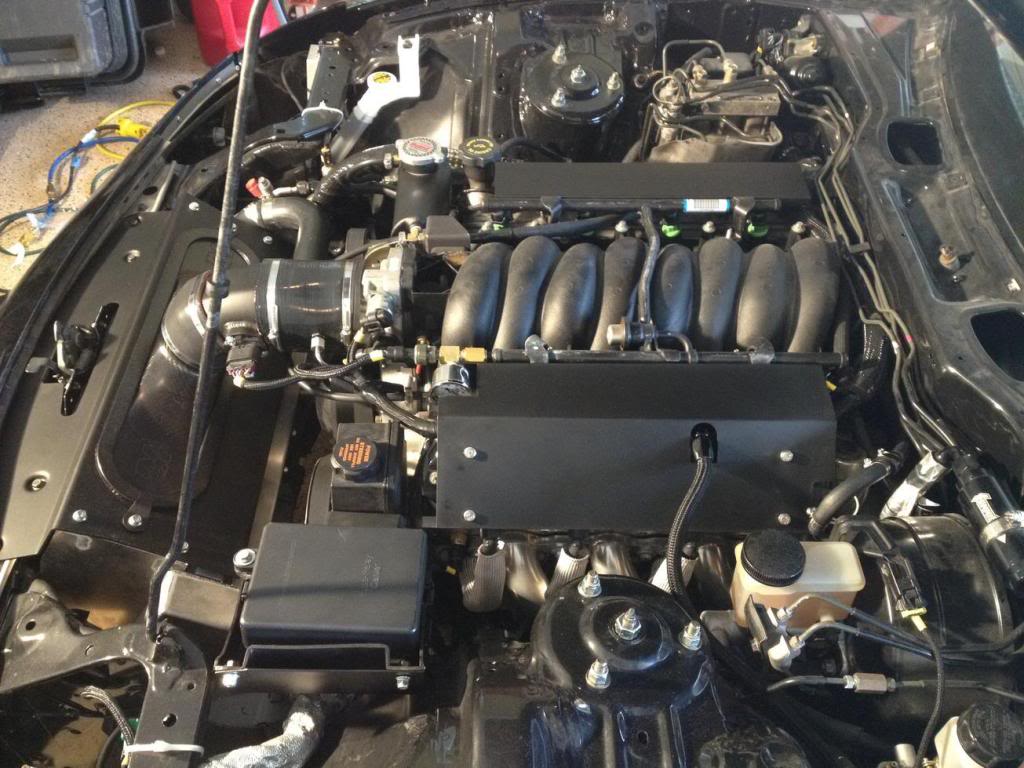
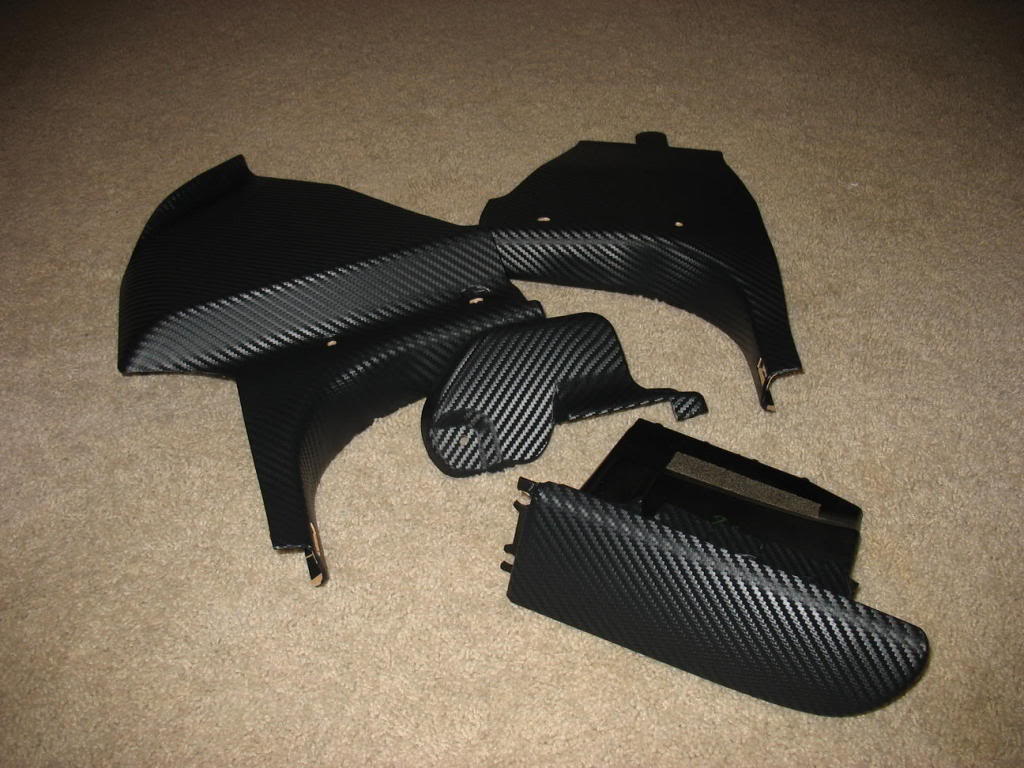
I got my AC, fender liners, and grounds installed so I'm calling it complete. Headlights don't count
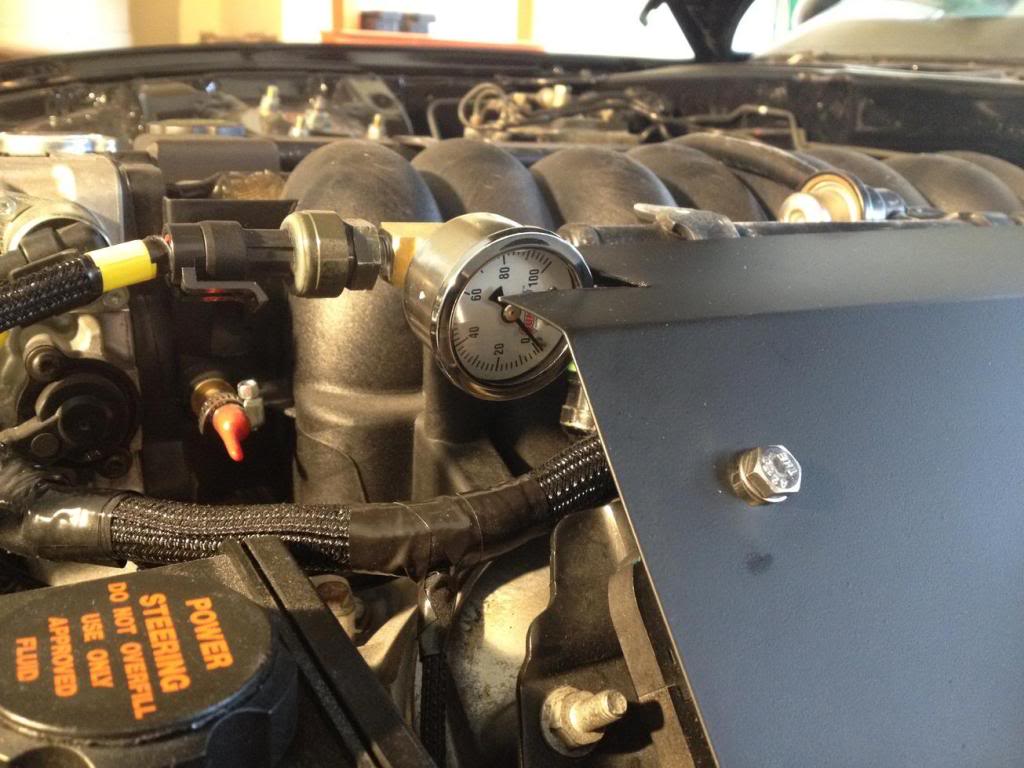
As shown in the pictures above I recently added a mechanical fuel pressure gauge to the end of my stock rail. It looks kind of hokey but I had to angle it the way it is for hood clearance. I have done minimal testing, but it looks like my speedhut gauge is off. The mechanical gauge is much more stable, and doesn't shift every time I start my car. At the moment I am trusting the mechanical gauge. After I do more testing and prove the speedhut gauge is to blame I'm going to try and get speedhut to send me another pressure sensor.
Here are some pics of how I routed my grounds:
The block ends of the grounds attach to the 4th unused boss for the engine mount pedestals.
As I mentioned I finished installing my AC this weekend. MY RX7 HAS AC!!!! Whoohooo!
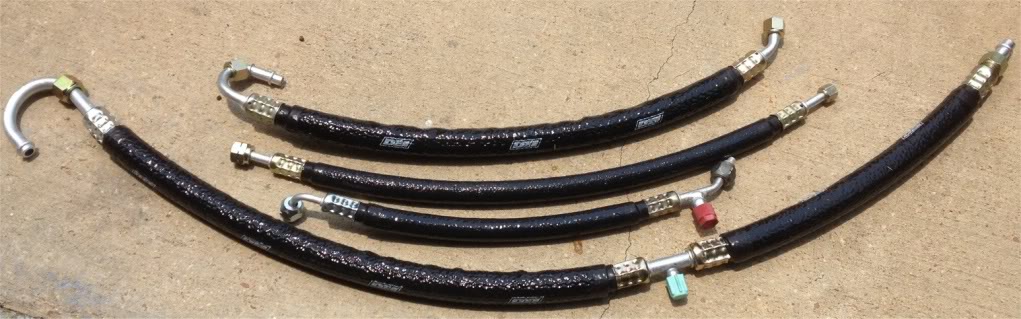
Consequently I have put up a full DIY for how to build AC lines for the FD:
http://www.norotors.com/index.php?topic=12654.0
--------------------
Lane