HOW TO: Install JIC Coilover Spacers
 08-08-03, 10:27 PM
#1
Super Snuggles
Thread Starter
HOW TO: Install JIC Coilover Spacers
For those who aren't familiar with the JIC coilovers, they're a bargain and a half if you're starting from scratch (no Ground Control comments, please...) and they feature separate adjustment for spring preload and ride height, so you can change one without affecting the other.
However, one owner apparently ended up with a damaged hood and another with a torn hood liner because the adjustment posts on the front shocks are too tall. Here's one thread on the subject...
https://www.rx7club.com/forum/showth...hreadid=176841
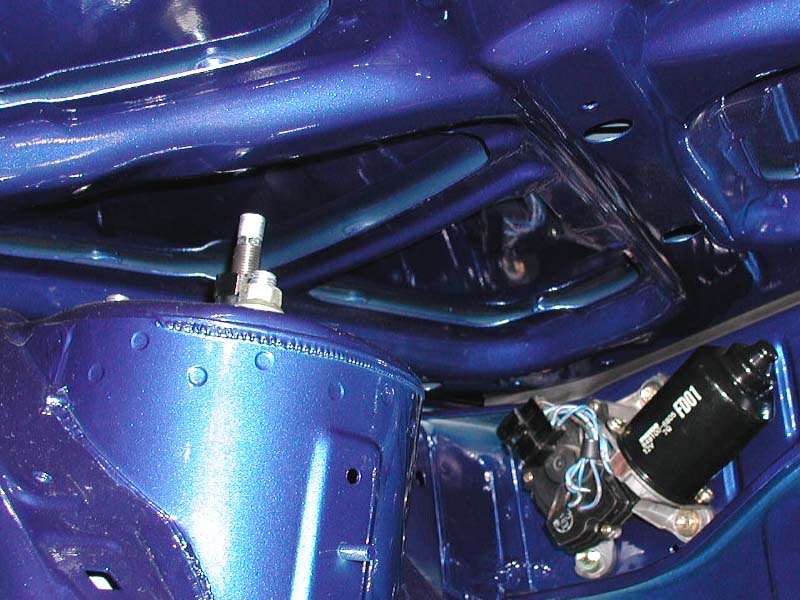
When I installed mine, I took a picture of the clearance prior to receiving my new hood liner (see below), and everything looked good to me. It wasn't until I started reading other's reports that I realized that there was a problem.
Having just bought a new hood liner (I don't even want to talk about what happened to the first one... search on my name with the keywords "Trev" and "oil" if you want to know) I didn't want anything bad to happen to it. Not that I ran an immediate danger of that happening because my car doesn't move under its own power, but you get the idea...
Luckily, Kris at JIC Magic heard our plea and sent out spacers to everyone who Rishie vouched for or faxed in a receipt. Now that's a class act, no doubt about it.
Mine showed up almost immediately, but I didn't get around to installing them until today, so follow along if you want to see how it's done.
However, one owner apparently ended up with a damaged hood and another with a torn hood liner because the adjustment posts on the front shocks are too tall. Here's one thread on the subject...
https://www.rx7club.com/forum/showth...hreadid=176841
When I installed mine, I took a picture of the clearance prior to receiving my new hood liner (see below), and everything looked good to me. It wasn't until I started reading other's reports that I realized that there was a problem.
Having just bought a new hood liner (I don't even want to talk about what happened to the first one... search on my name with the keywords "Trev" and "oil" if you want to know) I didn't want anything bad to happen to it. Not that I ran an immediate danger of that happening because my car doesn't move under its own power, but you get the idea...
Luckily, Kris at JIC Magic heard our plea and sent out spacers to everyone who Rishie vouched for or faxed in a receipt. Now that's a class act, no doubt about it.
Mine showed up almost immediately, but I didn't get around to installing them until today, so follow along if you want to see how it's done.
 08-08-03, 10:35 PM
#2
Super Snuggles
Thread Starter
Step one... disassemble your shocks.
You'll need a 21mm deep socket, preferably six-sided, not twelve. You'll also need an impact gun, because there's no way you can loosen the top nut on the shock without everything just turning along with it. An impact gun will jar it loose easily and make reinstalling it easier also.
Don't have a compressor and an impact gun? Don't worry. In the picture below, you can see the Chicago Electric 1/2" impact gun (240 lb-ft. max torque) that I picked up from Harbor Freight (PN 45252-2VGA) awhile back. It's more than powerful enough to zip off the nuts on the rear axles without even unstaking the nut (check your shop manual, you'll see what I mean), so it had no problem whatsoever on this job. $59.99, sometimes on sale for $49.99, and free shipping. You owe it to yourself to buy one.
However, if you don't want to go to the expense, get cozy with someone who does have an impact gun and zip off the top nut on your shocks.
Just hang on to the upper pillow mount good and tight (don't get your fingers down by the spring) and let the rest of the shock spin if it has to. Just bump the impact gun a few times, don't wail on it. The top nut will come off very easily after a few bumps. Put a piece of cardboard or something under the bottom of the shock while you're working on it, so it doesn't get scuffed up.
08-08-03, 10:47 PM
#3
Super Snuggles
Thread Starter
Step two... install the spacer provided by JIC Magic.
In the picture below, you can see the spacer (black arrow) going onto the post first. The piece after it is the sleeve that the pillow ball in the upper plate slides over.
Slide the spacer on, slide the sleeve on, reinstall the spring if you removed it, put the upper plate back on, and you're ready to reinstall the nut. Once again holding just the upper plate, bump the nut a few times with your impact gun to tighten it snugly and let the rest of the shock spin if it has to.
After that's done, you'll notice that you have a gap between the rubber ring on the underside of the upper plate and the spring and that the spring is now loose. No worries, just flip the shock over and seat the spring on the rubber ring and move the adjustment collar and lock collar so that the spring is snug again.
To ensure that the overall length of the shock remained the same as before, I used a caliper and measured the space between the lock collar below the spring collar and the lock collar on the bottom of the shock and then tightened down the set screw on the caliper to hold that measurement. After tightening the collars down on the spring as mentioned above, I then moved up the lower lock collar to the same distance as before using the caliper as a guide, and then threaded up the bottom section of the shock (with the JIC label) until it was tight. Length preserved.

 08-08-03, 10:56 PM
#6
Super Snuggles
Thread Starter
On a side note, you can completely unscrew the bottom portion of the shock and remove it and the lock and adjustment collars to remove the spring with the shock still on the car. Should you ever decide to change spring rates, you can leave the shocks bolted in place and just swap out the springs from below.
08-12-03, 09:02 PM
#7
Senior Member
Join Date: Dec 2001
Location: Crestview, FL
Posts: 334
Likes: 0
Received 0 Likes
on
0 Posts
Thanks for the writeup Jimlab. I talked with Rishie the other day and my spacers are supposed to be shipped out in the next few days. I'm hoping that your writeup will come in handy when I get ready to install them.
I'm glad to see that the adjustment **** is MUCH lower with the spacer. Again thanks for taking the time to writeup this how to.
- Cody
I'm glad to see that the adjustment **** is MUCH lower with the spacer. Again thanks for taking the time to writeup this how to.
- Cody
Trending Topics
 08-12-03, 11:35 PM
#9
Super Snuggles
Thread Starter
Originally posted by VTAOE
Again thanks for taking the time to writeup this how to.
Again thanks for taking the time to writeup this how to.
4fcn, I paid somewhere around $1,450, if I recall correctly.
10-04-03, 01:44 PM
#11
Super Snuggles
Thread Starter
Originally posted by Jesuscookies
One note, I think you mentioned that a 21mm deep socket would be needed. The size on mine is 18mm.
One note, I think you mentioned that a 21mm deep socket would be needed. The size on mine is 18mm.
Edit: I just double-checked and mine are definitely 21mm.
Last edited by jimlab; 10-04-03 at 01:49 PM.
 02-14-04, 12:18 AM
#17
Super Snuggles
Thread Starter
Originally posted by Red-Rx7
Jim, how much was your new headliner? I need a new one too.
Jim, how much was your new headliner? I need a new one too.

Thread
Thread Starter
Forum
Replies
Last Post
coil, coilover, fd0168601c, import, instal, install, installing, intall, jic, mount, pillowmount, side, spacer, spacers, specific