My Project and how it's coming....FD
#1
Thread Starter
FD Under Construction =P
iTrader: (5)
Joined: Jun 2003
Posts: 4,030
Likes: 24
From: Avondale, AZ
My Project and how it's coming....FD
ALright, here are some recent pics... I've never done this kind of crap.. doing a custom single setup, but here's what I have so far....
YOu can find all the pics at this URL:
http://photobucket.com/albums/y93/dhahlen/
Here is what I Snapped before I stopped working today:


I've got a TON Of cleaning to do, rust busting etc...
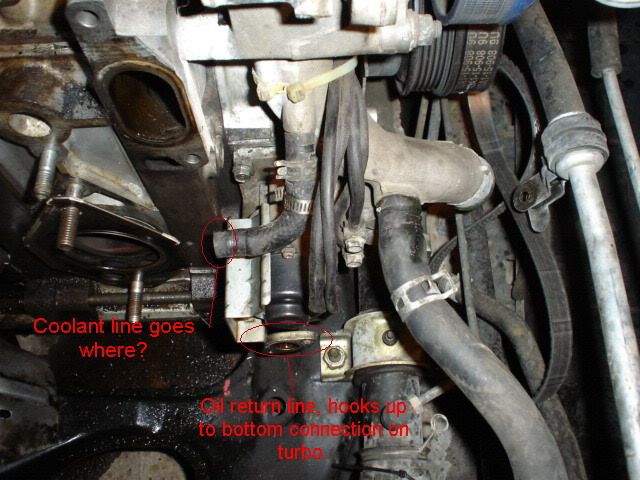
I am not sure where half of the stuff goes... what I should do with all the electrical connections, and what I Need to block off and what I don't... anyway if you have any input, please throw stuff my way.
THanks,
-DArren-
YOu can find all the pics at this URL:
http://photobucket.com/albums/y93/dhahlen/
Here is what I Snapped before I stopped working today:


I've got a TON Of cleaning to do, rust busting etc...
I am not sure where half of the stuff goes... what I should do with all the electrical connections, and what I Need to block off and what I don't... anyway if you have any input, please throw stuff my way.
THanks,
-DArren-
#2
haha you have so much work to do man haha. I remember when my car looked EXACTLY like that wow. Step one would be to get those holes covered up...you don't want a nut or any debris falling down there. I just stuffed a bunch of paper down mine...I think i used duct tape on some too. Don't forget to put new plugs in while you have the engine bay ripped apart...it'll be easier now.
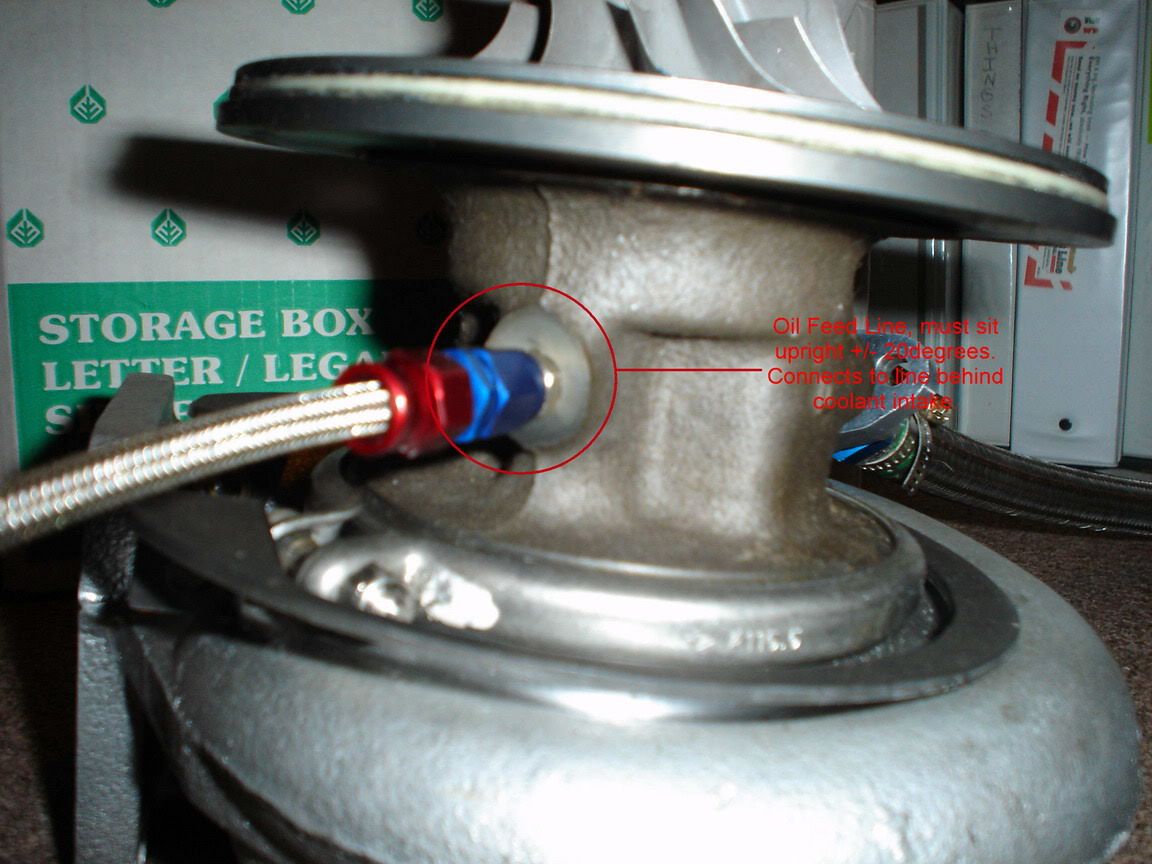
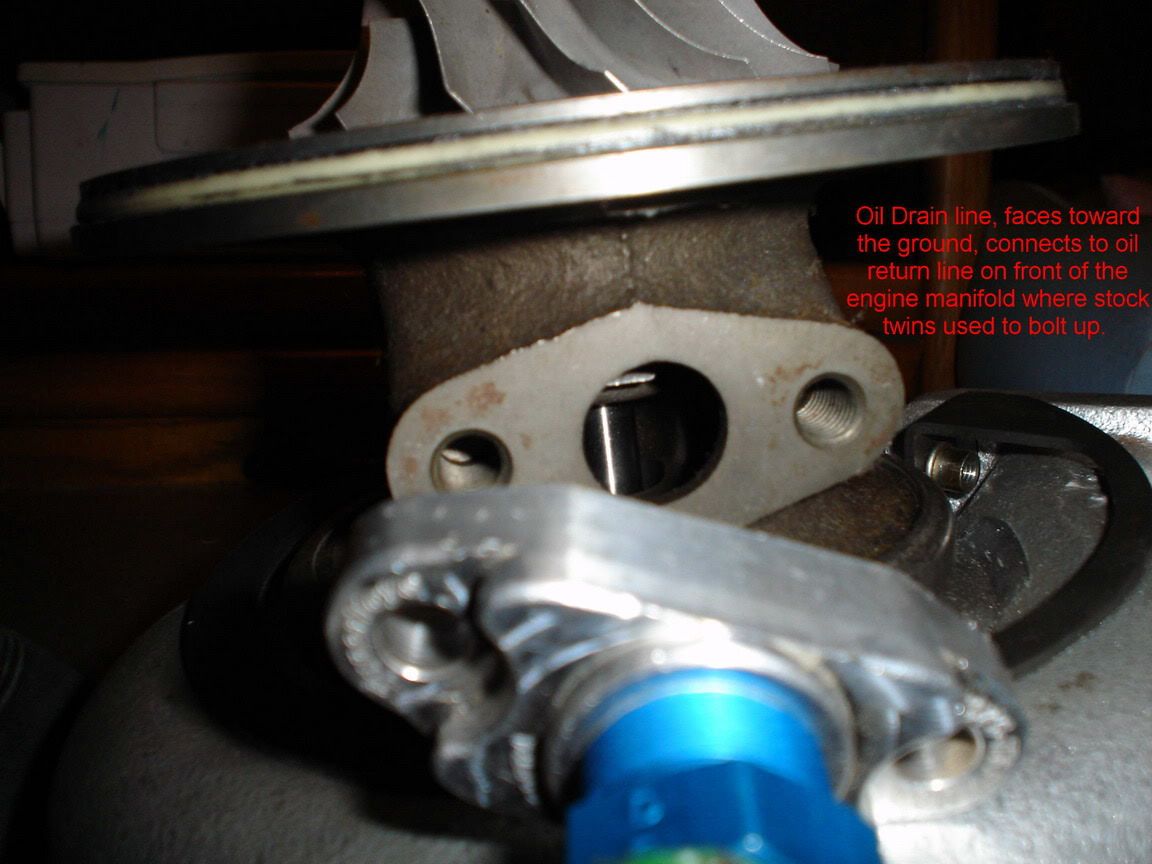
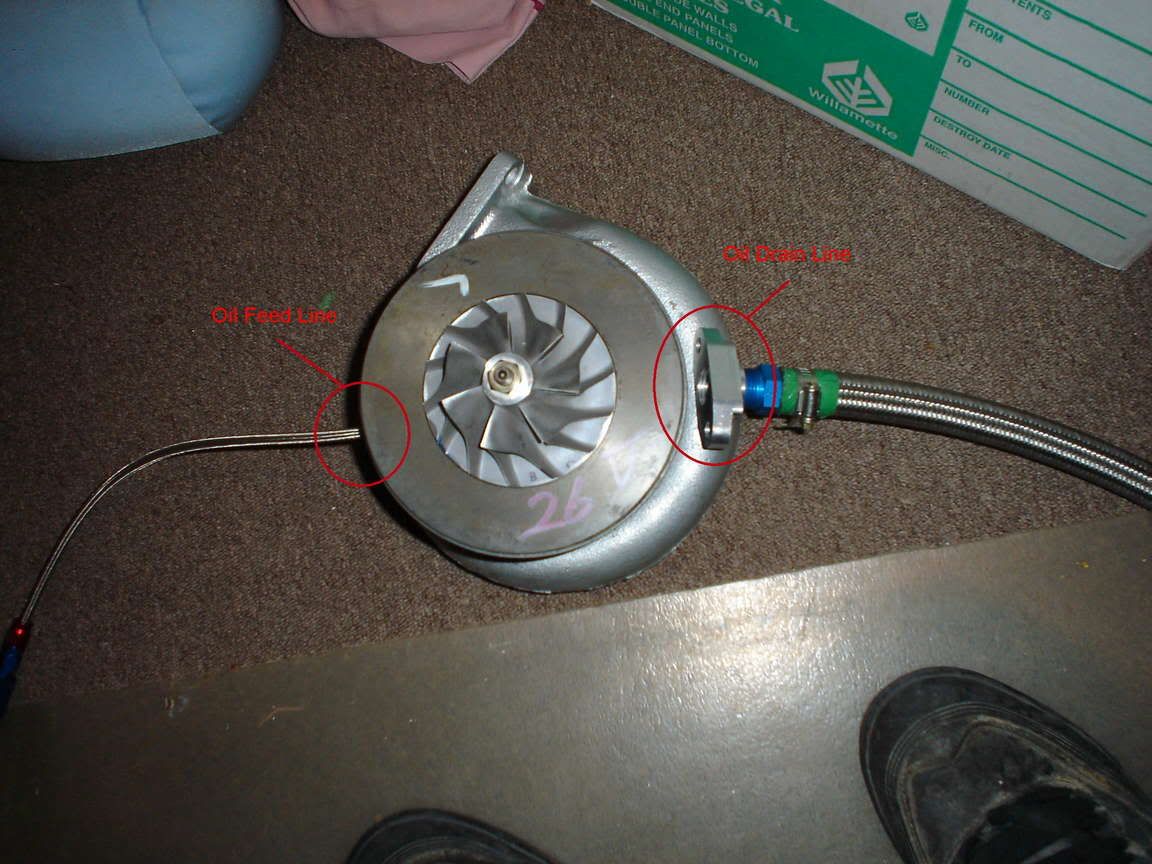
I would say start with the turbo...getting that thing on there may or may not be a pretty big project in itself since its so large. You are going to have to clock it to the loactions that work for your setup. Also remember that the oil drain should be no more than 20 degrees away from straight down. Then start making the dp because that isn't the easiest thing in the world either.
I can't see the picture right now but if you don't have the LIM on forget about trying to fit the turbo, because the LIM is one of the potential obstacles
Last edited by widebody2; 03-24-05 at 11:09 PM.
#5
Thread Starter
FD Under Construction =P
iTrader: (5)
Joined: Jun 2003
Posts: 4,030
Likes: 24
From: Avondale, AZ
All the piping (downpipe, intercooler piping, etc) anything that has to be hard pipe is going to be done by the shop. Once i get everything on (Aside from the front mount, and the downpipe) i'll take it to a shop and have them fabricate the downpipe and the intercooler piping to my liking =P I am not going to do that ****, so it will save me a ton of time... and it will run me around $300 to have it done for me.
#7
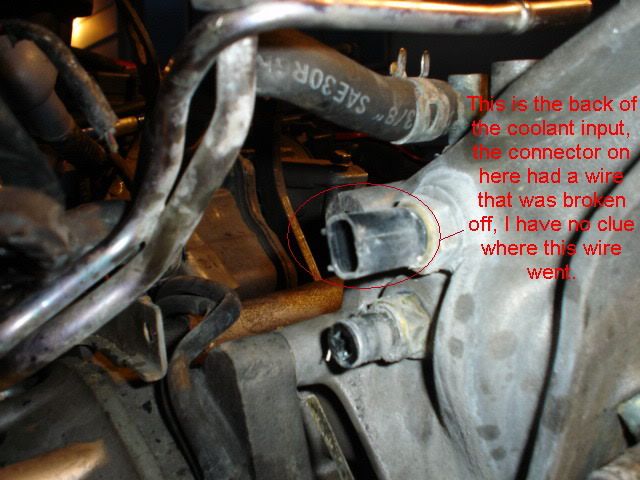
The feed line doesn't have to be within 20 degrees of vertical, only the outlet, because it is gravity whereas the feed is pressurized. That coolant hose in your 5th pic of your last post can get capped as it would normally feed the turbos, but you're running a oil only cooled now. Also the coolant return from the turbos can get capped as well or you could run a hose straight from the coolant feed to the coolant return if you don't want to plug them up.
Trending Topics
#9
Thread Starter
FD Under Construction =P
iTrader: (5)
Joined: Jun 2003
Posts: 4,030
Likes: 24
From: Avondale, AZ
Rockin, where is the coolant feed like located?
It's probably on one of the pics here
http://photobucket.com/albums/y93/dhahlen/
=P
It's probably on one of the pics here
http://photobucket.com/albums/y93/dhahlen/
=P
#13
Darren when this is all said and done this thread is going to be great for people who are doing this install themselves. Just make sure you correct anything you may have had confused with your red lettering. When we get to the electrical connector elims, those pics will really be helpful because that info seems to be difficult to get on this forum. I know it was for me at least. I think like the saying goes...a picture is worth a thousand words. With the electrical connector on the back of the coolant filler...did you just look for a broken wire in your mess of connectors. That wire will just come out from under the uim along with all the other wires so I don't think it should be that hard to find.
#14
Thread Starter
FD Under Construction =P
iTrader: (5)
Joined: Jun 2003
Posts: 4,030
Likes: 24
From: Avondale, AZ
I plan on saving all of these pictures and getting a correct and accurate guide made to do a single install, it will vary depending on the setup, but sort of like rob robinette has done, i would like to have a guide out there for everyone that is jumping into the single project blind like I have =P
Anyway, another example of me being lost...
This is the LIM - and this bolts onto it, can I eliminate it, do I need it, whats the deal? LOL


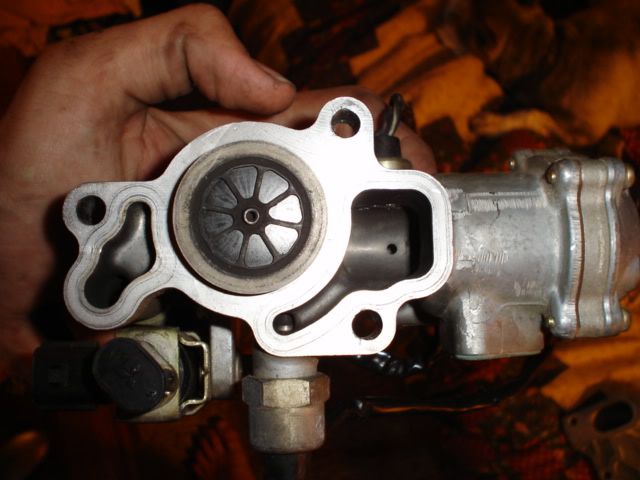
I dont have my blockoff plates in front of me so I dont know if I can just cap this hole.. .I dunno what this thing does, haha.
Anyway, another example of me being lost...
This is the LIM - and this bolts onto it, can I eliminate it, do I need it, whats the deal? LOL


I dont have my blockoff plates in front of me so I dont know if I can just cap this hole.. .I dunno what this thing does, haha.
#18
Thread Starter
FD Under Construction =P
iTrader: (5)
Joined: Jun 2003
Posts: 4,030
Likes: 24
From: Avondale, AZ
Theres more where they're coming from. I have to veryify this info like 3-4 times before I get it right. Thanks to widebody2 for dealing with my *** over the phone answering my questions, Greg (dont know his name on the forums), 2a+Ron, they're all helping out. I'll get a decent guide eventually.
#23
This may or may not help.
The deltas: I retained all my emissions equipment (I'm not the tyep to slip the tester a 50 every time I need to pass testing). Already have fuel taken care of (simple 1300 denso drop ins) GT35R has a wet center section.
FWIW:
http://www.negative-camber.org/crispyrx7/gt35rpage1.htm
Regards,
Crispy
The deltas: I retained all my emissions equipment (I'm not the tyep to slip the tester a 50 every time I need to pass testing). Already have fuel taken care of (simple 1300 denso drop ins) GT35R has a wet center section.
FWIW:
http://www.negative-camber.org/crispyrx7/gt35rpage1.htm
Regards,
Crispy
#25
Thread Starter
FD Under Construction =P
iTrader: (5)
Joined: Jun 2003
Posts: 4,030
Likes: 24
From: Avondale, AZ
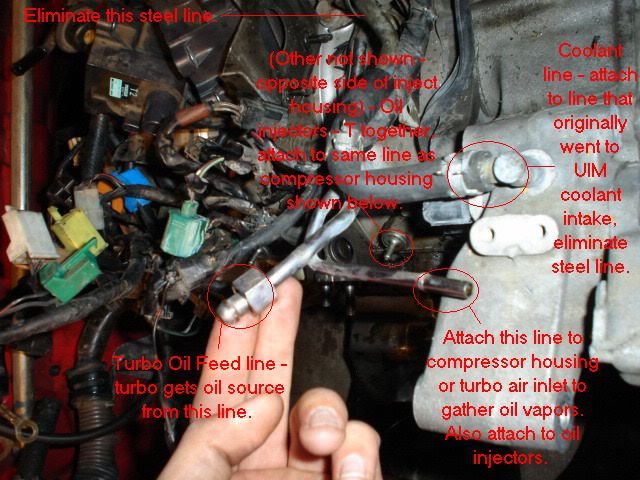
ok, check this is where I am at. I re-routed the coolant line that comes from the engine block, and put it into coolant filler neck line.
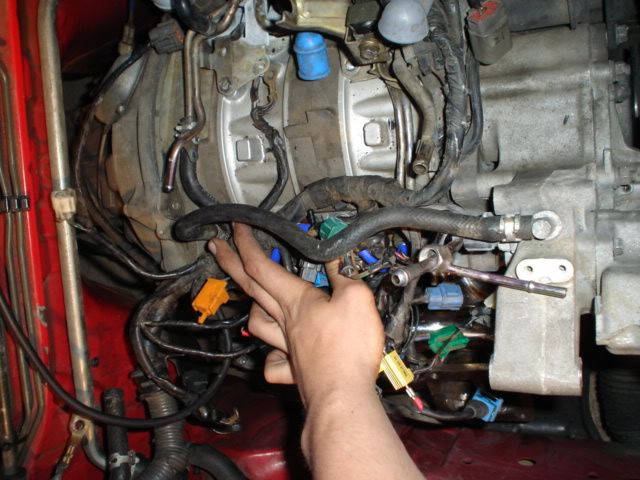
Here I took the oil injector lines and tied them together, the nipple that is left here will be tied into the compressor housing, or the air intake to the turbo.
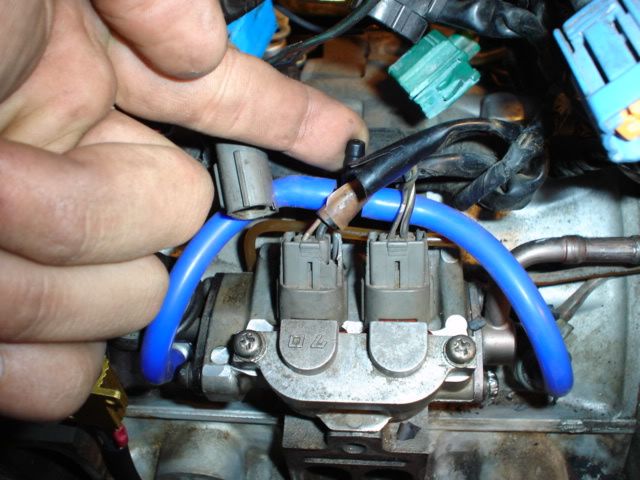
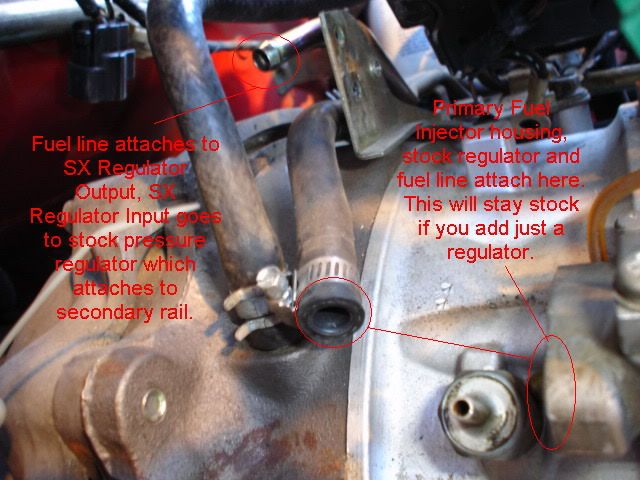
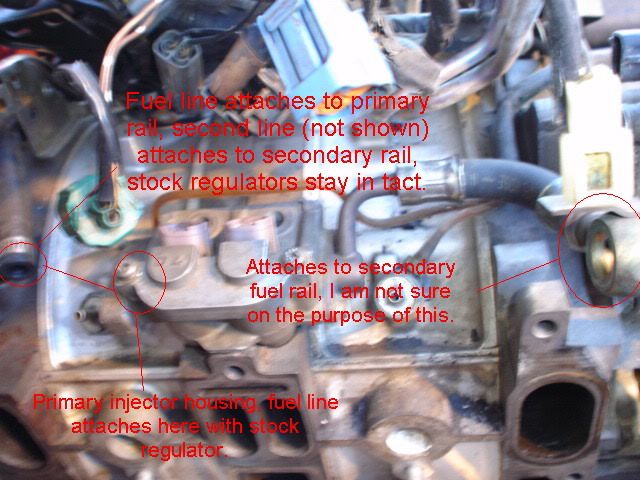
I machined down the primary injector housing and threw my 850cc's in my primary housing, and the 1600cc's in the secondary with the fuel rail.
Now I have to figure out where the hell to mount the SX Fuel pressure Regulator... ugh, pain in the ***.

Here I took the oil injector lines and tied them together, the nipple that is left here will be tied into the compressor housing, or the air intake to the turbo.

I machined down the primary injector housing and threw my 850cc's in my primary housing, and the 1600cc's in the secondary with the fuel rail.
Now I have to figure out where the hell to mount the SX Fuel pressure Regulator... ugh, pain in the ***.


