500R Turbo Kit - Install, Pics, Dyno, General Notes, ect.
#1
500R Turbo Kit - Install, Pics, Dyno, General Notes, ect.
I decided to move to a better size turbo for what I was doing with my car. The did love the R85 kit and I recommend it to anyone who wants to make a lot of power, but in the end it was to big for the boost/power that I wanted to run and for the response I need for road racing. I was simply not using the power of the r85 with boost level I was running and also my usable power was to high in the rpm range. I typically run 12 to 14 psi but wanted the option to run up to 18ish if I wanted some extra 'snort'. Based on that, plus my goals for the car, plus my insightful talks with Andy, and my informative talks with Brian over at ASpec....I decided to go with the 500R kit. This thread is combo install-notes-dyno kinda deal.
General Notes on the A-Spec 500R Kit (pre install)
The kit came well packaged. The coating on the turbo hot side, manifold, and downpipe looked great. It come with everything you need to get the turbo installed, however I struggled a bit with some of the fittings/hoses that it came with and I did my own custom setup with the coolant/oil lines. There are a few options with the kit, and if you are curious about those I suggest calling up A-spec and asking them, however I will mention that I do have the 'long runner' manifold setup on my kit.
Picts of the turbo
Note: The turbo came to me very clean. Any dirty stuff on it was from me, test fitting some dirty couplers on it and things like that.
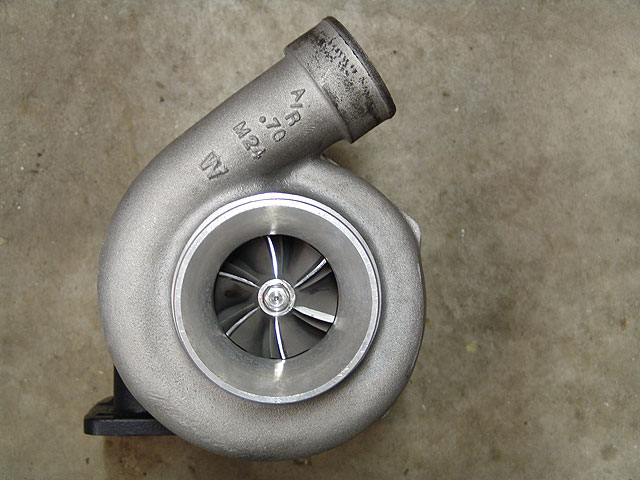
Compressor Side:
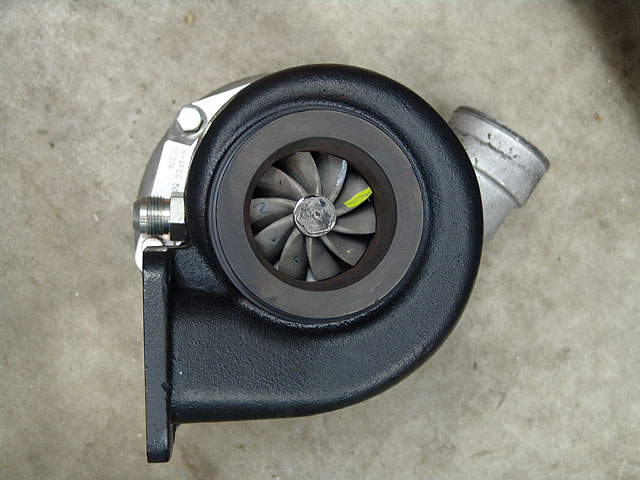
Turbine Side:
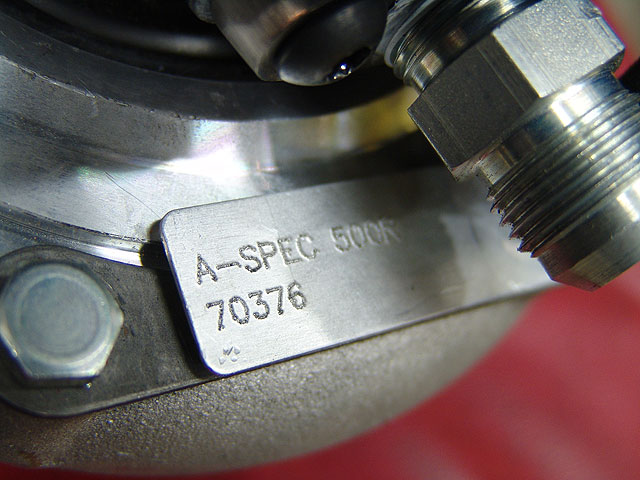
Ahh, the 'fo real' seal:
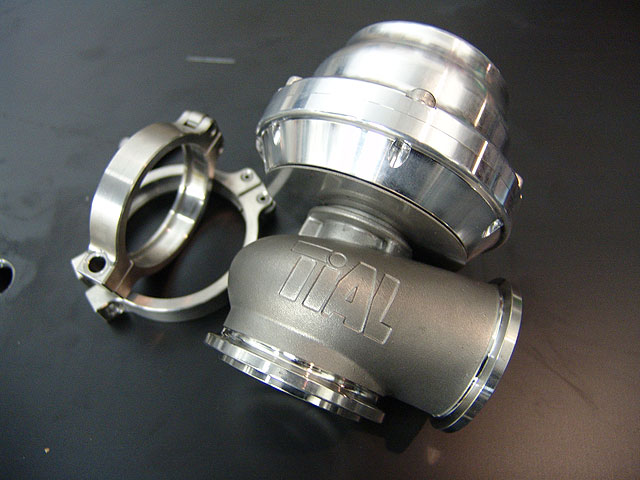
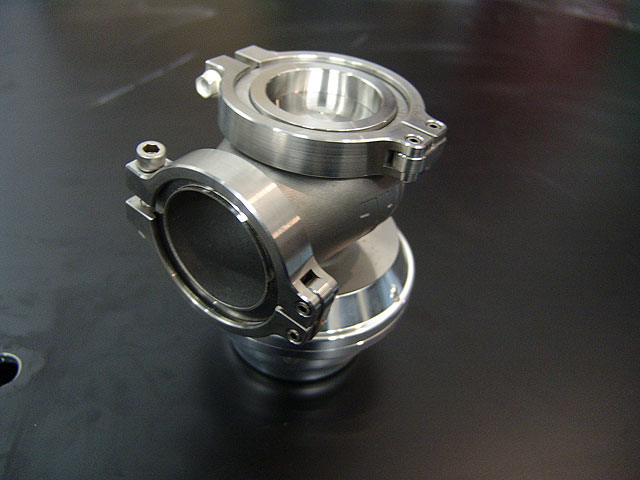
The waste gate:
The V-band WG is one of the best features of the kit. If you have ever dealt with those dam WG bolts and blowing WG gaskets, then you know what I am talking about. No more buying new gaskets all the time and no more drilling WG bolt heads to wire them down. Me = love Vband WG.
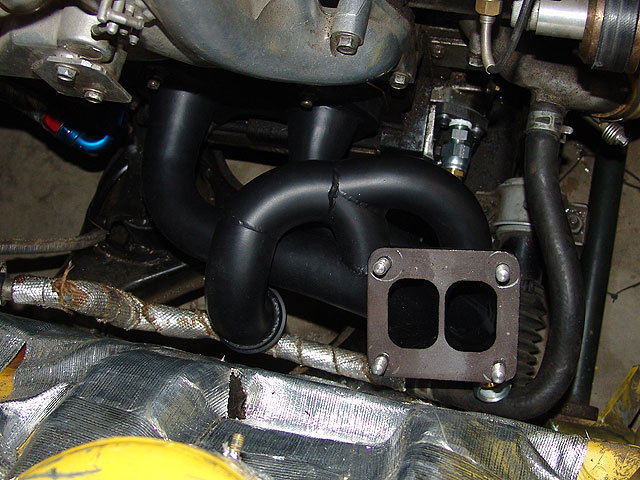
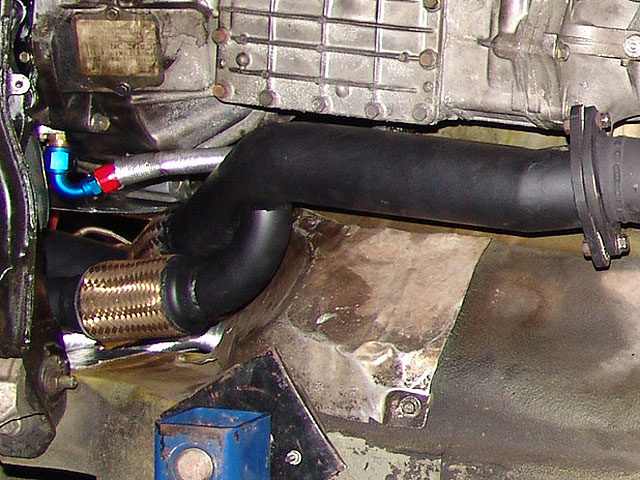
Manifold and DownPipe:
Both of these are very good quality.
Installation Tips
One thing I found myself doing over and over was having to take things apart after finding out I could not reach a bolt or fitting. So here are a few suggestions on install.
Manifold studs:
Its kinda tricky to install the longrunner manifold, so what ended up doing is remove the 2 top manifold studs from the engine housings, then the manifold dropped in very easily, then screwed the manifold studs back in through the manifold.
Manifold to turbo housing bolts:
The bolt heads sit in a very tight spot on the turbo housing, so I did have to do some very minor grinding to make sure the bolt heads could seat all the way against the turbo housing flange and still rotate without a corner of the bolt head hitting the turbo housing.
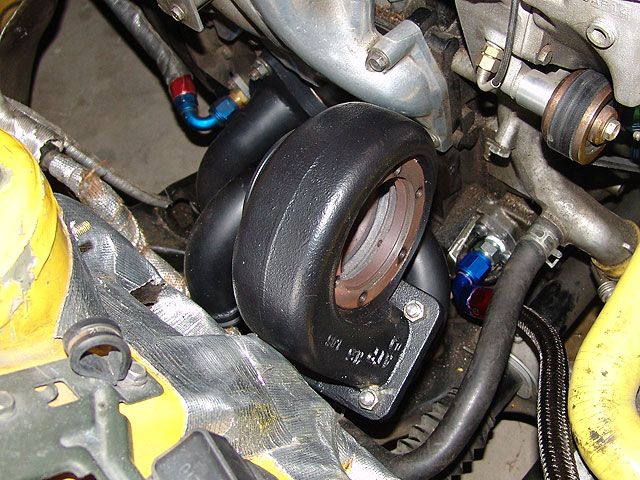
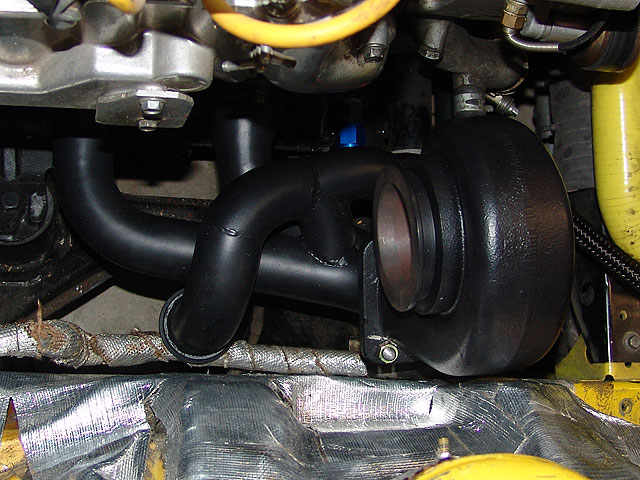
Remove the turbo core:
On the 5th time of trying to get to all the turbo housing to manifold bolts, I realized that if I just removed the turbo core I could get to them all with little effort.
DO THIS AT UR OWN RISK. I do NOT suggest you do this unless you are sure you know what you are doing. You can damage the turbine and/or compressor blades if you make a mistake here. Here are a few pics of what I mean. See how the bolt heads can be accessed easily when the turbo core is out:
Wastegate install:
I wanted to position the input WG barb in a different location so I removed the cover of the WG so I could loosen the nut that holds the bottom part of the 'clam shell' and rotate it to get the barb in a location I was more happy with. This helped the angle of the silicone line that I run to the WG. Here is a pic to see what I mean:
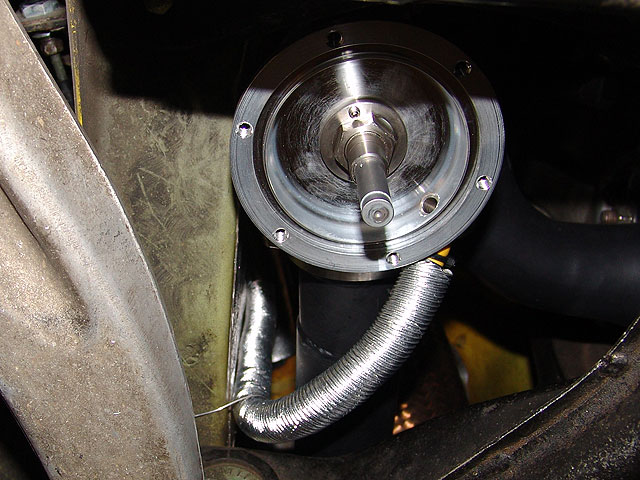
In the picture below you can see how close the WG gets to the subframe, and on my car it ended up hittin it a bit, so I ground off just a small amount of the extra lip on the subframe to give it more clearance.
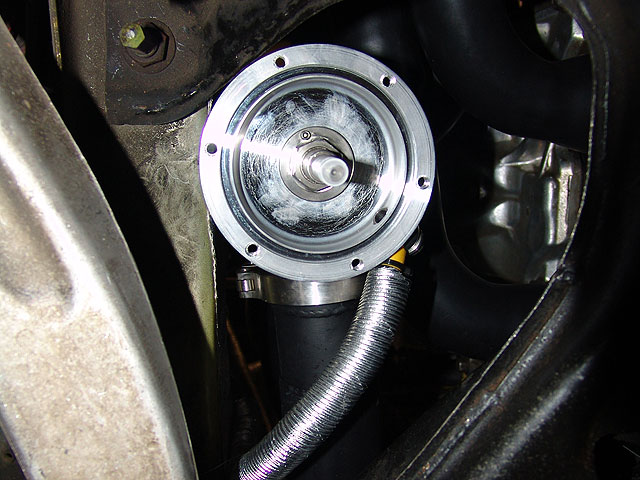
Again, DO THIS AT UR OWN RISK. I do NOT suggest you do this unless you are sure you know what you are doing. You can damage the WG diaphragm if you are not careful when you reinstall the top of the WG.
Coolant Lines:
The kit comes with coolant return lines and barbed fittings, but I had to step it up for the race car :-)
I created new lines with matching AN fittings and -6 AN JEGS Pro-Flo 350 Series Braided Hose. I also wrapped this in the 'shiny aluminum stuff' :-)
Oil Feed Line
The supplied oil feed line fit in great and I already had a fitting in the engine block from the pervious turbo oil feed source, so that installed very easily.
Oil Return line:
The kit comes with coolant lines and a very nice SS-braided oil return line. However I could not get the oil return line to bend the way I liked during the install so I created my own oil return line using the -10 AN JEGS Pro-Flo 350 Series Braided Hose. I had to play with different end fittings to get the hose to line up just how I wanted it, and ended up with a good combination of turbo-fitting -> return hose -> engine-fitting combination for a decent oil return path. The challenge is clearing the manifold runner, not kinking the return line, and also keeping a nice downward bend for good oil return flow.
I also wrapped this in the 'shiny aluminum stuff' :-)
My Heat shield:
I am the 'heat shield guy' so I had to make one :-) ... but sorry, no downloadable template for this yet (hehehe).
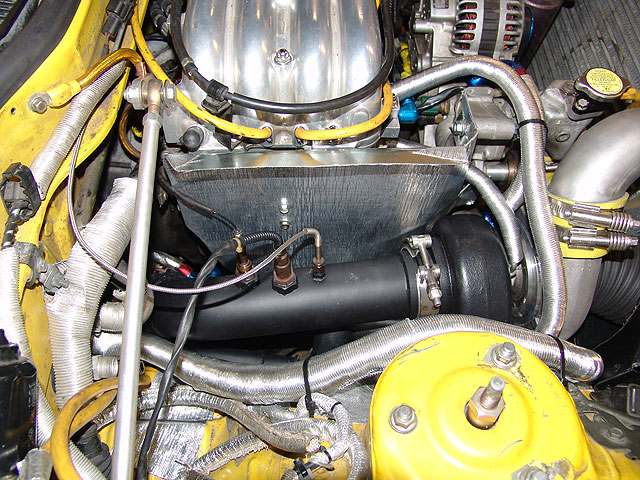
I wanted the UIM and LIM blocked off from radiant heat, so I made a simple shield out of sheetmetal and coated it with that aluminum heat reflective stuff.
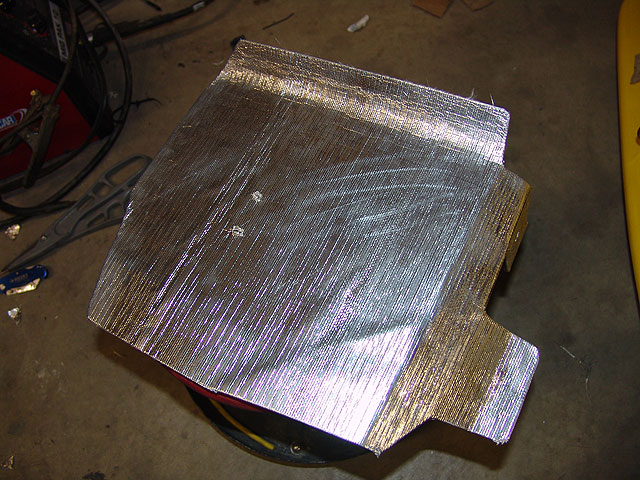
Here is a pic of how the final install looks in the engine bay.
And now, what we really care about, ....the Dyno Sheet
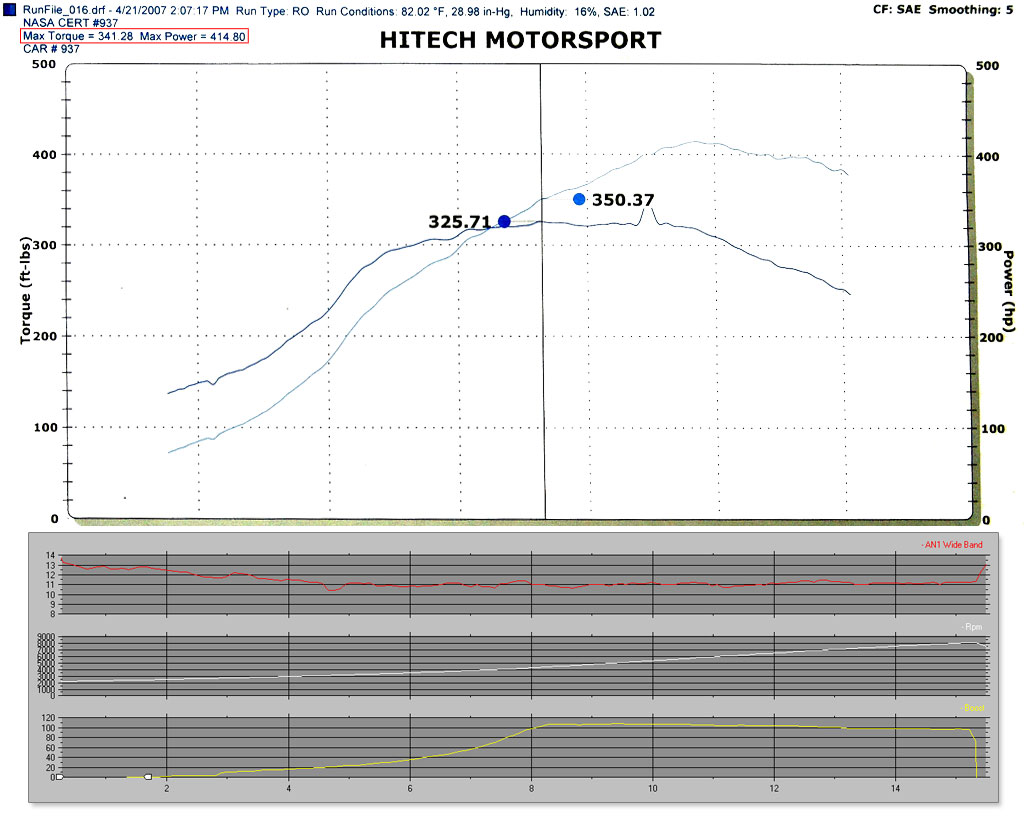
Below is data from a dyno run we did while getting setup for our NASA event. The dyno AF meter was going wacky but I had my wideband running so I pasted in the AF chart in there for you to see. I did not exactly line up the RPMS from my AF chart and the Dyno chart, it is just meant to be a general reference for you too see the basic AF data.
Basically, at around 15 psi, the car made 415RWHP at a conservative 11 AF line.
I was very happy with those numbers considering the conservative AF I run.
A note on the dyno sheet and af/boost log chart:
- The boost drops about 1 to 1.5 psi during the runs and we determined this drop is caused by the boost controller. We say the same repeatable behavior on 3 cars running the same manual controller. At this boost level, with my engine porting, the turbo can easily pull to the end of the rpms without fading so with a better boost controller we can keep a better boost line all the way to redline.
- This was the last pull of many on the dyno, and although we had large fans blowing in the radiator/IC opening, these numbers are with a 'hot' engine bay. In other words, this was not with icebags and water sprayed everywhere, this run was on a heatsoaked engine bay.
- Keep in mind that I am not even in its peek range yet, from my limited understanding, the real strength of the turbo starts to show at about the 18 to 20+ psi range.
General Notes on the A-Spec 500R Kit (post install)
I have put the kit through 4 solid tests now, my event at MidAmerica Motorplex, a RoadAmerica weekend, the dyno runs, and the first NASA race of the midwest season at Iowa Raceway. So far I am very happy with the kit, the car feels very responsive and powerful. The 500R kit definitely met my goals for optimizing the cars setup.
When I get time I will make threads on the MAM event, NASA Iowa event, et. :-)
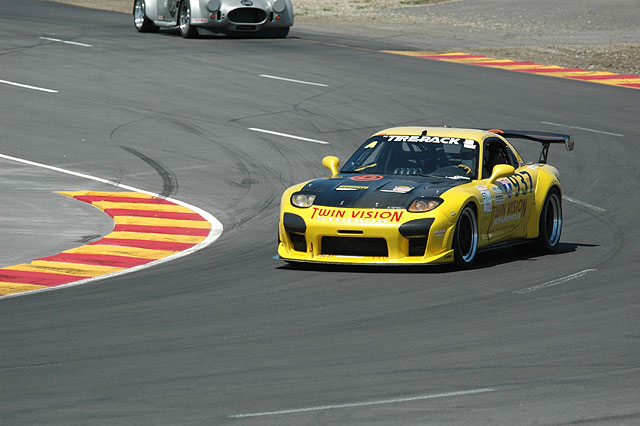
Thanks to Brian at A-spec and the rest of the A-Spec crew for helping me get my setup figured out and getting it done in time for me to install/tune/dyno for my first race.
By the way I won my fist race, getting to the grid late and starting dead last, I ended up finishing first overall, passing the entire field (whoot)!!
I will post another thread/video on that later ;-)
General Notes on the A-Spec 500R Kit (pre install)
The kit came well packaged. The coating on the turbo hot side, manifold, and downpipe looked great. It come with everything you need to get the turbo installed, however I struggled a bit with some of the fittings/hoses that it came with and I did my own custom setup with the coolant/oil lines. There are a few options with the kit, and if you are curious about those I suggest calling up A-spec and asking them, however I will mention that I do have the 'long runner' manifold setup on my kit.
Picts of the turbo
Note: The turbo came to me very clean. Any dirty stuff on it was from me, test fitting some dirty couplers on it and things like that.
Compressor Side:

Turbine Side:

Ahh, the 'fo real' seal:

The waste gate:
The V-band WG is one of the best features of the kit. If you have ever dealt with those dam WG bolts and blowing WG gaskets, then you know what I am talking about. No more buying new gaskets all the time and no more drilling WG bolt heads to wire them down. Me = love Vband WG.


Manifold and DownPipe:
Both of these are very good quality.


Installation Tips
One thing I found myself doing over and over was having to take things apart after finding out I could not reach a bolt or fitting. So here are a few suggestions on install.
Manifold studs:
Its kinda tricky to install the longrunner manifold, so what ended up doing is remove the 2 top manifold studs from the engine housings, then the manifold dropped in very easily, then screwed the manifold studs back in through the manifold.
Manifold to turbo housing bolts:
The bolt heads sit in a very tight spot on the turbo housing, so I did have to do some very minor grinding to make sure the bolt heads could seat all the way against the turbo housing flange and still rotate without a corner of the bolt head hitting the turbo housing.
Remove the turbo core:
On the 5th time of trying to get to all the turbo housing to manifold bolts, I realized that if I just removed the turbo core I could get to them all with little effort.
DO THIS AT UR OWN RISK. I do NOT suggest you do this unless you are sure you know what you are doing. You can damage the turbine and/or compressor blades if you make a mistake here. Here are a few pics of what I mean. See how the bolt heads can be accessed easily when the turbo core is out:


Wastegate install:
I wanted to position the input WG barb in a different location so I removed the cover of the WG so I could loosen the nut that holds the bottom part of the 'clam shell' and rotate it to get the barb in a location I was more happy with. This helped the angle of the silicone line that I run to the WG. Here is a pic to see what I mean:

In the picture below you can see how close the WG gets to the subframe, and on my car it ended up hittin it a bit, so I ground off just a small amount of the extra lip on the subframe to give it more clearance.

Again, DO THIS AT UR OWN RISK. I do NOT suggest you do this unless you are sure you know what you are doing. You can damage the WG diaphragm if you are not careful when you reinstall the top of the WG.
Coolant Lines:
The kit comes with coolant return lines and barbed fittings, but I had to step it up for the race car :-)
I created new lines with matching AN fittings and -6 AN JEGS Pro-Flo 350 Series Braided Hose. I also wrapped this in the 'shiny aluminum stuff' :-)
Oil Feed Line
The supplied oil feed line fit in great and I already had a fitting in the engine block from the pervious turbo oil feed source, so that installed very easily.
Oil Return line:
The kit comes with coolant lines and a very nice SS-braided oil return line. However I could not get the oil return line to bend the way I liked during the install so I created my own oil return line using the -10 AN JEGS Pro-Flo 350 Series Braided Hose. I had to play with different end fittings to get the hose to line up just how I wanted it, and ended up with a good combination of turbo-fitting -> return hose -> engine-fitting combination for a decent oil return path. The challenge is clearing the manifold runner, not kinking the return line, and also keeping a nice downward bend for good oil return flow.
I also wrapped this in the 'shiny aluminum stuff' :-)
My Heat shield:
I am the 'heat shield guy' so I had to make one :-) ... but sorry, no downloadable template for this yet (hehehe).
I wanted the UIM and LIM blocked off from radiant heat, so I made a simple shield out of sheetmetal and coated it with that aluminum heat reflective stuff.

Here is a pic of how the final install looks in the engine bay.

And now, what we really care about, ....the Dyno Sheet
Below is data from a dyno run we did while getting setup for our NASA event. The dyno AF meter was going wacky but I had my wideband running so I pasted in the AF chart in there for you to see. I did not exactly line up the RPMS from my AF chart and the Dyno chart, it is just meant to be a general reference for you too see the basic AF data.
Basically, at around 15 psi, the car made 415RWHP at a conservative 11 AF line.
I was very happy with those numbers considering the conservative AF I run.

A note on the dyno sheet and af/boost log chart:
- The boost drops about 1 to 1.5 psi during the runs and we determined this drop is caused by the boost controller. We say the same repeatable behavior on 3 cars running the same manual controller. At this boost level, with my engine porting, the turbo can easily pull to the end of the rpms without fading so with a better boost controller we can keep a better boost line all the way to redline.
- This was the last pull of many on the dyno, and although we had large fans blowing in the radiator/IC opening, these numbers are with a 'hot' engine bay. In other words, this was not with icebags and water sprayed everywhere, this run was on a heatsoaked engine bay.
- Keep in mind that I am not even in its peek range yet, from my limited understanding, the real strength of the turbo starts to show at about the 18 to 20+ psi range.
General Notes on the A-Spec 500R Kit (post install)
I have put the kit through 4 solid tests now, my event at MidAmerica Motorplex, a RoadAmerica weekend, the dyno runs, and the first NASA race of the midwest season at Iowa Raceway. So far I am very happy with the kit, the car feels very responsive and powerful. The 500R kit definitely met my goals for optimizing the cars setup.
When I get time I will make threads on the MAM event, NASA Iowa event, et. :-)

Thanks to Brian at A-spec and the rest of the A-Spec crew for helping me get my setup figured out and getting it done in time for me to install/tune/dyno for my first race.
By the way I won my fist race, getting to the grid late and starting dead last, I ended up finishing first overall, passing the entire field (whoot)!!
I will post another thread/video on that later ;-)
Last edited by damian; 05-11-07 at 04:27 PM.
#3
great right-up damian - thorough as always.
quick question: in the pic below, where is the -an fitting line going to? seems like its attached to the secondary oil return on the rear iron, but where is the an line going?

quick question: in the pic below, where is the -an fitting line going to? seems like its attached to the secondary oil return on the rear iron, but where is the an line going?

#4
Nope, not race gas, just pump gas... standard 92 - 93 octane stuff. My Af ratio and boost level does not really warrent race gas yet,... if I decide to run 17 or 18 psi and/or more agressive AF, then I would move to race gas. But I probably wont, as I am already close to my peak power/weight for my NASA class (ST1).
#5
>>quick question: in the pic below, where is the -an fitting line going to? seems like its attached to the secondary oil return on the rear iron, but where is the an line going?
That line goes to my oil catch can. I will do another write up on that setup as I have battled the oil catch can thing for years now and with the help of good forum information, Crispy's efforts, and Andys help (GooRoo on the forum), ...I have solved the dreaded oil catch can problem. I can run and entrie race weekend now and not even have to empty the catch can, actualy not even fill it more that 1/4. Keep an eye out on the thread for that, I'll get to that one soon, I just need to take a few more pics.
That line goes to my oil catch can. I will do another write up on that setup as I have battled the oil catch can thing for years now and with the help of good forum information, Crispy's efforts, and Andys help (GooRoo on the forum), ...I have solved the dreaded oil catch can problem. I can run and entrie race weekend now and not even have to empty the catch can, actualy not even fill it more that 1/4. Keep an eye out on the thread for that, I'll get to that one soon, I just need to take a few more pics.
#6
I love that you used the heat barrier on the strut tower wall. I did that also, yet everyone made fun of me  .
.
Anyway, very nice setup. Your R85 didn't have a vband for the wastegate?
I'm having a problem with my turbine housing rattling the nuts off the bolts! I've used locktite and double nutted them. I wish I had a t51 with a nice v-band manifold.
It's funny you trade your r85 for a smaller turbo... I'm looking to trade it to do the direct opposite.
I've also been wondering. What is the threshold on the 500r?
 .
. Anyway, very nice setup. Your R85 didn't have a vband for the wastegate?
I'm having a problem with my turbine housing rattling the nuts off the bolts! I've used locktite and double nutted them. I wish I had a t51 with a nice v-band manifold.
It's funny you trade your r85 for a smaller turbo... I'm looking to trade it to do the direct opposite.
I've also been wondering. What is the threshold on the 500r?
Trending Topics
#8
>>I love that you used the heat barrier on the strut tower wall. I did that also, yet everyone made fun of me
Dood, shiny aluminum stuff everywhere, why not do it!! :-) The haters are just jelous anyway ;-)
Actualy, I do take that area seriously, I need to keep heat away from the shock on that side.
>>Anyway, very nice setup. Your R85 didn't have a vband for the wastegate?
Not when I got the kit. It may now?
>>I'm having a problem with my turbine housing rattling the nuts off the bolts! I've used locktite and double nutted them.
Drill and wire man, drill and wire :-) I know it all to well :-)
>>I've also been wondering. What is the threshold on the 500r?
Good question, and im not the guy to answer as I will never even get close to it :-)
#9
Damian,
Thanks for sharing "real world" info. I always look forward to browsing the threads you initiate.
Question... may be useful to get a picture of HOW you addressed the air intake/filter with the use of a long runner manifold? I understand that the turbo is located very far forward with this arrangement.
All the best to you, and congrats on your run to first place. (can't wait to see video)
David
DI
Last edited by Rx7@Rocketship.com; 05-11-07 at 05:26 PM. Reason: spelling
#10
Speed Mach Go Go Go
iTrader: (2)
Joined: Oct 2001
Posts: 4,772
Likes: 2
From: My 350Z Roadster kicks my RX7's butt
Love the wastegate. Tial has V-band turbine snails now to. What size turbine snail is yours and what size piping? My turbo doesn't have an A-Spec srial # plack, maybe that's something new. Your car looks very well thought out. I hope to be able to use my NASA membership soon.
#12
Excellent write up and glad it is meeting your goals. We had a couple NASA guys have to come use our dyno just over a week ago. Some really nicely setup cars. Congrats on the win as well!!
-S-
-S-
#13
i had thought about removing my turbo center cartridge for easier install too, but how do you get the bottom 2 bolts in their holes? i guess it might make it a little easier if you dont have a permanent turbo blanket on their.
#14
#15
mine went right in from the top, no problems there for my kit.
#17
#21
#22
Speed Mach Go Go Go
iTrader: (2)
Joined: Oct 2001
Posts: 4,772
Likes: 2
From: My 350Z Roadster kicks my RX7's butt
Dude, your car  's! I hope I get mine finished and get to use my NASA membership sometime.
What size turbine A/R do you have (1.0 or 1.06)?
What size DP and exhaust and any cats or strait through?
 's! I hope I get mine finished and get to use my NASA membership sometime.
What size turbine A/R do you have (1.0 or 1.06)?
What size DP and exhaust and any cats or strait through?
#23
>>What size turbine A/R do you have (1.0 or 1.06)?
dam i forget...think it was the 1.06
>>What size DP and exhaust and any cats or strait through?
Standard aspec 3" DP, straight through midpipe... (no cats)... and RSR catback :-)
dam i forget...think it was the 1.06
>>What size DP and exhaust and any cats or strait through?
Standard aspec 3" DP, straight through midpipe... (no cats)... and RSR catback :-)
#24
Speed Mach Go Go Go
iTrader: (2)
Joined: Oct 2001
Posts: 4,772
Likes: 2
From: My 350Z Roadster kicks my RX7's butt
^ They let you run at those sound levels? How much does the RSR quiet it down? When I was mid pipe strait through exhaust the sound literaly hurt my ears. There were a couple loud Hondas that I was suprised didn't get black flagged but still I thought all the tracks had noise limits now.
#25
Joined: Mar 2001
Posts: 30,580
Likes: 567
From: FL-->NJ/NYC again!
>>What size turbine A/R do you have (1.0 or 1.06)?
dam i forget...think it was the 1.06
>>What size DP and exhaust and any cats or strait through?
Standard aspec 3" DP, straight through midpipe... (no cats)... and RSR catback :-)
dam i forget...think it was the 1.06
>>What size DP and exhaust and any cats or strait through?
Standard aspec 3" DP, straight through midpipe... (no cats)... and RSR catback :-)
Damian, congrats on your new setup, everything looks great! I'd be curious to know what you'd dyno with a 4 inch exhaust........once I can find a competent tuner here in the NE i plan to get dyno results for my setup, but that isn't proving to be easy.


