FD3S: Sanai Works Rear Diffuser..... Who wants in?
#284
Thread Starter
Registered User
iTrader: (11)
Joined: Oct 2005
Posts: 2,840
Likes: 10
From: Rancho Cucamonga , California
Yep. Still available. More info and pricing and a few more pics are are on the site.
FD3S RX-7 Spec-S Full Aero | Shine Auto Project
FD3S RX-7 Spec-S Full Aero | Shine Auto Project
#285
Big thanks to Ken for taking the time to meet me up after work to hand the diffuser off to me, saving me an hour trip!
It took me a while to figure out how to mount the diffuser during my install since all my googling lead me to the RE-A diffuser instructions that kept mentioning gas tank straps.
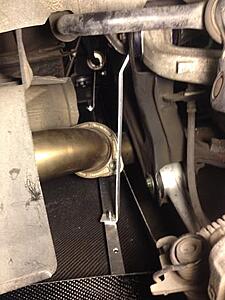
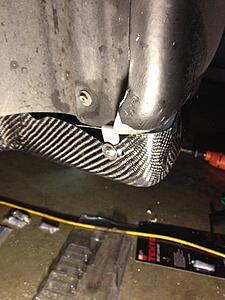
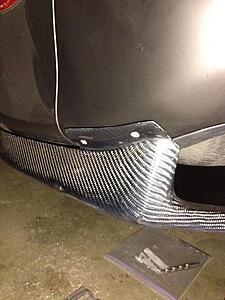
In case anybody else is getting confused, here's some pictures showing what I did.
- There's little divets in the CF that show you the general area of where to drill, you can kind of piece together how it all fits.
- Put the metal bar with the nutserts side facing down, this is where the diffuser bolts in.
- I bolted the brackets to the nut that holds in the upper control arm. I couldn't find anywhere else that lined up correctly so I assume this is the way its supposed to be.

- Bracket in the wheel well. It may have just been my car but the adjustments and where I ended up drilling the holes was a little bit different from 1 side to the other.

- I used rivets to fasten the diffuser to the bumper instead of the screws that came in the bag of hardware, though the screws would work just fine.
- 3/16" OD rivet, I bought a prev bag that ended up being a little too small. Here's a link:
 Stainless Steel Blind Rivet, Meets IFI Grade 51, 0.251"-0.375" Grip Range, 3/16" OD, 0.575" Length, #11 Drill Size (Pack of 100): Amazon.com: Industrial & Scientific
full stainless steel so I don't need to worry about rust.
- The rivet was actually kind of big, and my hand powered rivet setting tool was having problems breaking off the mandrel. I ended up using 2 pipes stuck on the handle for leverage.

It took me a while to figure out how to mount the diffuser during my install since all my googling lead me to the RE-A diffuser instructions that kept mentioning gas tank straps.
In case anybody else is getting confused, here's some pictures showing what I did.
- There's little divets in the CF that show you the general area of where to drill, you can kind of piece together how it all fits.
- Put the metal bar with the nutserts side facing down, this is where the diffuser bolts in.
- I bolted the brackets to the nut that holds in the upper control arm. I couldn't find anywhere else that lined up correctly so I assume this is the way its supposed to be.

- Bracket in the wheel well. It may have just been my car but the adjustments and where I ended up drilling the holes was a little bit different from 1 side to the other.

- I used rivets to fasten the diffuser to the bumper instead of the screws that came in the bag of hardware, though the screws would work just fine.
- 3/16" OD rivet, I bought a prev bag that ended up being a little too small. Here's a link:
- The rivet was actually kind of big, and my hand powered rivet setting tool was having problems breaking off the mandrel. I ended up using 2 pipes stuck on the handle for leverage.

#289
Good lord I canít believe itís already been 6 yrs since I installed this thing. Iíd totally forgotten I made that write up and scrolled up to the pictures wondering why that car looks so much like mine lol.
for the record, yeah all the hardware came with the diffuser. I canít imagine trying to go to the local hardware store and trying to find/bend stuff to make it mount correctly.
for the record, yeah all the hardware came with the diffuser. I canít imagine trying to go to the local hardware store and trying to find/bend stuff to make it mount correctly.
Thread
Thread Starter
Forum
Replies
Last Post
Frisky Arab
2nd Generation Specific (1986-1992)
13
08-18-15 06:30 PM


