
Engine Building Thoughts

 11-27-06, 03:29 PM
#127
Originally Posted by Dan_s_young
Building a S5 engine with S4 rotors, S5 rotor housings should I use a S4 or S5 E-shaft or does it matter?
Still curious at what HP level/boost level should I be considering going to a high tensile strength dowel pin?
12-01-06, 07:43 PM
#128
And the Revolution...
I've been doing some research about coatings and things of that nature because I forsee a rebuild in the not to distant future. My question is, Do you think a coating such as the Ceremet (JHB) or Polydyn (Turblown Eng) could benefit even more if you coupled them with cryotreatment? And would you want to do the Cryo before or after the coating? I guess I would have to understand both coatings a little better but the info about their composition is limited. Ceramic seals would not benefit from cryo because of thier makeup I would assume. Any input is appreciated. Thanks
Chris
Chris
12-02-06, 02:58 AM
#129
Originally Posted by Blake
Still, you should not have to worry too much if you are running 400hp or thereabouts, again presuming proper tuning. If you do some searching on the forum, you should find a thread with comparrison photos of S4 and earlier, S5-T and FD rear plate dowel pin hole castings, so you can see what you have. Not all S5-T plates were reinforced as extensively as others, so you can't just take it for granted.
http://www.rotaryresurrection.com/2n...ron_break.html
12-02-06, 04:28 PM
#131
Originally Posted by DarkKnightFC
I've been doing some research about coatings and things of that nature because I forsee a rebuild in the not to distant future. My question is, Do you think a coating such as the Ceremet (JHB) or Polydyn (Turblown Eng) could benefit even more if you coupled them with cryotreatment? And would you want to do the Cryo before or after the coating? I guess I would have to understand both coatings a little better but the info about their composition is limited. Ceramic seals would not benefit from cryo because of thier makeup I would assume. Any input is appreciated. Thanks
Chris
Chris
12-02-06, 06:47 PM
#133
What he's saying is that cryo treating is good for the surface of a part, but if you plan to coat over the original surface (now cryo treated) then you lose any benefit you would have had. You'd either do one or the other, cryo treat the existing surface or coat over it with something else, doing both would be a waste of money.
12-10-06, 03:48 PM
#135
I know this is under engine buildup, but I had a question about tuning. Using the dual egt guage with a wideband would help you tune for each rotor correct? now someone had mentioned that one rotor is leaner at low rpm, and then gets richer at high rpm, and the other rotor is vise versa. is there an ECU available that you can tune each rotor separately? thus preventing carbon buildup from running too rich at any rpm, and also balancing power output? Heck, maybe even increasing fuel economy since you can tune each rotor to its safe point in each rpm range?
12-13-06, 11:14 AM
#136
Originally Posted by Monkman33
I know this is under engine buildup, but I had a question about tuning. Using the dual egt guage with a wideband would help you tune for each rotor correct? now someone had mentioned that one rotor is leaner at low rpm, and then gets richer at high rpm, and the other rotor is vise versa. is there an ECU available that you can tune each rotor separately? thus preventing carbon buildup from running too rich at any rpm, and also balancing power output? Heck, maybe even increasing fuel economy since you can tune each rotor to its safe point in each rpm range?
12-17-06, 08:38 PM
#137
Junior Member

Join Date: Aug 2006
Location: Portland
Posts: 11
Likes: 0
Received 0 Likes
on
0 Posts
[QUOTE=Blake]Don't use an oil pan gasket. The gaskets cost money (obviously) but don't do as good of a job as simple silicone. In fact, once the factory oil pan gaskets start to leak, they spew oil at a prodigious rate. When the silicone leaks, it will at least be a relatively minor leak. I say "when" because it's not a case of "if". The stock pans always leak eventually due to the flexing of the engine. That's one of the reasons we developed aluminum oil pans for FCs and FDs, using an o-ring insetead of a gasket.QUOTE]
I disagree with this statement. Me and a friend are rebuilding a blown G54b. The old owner used silicone (rtv) for a pan seal and well when you press/tighten it down some sqeezes out, AND IN. meaning that you have big chuncks of rtv in your oil now. this clogged the oil squirters, oil pump and might have been a leading factor in its overheating. there where other problems not just this one but im sure this added to the crap that this engine took. Im still learning about rotories but i think it would do the same thing. Clogging my working omp is not something i need after a rebuild. rtv is good but dont use to much. use it in weak points on the seal and to hold it down while your working. just a thought correct me if im wrong.
I disagree with this statement. Me and a friend are rebuilding a blown G54b. The old owner used silicone (rtv) for a pan seal and well when you press/tighten it down some sqeezes out, AND IN. meaning that you have big chuncks of rtv in your oil now. this clogged the oil squirters, oil pump and might have been a leading factor in its overheating. there where other problems not just this one but im sure this added to the crap that this engine took. Im still learning about rotories but i think it would do the same thing. Clogging my working omp is not something i need after a rebuild. rtv is good but dont use to much. use it in weak points on the seal and to hold it down while your working. just a thought correct me if im wrong.
12-18-06, 02:09 PM
#139
Originally Posted by Ocula
I disagree with this statement...[deleted]...just a thought correct me if im wrong.
02-09-07, 10:12 PM
#140

Blake,
Love your writing style. It makes your obviously voluminous expertise easily digestable to a neophite like me. My question is this: I bought a '79 RX7 with damaged oil control rings. Car runs but obviously not drivable. The problem is that it sat for ten year without being turned on for most of that time. Do you think the motor has a prayer of being salvagable or is it very likely that it has corroded internally beyond hope of being rebult?
Tnx
02-10-07, 02:22 AM
#141
Originally Posted by locopr1
Blake,
Love your writing style. It makes your obviously voluminous expertise easily digestable to a neophite like me. My question is this: I bought a '79 RX7 with damaged oil control rings. Car runs but obviously not drivable. The problem is that it sat for ten year without being turned on for most of that time. Do you think the motor has a prayer of being salvagable or is it very likely that it has corroded internally beyond hope of being rebult?
Tnx
Love your writing style. It makes your obviously voluminous expertise easily digestable to a neophite like me. My question is this: I bought a '79 RX7 with damaged oil control rings. Car runs but obviously not drivable. The problem is that it sat for ten year without being turned on for most of that time. Do you think the motor has a prayer of being salvagable or is it very likely that it has corroded internally beyond hope of being rebult?
Tnx
02-11-07, 01:35 AM
#142
Originally Posted by Blake
Hmm, hard to say. Almost any engine that sits for a long time after a failure is not going to be the best core, but at least it was an oil seal instead of a water seal. The best thing to do is simply open it up and take a look. Sorry I can't be more helpful.
02-18-07, 08:34 PM
#143
On average, providing no major problems, how many hours does it take to rebuild a 3rd gen motor. And if the customer provided all the parts, how much to rebuild? Ballpark figure..? Thanks! I'm curious because I have a newly rebuilt motor with only 1500 miles on it with low compression on the rear rotor allready and I'd like someone with your talent to build my next one. I'm thinking it could be a stuck seal. Please share your thoughts!-Matt
02-18-07, 08:51 PM
#144
Originally Posted by RX72NR
On average, providing no major problems, how many hours does it take to rebuild a 3rd gen motor. And if the customer provided all the parts, how much to rebuild? Ballpark figure..? Thanks! I'm curious because I have a newly rebuilt motor with only 1500 miles on it with low compression on the rear rotor allready and I'd like someone with your talent to build my next one. I'm thinking it could be a stuck seal. Please share your thoughts!-Matt
http://www.pineappleracing.com/index...on=Custom&ID=2
If your engine was rebuilt with new rotor housings, then we might be able to just freshen it up, but if it's the normal "floorsweeper' rebuild using a lot of worn out parts, it won't save you any money. Have you talked to the builder to see if they are willing to help you?
02-18-07, 11:40 PM
#145
It was done by Mike Jones thru Premeir autowerks, they're out of business. The motor has brand new housings, seals, over $3500 just in parts already. No boost and took it easy on the break in period. I've bought another $3500 in upgrades for the next rebuild, Nrs 3mm grey apex seals, stinger springs, cermet A coated 3mm rotors, ect. Just curious on labor. Also got the GZ lim, oil pan, fuel rail. And everything polished and ported. Hoping to get more than another 1000 miles.
02-18-07, 11:57 PM
#146
Originally Posted by RX72NR
It was done by Mike Jones thru Premeir autowerks, they're out of business. The motor has brand new housings, seals, over $3500 just in parts already. No boost and took it easy on the break in period. I've bought another $3500 in upgrades for the next rebuild, Nrs 3mm grey apex seals, stinger springs, cermet A coated 3mm rotors, ect. Just curious on labor. Also got the GZ lim, oil pan, fuel rail. And everything polished and ported. Hoping to get more than another 1000 miles.
02-22-07, 05:08 PM
#148
Engine Painting
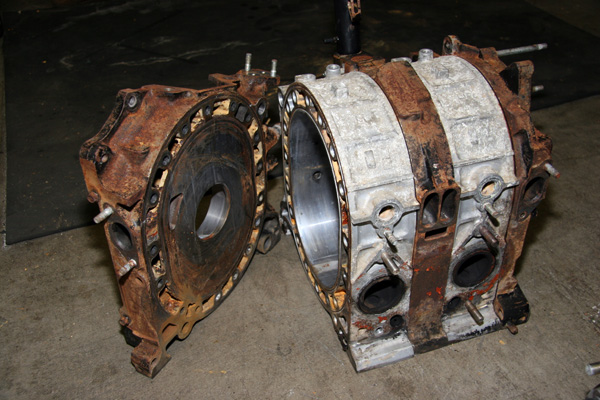
Painting an engine is pretty straight forward and, like other types of painting, the results reflect the preparation. The best way to paint an engine is when it is disassembled. While it is possible to paint the aluminum rotor housings, the results are not usually good in the long term due to flaking and discoloration. Aluminum also does not rust like steel or cast iron and what oxidation does form is easy to remove with steel wool or sandpaper. For these reasons, we typically only paint the side housings (aka "plates") which are cast iron.
To remove rust scales or old paint from housings, we prefer media blasting with glass bead. This is where compressed air blows tiny glass particles out at a high velocity, abrading dirt, paint and rust off of metal. There are a variety of materials that can be used in media blasting, such as sand, glass and walnut shells. Sand is very abrasive while walnut shells are much less abrasive. Glass bead is somewhere inbetween and works great for cast iron and aluminum engine parts. Any cheap "sand blasting" setup can be converted to glass bead by simply replacing the blasting material. You could also just use a wire brush, but it won't be nearly as fast or effective.
Once the parts are blasted clean, you need to spray them down with non-chlorinated alcohol and preferably blow-dry the parts with compressed air. This will get any dust and residual oils off the parts. Now, you are ready to paint.
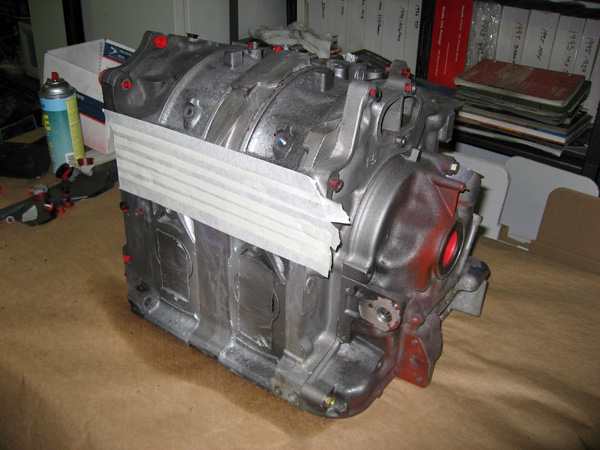
To paint the plates, we mock up an engine with the parts we are painting and junk rotor housings and front cover. All the critical openings need to be masked off and the threaded holes plugged. We use a variety of plastic caps to plug the threaded holes and other round openings. Masking tape is great for odd shapes or larger areas, like around the intake ports.
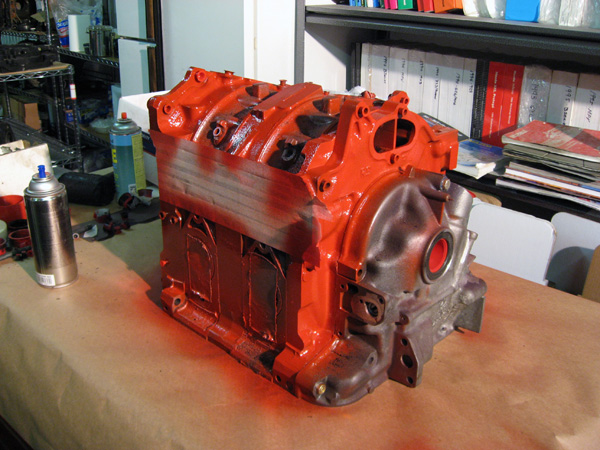
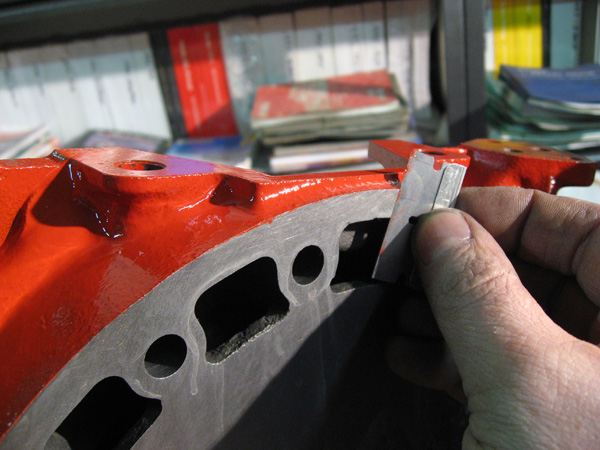
It is best to start with a thin, light coat and let it begin to set up. At that time, you can lay on a thicker coat with less risk of runs. When in doubt, do a light coat and simply repeat until you are satisfied. After the final coat begins to set up, remove the masking tape and caps before it is completely dry. Pull the pieces apart and let them dry a bit more. Then, scrape any bleeding into critical areas or paint buildup near mating surfaces.
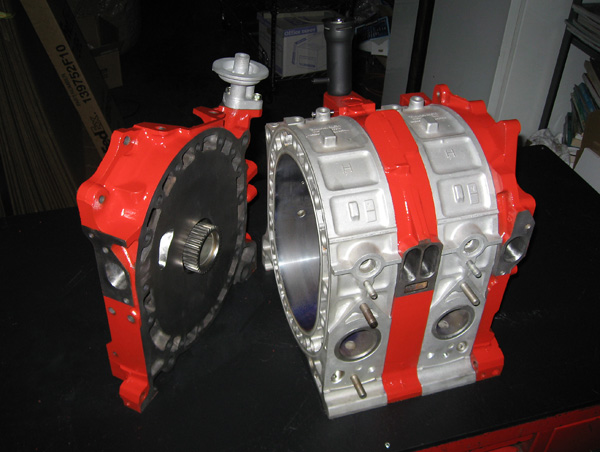
I prefer to use Duplicolor Engine Enamel, but any quality paint will do. Often, we just paint the plates cast iron color to preserve the "natural" appearance or black, because it looks clean and professional. In the case below, I used a bright Ford Red for contrast, because it is being built for a Mazdasport magazine project car and the bright color will show it off better.
Here is an example:
This is how the engine looked when I pulled it apart:
After cleaning, I mocked up the plates for painting:
Paint applied:
Scraping off excess paint:
Final results (yes, these are the exact same parts as in the first picture):
To remove rust scales or old paint from housings, we prefer media blasting with glass bead. This is where compressed air blows tiny glass particles out at a high velocity, abrading dirt, paint and rust off of metal. There are a variety of materials that can be used in media blasting, such as sand, glass and walnut shells. Sand is very abrasive while walnut shells are much less abrasive. Glass bead is somewhere inbetween and works great for cast iron and aluminum engine parts. Any cheap "sand blasting" setup can be converted to glass bead by simply replacing the blasting material. You could also just use a wire brush, but it won't be nearly as fast or effective.
Once the parts are blasted clean, you need to spray them down with non-chlorinated alcohol and preferably blow-dry the parts with compressed air. This will get any dust and residual oils off the parts. Now, you are ready to paint.
To paint the plates, we mock up an engine with the parts we are painting and junk rotor housings and front cover. All the critical openings need to be masked off and the threaded holes plugged. We use a variety of plastic caps to plug the threaded holes and other round openings. Masking tape is great for odd shapes or larger areas, like around the intake ports.
It is best to start with a thin, light coat and let it begin to set up. At that time, you can lay on a thicker coat with less risk of runs. When in doubt, do a light coat and simply repeat until you are satisfied. After the final coat begins to set up, remove the masking tape and caps before it is completely dry. Pull the pieces apart and let them dry a bit more. Then, scrape any bleeding into critical areas or paint buildup near mating surfaces.
I prefer to use Duplicolor Engine Enamel, but any quality paint will do. Often, we just paint the plates cast iron color to preserve the "natural" appearance or black, because it looks clean and professional. In the case below, I used a bright Ford Red for contrast, because it is being built for a Mazdasport magazine project car and the bright color will show it off better.
Here is an example:
This is how the engine looked when I pulled it apart:
After cleaning, I mocked up the plates for painting:
Paint applied:
Scraping off excess paint:
Final results (yes, these are the exact same parts as in the first picture):
03-01-07, 04:46 PM
#149
Stay tuned...
iTrader: (3)
Join Date: Jul 1997
Location: West Islip, Long Island NY
Posts: 2,917
Likes: 0
Received 1 Like
on
1 Post
Blake,
Regardind your new video of speccing the eccentric shaft...
1. Do you guys sell the precision v blocks?
2. I did not notice your heavy duty inner and outer coolant seal kit on your site, is it available separately like the close up kit that Rotary Aviation sells?
If you do not have the precision v blocks available, can you recommend where you got yours or at least the size that is needed.
Thanks,
Anthony
