my semi-peripheral project
 06-11-09, 02:38 PM
#1
my semi-peripheral project
Prelude:
Hi All,
I think I’ve cluttered Drifting Rex’s thread enough with my crap, and I have some time now so I decided to get off my duff and start my own. This one goes out you, man. Do your thing and I want to see that thing running soon.
Anyway, after a couple of years of thinking, planning, wishing and few attempts at trying to perform magic, I have started the process of actually doing this. I actually started this project several months ago and until my financial state stabilizes a bit, I have no reason to think that it will not be another several months before I finish. Also, I have to finish my brother’s MegaSquirt project first and that’s probably going to take me into August. I’ve been patient, so you guys will have to follow suit.
This port configuration has always intrigued me. If there is a body of information out there on it, I haven’t found it and it’s not a lack of trying. The best I could do was a few lines here and there and a few pictures from Japan and Judge Ito. However, after the unfortunate event of crashing my Rx-7 2 years ago, I got to thinking of getting off my *** and building a racecar. I decided to combine the 2 projects, so whenever this engine gets built, it will be going in my Rx-7. Though I do plan to turbocharge it some day, it won’t be anytime soon. For now I just want to build it, work out the kinks, tune it and start racing before I’m … like … 50.
Now before I start any history or self-promotion, let me officially state that I have the utmost respect for people that have made a living building race-level engines (rotary and piston), doing machine work of any sort, and welders. My God, you guys are great. If I have learned nothing in this process thus far, it's just how ******* hard your jobs are and just how easy it is for someone on the outside to mistakenly think it's easier than it is. Keep in mind that I've been building "decent" engines, myself, for the better part of about 15 years. I've been building stock ports and streetports to this point - not as business, but for my own consumption and a few friends.
With that said, I think the hardest part about this whole ordeal has been locating resources. As I said, I can build engines fairly well (I finally have the confidence to say that), but this project has taken me well beyond the skills I've acquired and utilized over the years. I can't weld - never tried and I don't have the equipment. I don't have machining tools or skills outside of the very basic. I've hated the very idea of using epoxy on an engine up to now and therefore, never bothered learning what's involved with that either. The bottomline is I've needed to find people that provide services for me and it's been a serious hit-n-miss affair. Some people are just: (1)clueless, (2) others are thieves, (3) others can't get over themselves/their skills and (4) others simply don't think a guy working on a rotary engine is important enough to take seriously. It is for those reasons that I've been having to learn as much as I have. At this point, I take all of these disappointments as "blessings in disguise". Maybe someday someone can come to me, and I pray that I won't be dick if that ever happens. (And if I am, please reference this thread and call me on it).
Anyway, I'm resisting the urge to ramble. I honestly don't know what people care about and what they don't, so let me just recap and move on. It's been a pretty hard road to get to this point and I'm not done, but I think I'm over the hump (knock on wood). I may have just jinxed myself by saying so, but I was really anticipating ******* up the epoxy and possibly having to change the current timing specs to cover up my mistake, but I was able to get through that part just fine. So I think I’ll be able to finish up my port-work in the usual fashion.
This will be my journal of sorts. I’d love to hear comments, suggestions and thoughts. I can take positive and negative, my skin is thick, but if you can, then please keep it civil and respectful. I’ll be adding the pics as soon as I can.
Thank you and even if it never helps anyone, I hope you enjoy.
1
Hi All,
I think I’ve cluttered Drifting Rex’s thread enough with my crap, and I have some time now so I decided to get off my duff and start my own.
This one goes out you, man. Do your thing and I want to see that thing running soon.Anyway, after a couple of years of thinking, planning, wishing and few attempts at trying to perform magic, I have started the process of actually doing this. I actually started this project several months ago and until my financial state stabilizes a bit, I have no reason to think that it will not be another several months before I finish. Also, I have to finish my brother’s MegaSquirt project first and that’s probably going to take me into August. I’ve been patient, so you guys will have to follow suit.
This port configuration has always intrigued me. If there is a body of information out there on it, I haven’t found it and it’s not a lack of trying. The best I could do was a few lines here and there and a few pictures from Japan and Judge Ito. However, after the unfortunate event of crashing my Rx-7 2 years ago, I got to thinking of getting off my *** and building a racecar. I decided to combine the 2 projects, so whenever this engine gets built, it will be going in my Rx-7. Though I do plan to turbocharge it some day, it won’t be anytime soon. For now I just want to build it, work out the kinks, tune it and start racing before I’m … like … 50.
Now before I start any history or self-promotion, let me officially state that I have the utmost respect for people that have made a living building race-level engines (rotary and piston), doing machine work of any sort, and welders. My God, you guys are great. If I have learned nothing in this process thus far, it's just how ******* hard your jobs are and just how easy it is for someone on the outside to mistakenly think it's easier than it is. Keep in mind that I've been building "decent" engines, myself, for the better part of about 15 years. I've been building stock ports and streetports to this point - not as business, but for my own consumption and a few friends.
With that said, I think the hardest part about this whole ordeal has been locating resources. As I said, I can build engines fairly well (I finally have the confidence to say that), but this project has taken me well beyond the skills I've acquired and utilized over the years. I can't weld - never tried and I don't have the equipment. I don't have machining tools or skills outside of the very basic. I've hated the very idea of using epoxy on an engine up to now and therefore, never bothered learning what's involved with that either. The bottomline is I've needed to find people that provide services for me and it's been a serious hit-n-miss affair. Some people are just: (1)clueless, (2) others are thieves, (3) others can't get over themselves/their skills and (4) others simply don't think a guy working on a rotary engine is important enough to take seriously. It is for those reasons that I've been having to learn as much as I have. At this point, I take all of these disappointments as "blessings in disguise". Maybe someday someone can come to me, and I pray that I won't be dick if that ever happens. (And if I am, please reference this thread and call me on it).
Anyway, I'm resisting the urge to ramble. I honestly don't know what people care about and what they don't, so let me just recap and move on. It's been a pretty hard road to get to this point and I'm not done, but I think I'm over the hump (knock on wood). I may have just jinxed myself by saying so, but I was really anticipating ******* up the epoxy and possibly having to change the current timing specs to cover up my mistake, but I was able to get through that part just fine. So I think I’ll be able to finish up my port-work in the usual fashion.
This will be my journal of sorts. I’d love to hear comments, suggestions and thoughts. I can take positive and negative, my skin is thick, but if you can, then please keep it civil and respectful. I’ll be adding the pics as soon as I can.
Thank you and even if it never helps anyone, I hope you enjoy.
1
 06-11-09, 03:10 PM
#2
Moderator
iTrader: (3)
Join Date: Mar 2001
Location: https://www2.mazda.com/en/100th/
Posts: 30,979
Received 2,686 Likes
on
1,901 Posts
neat, cant wait for pics!
 06-11-09, 03:23 PM
#5
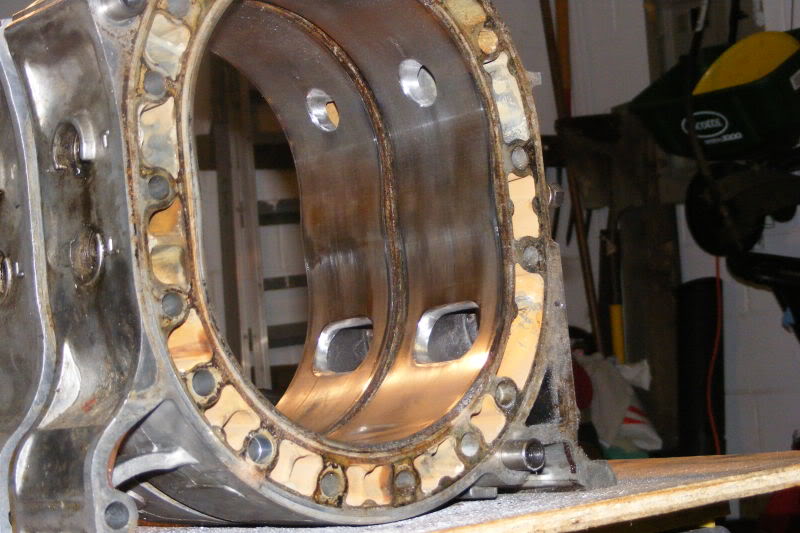
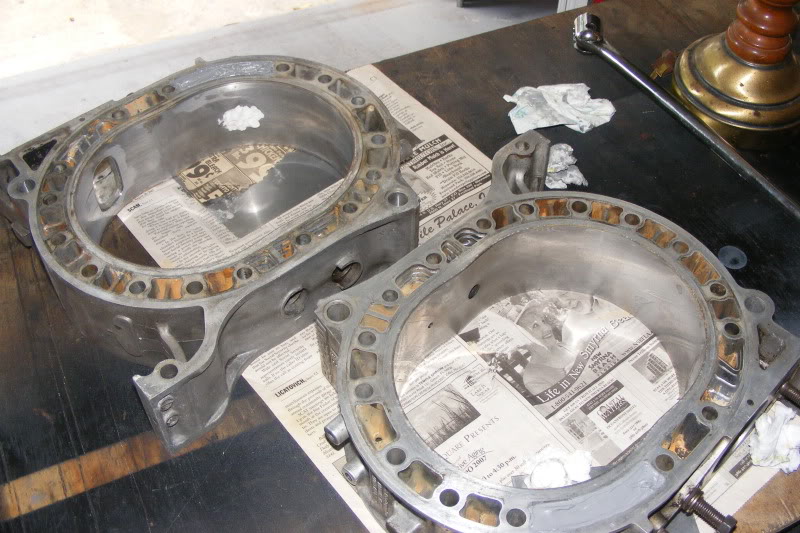
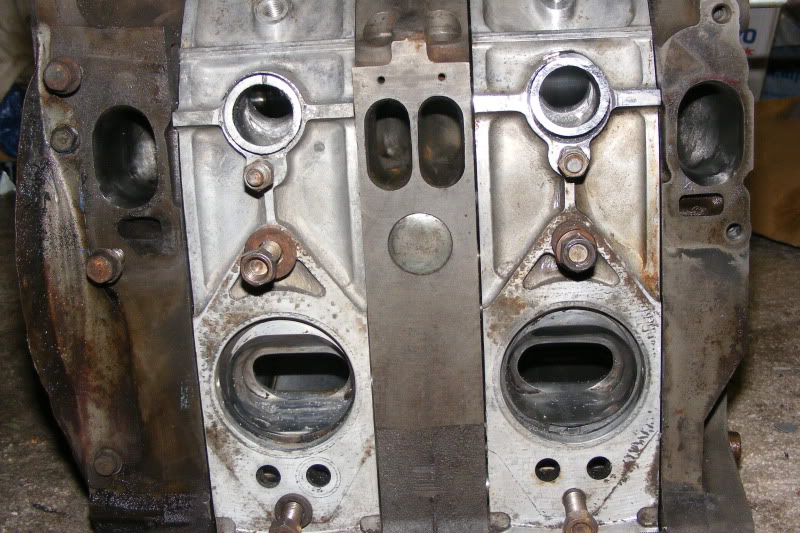
okay, before the really astute starts hassling me about the condition of the housings, let me say; "you're right." they're not in the best shape, but that's by design. here's where the history comes in.
these are the rotor housings from the very first motor i built back in 1994. it failed and my ignorance was to blame, but i thought it was fitting for them to help me through another major milestone in my rotary life. this is somewhat an experiment, so i'm not trying to go all out with cost. i couldn't justify hacking up new housings and until this thing takes it's first breath, i'm working with the assumption that i will fail. it's easier on my ego that way.
just be warned ... there will probably be some more photos that are not "pretty", but just keep in mind that i am aware.
 06-11-09, 03:35 PM
#7
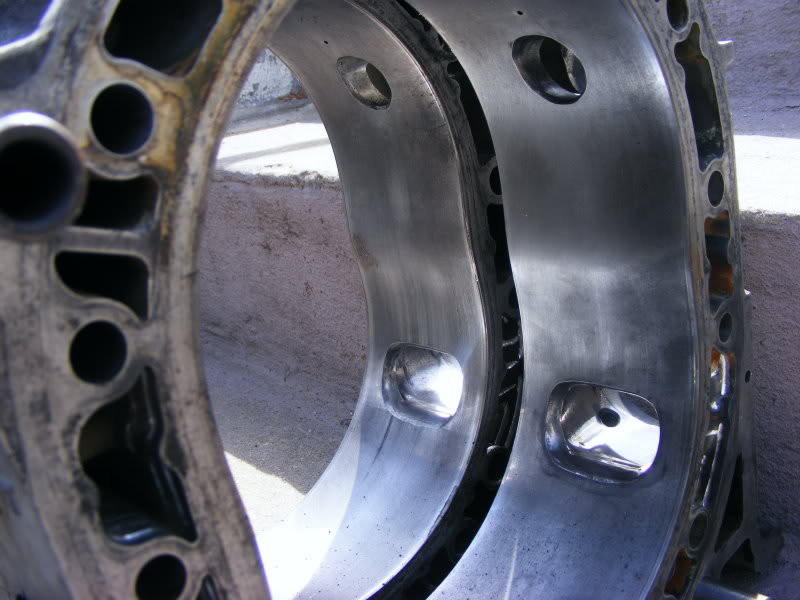
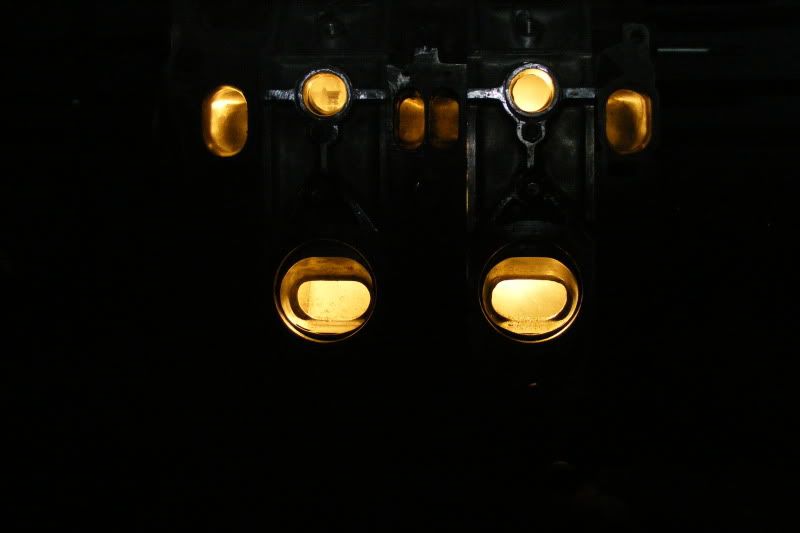
this is one of my favorite pics ... i'm actually thinking of finally changing my avatar.

by the way, if this thing seems a bit disjointed and disorganzied, it's because it is. like i said, i started this quite some time ago and i haven't been working steadily. my jobs takes me away from home for months at a time (though i'm trying to change this) and my engine parts sometimes make the trip with me, but sometimes they don't. so the photos will not be uniform.
by the way, if this thing seems a bit disjointed and disorganzied, it's because it is. like i said, i started this quite some time ago and i haven't been working steadily. my jobs takes me away from home for months at a time (though i'm trying to change this) and my engine parts sometimes make the trip with me, but sometimes they don't. so the photos will not be uniform.
Trending Topics
 06-12-09, 12:05 AM
#9
Rotary Enthusiast
nice job,lets keep this rolling....here are some of mine recently for my drifter 20B,similar type porting.I am telling you they work great and make tons of HP,you will have fun with these little ports.....keep up the good work.
Here is a crappy shot of my FC 20b semi p idle,sounds very nice and revs quickly....
Its a streetport with the semi p's but sounds a lot more like a big bridge......
http://vids.myspace.com/index.cfm?fu...elID=474924313
Here is a crappy shot of my FC 20b semi p idle,sounds very nice and revs quickly....
Its a streetport with the semi p's but sounds a lot more like a big bridge......
http://vids.myspace.com/index.cfm?fu...elID=474924313
06-12-09, 04:15 AM
#11
nice job,lets keep this rolling....here are some of mine recently for my drifter 20B,similar type porting.I am telling you they work great and make tons of HP,you will have fun with these little ports.....keep up the good work.
Here is a crappy shot of my FC 20b semi p idle,sounds very nice and revs quickly....
Its a streetport with the semi p's but sounds a lot more like a big bridge......
http://vids.myspace.com/index.cfm?fu...elID=474924313
Here is a crappy shot of my FC 20b semi p idle,sounds very nice and revs quickly....
Its a streetport with the semi p's but sounds a lot more like a big bridge......
http://vids.myspace.com/index.cfm?fu...elID=474924313
sweet Jesus, that thing sounded good. i love it. i hope to end up with the 13B equivalent of your 20B in terms of throttle response and quick revs. i combined mine with streetports, too. my reasoning is simply the fact that i have streetport experience, but none for bridgies. however, if it turns out to be a success, then i will eventually use bridges.
06-12-09, 04:23 AM
#12
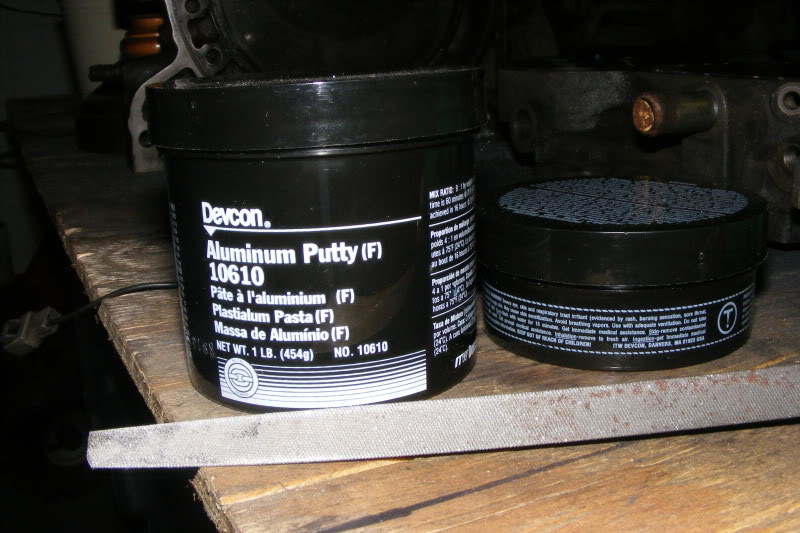
necessary? other than making sure the epoxy surface is flat and true to the rest of the rotor housing i'm not sure if it's necessary. i'd imagine if there is a reason it may be a heat-expansion-thing that prevents leakage from the water jacket, but i honestly don't know. i hope someone can answer this correctly.
however, to let you know why i'm going to do it is simple. all the full peripheral engines that i've seen the epoxy-work on have it, so i figured there's a reason for it and i chose to incorporate it in my semi. at this point the minutes of extra work doesn't really matter to me.
however, to let you know why i'm going to do it is simple. all the full peripheral engines that i've seen the epoxy-work on have it, so i figured there's a reason for it and i chose to incorporate it in my semi. at this point the minutes of extra work doesn't really matter to me.
06-12-09, 12:04 PM
#14
Very interesting idea you should have done it to a 6 port then have 8 ports! I can't wait to see the outcome of this. I would keep the peripheral ports breathing from a seperate runner from after the throttle body. Seperate from the other ports I mean. I would think they are going to puls at a different rate than the side ports I could also be wrong.
06-12-09, 02:10 PM
#15
Moderator
iTrader: (3)
Join Date: Mar 2001
Location: https://www2.mazda.com/en/100th/
Posts: 30,979
Received 2,686 Likes
on
1,901 Posts
this is one of my favorite pics ... i'm actually thinking of finally changing my avatar.
by the way, if this thing seems a bit disjointed and disorganzied, it's because it is. like i said, i started this quite some time ago and i haven't been working steadily. my jobs takes me away from home for months at a time (though i'm trying to change this) and my engine parts sometimes make the trip with me, but sometimes they don't. so the photos will not be uniform.
by the way, if this thing seems a bit disjointed and disorganzied, it's because it is. like i said, i started this quite some time ago and i haven't been working steadily. my jobs takes me away from home for months at a time (though i'm trying to change this) and my engine parts sometimes make the trip with me, but sometimes they don't. so the photos will not be uniform.
06-12-09, 02:23 PM
#16
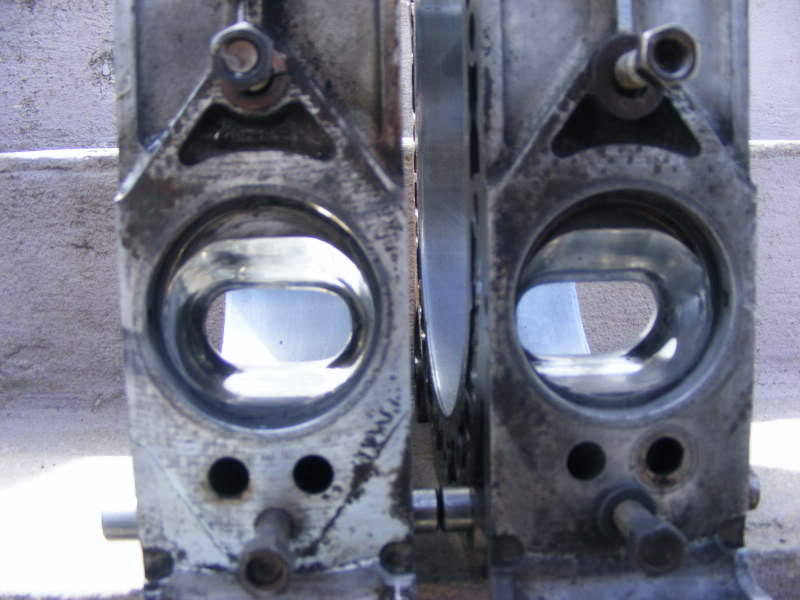
just a little more background on this thing:
i decided to build the semi-peripheral on a streetport base. it's an S4 engine. if you notice, it's 60% N/A and 40% T2. the N/A sections, as i mentioned, are from the first engine i ever built.
i still have major finishing work to do. i still have to put the final surfacing on the side ports and polish the exhaust ports. it kind of sucks because i actually have the time to do it, but i've been trouble finding the sanding rolls from my usual local sources and it seems like such a waste to order them online.
for the peripherals, i still have some transitioning to do, then i can do surfacing and such.
at this point, i think i've decided to leave it relatively rough (maybe 120, maybe 60). i could definitely do with some input on this.
also, due to the way decided to cut the ports, and my lack of true machining, the are some gaps where the port sleeve meets the port itself. most of them got filled when i put the epoxy in the passages, but there are still an existing few. i'll be honest, maybe inhaled too much of the stuff, but i find myself tempted to try using the epoxy to fill them. what do you guys think? i can justify leaving them alone simply because there's usually a gap between my exhaust ports and port inserts, but i don't know how big of a deal it will be on the intake side of the engine. again, input is welcome.
will continue to update as i am able.
06-12-09, 02:55 PM
#17
and coming from you, i'm really touched.Very interesting idea you should have done it to a 6 port then have 8 ports! I can't wait to see the outcome of this. I would keep the peripheral ports breathing from a seperate runner from after the throttle body. Seperate from the other ports I mean. I would think they are going to puls at a different rate than the side ports I could also be wrong.
8 ports, eh? well, i suppose if my front housing never broke i may have been tempted, but i took it as an opportunity to get some T2 secondaries instead. if i were experienced in flow testing, i'd look into it because it is an intriguing prospect, but without sounding like i'm ******* 6 ports, i've always preferred the 4 port engines.
as far as the intake design is concerned i have a few ideas. i even made a few sketches, but ultimately it will land squarely on what throttle body(ies) i end up with.
i had this knot in my gut the night i cut the ports. it was bloody ridiculous. i measured the timing a couple nights afterwards and i was sooo relieved to see that they were only 2� off. by the time i get to the final finishing on the ports themselves i actually may be able to get them even.
hopefully it doesn't kill performance too much, but i guess we'll all see.


 06-13-09, 10:32 AM
#19
Moderator
iTrader: (3)
Join Date: Mar 2001
Location: https://www2.mazda.com/en/100th/
Posts: 30,979
Received 2,686 Likes
on
1,901 Posts
you mean to decrease some of the overlap? if so, i agree with you on that. that was actually what i wanted, but due to my lack of experience on this type of port, machine work, etc., i was at the mercy of the tools and methods i had at hand. i'm already almost embarassed for when it comes time to take the pics of my tools and template and post them up.
i had this knot in my gut the night i cut the ports. it was bloody ridiculous. i measured the timing a couple nights afterwards and i was sooo relieved to see that they were only 2� off. by the time i get to the final finishing on the ports themselves i actually may be able to get them even.
hopefully it doesn't kill performance too much, but i guess we'll all see.
mine is a full pp, if you havent seen one its a little scary
06-13-09, 02:01 PM
#20
man, those things are jaw-droppingly gorgeous!
which actually brings up one of the things i wish i had done differently with mine. i wish i were able to have put the sleeves all the way through. it is something i plan to figure out for the next one though.
yeah, even if i unable to work them to identical timing, i'm not worried about it.
oh, i didn't realize that yours was a full pp. how far along are you with your engine?
which actually brings up one of the things i wish i had done differently with mine. i wish i were able to have put the sleeves all the way through. it is something i plan to figure out for the next one though.
oh, i didn't realize that yours was a full pp. how far along are you with your engine?
06-14-09, 01:37 PM
#22
Moderator
iTrader: (3)
Join Date: Mar 2001
Location: https://www2.mazda.com/en/100th/
Posts: 30,979
Received 2,686 Likes
on
1,901 Posts
engine has been together for a long time, intake manifold was just finished recently, i need a couple more little bits, and some wires and it'll run
06-24-09, 10:03 AM
#24
 that sucks, man. what happened with it? which epoxy did you end up using?
yeah, i'm making slow, steady strides with mine. i actually finished the ports last night. i'll need to check them with the degree wheel now just to see if i was able to attain identical timing. they ended up being a little bigger than i would have liked, but i think it'll be fine. it's just a product of the methods i employed. lessons learned ... what can i say?
my focus will shift to the rotating assembly now. i need to get a flywheel and some race bearings, but in the meantime, i'll polish my rotors and e-shaft, then it will be a matter of finding someone to balance everything. if i'm able to get my brother's car finished by August, then there's no reason this thing shouldn't be assembled shortly thereafter.
let me know how yours is going though. feel free to post as much (or as little
) as you want here.
06-24-09, 12:05 PM
#25
I used some epoxy that i got from work. This stuff is crazy strong (too strong). I looked up all the specs and it is stronger at 500 degrees than devcon is at room temperature. The problem is that it has very little expansion with temperature. I heat cured it at 170 degrees and while it was cooling i was admiring it, all the sudden i heard a loud high pitch pop. After a closer look you can see where it had popped loose from one of the sides. As the aluminum cooled and shrank the epoxy did not So i ground most of it out and topped it off with JBweld. I don't know how well it will hold but it looks nice.
I keep changing things up though. I am going to get one of those new RxParts semi p-port intakes and give it a try. I don't like the way i did my injectors on my old intake. They don't leak but i am just a perfectionist like that. I figure by the time i get back home i will have my old motor back together and have my good motor ready to put in after i work all the bugs out. I am going to keep the boost low for a while so i can get some seat time in though. I figure at about 25 psi i should run mid 9s all day long. Maybe sometime next year i will strech it's legs out and see what it can really do!
So i ground most of it out and topped it off with JBweld. I don't know how well it will hold but it looks nice.I keep changing things up though. I am going to get one of those new RxParts semi p-port intakes and give it a try. I don't like the way i did my injectors on my old intake. They don't leak but i am just a perfectionist like that. I figure by the time i get back home i will have my old motor back together and have my good motor ready to put in after i work all the bugs out. I am going to keep the boost low for a while so i can get some seat time in though. I figure at about 25 psi i should run mid 9s all day long. Maybe sometime next year i will strech it's legs out and see what it can really do!