When you click on links to various merchants on this site and make a purchase, this can result in this site earning a commission. Affiliate programs and affiliations include, but are not limited to, the eBay Partner Network.
Naturally Aspirated Performance ForumDiscussion of naturally-aspirated rotary performance. No Power Adders, only pure rotary power!
From the "12A" to the "RENESIS" and beyond.
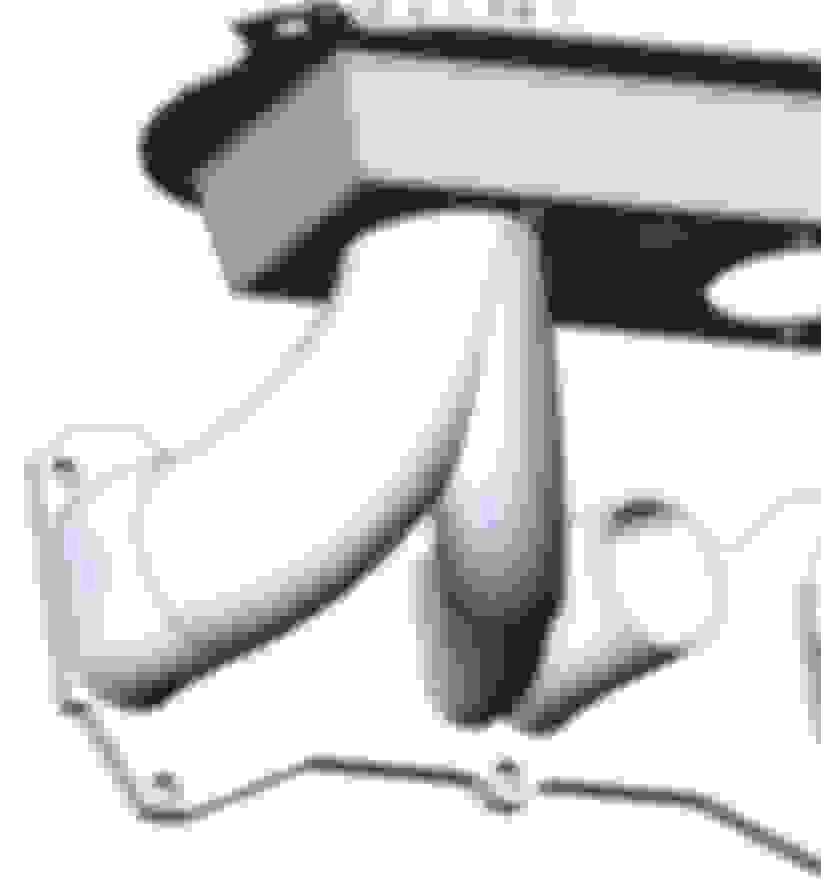
I dig the work and design but I've got to ask: why go to all that trouble with printed parts etc and then run the first leg of the manifold and runners perpendicular to the block when an RE/REW/20B already has their runners at a downward angle? Seems like a perfect use of printing to get a repeatable reduction in bends for the intake track.
more or less that I could do it and have access to the technology at the time, the idea was as straight shot as possible, with the porting there isn't much of a downward left its a pretty good straight shot in.
The irony is it didn't matter for the event as I took 1st in class, 12th overall (out of 68) and had some fastest 2wd times of the day, consistently top five 2wd. its just enough power to be competitive but that extra 30hp would really help on the long straight away sections.
now that I have the rotating assembly overbuilt the option to go full PP is on the table too, that just costs machining step + ceramic apex seals away, printing a manifold for that would be easy and even off the shelf ones are good for this too.
but first a quick compression baseline:
rear rotor is 86 87 90psi
front rotor is 87 86 79psi
when I built it and during break in it was closer to 105 rear 95psi front figured after some break in it may increase/equal out and it never made fantastic compression to begin with but for new rotor housings, front/rear iron brand new and all new hard seals this should be much higher, 110-125PSI range... so I may have overported this as it did want to eat the rubber buttons so I'm getting too much overlap and having a lack of engine compression because of this. Right now this is just a theory.
The other issue is the manifold design, needs smaller ID runners and less length so I will print a new section and run smaller air horns and retune and see if I can increase my peak power to help with shift points. I won't rebuild this until at least next year once I can see how a manifold re-re-redesign will work before doing anything because the car is competitive and I do miss racing so I may as well send it...
yeah, I agree on the manifold but didn�t want to rain on your parade. Because as it exists now the round tube diameter appears to match long axis dimension on the oval ports. Which means the velocity is too low. The equivalent round diameter for an oval port will be a dimension between the height axis and width axis of the oval, but then an oval shape will flow a little less than an equivalent round shape as well. Suggesting it could be smaller still without impacting maximum flow.
I�d also like to suggest that it�d also serve your purpose better if you designed it for the secondary ports to be piped directly & smoothly to each carb bore first, then design-pipe the primaries into the secondary piping at a steeper/smoother merge transition. Even if the primary pipes end up at a shorter length.
However when it�s all said and done, a 4 bbl manifold will likely be just as effective for anyone not wanting to involve 3D printing.
That is what I'm getting at too, too much volume in the manifold and its hurting my velocity. I should really build a DIY flow bench but with a toddler around I don't have quite the same free time unfortunately.
Ultimately this was an experiment based on an idea I had and I think the overporting is causing too much overlap and hurting compression because you spin the motor past TDC by hand. however it starts hot/cold almost instantly and has noticeable power over the old motor ( when it was dying ). these two things are fighting eachother right now too
4 barrel style work really good but I'm too far down the ITB rabit hole to go back.
but because its 3d printing I do have flexibility and now that the flange is welded up and 13b RE lower intake manifold gaskets are in stock again at mazda I am going to make some changes to the collector/transition by cutting off at a certain point:
its a bit rough right now but I'm printing a plastic one to do mockup:
I still may need to shrink the secondaries down in size but I want to see it in person and see, because I may just have my CAD goggles on. This time it will be no off the shelf elbow I will just print the new runners. this also comes at good times because the rules changed for the racing organization and now I can't have things sticking above the hood more than 15mm - which is a joke but it is what it is.
I’d suggest to you it doesn’t need to be any larger than 33mm ID to the primary and 44mm ID to the secondary, with a larger diameter matching the TB bore and tapering down to the secondary ID and primary merging off to the side of the larger taper area. However I’m basing that off different iron plates and am not sure of your specific port sizes.
The current one was based on the surface area being constant from the port entrance to the throttle body inlet, that is too much of a velocity drop, I wish I could jam a pito tube in there and measure air speed but it doesn't really work unfortunately. I think it came out to 1.5" and 2" but I need to check my old notes.
port is a mix of Australias extreme rotary template/pineapple large streetport on the front and rear and the center is a racing beat renesis streetport mixed with the pineapple racing race port.
if the revised manifold and shorter air horns don't increase my power and shift my peak power a bit higher I will just fill the ports and go full PP.
Cosmo ports/irons are a over kill for a na motor. Only reason the intake ports/runners are the biggest Mazda ever made was because Cosmo had forced induction. Where air speed didn't matter as much because it's forced in. I may suggest just using a off the shelf intake manifold from rb or peirce manifolds. They already did all the research and development on what works the best so u don't have to.. I think your low compression maybe due to side seal clearance. Aren't the rx8 side seals different from Rx7. I know they come already sized for length so u don't have to cut them. I think they are a shorter side seal also. If u do have to cut them yourself. Get a old junk rotor. With a Dremel sand paper bit on your drill press. So u don't bend the seal when cutting them. Double check your side seal grooves. The lightweight rotor machine work didn't leave much meat around the seal grooves.
The idea was that the cosmo RE parts are just the 2 rotor parts of the 20B which was going to be the next stepping motor, now that my racing organization has allowed 3 rotors. I figured take a small bite of the pie first and eat the rest later when ready. enjoy this and dial the system in a bit first.
Currently there are no off the shelf (non semi PP) manifolds for the cosmo RE motor. For the side seals I went as tight as possible which has been the issue on my non renesis motors in the past. I kept it around .0035-.0055" clearance on this motor. I know how to clearance side seals and did that same trick by using a cut up renesis rotor as a jig in the drill press and run a low speed. I even dressed stones from mcmastercarr so it was the same ID as a corner seal to fit nicely in the slot and give it that perfect shape. Some people argue that the renesis needs a higher tolerance .007"+ but in general it is difficult to measure these side seals as they move on a taper (also the keystone shape) so depending how you push them down and how even you may have the seal your measurements may vary (is what I found). The porting idea was high rpm high overlap to support the high volume but it didn't quite work as planned. If I want an off the shelf manifold I can re-prep my old t2 motor, part out this motor at a huge loss and salvage the FD rotor housings basically but I'm not at that point yet.
I won't be opening up the motor until the end of next year, next events are ice & snow anyways so 170whp is going to be plenty then go from there.
The other spot I think you are dropping intake runner flow and velocity at is your entry from the intake manifold to the side housings.
The whole idea of the 13B-REW and RE port runners is to have half the manifold bend in the side housing and half in the manifold for more room for the turbos.
By having your manifold flow straight into the port runner you are causing 2 issues I see.
1) your manifold runner is too large even at the oval straight section ahead of the port (the port runner face is actually a cross section of a tube bend).
2) you are also pointing flow at the wrong part of the port. The flow hitting the top of the port runner is being directed down instead of flowing along it as an inside radius as soon as it enters the runner and at the port runner bottom flow is being tripped into turbulence at the bottom of the port runner where the port runner drops down. Flow should point down the port runner (unimpeded) till it hits the bowl of the port where it is directed up and out of the port face.
If you do want a straight entry into the port runner, put a straight edge in the bottom of the port runners and match the manifold straight section to that 45 degrees.
But you might find that having one 45 degree bend in the manifold at the port runner flows better than one 90 degree bend ahead of the port runner and flowing straight (45 degrees down) into the port.
Because that is how the port was engineered to flow.
.
With it angled straight up through the hood and the max filter protrusion height rule it shortens the overall length even more. The intake runners can’t quite get away with as sharp as an angle into the ports for NA as it can for FI though, and I’m also not familiar enough with the chassis to understand the hood to engine clearance space either.
You might also consider that there are numerous options now for handling trumpets, air inlet boxes, and filters now than the old traditional way of the past as well.
and the link below is the source for many of the cast rotary engine manifolds, but they were hit hard by the Wuhooflu and the rotary section was supposed to be coming back online this past week. You can image search “racecast rotary manifold” to see what should be on there though.
.015-.0025" was impossible to measure and always find it binding too much - everything I saw for renesis rotor/side seal details was conflicting information
Originally Posted by TeamRX8
and the link below is the source for many of the cast rotary engine manifolds, but they were hit hard by the Wuhooflu and the rotary section was supposed to be coming back online this past week. You can image search “racecast rotary manifold” to see what should be on there though.
it is no longer available, I had already contacted them - they have a semi PP cosmo 13BRE IDA style available but its only for semi PP, I don't think just running that as a side port only would benefit as the fuel injectors are more upstream so eventually that would just fill with fluid in the not utilized semi PP portion. there is 3mm of casting flash that you have to grind away too to uncover the PP ports.
I thought the part that has to ground away prevents the puddling issue on the semiPP port manifold? Being that’s why it’s cast that way in the first place? It was my understanding that the flash casting isn’t at the manifold face, but back at the junction with the Sec port runner.
I wouldn’t get hung up on equal length runners either given that the Pri & Sec port sizes and flow rates are different. I’m actually not a fan of joining the Pri-Sec together like that, which the different Pri-Sec port timing is going to impact harmonics of both ports imo. My preference is for them all to be separate; which on a 13B you get with a 4-bbl carb manifold or for a custom manifold I’d consider a 3-bbl setup with both Sec ports separate and a 3rd tube with the Pri paired, but split down the middle with a divider plate welded in for the 3rd barrel.
.
I thought the part that has to ground away prevents the puddling issue on the semiPP port manifold? Being that�s why it�s cast that way in the first place? It was my understanding that the flash casting isn�t at the manifold face, but back at the junction with the Sec port runner.
I wouldn�t get hung up on equal length runners either given that the Pri & Sec port sizes and flow rates are different. I�m actually not a fan of joining the Pri-Sec together like that, which the different Pri-Sec port timing is going to impact harmonics of both ports imo. My preference is for them all to be separate; which on a 13B you get with a 4-bbl carb manifold or for a custom manifold I�d consider a 3-bbl setup with both Sec ports separate and a 3rd tube with the Pri paired, but split down the middle with a divider plate welded in for the 3rd barrel.
.
I thought it was at the flange, if thats the case and its inside the runners then everything is fine and I will probably pull the trigger on that and try.
please verify by direct contact, because it may just depend on which manifold supplied by which company
Race Cast is now finally back online for their rotary IDA intake manifolds, no semiPP for your engine, but if you look at the other ones with that option you can see that they’re as I described.
yes but it doesn't describe where it was blocked off at, I wanted to be sure. I will print a new merge transition piece and re-dyno it and if I'm not satisfied I will give that manifold a try and if that doesn't yield good results I'll just overhaul the motor again or go back to a t2 block.
 10-19-22, 03:55 PM