When you click on links to various merchants on this site and make a purchase, this can result in this site earning a commission. Affiliate programs and affiliations include, but are not limited to, the eBay Partner Network.
Hey everyone, finally getting around to introducing myself after lurking on the forums for a while. I'm a new FD owner as of July 10th of this year. Picked up 1993 SSM out of Kansas City and took it all the way back to the Indianapolis area. Here's a picture of the car I took the day I got it, outside of a KC McDonalds!
The car is base trim with black leather seats. The previous owner kept it mostly stock except for aluminum AST, downpipe, midpipe, Racing Beat catback, Tokico shocks, Eibach springs, aluminum radiator (unknown brand), and a Pettit Racing ECU. It had ~120300 miles on the chassis and the rebuilt engine had ~1000 miles on it.
About 15 minutes into the drive home, the car threw a CEL! It seemed to be driving okay with no obvious signs of anything wrong so I pushed on until I got back to Indy, making sure to check over everything on the way home at each stop.
A few days after getting home, I finally had the chance to dive deeper into the issue. Turns out the O2 sensor was completely disconnected from the harness - the connector on the sensor side was completely missing! Replacing the sensor with an OE NTK unit got rid of the code and the car drove a bit better.
Since then, I have replaced engine oil, fuel filter, spark plugs, transmission oil, and diff fluid, but still yet to do coolant. The car was missing the front undertray so I replaced that with a brand new one direct from Mazda Motorsports. I have also rebuilt the shifter as there was a ridiculous amount of slop - the boot and bushings were basically completely torn apart when I got the car. I replaced a few of the turbo oil feed gaskets as there was a noticeable oil pool underneath the secondary turbo, coupled with a decent amount of white smoke coming from that area after shutting off the car and popping the hood. Replacing the oil feed gaskets (a huge pain in the rear) and cleaning up some of the caked on oil has led to less of an oil leak under the car but most importantly no more smoke!
Other than those maintenance items, I have made a few other modifications. I replaced the original thermoswitch with an FC 97C thermoswitch to help keep coolant temperatures lower. I installed a high flow catalytic converter to replace the midpipe that the car came with to try to tone down the sound, smell, and to be a little cleaner. I've also replaced the original plastic y-pipe with the 99-spec/Efini y-pipe to get rid of that coupler that seems to be a common failure point. Very recently, I installed a Power FC and updated the basemap it came with with some modifications recommended by the FC-Tweak software. The car runs quite a lot better than before, though I am still trying to work through a few idling gremlins. I am premixing with 8 oz of Idemitsu premix each time I fill up the tank, usually about ~15 gallons of 93 octane.
The next things on my to-do list are a coolant flush, vacuum hose replacement with silicone, replacing the clunking original pillow-ball bushings with new J-Auto bushings (awaiting shipping), and installing Sakebomb Garage's IGN-1A Ignition System. The rest of the interior definitely needs some love as well, but anything and everything engine related takes priority right now.
So far the car has been fun to work on and drive! The FD was definitely a car I knew I needed to get before the prices went absolutely crazy. I knew I'd be in for a little bit of work when I grabbed this one but so far it has been worth it, especially compared to paying 45k+ for a low mileage example. My plans for the car are to keep it OEM+, keeping the twin turbos, doing some upgrades to allow the car to perform at its best without adding tons of boost, and probably eventually add some 99 spec body parts to update the looks. There was also some water damage in the rear hatch underneath the carpet that came with the car that is becoming surface rust in certain areas. I found and fixed the leak but I will probably take the car to a body shop/restoration shop so they can address the damage/rust professionally and other surface rust in the fenders from rock chips, especially in the rear fenders.
This forum has been incredibly helpful thus far and has given me so much information to work with. I'd like to thank all the folks who have been here for 15-20+ years and still continuing to share information, develop products, and so much more for these cars. It's people like you that are still making these cars accessible to new guys like me. The car is still a little rough around the edges but it's getting better every single day thanks to all of you!
Welcome to the club. Before tackling the vacuum lines, I'd highly suggest grabbing the handy colorized diagrams from the 3rd Gen Sticky Thread, printing it and going through it one vacuum line at a time. Using a different color makes it a bit easier too, but that's up to individual tastes. Laminating the diagram is probably a good idea too
Most who premix usually run 1:100, so about 1oz of premix per gallon of fuel, give or take. I didn't see if you still have the OMP or not, but having a little extra premix certainly wouldn't hurt. I definitely feel your pain about the turbo inlet/outlet gaskets, the 20B's gaskets were the paper style like found between Upper and Lower Intake Manifolds. Unfortunately, when it comes to fluids, this style of gasket leaks if you look at them wrong. Common issue with BMWs too, hence their reputation for marking their territory.
With the turbos out of the car, new fluid and inlet/outlet gaskets are easy to make from Fel-Pro #3157 gasket material. By the way, you might want to look at your Oil Pan, as leaks are quite common at the mating surfaces due to the oil level being higher than the edge of the pan.
If you get stuck on something or need a hand, give me a holler. I'm on the south side of Indy.
Welcome to the forum!! I love the color and I would love to see more pictures of the car!! Sounds like you're doing all of the right things with the car! Well done thus far!
Welcome to the club. Before tackling the vacuum lines, I'd highly suggest grabbing the handy colorized diagrams from the 3rd Gen Sticky Thread, printing it and going through it one vacuum line at a time. Using a different color makes it a bit easier too, but that's up to individual tastes. Laminating the diagram is probably a good idea too
Most who premix usually run 1:100, so about 1oz of premix per gallon of fuel, give or take. I didn't see if you still have the OMP or not, but having a little extra premix certainly wouldn't hurt. I definitely feel your pain about the turbo inlet/outlet gaskets, the 20B's gaskets were the paper style like found between Upper and Lower Intake Manifolds. Unfortunately, when it comes to fluids, this style of gasket leaks if you look at them wrong. Common issue with BMWs too, hence their reputation for marking their territory.
With the turbos out of the car, new fluid and inlet/outlet gaskets are easy to make from Fel-Pro #3157 gasket material. By the way, you might want to look at your Oil Pan, as leaks are quite common at the mating surfaces due to the oil level being higher than the edge of the pan.
If you get stuck on something or need a hand, give me a holler. I'm on the south side of Indy.
I do still have the OMP, which is why I've been only putting in 8 oz of premix per tank. I wouldn't be opposed to bumping it up a little bit just to be on the safer side though. It's hard to believe that they used paper gaskets on the 20B. It was a huge pain putting in the copper crush washer "gaskets" for the turbo oil feed lines. I tried to do them with the turbos still installed and succeeded only after hours of struggling.
I may take you up on that offer! Couldn't hurt to have someone double checking my work, especially when I get around to doing the rats nest!
Originally Posted by mazdaverx713b
Welcome to the forum!! I love the color and I would love to see more pictures of the car!! Sounds like you're doing all of the right things with the car! Well done thus far!
Originally Posted by SETaylor
Welcome to the club! Silver is the best color.
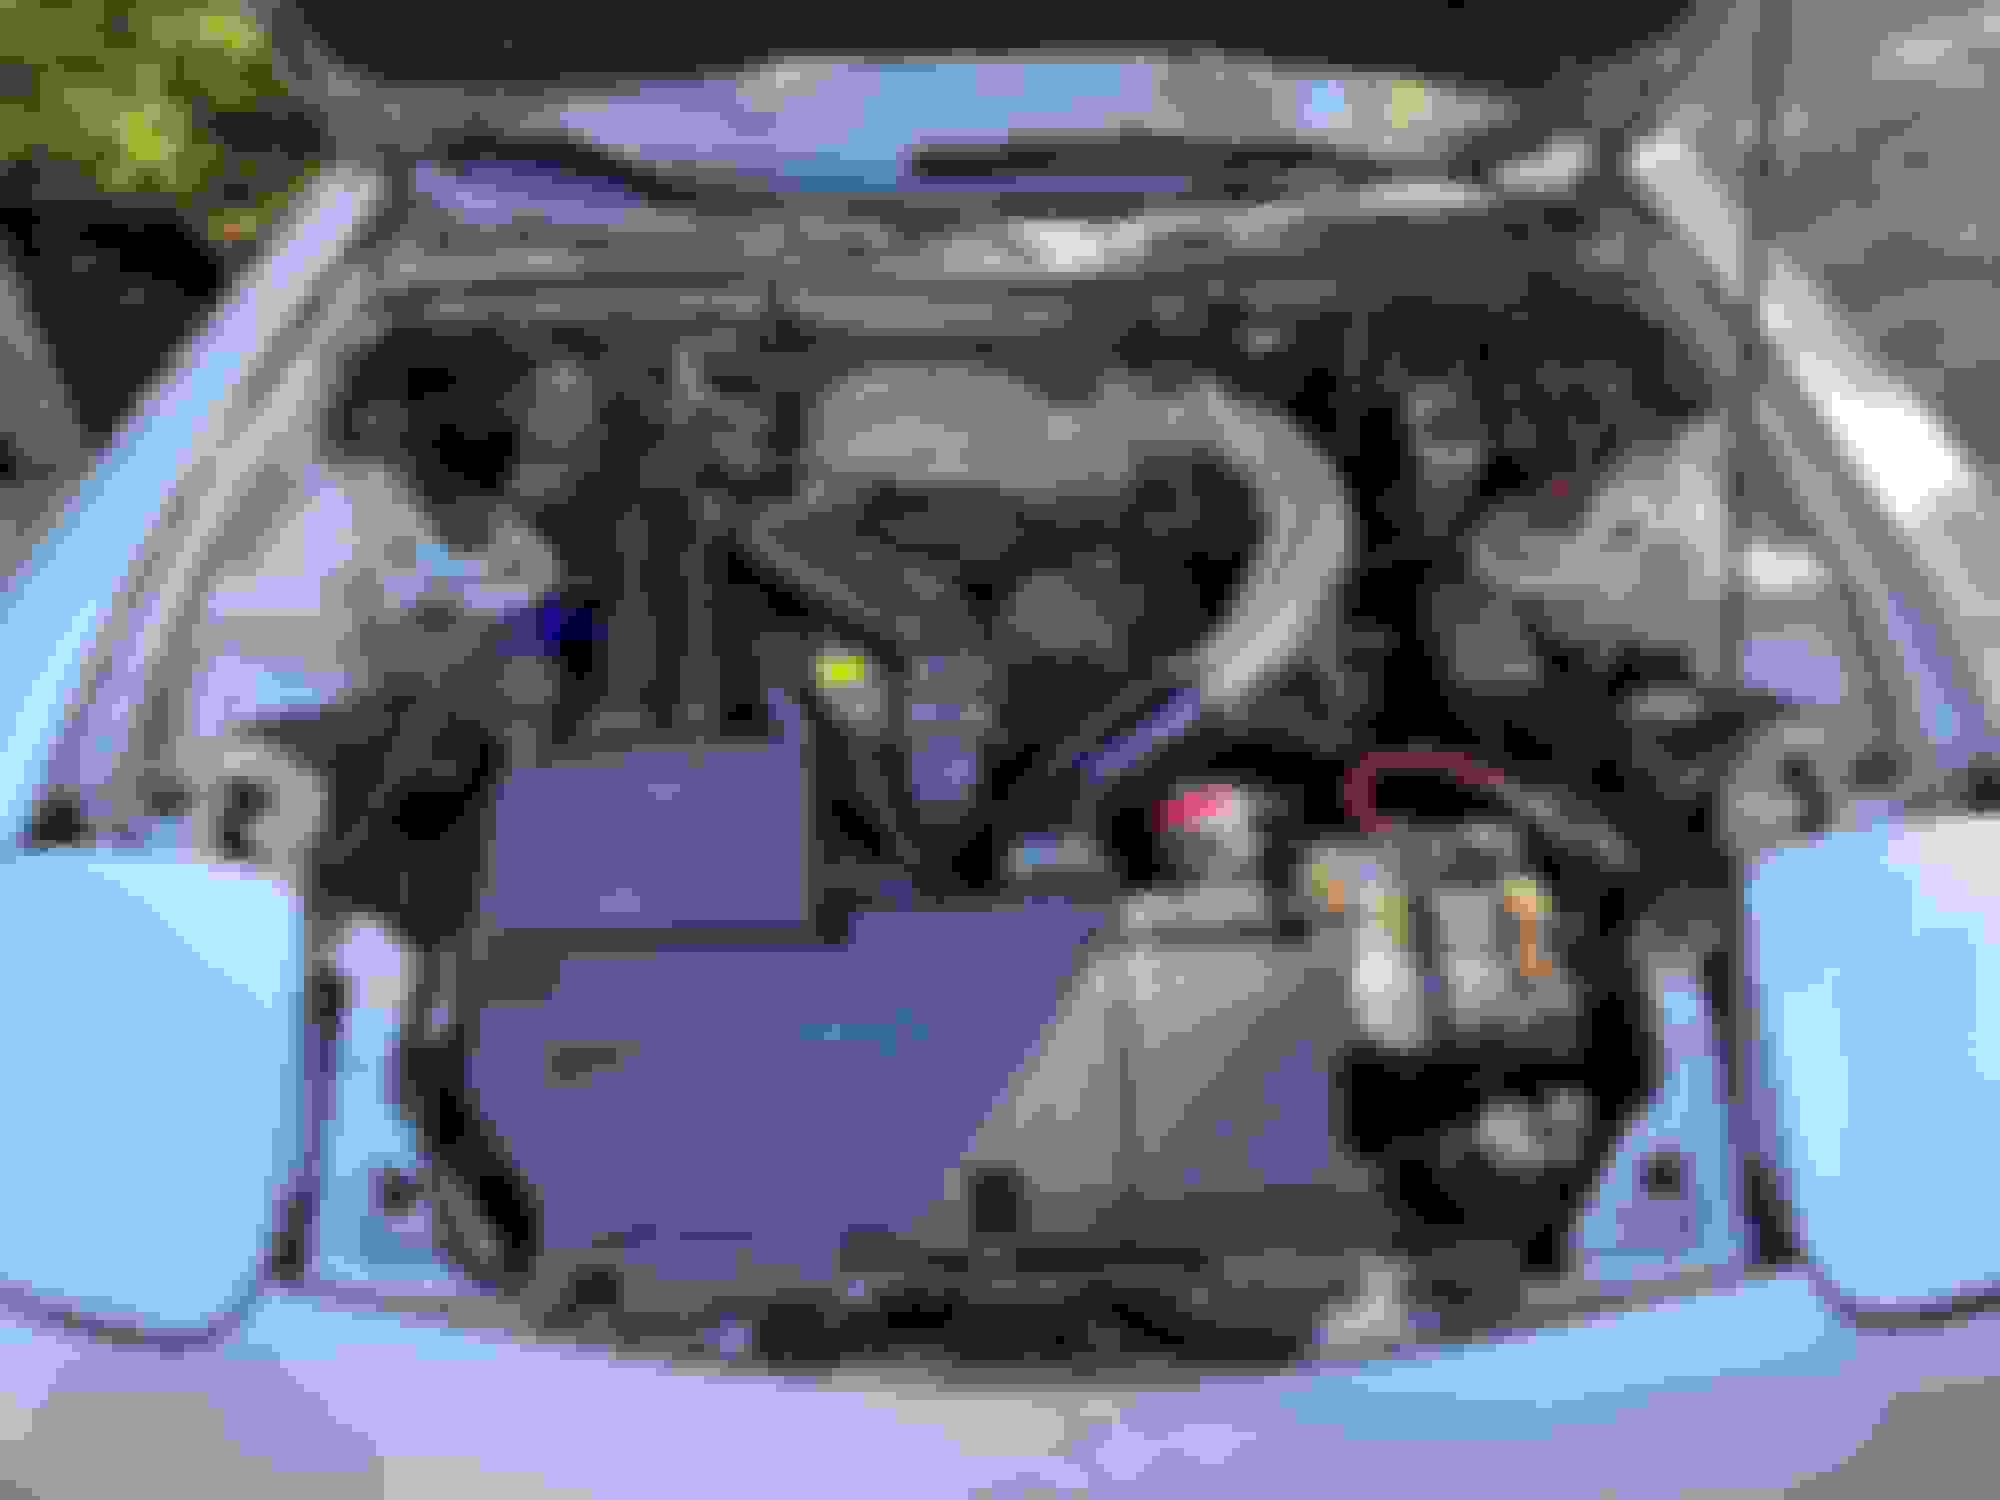
Thanks! I clearly need to do a better job of taking pictures - here are a few more. The engine bay picture is from before I did the 99-spec/Efini y-pipe installation. The picture with the water damage is how the hatch below the carpet looks. It's a little bit more spread out than I'd like to admit, but those other areas are more of a yellow color rather than the brown rusty color. I'm hoping that a shop can address this without too much issue.
I'll take some more pictures from better angles tomorrow!
On the plus side, the water/rust issue looks like a decent weekend DIY fix is quite doable. Paintscratch.com is the usual go-to source for most paint, and they'll have no issues whipping up a batch of SilverStone Mica for you since it's already in their database. Also, since it's under the carpet, imperfections won't be very noticeable unless you're in there to retrieve the spare tire and associated tools.
One thing I did notice is your positive battery terminal/connection. The original setup from the factory (made by Yazaki) secures the Main Fuse box in place using the positive battery terminal. Not exactly a great choice, making it difficult to repair if the terminal needs to be replaced, as you've found out.
Your current setup allows the fuse box to bounce around. Looks like there's an un-insulated connection right on the box, where the cable is bolted on. Bad juju there, all it would take is one big bump to short out on the hood. Pretty sure I have a Series 4 Fuse Box somewhere in the garage, I'll check tomorrow or Thursday. It's basically the same thing, just with traditional flange mount tabs and one extra Fuse slot on it compared to the stock FD box. Wouldn't be too hard to fab a bracket up so it stays put, a few minutes with a mig welder. Did a quick look on Ebay, seems like the underside connections are the same on both. At worst, connectors might need de-pinned and re-pinned to suit the retrofit to your liking.
Yeah I'm not very happy with the battery setup at all. The previous owner used what looks like a Group 80 battery instead of a Group 35, which I've read is the stock size. The original battery box is gone, but I'm hoping to find the parts to put back the original battery assembly. I've already found a lid and the original positive battery terminal and fuse box assembly, just need the sides of the actual box.
The FC commander reads battery voltage at 12.0V when in accessory. With the car idling, I'm seeing between 13.5V-13.8V. It seems a little on the low side compared to the 14V+ that I've seen talked about in other threads.
Welcome! High 13s look good for idle, you won't get 14V at idle except during cold start. As long as you are above mid 13's with fans running then you are good.
Yeah I'm not very happy with the battery setup at all. The previous owner used what looks like a Group 80 battery instead of a Group 35, which I've read is the stock size. The original battery box is gone, but I'm hoping to find the parts to put back the original battery assembly. I've already found a lid and the original positive battery terminal and fuse box assembly, just need the sides of the actual box.
The FC commander reads battery voltage at 12.0V when in accessory. With the car idling, I'm seeing between 13.5V-13.8V. It seems a little on the low side compared to the 14V+ that I've seen talked about in other threads.
Have you verified these readings against a voltmeter on the battery terminals? I call this the 4-state test and it will tell you if you have any starting or charging issues beyond any possible doubt. Here's what you should see.
Key OFF: 12.6v (Lower voltage here is a weak/undercharged battery)
Key ON: 12.5-12.6v (Less than this means excess Current Draw from stuff being on. Also reads low if Key OFF reads low)
Cranking: 10.0v or more (Reading lower means your Battery is failing under load, or Starter is drawing excessive current. Also reads low if Key OFF and Key ON read low)
Engine Running: 13.5-15.0v (13.8-14.4v is the usual "everything's good" range. Under 13.5v means a failing Alternator. 15.0v or more means the Voltage Regulator has failed)
Something else to note is that if your Battery is weak, the Alternator will try to "save" it by raising its output to the higher end of the acceptable range in a roughly proportionate degree. Around 14.6-14.8v in most cases. Here's a handy way of telling how charged your battery is:
12.6v: Fully charged
12.4v: 75% charged
12.2v: 50% charged
12.0v: 25% charged
11.8v: Completely dead.
After charging, if it reads Approx 2v less than ANY of the above, you have a dead cell and it's time for a new battery.
If the stock fuse box could be mounted solidly, it would solve quite a few concerns. I've never been a fan of the whole "fuse block ON the battery" setup, as it stresses the integrated positive battery terminal whenever you remove or reinstall a fuse. 13B/20B Cosmo has this too, and I just see it as failure waiting to happen. And $80+ for a new one isn't much fun either when only the terminal has failed. Been awhile since I looked in my Yazaki catalogs, but I'd imagine the bare terminal by itself is probably $5 or less.
 09-27-21, 09:20 PM