When you click on links to various merchants on this site and make a purchase, this can result in this site earning a commission. Affiliate programs and affiliations include, but are not limited to, the eBay Partner Network.
I'm fairly disappointed in this product. The fitment is awful and as far as I'm concerned, this thing couldn't support a welfare recipient much less a brake master cylinder. The wait for the product to begin fabrication as well as shipment was too long as well. Now let me just say I spent about an hour with this junk before I was fed up with it. My day job is an F-16 mechanic so I specialize in making big turds fit in tight spaces. Here are the issues.
FITMENT
This thing doesn't line up and here's why.
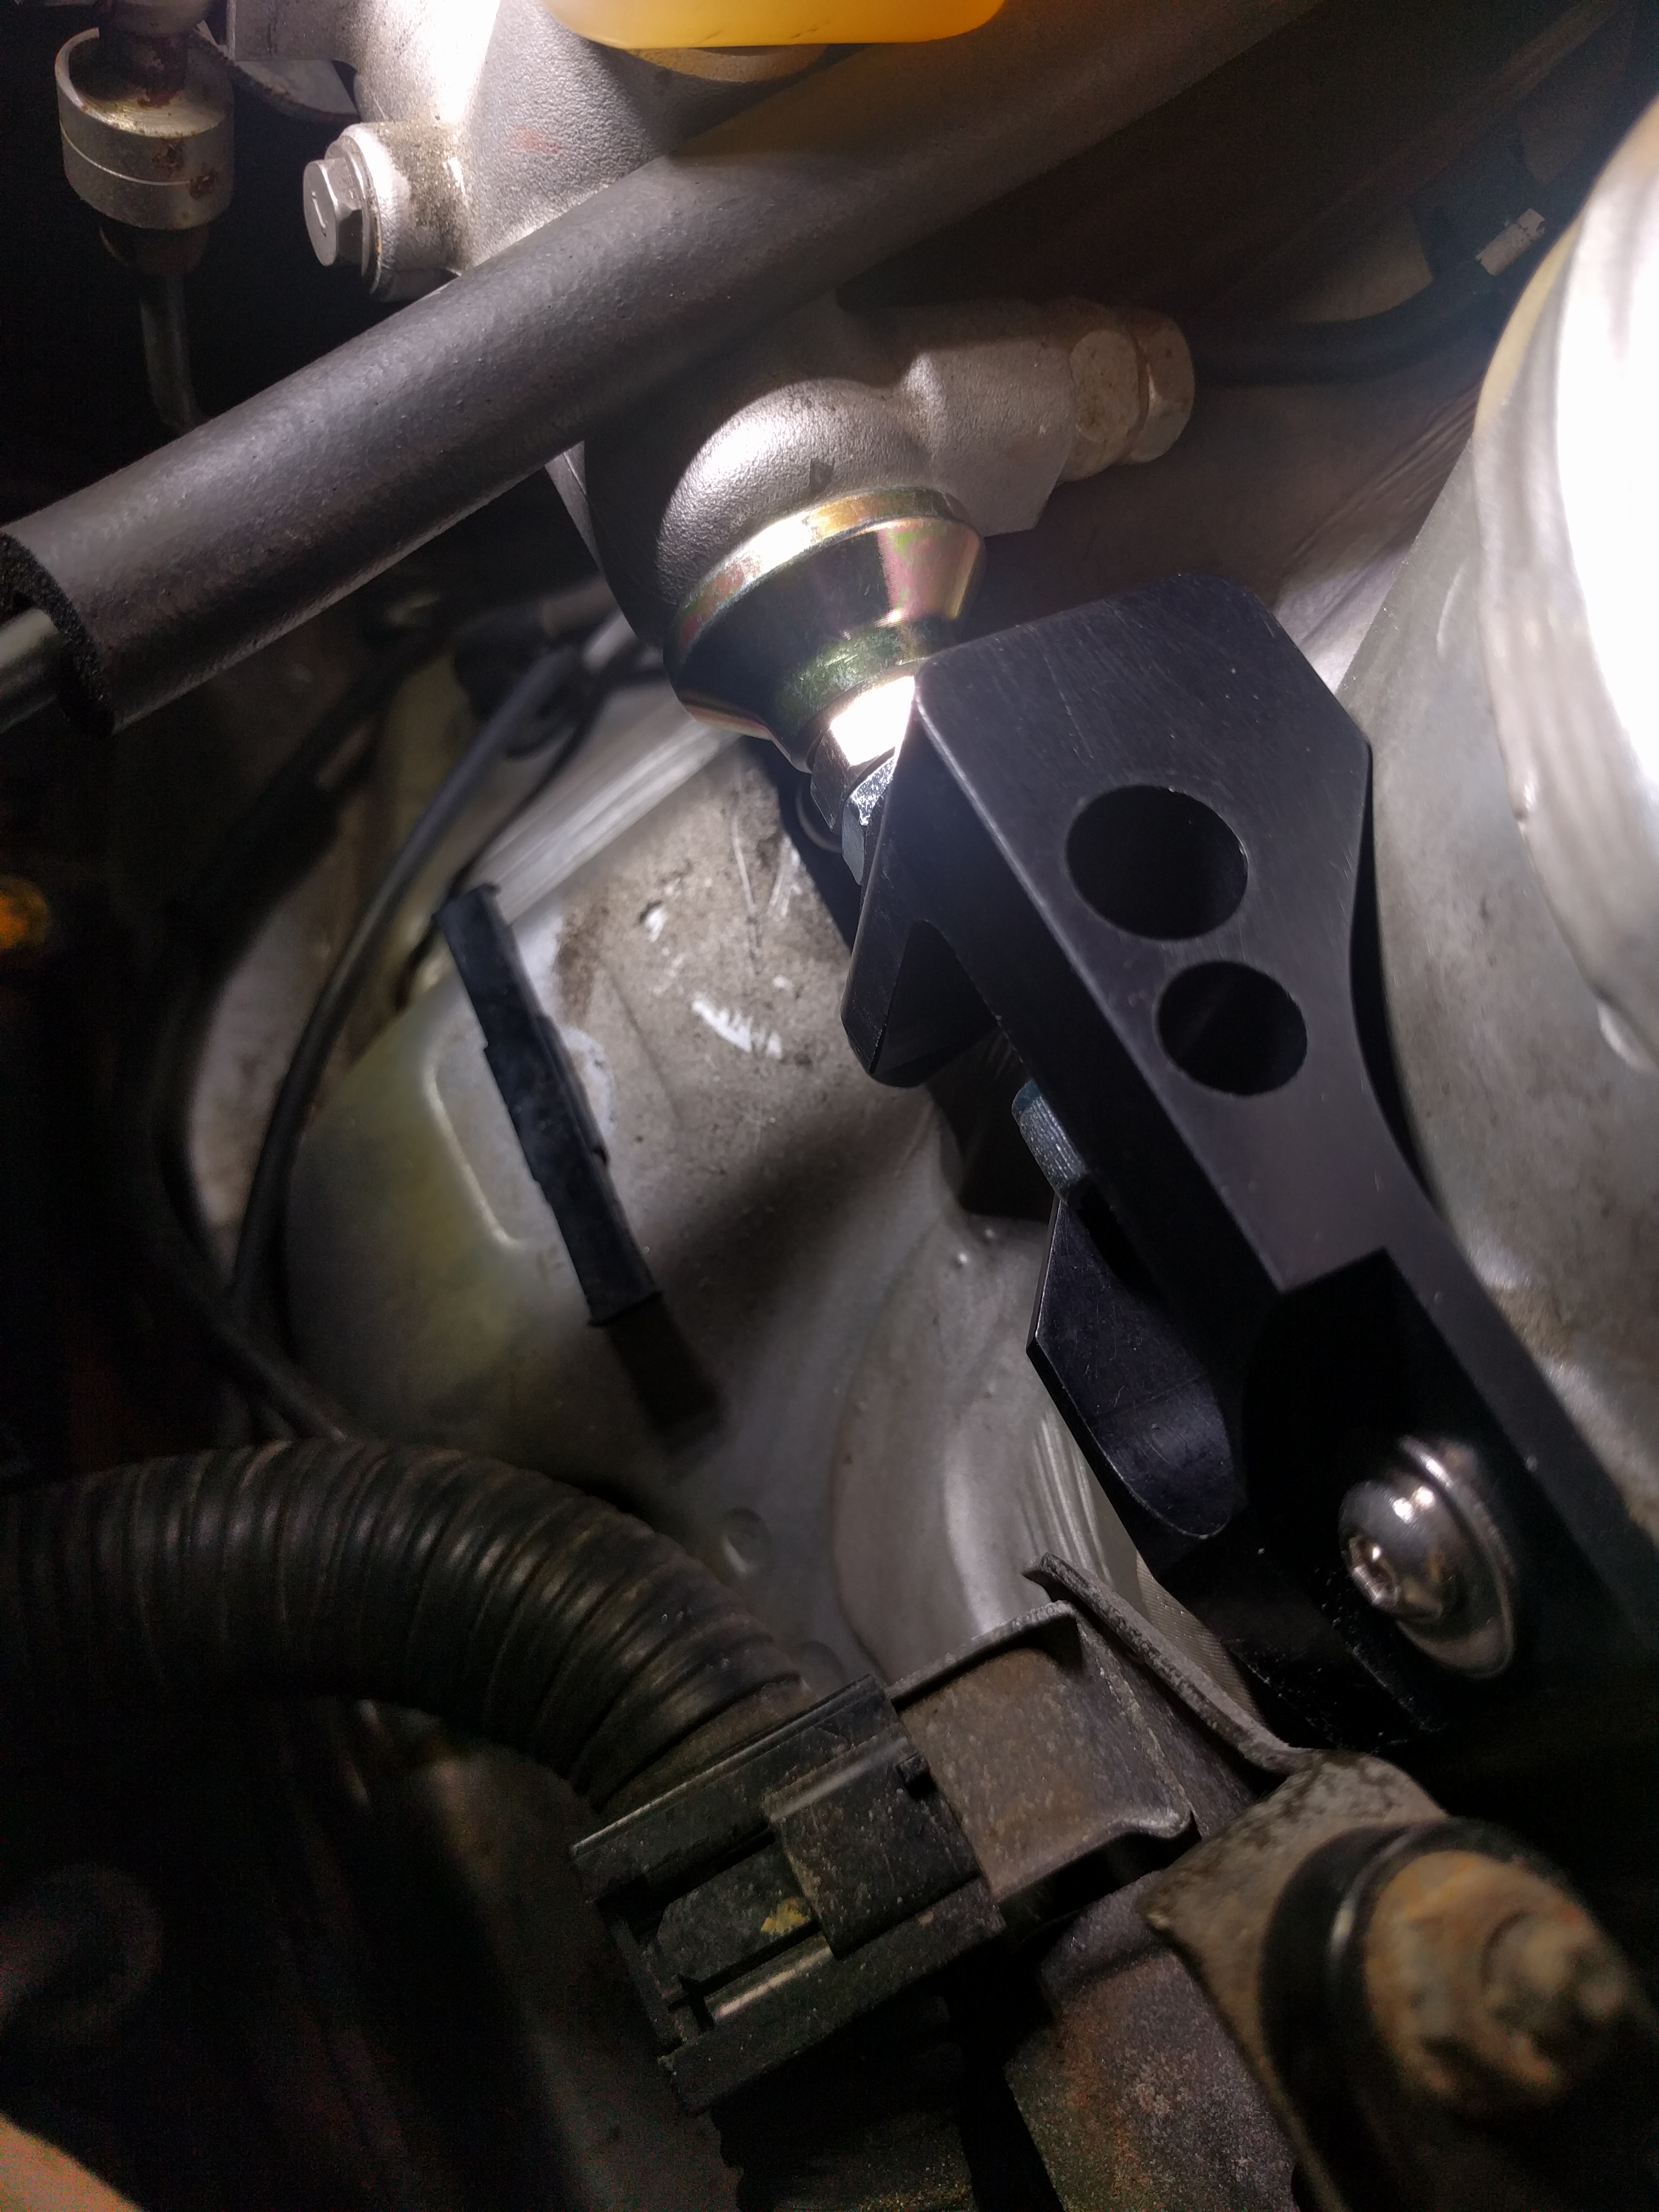
This ball ended stopper arm is a bad after thought. Once you begin to snug it up against the slightly rounded master cylinder end, it just flexes the head and falls out of the way.
The brackets need a redesign. The lower bracket needs to be machined longer. With everything in place and tightened down, it pulls the plunger out of the way of the master cylinder any which way you look at. After shimming it with two washers, it was closer, but not exactly precision.
The main bracket is where the junk really gets interesting. Hex head screw? Cool man, can you fit a hex head wrench that size in there? Absolutely not.
Stick with a normal bolt there so maybe we can stick a 1/4" socket in there unless you plan on providing shaved/shortened allen heads with the product.
Not only that, but I needed to shim this thing inboard with two washers so it isn't butted up against the shock tower.
The bracket itself needs two mount holes. There is a second hole below the one you mount it to. If the main bracket utilized this, it would be MUCH sturdier.
The jam nut for the plunger bolt seems like it should be a good idea. However with this big *** plunger on it, there is ZERO room to even adjust the junk with this thing put together. It just doesn't work.
This thing is more nut to butt than a than six dudes in the back of a convertible Chrysler PT cruiser.
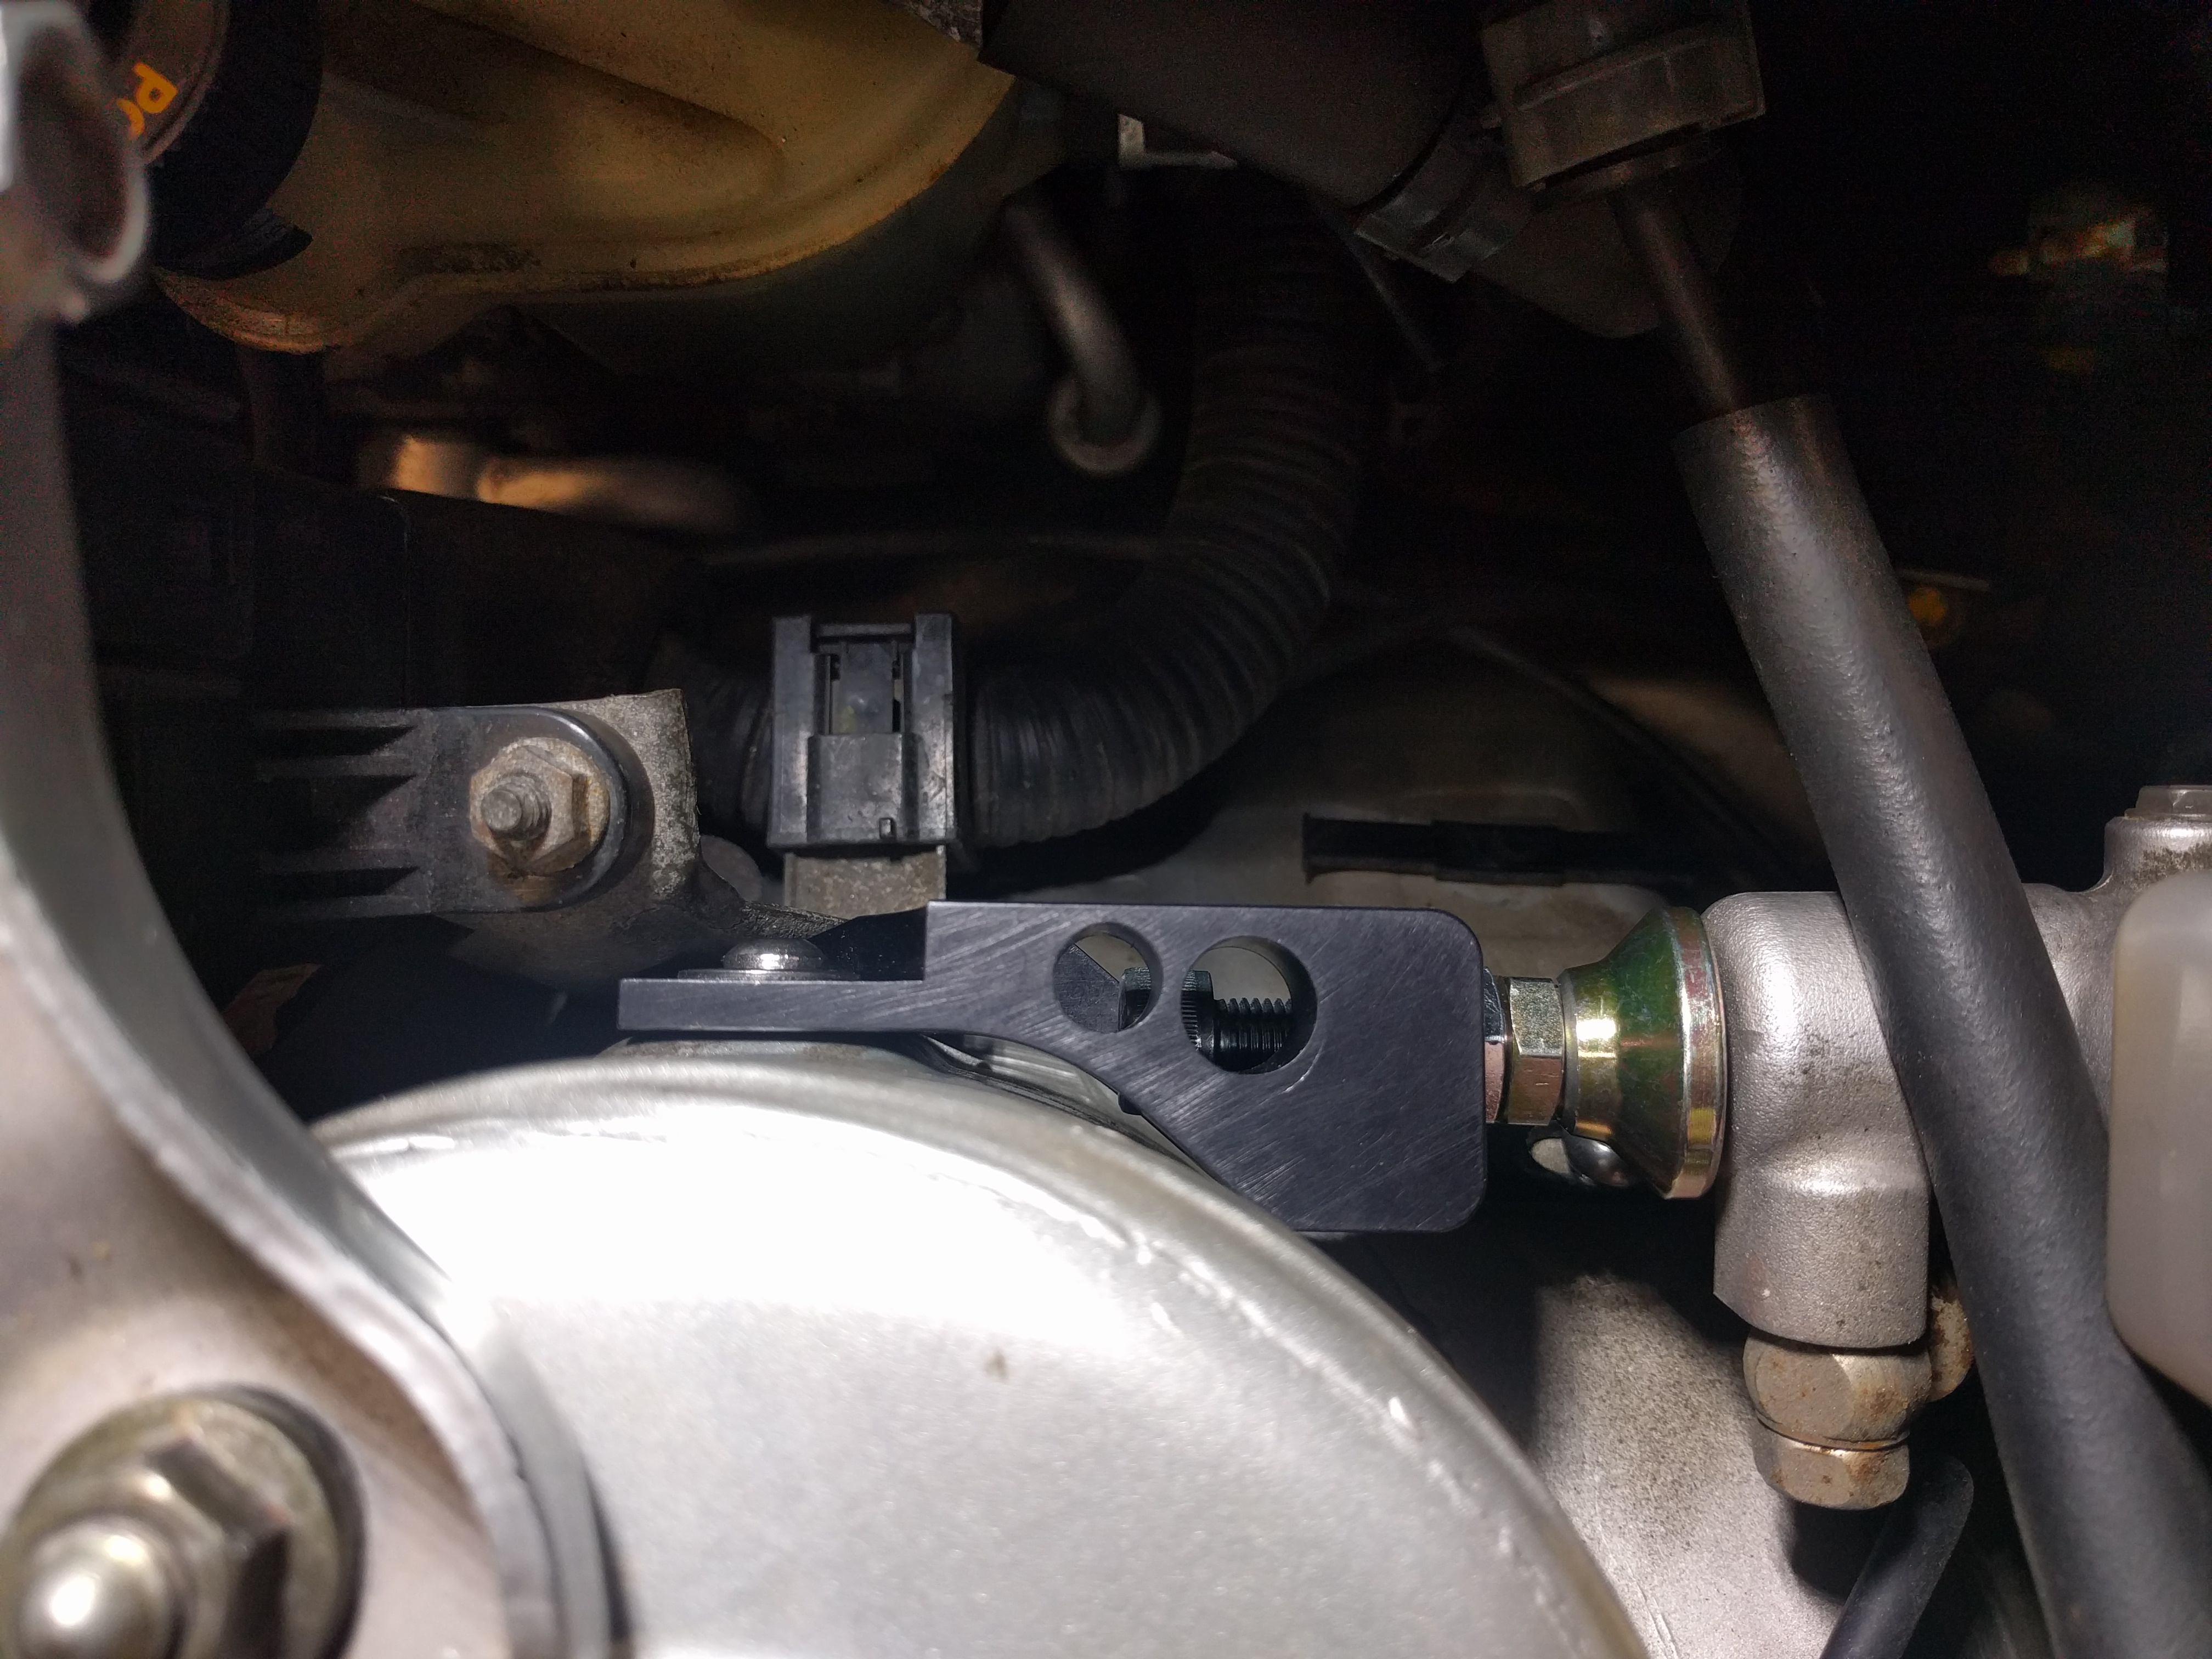
So because none of this junk lines up or properly adjusts even after shimming it with 4 washers, this is the end result.
This product needs some more development for sure.
TL;DR
Fitment sucks. The lower bracket is too short. The main bracket needs to be thicker up top to shim away from the shock tower with an additional lower mount hole. The plunger needs to be a solid end and not a flex end with a better locking set up. Plunger bolt needs to be a regular bolt and not an internal wrenching hex head.
The main bracket is where the junk really gets interesting. Hex head screw? Cool man, can you fit a hex head wrench that size in there? Absolutely not.
Stick with a normal bolt there so maybe we can stick a 1/4" socket in there unless you plan on providing shaved/shortened allen heads with the product.
This irritated me the most and seriously made the install a lot more time consuming than I thought it should have been since I thought I'd be able to do adjustments with that bolt. It's a super tight fit where both the nut and the plunger both just kind of rub each other and without being able to turn the hex bolt, it wasn't easy to make it fit.
While mine isn't dead center of my master cylinder either, it isn't as off as yours is. I'm on the OEM master cylinder, fwiw. I haven't actually had a chance to drive around with it to see if it pops out like yours did, but when I tested it in the garage it seems to have hold. I'll probably try recording it like you did in your video to see if it's actually bracing it.
The pic above with the white engine bay looks nice and it lines up and what not. You can see it doesn't line up in the red pic they provided, but at least with the old style plunger I think it would brace it better. I'm using an OEM master cylinder as well. "Install instructions" were supposed to be posted but it's pretty straight forward. Try to get the thing to line up, fail, curse the gods, make post.
I sent my email on the 16th and haven't got a reply or tracking yet.
I hope it fits better than that. If you look on their website they show 2 pics. This one seems like it lines up well:
This pic doesn't look like it lines up well.
I'm thinking that something must be different with this batch. The photos from the IR website seem to show a good fit around the shock tower, and plenty of clearance between the MC and the brace so that you can properly use the locking nut. I have just test fit mine so far, and I have the same gap between the brace and shock tower - it just contacts at 2 points - where it bolts up and at the very front closest to the MC.
If I keep this I will probably cut down the allen bolt so that it can be tightened with a wrench or find a shorter one. Maybe adding the swivel head while keeping the same bolt length created some of the fitment problems. Not sure about the relatively poor fit around the shock tower though when the stock photos look like they have a tight fit.
I did not receive any install instructions with mine at all, and I was wondering where the smaller bracket went until I saw the photos in this thread...
First off, I wanted to thank everyone for their patience. Everyone who emailed me their info like I requested has had their brace shipped out. Like I explained earlier, it was an issue with Paypal where many payments did not have the shipping address or what the payment was for with it. We sorted out as many of these was we could but with the volume of payments we receive on a regular basis, it is very difficult to match up an order with the customer's shipping address, real name, and forum name if the information is not visible in Paypal. The machine shop took much longer to manufacture these than we were originally told. We have just moved into our new shop. The past 3 months has been construction on the new building and setting up while trying to maintain some sort of workflow.
Second, it has been brought to my attention that several individuals have had some issues with installation and fitment. I'm not going to single anyone out, but if I have an issue with a product, my first thought is going to be to double check my work. If I still am having an issue I will contact the manufacturer. Posting derogatory remarks and slamming a product without contacting the manufacturer and giving them the opportunity to rectify the problem is the equivalent of a toddler throwing a tantrum. It is unprofessional and shows poor character. I will not do business with these types of individuals and will gladly take the product back and issue a refund.
Third, when this run of master cylinder braces was finished, we test fitted them in house before any were sent out to our customers. Because of the rush to get these out to everyone, we did not test them on a car with as 929 master cylinder. That is my fault. The issue is the new design stopper with the pivot base is longer than the original fixed stopper. We went with the pivot base to ensure a better fit against the master cylinder. When I ordered the hardware I give the company we dealt with the specs I wanted, and the stoppers came out longer than we requested.
As you see in the picture on the white car on our website, the brace fits pretty true with the stock master cylinder. As part of the design, it is intended to contact the shock tower. There should be no additional shimming required. All the necessary adjustment should be able to be achieved with the slotted bracket and stopper bolt. If there are issues with the fitment, I am willing to bet one of the following applies:
1. The car was previously in an accident. The brace is a tight fit and even a slight tweak of the frame can affect the way it sits.
2. An aftermarket master cylinder is being used. These were originally designed to fit with the Mazda OEM FD and 929 master cylinders only. The shape and size of an aftermarket master cylinder may vary and can affect the way the brace sits.
3. The master cylinder itself is not sitting straight. There is a bit of slop in the firewall bolt holes the master cylinder occupies. If the master cylinder was replaced, it may not be sitting correctly.
4. The firewall itself is bent. Mazda used very thin sheet metal in many areas of this car to save weight. The firewall is one of them. Stand in front of the engine bay and watch the firewall and brake master cylinder while an assistant presses hard on the brake pedal. You will see the movement I am referring to. With the age of these cars and years of hard braking some distortion of the firewall can be expected on some cars.
We stayed at the shop late last night and fitted the braces on 3 different cars. The only issue we found is the new style stopper is too long for cars with the 929 master cylinder. On cars with the stock fd master cylinder there were no issues with fitment. The braces in this run are identical to the last run we did, and we have had ZERO complaints in fitment. The only differences in this run are the following:
1.The new style stopper with the pivoting base. This was done for better fit. Because it is causing a clearance issue with 929 master cylinders, I will manufacture a run of the original fixed stoppers to replace these. The brace can still be installed in the mean time, but without the stainless steel jam nut. I will post a timeframe to get these to you shortly.
2.The hardware was changed to have socket button heads. This was done strictly for cosmetic reasons. Anyone wanting the original hex head hardware can contact me for a replacement free of charge. The long m10x1.25 bolt needs to be a hex head for clearance reasons. This bolt can be turned with a conventional 8mm ball end allen wrench. It does not need to be super tight. The bolt only needs to be weld stationary while the jam nut is tightened.
3.The shock tower bolt was made longer for easier installation. Not an issue.
Last, I apologize no instructions were provided with the braces. We had them on our old computer and this information was lost when we moved to our new shop. I will write up a new set of instructions and post them today.
Below are the following:
The brace from the original run installed on the white car.
The brace from this run installed on the red car.
The two braces side by side. The original is on the left, the new on right.
Thank you.
Ihor @ IR Performance
Last edited by IRPerformance; 08-23-16 at 11:12 AM.
Thank you for purchasing the IRP Master Cylinder Brace. This innovative product is designed to reduce flex in the firewall caused by heavy braking, therefore significantly improving brake pedal feel. Installation is relatively simple with basic hand tools. Factory bolt holes are utilized so absolutely no drilling or cutting is required.
Suggested tools and equipment for installation
Jack, jack stands, 10mm and 14mm sockets, ratchet, several extensions, 8mm, 5mm, and 4mm ball end allen wrenches, 16mm and 17mm combination wrenches.
Disconnect the negative battery cable.
Remove the shock tower brace if so equipped. The factory nuts take a 14mm socket. Reinstall the nuts before jacking up the car.
Raise the front of the car enough to get the front wheels off the ground. Support the car with jack stands.
Remove the intake elbow to the throttle body. This is secured by 4 m6x1.0 nuts to the throttle body. Remove these 4 nuts with a 10mm socket and loosen the hose clamp to allow the elbow to come out.
Remove the piece of body tape covering the factory hole on the inside of the shock tower if present. This hole is directly behind the fuse box.
Secure the IRP Master Cylinder Brace to the inside of the shock tower with the provide m6x1.0 bolt, 2 washers, and nut. Place the bolt through the hole, then install the nut from the inside of the wheel well. It may be easier to remove the driver’s front wheel and have an assistant give a hand here to hold one of the fasteners. DO NOT tighten this bolt fully yet.
Secure the support bracket to the existing un-used m8x1.25 threaded hole on the frame directly under the front of the master cylinder with a 5mm allen wrench This bracket is slotted for adjustment. DO NOT tighten this bolt fully yet.
Adjust the IRP Master Cylinder Brace so that the stopper is centered against the end of the master cylinder. The pivot base stopper can be adjusted with a 16mm combination wrench. Once it is centered, fully tighten both the m6x1.0 bolt and nut with a 4mm allen wrench and 10mm combination wrench. Tighten the m8x1.25 side bracket bolt with a 5mm allen wrench.
Screw in the m10x1.25 allen bolt on the IRP Master Cylinder Brace with an 8mm ball end allen wrench until the stopper rests against the master cylinder. While holding the bolt stationary, tighten the m10x1.25 jam nut with a 17mm combination wrench to lock the stopper in place.
Re-install the intake elbow and shock tower brace.
Carefully lower the car.
Enjoy the improved brake pedal feel!
Last edited by IRPerformance; 08-23-16 at 11:46 AM.
Thank you for purchasing the IRP Master Cylinder Brace. This innovative product is designed to reduce flex in the firewall caused by heavy braking, therefore significantly improving brake pedal feel. Installation is relatively simple with basic hand tools. Factory bolt holes are utilized so absolutely no drilling or cutting is required.
Suggested tools and equipment for installation
Jack, jack stands, 10mm and 14mm sockets, ratchet, several extensions, 8mm, 5mm, and 4mm ball end allen wrenches, 16mm and 17mm combination wrenches.
Disconnect the negative battery cable.
Raise the front of the car enough to get the front wheels off the ground. Support the car with jack stands.
Remove the shock tower brace if so equipped. The factory nuts take a 14mm socket.
Remove the intake elbow to the throttle body. This is secured by 4 m6x1.0 nuts to the throttle body. Remove these 4 nuts with a 10mm socket and loosen the hose clamp to allow the elbow to come out.
Remove the piece of body tape covering the factory hole on the inside of the shock tower if present. This hole is directly behind the fuse box.
Secure the IRP Master Cylinder Brace to the inside of the shock tower with the provide m6x1.0 bolt, washer, and nut. Place the bolt through the hole, then install the nut from the inside of the wheel well. It may be easier to remove the drivers front wheel and have an assistant give a hand here to hold one of the fasteners. DO NOT tighten this bolt fully yet.
Secure the support bracket to the existing un-used m8x1.25 threaded hole on the frame directly under the front of the master cylinder. This bracket is slotted for adjustment. DO NOT tighten this bolt fully yet.
Adjust the IRP Master Cylinder Brace so that the stopper is centered against the end of the master cylinder. The pivot base stopper can be adjusted with a 16mm combination wrench. Once it is centered, fully tighten both the m6x1.0 bolt and nut with a 4mm allen wrench and 10mm combination wrench. Tighten the m8x1.25 side bracket bolt with a 5mm allen wrench.
Screw in the m10x1.25 allen bolt on the IRP Master Cylinder Brace with an 8mm ball end allen wrench until the stopper rests against the master cylinder. While holding the bolt stationary, tighten the m10x1.25 jam nut with a 17mm combination wrench to lock the stopper in place.
Re-install the intake elbow and shock tower brace.
Carefully lower the car.
Enjoy the improved brake pedal feel!
Ihor has always been an asset to this community, and a stand up business owner. Anyone doubting his integrity or dedication to a quality product is greatly mistaken. I have worked with him several times and have always been satisfied with communication, turnaround, and quality.
Kudos for keeping your head cool and handling this situation with tact, Ihor
Thanks for the follow up and instructions. I'd be interested in purchasing the alternate style stopper. Haven't tried the install yet, but options are always good.
Wondering if little rubber glued to the end of the stopper would help prevent cylinder movement...
Apologies if I took my frustrations out on you. It was just upsetting to get such a hyped product and have so many issues fixing it. While I didn't intend to slander the product, it came more so as I did. I can have a dirty mouth when I'm mad :P
3. The master cylinder itself is not sitting straight. There is a bit of slop in the firewall bolt holes the master cylinder occupies. If the master cylinder was replaced, it may not be sitting correctly.
This was a contributing factor for me. While I have not replace the master cylinder in my ownership, upon loosening the two 12mm nuts for it, it sank down a bit. This allowed my adjustment to come closed.
Ball end hex is not a tool in my inventory [nor is a damn 16mm wrench apparently]. I was able to lock down the stopper to the hex before the install and then use the nut on the stopper move the bolt towards the master cylinder as required. A 5/8" wrench will be useful here if you lack a 16mm.
In order to keep the brace where I wanted it while I extended the stopper to contact the MC, I used a craftsman apex screw driver [fits like a damn fine tailored suit in the forward hole] in one of the holes to pry and keep the brace on center while I applied pressure to the MC. I then locked down the jam nut and tightened everything up. It fits "better" but still not 100%. I think I would have more satisfaction with the standard solid style stopper. While it didn't occur in my garage, I'm thinking it might flex out of place under hard braking at the track. I'll cross that bridge next month.
I was still required to shim the bracket inboard with 1 washer. This was to encourage a gap between the brace and the shock tower. Otherwise, I found it'll just scratch the **** out of your shock tower.
I "MIGHT" be able to remove the two shim washers on the lower bracket, but I'm just going to leave them there. A slightly longer bracket would still be nicer for a bit more give when adjusting. I still feel utilizing the lower "tape" hole would be helpful in the bracing and alignment as well.
Apologies if I took my frustrations out on you. It was just upsetting to get such a hyped product and have so many issues fixing it. While I didn't intend to slander the product, it came more so as I did. I can have a dirty mouth when I'm mad :P
This was a contributing factor for me. While I have not replace the master cylinder in my ownership, upon loosening the two 12mm nuts for it, it sank down a bit. This allowed my adjustment to come closed.
Ball end hex is not a tool in my inventory [nor is a damn 16mm wrench apparently]. I was able to lock down the stopper to the hex before the install and then use the nut on the stopper move the bolt towards the master cylinder as required. A 5/8" wrench will be useful here if you lack a 16mm.
In order to keep the brace where I wanted it while I extended the stopper to contact the MC, I used a craftsman apex screw driver [fits like a damn fine tailored suit in the forward hole] in one of the holes to pry and keep the brace on center while I applied pressure to the MC. I then locked down the jam nut and tightened everything up. It fits "better" but still not 100%. I think I would have more satisfaction with the standard solid style stopper. While it didn't occur in my garage, I'm thinking it might flex out of place under hard braking at the track. I'll cross that bridge next month.
I was still required to shim the bracket inboard with 1 washer. This was to encourage a gap between the brace and the shock tower. Otherwise, I found it'll just scratch the **** out of your shock tower.
I "MIGHT" be able to remove the two shim washers on the lower bracket, but I'm just going to leave them there. A slightly longer bracket would still be nicer for a bit more give when adjusting. I still feel utilizing the lower "tape" hole would be helpful in the bracing and alignment as well.
Sorry for being a dick.
Matt
Not a problem. As many others have said I stand behind everything I sell so if there are any issues I am always more than happy top do my best to resolve them. There is very little profit in making a small run of custom parts such as these. I do this to offer the community something no one else has.
As for the original fixed design stopper, I sent in an inquiry and am waiting for a time frame to manufacture.
If anyone has any issues or questions, please feel free to contact me at any time. irperformance@live.com
732-662-1794
98% of you guys should have received your brace. For the remaining 2% of you, I will start handling every individual case via phone to ensure everyone has received their brace. For some reason I have not received word, email or notification on verifying shipping address on the remaining 2%. Please call me if you have not received it and I will get you squared away that moment you call. Again thank you for your patience.
Andrew @ IRP
Last edited by IRPerformance; 08-25-16 at 04:41 PM.
98% of you guys should have received your brace. For the remaining 2% of you, I will start handling every individual case via phone to ensure everyone has received their brace. For some reason I have not received word, email or notification on verifying shipping address on the remaining 2%. Please call me if you have not received it and I will get you squared away that moment you call. Again thank you for your patience.
Andrew @ IRP
If you don't mind getting back to me with an update on my order I would appreciate it. I sent you 2 PM's and I'm not able to get a hold of anyone via telephone. Thanks.
If you don't mind getting back to me with an update on my order I would appreciate it. I sent you 2 PM's and I'm not able to get a hold of anyone via telephone. Thanks.
Hey pingu, If you read my previous post I asked everyone to EMAILirperformance@live.com their information and I just checked my email, and I have not received an email from you. Its very easy for a message to get lost in our PM inbox since we get a lot a day and there is no way of sorting the box so I asked everyone to email us using the Master Cylinder Brace as a subject line so I can keep everyone's emails organized. I have had the phone in my pocket all day and I have answered every call whether I am in the office or under a car. Please email me if your phone is not working. I will be here until 630 today.

 08-20-16, 04:36 PM