Summer 2010 Updates On My Bridgeported Turbo-NA Project
#26
Aaron, two questions that I have wondered about for some time and I respect your knowledge and reasoning. The first question is how come in about 95% of the cases, all of the turbo changes result in the owner clamping a breather on the turbo inlet. Why doesn't anybody spend the time routing ducting to a cold air source. The turbo's have to be breathing really hot air from the rad and intercooler as well as radiated from the hot side of the turbo. It just doesn't make sense to me to have ginormous intercoolers and huge turbos then handicap them by having them work with 200 degree air.
Secondly, I love what you did to your suspension, basically other than the shocks, springs and bars, its the same as the one in my race car. I replaced the toe steer links with fabbed ones using a male and female rod end. This allowed me a certain level of setup flexibility along with adjustable subframe camber link I have. Its a pretty low cost mod and allows for better setups. Maybe an idea for the future?
Comments?
Eric
#27
Aaron, two questions that I have wondered about for some time and I respect your knowledge and reasoning. The first question is how come in about 95% of the cases, all of the turbo changes result in the owner clamping a breather on the turbo inlet. Why doesn't anybody spend the time routing ducting to a cold air source. The turbo's have to be breathing really hot air from the rad and intercooler as well as radiated from the hot side of the turbo. It just doesn't make sense to me to have ginormous intercoolers and huge turbos then handicap them by having them work with 200 degree air.
Secondly, I love what you did to your suspension, basically other than the shocks, springs and bars, its the same as the one in my race car. I replaced the toe steer links with fabbed ones using a male and female rod end. This allowed me a certain level of setup flexibility along with adjustable subframe camber link I have. Its a pretty low cost mod and allows for better setups. Maybe an idea for the future?
Comments?
Eric
Secondly, I love what you did to your suspension, basically other than the shocks, springs and bars, its the same as the one in my race car. I replaced the toe steer links with fabbed ones using a male and female rod end. This allowed me a certain level of setup flexibility along with adjustable subframe camber link I have. Its a pretty low cost mod and allows for better setups. Maybe an idea for the future?
Comments?
Eric
OR
He prefers a cleaner engine bay.... lol
#28
Thread Starter
Engine, Not Motor
iTrader: (1)
Joined: Feb 2001
Posts: 29,793
Likes: 119
From: London, Ontario, Canada
The intercooler changes seem to have made a bit of a difference in turbo response. But the downside is that I have noticed a slight reduction in cooling to the radiator. I'll need to add a duct to the undertray.
Aaron, two questions that I have wondered about for some time and I respect your knowledge and reasoning. The first question is how come in about 95% of the cases, all of the turbo changes result in the owner clamping a breather on the turbo inlet. Why doesn't anybody spend the time routing ducting to a cold air source. The turbo's have to be breathing really hot air from the rad and intercooler as well as radiated from the hot side of the turbo. It just doesn't make sense to me to have ginormous intercoolers and huge turbos then handicap them by having them work with 200 degree air.
Secondly, I love what you did to your suspension, basically other than the shocks, springs and bars, its the same as the one in my race car. I replaced the toe steer links with fabbed ones using a male and female rod end. This allowed me a certain level of setup flexibility along with adjustable subframe camber link I have. Its a pretty low cost mod and allows for better setups. Maybe an idea for the future?
 I don't think my level of driving could benefit from an adjustable suspension.
#29
Thread Starter
Engine, Not Motor
iTrader: (1)
Joined: Feb 2001
Posts: 29,793
Likes: 119
From: London, Ontario, Canada
Just a quick little update that is too small for a thread of it's own.
THis winter I purchased a set of AWR engine mounts. However when I was testing the passenger side for fit, I found out that it didn't actually fit my car. THe wastegate runners on my turbo manifold run right past the stock mount and were too low, occupying the same space that the AWR mount wanted to take. So I put them aside for modification, but didn't actually get around to doing it...until now.
I grabbed a spare 2nd gen subframe and a bad center iron. Then I mounted the center iron to the subframe using the AWR mounts, and then welded support braces from the iron to the subframe. That way, the iron was locked in place and I could remove the passenger mount for modification.
The mount had to be lowered a lot, so first I cut it totally apart. I cut the upper part of the mount (the flange that bolts to the center iron) in half. Then I bolted in the bushing, held it up for a while, and decided where to tack it.
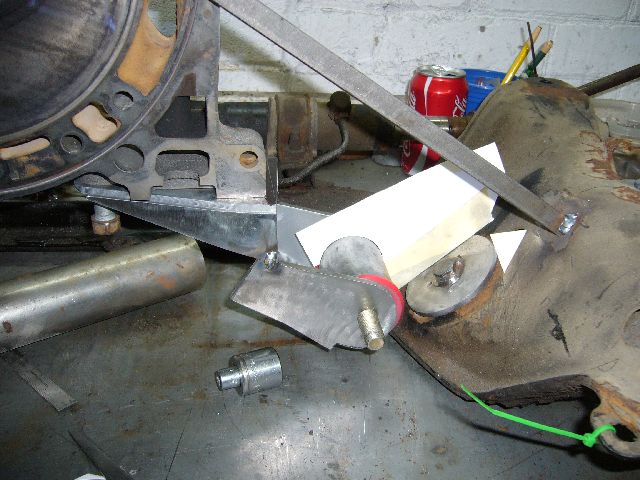
To connect the bushing to the subframe, I made a template out of cardboard before cutting any metal. The idea was to keep this part of the mount as low and away from the subframe as possible to eliminate any possibility of interference with the manifold runners, and to also keep it away from the heat.
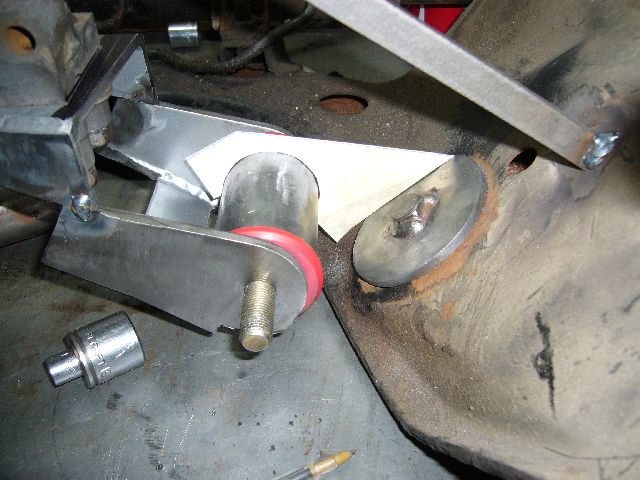
Once the steel was cut, everything was heavily tacked together. I did a lot of tacking to try and keep warp under control during final welding. Unlike rubber mounts, these have very little play so there isn't much room for adjustment once installed. Note that I also cut two little triangle pieces that connected to the oil pan area of the mount. This provides much more weld area for the piece bolted to the bushing.
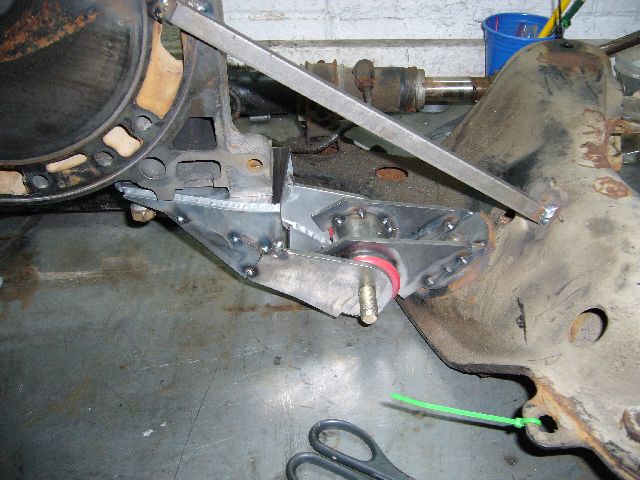
Because the mounts were powder coated from AWR, I sand blasted them prior to finish welding. Trying to TIG weld through powder coat is less then fun. I also welded a plate to the top of the subframe side of the mount for a bit more side-to-side rigidity.
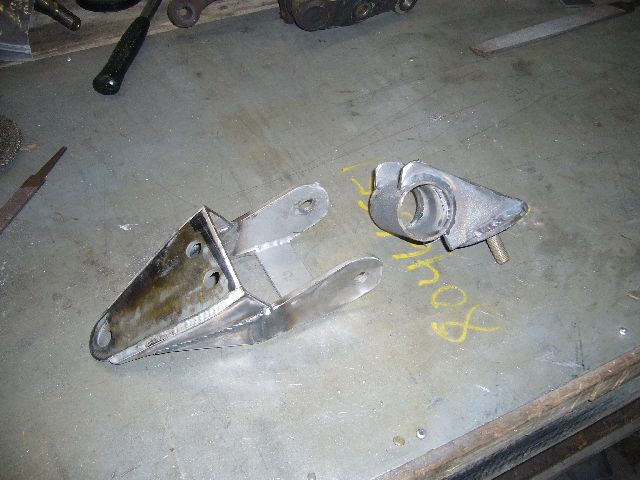
After another sand blasting (actually, I blast with copper slag) I painted the mounts up with silver POR-15 (which closely matches the AWR silver powder coating) and then pressed in the bushings.
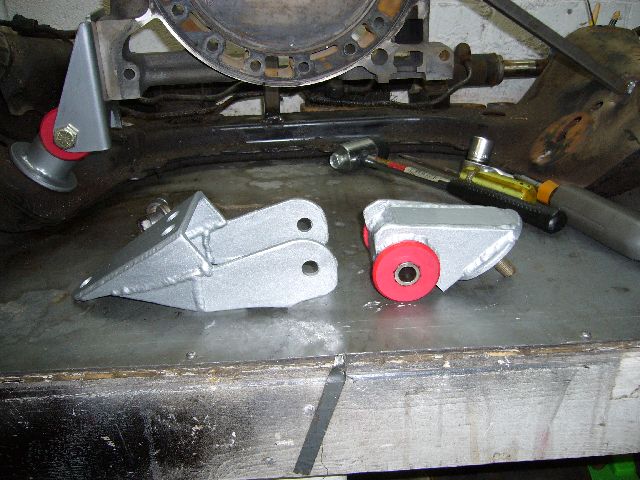
When the paint was dry, the mounts were installed on the car. It is such a pain in the butt to remove the stock driver side mount when the engine is in the car but the design of the AWR mount made installation very easy. The bottom bushing gets installed first but left loose. The top part then slips over the studs and onto the bottom piece before the bolt is passed through. I pre-assembled the passenger mount and then just angled it into place. Then I tightened up all the bolts and let the engine settle into place.
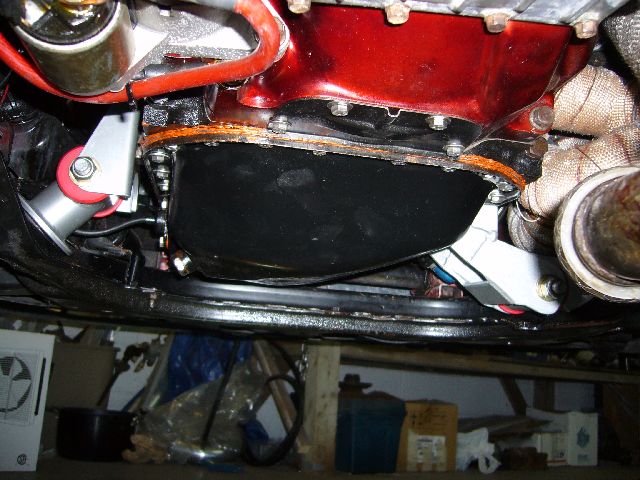
Any set of solid or poly mounts is going to transmit more vibration to the chassis, and I am definitely seeing more NVH (noise, vibration, harshness) under 3,000 RPM. But it is only a slight vibration and basically what I expected. Solid mounts used on stock port engines don't vibrate much at all. The engine is now held steady at all times, so the shifter feels far more solid. But best of all, the engine does not twist up an inch on the mounts at full throttle, which I know was stressing my solid rad pipes, intercooler piping, u-joints and transmission mounts.
THis winter I purchased a set of AWR engine mounts. However when I was testing the passenger side for fit, I found out that it didn't actually fit my car. THe wastegate runners on my turbo manifold run right past the stock mount and were too low, occupying the same space that the AWR mount wanted to take. So I put them aside for modification, but didn't actually get around to doing it...until now.
I grabbed a spare 2nd gen subframe and a bad center iron. Then I mounted the center iron to the subframe using the AWR mounts, and then welded support braces from the iron to the subframe. That way, the iron was locked in place and I could remove the passenger mount for modification.
The mount had to be lowered a lot, so first I cut it totally apart. I cut the upper part of the mount (the flange that bolts to the center iron) in half. Then I bolted in the bushing, held it up for a while, and decided where to tack it.

To connect the bushing to the subframe, I made a template out of cardboard before cutting any metal. The idea was to keep this part of the mount as low and away from the subframe as possible to eliminate any possibility of interference with the manifold runners, and to also keep it away from the heat.

Once the steel was cut, everything was heavily tacked together. I did a lot of tacking to try and keep warp under control during final welding. Unlike rubber mounts, these have very little play so there isn't much room for adjustment once installed. Note that I also cut two little triangle pieces that connected to the oil pan area of the mount. This provides much more weld area for the piece bolted to the bushing.

Because the mounts were powder coated from AWR, I sand blasted them prior to finish welding. Trying to TIG weld through powder coat is less then fun. I also welded a plate to the top of the subframe side of the mount for a bit more side-to-side rigidity.

After another sand blasting (actually, I blast with copper slag) I painted the mounts up with silver POR-15 (which closely matches the AWR silver powder coating) and then pressed in the bushings.

When the paint was dry, the mounts were installed on the car. It is such a pain in the butt to remove the stock driver side mount when the engine is in the car but the design of the AWR mount made installation very easy. The bottom bushing gets installed first but left loose. The top part then slips over the studs and onto the bottom piece before the bolt is passed through. I pre-assembled the passenger mount and then just angled it into place. Then I tightened up all the bolts and let the engine settle into place.

Any set of solid or poly mounts is going to transmit more vibration to the chassis, and I am definitely seeing more NVH (noise, vibration, harshness) under 3,000 RPM. But it is only a slight vibration and basically what I expected. Solid mounts used on stock port engines don't vibrate much at all. The engine is now held steady at all times, so the shifter feels far more solid. But best of all, the engine does not twist up an inch on the mounts at full throttle, which I know was stressing my solid rad pipes, intercooler piping, u-joints and transmission mounts.
#31
Thread Starter
Engine, Not Motor
iTrader: (1)
Joined: Feb 2001
Posts: 29,793
Likes: 119
From: London, Ontario, Canada
I don't notice any difference with the change in gearing, but the LSD means that the rear is always more planted. I can be far deeper into the throttle without worrying the rear will come around, and 3rd gear really digs in now. I'm still losing traction on the 3rd to 4th shift, though less so now.
#32
Rotoholic Moderookie
iTrader: (4)
Joined: May 2002
Posts: 5,962
Likes: 33
From: Ottawa, Soviet Canuckistan
As my Irish office-mate says, "F-ing Brilliant!"
Still impressed as ever. Can't wait to see this thing in person Aaron. She has turned out to be quite the beauty, and the attention to detail still amazes me.
Jon
Still impressed as ever. Can't wait to see this thing in person Aaron. She has turned out to be quite the beauty, and the attention to detail still amazes me.
Jon
#33
Thread Starter
Engine, Not Motor
iTrader: (1)
Joined: Feb 2001
Posts: 29,793
Likes: 119
From: London, Ontario, Canada
Thank you!
Though it looks like I will be pulling the transmission to swap either the whole clutch assembly or just the pressure plate, becuase it did nothing but slip last night at St. Thomas Dragway. Best I managed was a 13.03 @ 114.
Though it looks like I will be pulling the transmission to swap either the whole clutch assembly or just the pressure plate, becuase it did nothing but slip last night at St. Thomas Dragway. Best I managed was a 13.03 @ 114.
#34
I don't notice any difference with the change in gearing, but the LSD means that the rear is always more planted. I can be far deeper into the throttle without worrying the rear will come around, and 3rd gear really digs in now. I'm still losing traction on the 3rd to 4th shift, though less so now.
#36
Thread Starter
Engine, Not Motor
iTrader: (1)
Joined: Feb 2001
Posts: 29,793
Likes: 119
From: London, Ontario, Canada
Much, much too slow. The first run last night was highly disappointing. As soon as I went hard into 3rd gear, the engine just flew to redline as the clutch slipped. Over the next few runs I kind of figured out how to baby the clutch and was able to run 13.1s, 13.0s and around there by lazily shifting into 3rd and 4th. Even on a lazy shift, the engine RPM would kind of "slosh" down when I let out the clutch and there was no violence in it. Yet it doesn't slip on the street, probably because the wheels just spin.
I am very, very unhappy with the clutch people as I went on their recommendations.
#37
*cough* OS Giken twin disk *cough*
i see them used on here alot for 3-500
starting off is alittle ruff, once you get going you can shift nice and smooth... nothing beats how it grabs with hard shifts.
check these shifts out, you can just slam the gears
http://www.youtube.com/watch?v=j2hAF2FmTMs
i see them used on here alot for 3-500
starting off is alittle ruff, once you get going you can shift nice and smooth... nothing beats how it grabs with hard shifts.
check these shifts out, you can just slam the gears
http://www.youtube.com/watch?v=j2hAF2FmTMs
#38
Thread Starter
Engine, Not Motor
iTrader: (1)
Joined: Feb 2001
Posts: 29,793
Likes: 119
From: London, Ontario, Canada
That's one of the clutches I am considering. My concern is abrupt engagement, as I drive the car daily. I previously had a ceramic 6 puck (sprung) which didn't show any slip but it was quite hard on the flywheel.
#40
Great work as always Aaron. It is truly an inspiration to keep and keep working on my RX-7. In the words of one of my favorite quotes from GalaxyQuest, "Never give up, Never surrender."
Now, the real question now is this: What's in store for the Insight? Turbo? Crazy Aero mods??? Dilithium crystals to replace the battery pack?
Vince
Now, the real question now is this: What's in store for the Insight? Turbo? Crazy Aero mods??? Dilithium crystals to replace the battery pack?
Vince
#41
Thread Starter
Engine, Not Motor
iTrader: (1)
Joined: Feb 2001
Posts: 29,793
Likes: 119
From: London, Ontario, Canada
The Insight is getting paint, but I don't know what else. I just had the injectors cleaned and made a few minor repairs it has needed for a while. At some point it will likely get MIMA.
As far as the RX-7, I discovered a cracked water pump housing on Thursday as I smelled coolant on the drive to work. The housing cracked near the thermostat neck, from age/fatigue as far as I can tell. So I've spent the last few days driving around my parents car as my Insight was in my shop for the aforementioned minor repairs....I have a new water pump housing prepared and ready to go on the RX-7.
As far as the RX-7, I discovered a cracked water pump housing on Thursday as I smelled coolant on the drive to work. The housing cracked near the thermostat neck, from age/fatigue as far as I can tell. So I've spent the last few days driving around my parents car as my Insight was in my shop for the aforementioned minor repairs....I have a new water pump housing prepared and ready to go on the RX-7.
#42
.
will it be still smooth as an OEM clutch?
and will it add any Horseppower to the car or no?
#44
Thread Starter
Engine, Not Motor
iTrader: (1)
Joined: Feb 2001
Posts: 29,793
Likes: 119
From: London, Ontario, Canada
Almost all aftermarket clutches that can hold more power then stock will engage more abruptly and have a harder pedal. While I have not driven a car equipped with a Single OS Giken clutch, I assume the same holds true for them as every other aftermarket clutch. More holding force = more abrupt engagement, harder pedal.
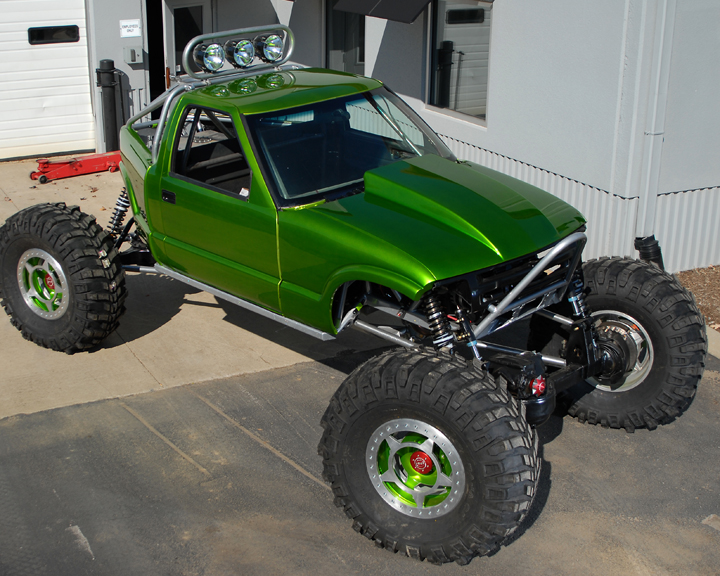
I'll be painting the Insight with PPG Anti-Freeze green as seen in this picture:
Thread
Thread Starter
Forum
Replies
Last Post


