Project Naomi III : End of Summer 2010 Update
 09-05-10, 01:21 AM
#1
Project Naomi III : End of Summer 2010 Update
For anyone looking for the other project threads:
Project Naomi I : New Project on an Old Favourite
Project Naomi II : Giant Rotisserie Pictures Update
Project Naomi III : End of Summer 2010 Update
Project Naomi IV : Almost Off The Rotisserie
Project Naomi V : Finally PAINT!
Project Naomi VI : IT LIVES!
Project Naomi VII : Coming Home
-----
Hey All,
Joe over at ClassicAuto has been absolutely awesome at keeping me up to date on the project. I, on the other hand, have been rather remiss on updating things here on the forum, so I'm lumping the last 5 update emails he sent me over the last two months into one big progress thread
The good news is that the project is still moving along. The bad news is that the battle has been a little harder than we initially anticipated. Every tool in the shop is being brought out in the fight against the evils of Rust!
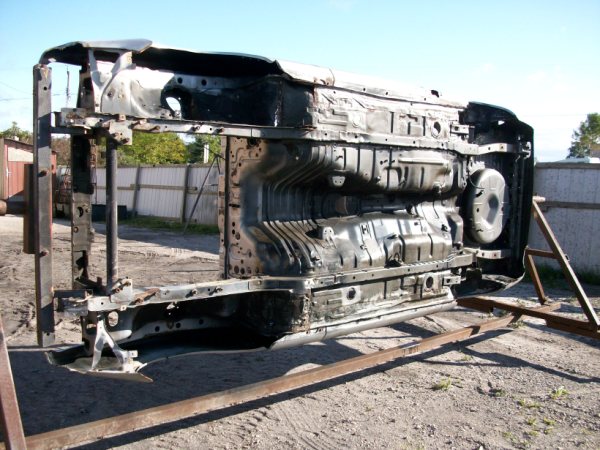
Last we checked in it was July, the car was stripped, the parts were ordered, and it was time to begin removing the tar from the underneath. Here are a few quotes from Joe's emails to give you an idea of what he's up against
Of course, a thousand other things happened in between this fight against 26 years of rustproofing tar, road grime, and anything else that ends up stuck underneath an rx7 with over 200,000km on it!
One of the trickiest parts to get ahold of was the replacement for this broken end link:
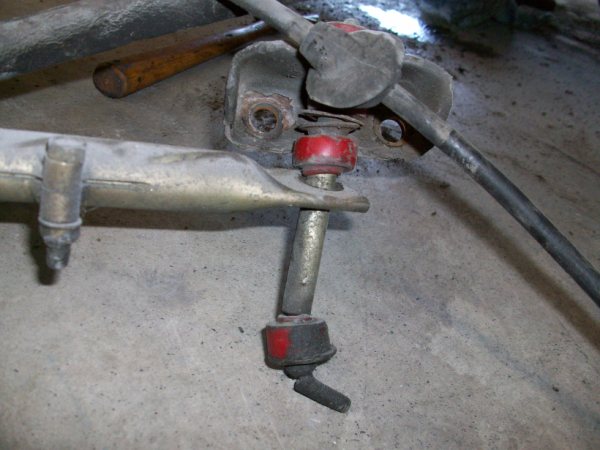
The end links came with my Racing Beat front and rear Swaybar kit. I actually broke that one the day I picked up the car from having the rear swaybar installed. I took the car from RPM's garage to a local car wash at a Petro Canada station, which had one of those guide-bar-belt things that pull your car through. The car sits so low that one of the guide bars made contact with the end link and bent it until it almost snapped. Suffice it to say, I wasn't amused. But, I drove with it bent like that for a season or two and never got around to fixing it.
I called Racing Beat about them, figuring it was better to order a brand new set of exactly the same ones that the sway bar was meant to go with, rather than risk buying something that might not fit properly. As it turns out, nobody had ever asked them for a set of the end links on their own before!
It took about three weeks, but they managed to order in a set of end links, give them a SKU, get them into inventory, send them out for galvanizing, come up with a price and then finally ship them out to me.
When all was said and done, a nice big pile of parts was sitting in Joe's office over at ClassicAuto waiting to be installed much later in the project:
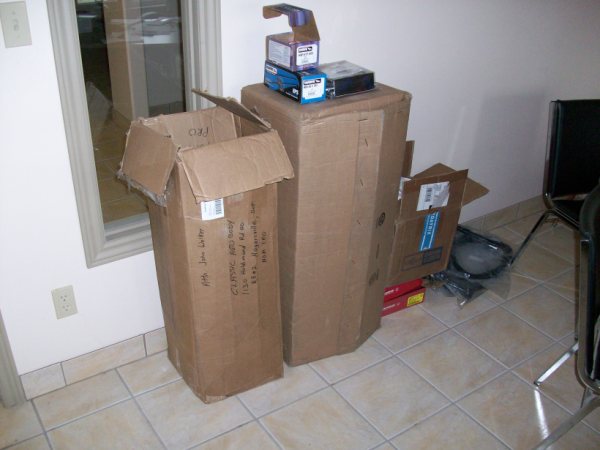
In total, we got:
- Front and Rear carpet kit from stockinteriors.com, black, made with "Plush Pile" and the added "Mass Backing" for more heat and noise insulation. Ordered a square yard of extra carpet for those odd spots that the kit doesn't cover.
- 80sq ft of Damplifier Pro Sound Deadening Material
- 36sq ft of Luxury Liner Pro Sound Absorbsion Material
- Two brand new rear discs, Hawk HPS Pads all around, and SS Brake Hoses all around
- Racing Beat replacement Rear End Links
- ReSpeed Poly Bushing Kit to replace ALL the bushings front and rear
- Door weatherstripping, window run channel and related rubber
Not to mention the parts car itself, which was $500 well spent! We'll be stripping the front passenger fender, bumper, valance, brake ducts, door panels, power window motors, and the entire rear end including Limited Slip Diff and Disc Brake Hadware from it.
So as August began, the undercoating was putting up a hell of a fight, and we started to cut the rustybits we saw in the last update
Which was a great start, but just a little while later...
And that came with a bunch of pictures that could make any car owner cringe:
More updates in just a sec...
Project Naomi I : New Project on an Old Favourite
Project Naomi II : Giant Rotisserie Pictures Update
Project Naomi III : End of Summer 2010 Update
Project Naomi IV : Almost Off The Rotisserie
Project Naomi V : Finally PAINT!
Project Naomi VI : IT LIVES!
Project Naomi VII : Coming Home
-----
Hey All,
Joe over at ClassicAuto has been absolutely awesome at keeping me up to date on the project. I, on the other hand, have been rather remiss on updating things here on the forum, so I'm lumping the last 5 update emails he sent me over the last two months into one big progress thread
The good news is that the project is still moving along. The bad news is that the battle has been a little harder than we initially anticipated. Every tool in the shop is being brought out in the fight against the evils of Rust!
Last we checked in it was July, the car was stripped, the parts were ordered, and it was time to begin removing the tar from the underneath. Here are a few quotes from Joe's emails to give you an idea of what he's up against
Originally Posted by Joe from ClassicAuto
... the under coating on that car has to be the most difficult to clean undercoat job I've ever run across LOL sitting in degreaser + hot water pressure washing has only removed part of it....have to do that process a few more times.
...(some time later)...
The undercarriage I've left soaking for about a week, re-applied some degreaser a few days ago as well. In the mean time I've been trimming around the known rusty areas, and poking around to find a few more
...
I'll be pulling it out to pressure wash the underside next week, so I should have some shots of it cleaned off at that point.
Of course, a thousand other things happened in between this fight against 26 years of rustproofing tar, road grime, and anything else that ends up stuck underneath an rx7 with over 200,000km on it!
One of the trickiest parts to get ahold of was the replacement for this broken end link:
The end links came with my Racing Beat front and rear Swaybar kit. I actually broke that one the day I picked up the car from having the rear swaybar installed. I took the car from RPM's garage to a local car wash at a Petro Canada station, which had one of those guide-bar-belt things that pull your car through. The car sits so low that one of the guide bars made contact with the end link and bent it until it almost snapped. Suffice it to say, I wasn't amused. But, I drove with it bent like that for a season or two and never got around to fixing it.
I called Racing Beat about them, figuring it was better to order a brand new set of exactly the same ones that the sway bar was meant to go with, rather than risk buying something that might not fit properly. As it turns out, nobody had ever asked them for a set of the end links on their own before!
It took about three weeks, but they managed to order in a set of end links, give them a SKU, get them into inventory, send them out for galvanizing, come up with a price and then finally ship them out to me.
When all was said and done, a nice big pile of parts was sitting in Joe's office over at ClassicAuto waiting to be installed much later in the project:
In total, we got:
- Front and Rear carpet kit from stockinteriors.com, black, made with "Plush Pile" and the added "Mass Backing" for more heat and noise insulation. Ordered a square yard of extra carpet for those odd spots that the kit doesn't cover.
- 80sq ft of Damplifier Pro Sound Deadening Material
- 36sq ft of Luxury Liner Pro Sound Absorbsion Material
- Two brand new rear discs, Hawk HPS Pads all around, and SS Brake Hoses all around
- Racing Beat replacement Rear End Links
- ReSpeed Poly Bushing Kit to replace ALL the bushings front and rear
- Door weatherstripping, window run channel and related rubber
Not to mention the parts car itself, which was $500 well spent! We'll be stripping the front passenger fender, bumper, valance, brake ducts, door panels, power window motors, and the entire rear end including Limited Slip Diff and Disc Brake Hadware from it.
So as August began, the undercoating was putting up a hell of a fight, and we started to cut the rustybits we saw in the last update
Originally Posted by Joe from ClassicAuto
I've cut the inner portions (of the wheel wells) off so we can blast between where those panels rotted.
Which was a great start, but just a little while later...
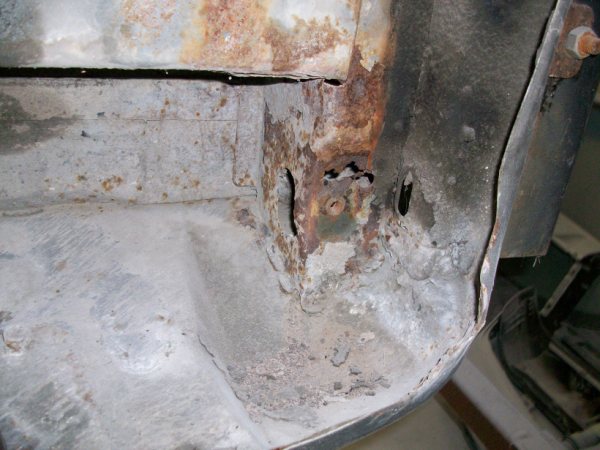
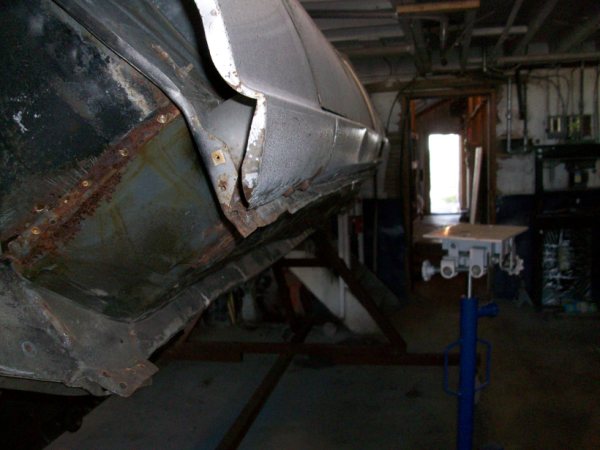
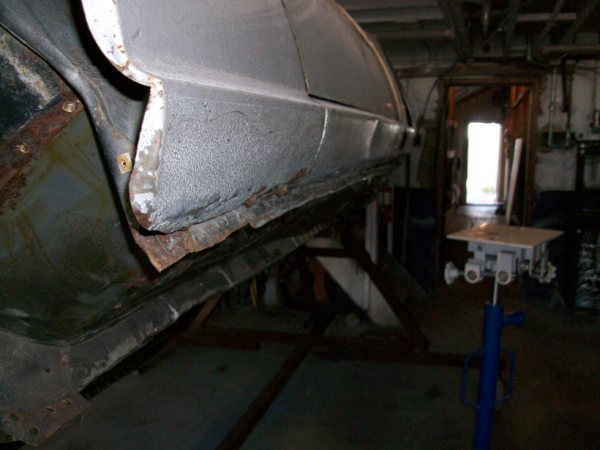
Originally Posted by Joe from ClassicAuto
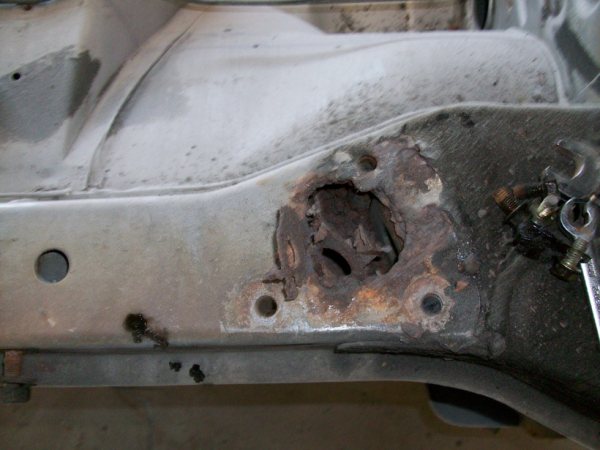
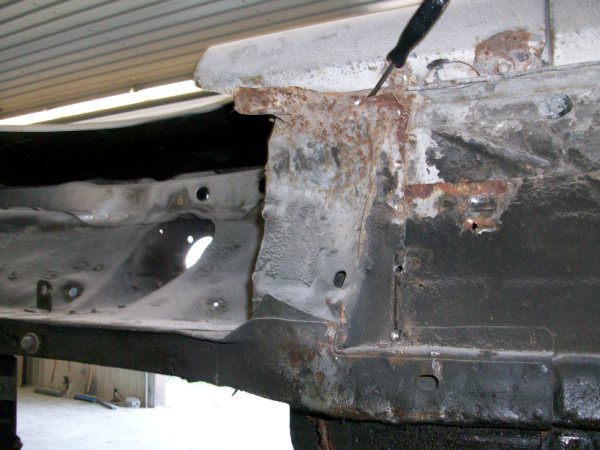
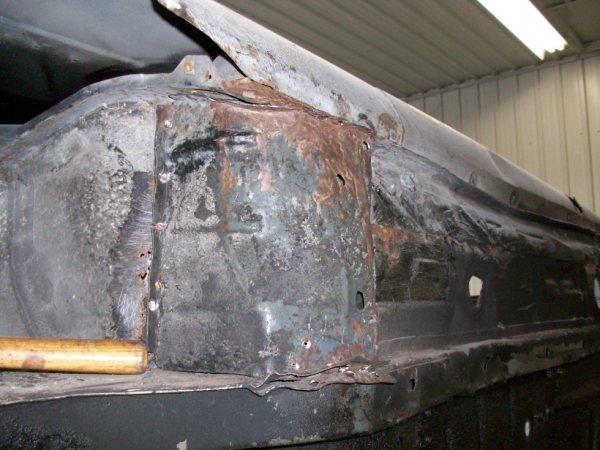
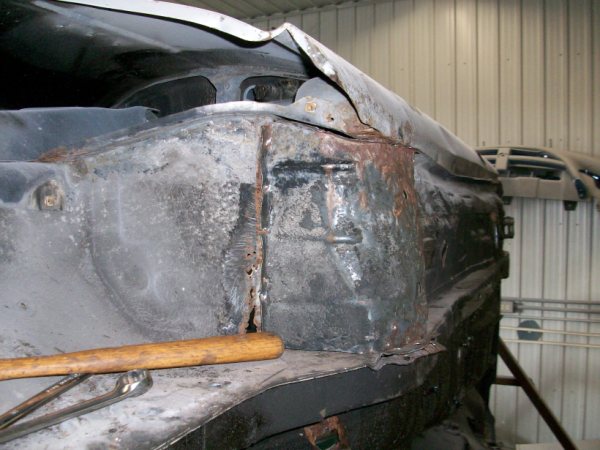
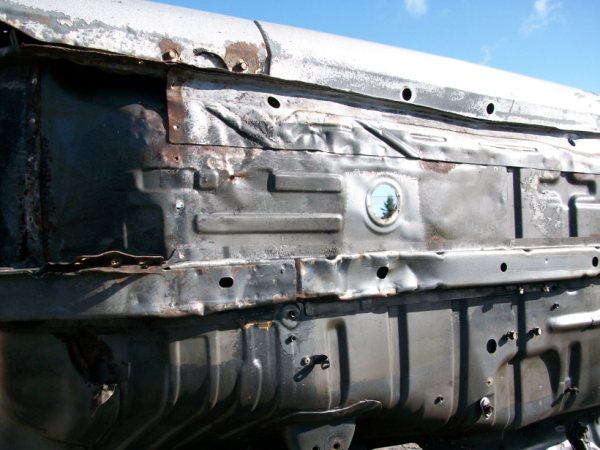
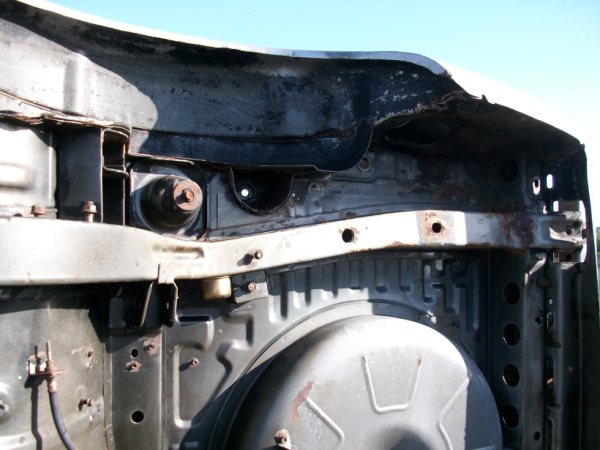
The surprise areas are in the driver's foot well (both panels rotted, its where your feet would sit by the pedals) and behind the passenger side rear mount for the subframe. You know those large triangle plates on the rack kit that sandwich the frame rail? Behidn there, a nice, rough hole.
...
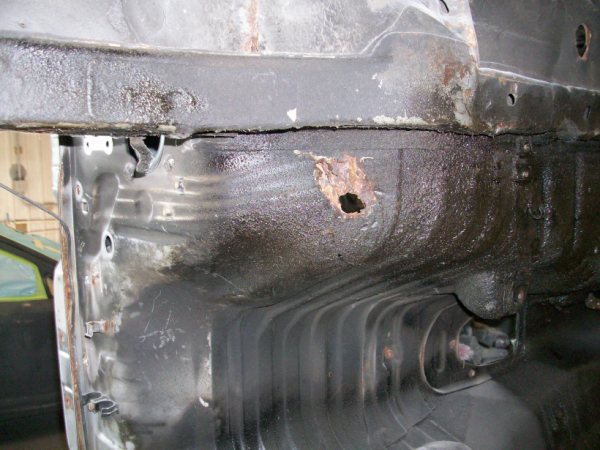
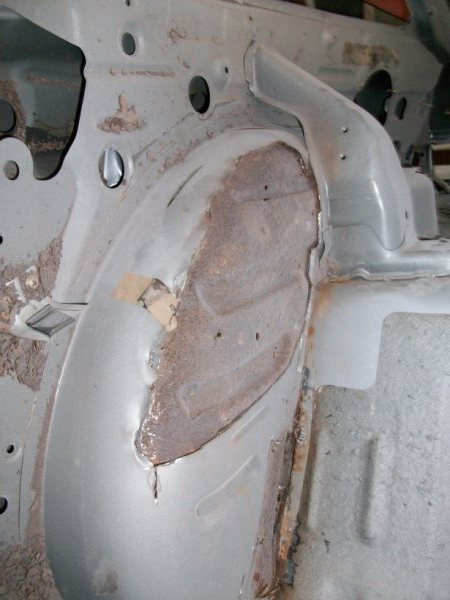
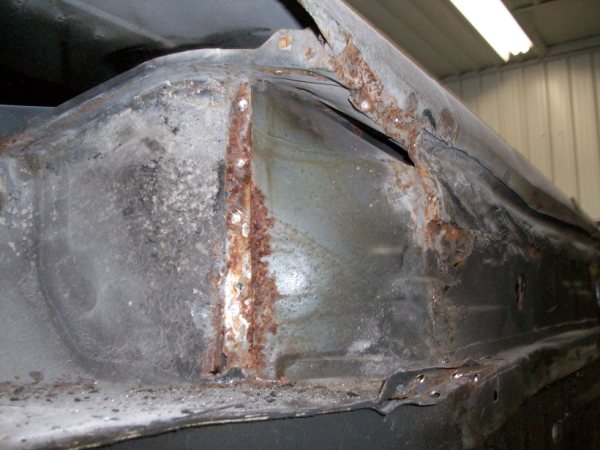
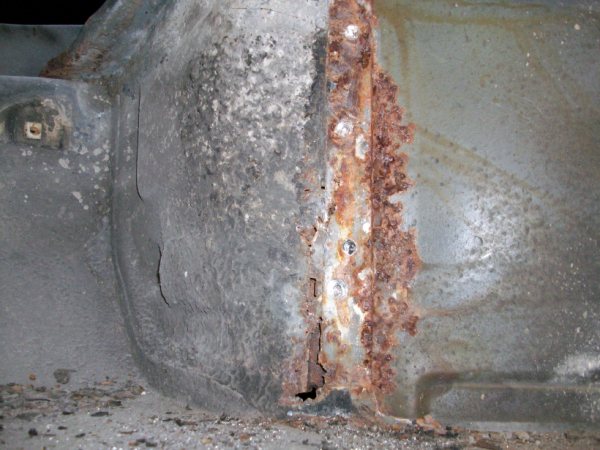
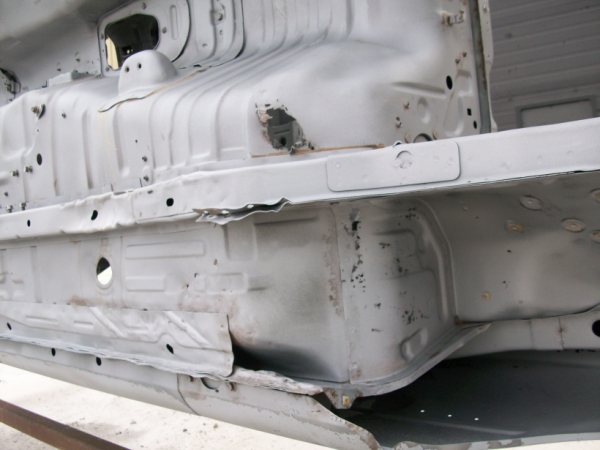
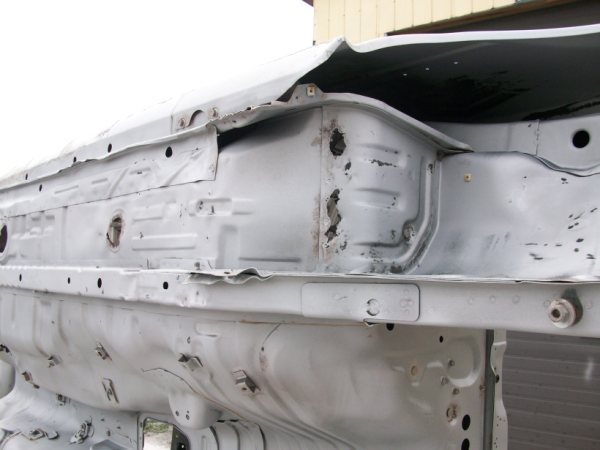
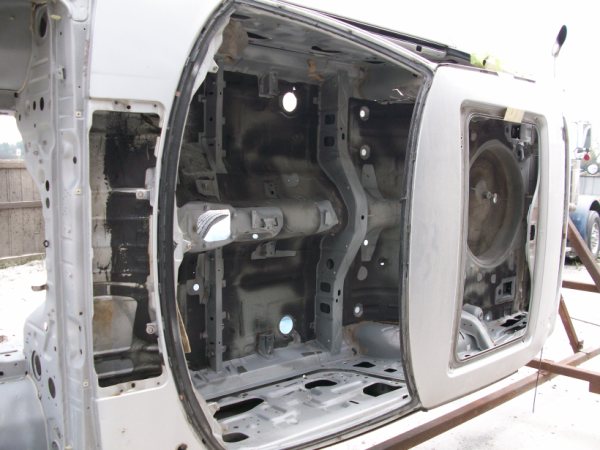
The wheel wells in the rear (i've attached pics after trimming) are actually pretty rough. The way those panels are assembled is part of the problem too - they aren't really a true "two layer" panel, they are actually a bunch of pieces of single layer panel, doubled over in some spots. I have found holes that go through to the outside (some of which are on the mounts for those lower lateral arms for the diff) so there'll be some extensive metal work there. Basically, if you look at the pics of the wheel well, you'll see the areas I've cut off - the pieces that are left make up the wheel well in one layer, its just that they're small pieces...not sure if that makes sense or not, but hopefully it comes across
...
The wheel wells in the rear (i've attached pics after trimming) are actually pretty rough. The way those panels are assembled is part of the problem too - they aren't really a true "two layer" panel, they are actually a bunch of pieces of single layer panel, doubled over in some spots. I have found holes that go through to the outside (some of which are on the mounts for those lower lateral arms for the diff) so there'll be some extensive metal work there. Basically, if you look at the pics of the wheel well, you'll see the areas I've cut off - the pieces that are left make up the wheel well in one layer, its just that they're small pieces...not sure if that makes sense or not, but hopefully it comes across
More updates in just a sec...
Last edited by vipernicus42; 08-23-15 at 10:05 PM.
 09-05-10, 01:40 AM
#2
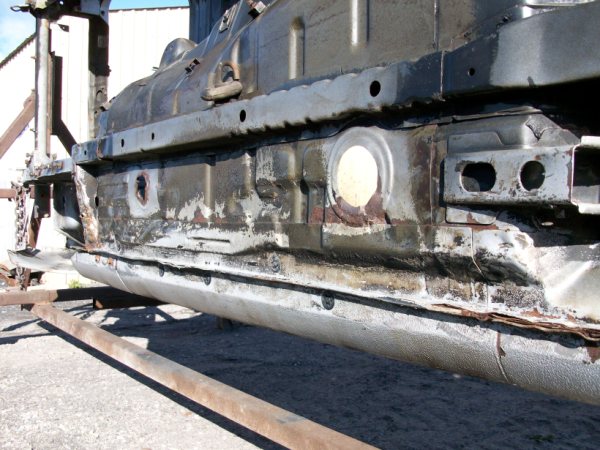
That brings us to the end of August. In the last update thread I showed some pictures of the rocker panels which had been bent along with the floor when the car got jacked up in the middle instead of at the jacking points. There was also floor damage further forward around where the jacking point actually is, and further inwards towards the transmission tunnel where rust had eaten through under the driver's feet.
Joe started working on those floors, and in the process found even more evil rust:
I just love what looks like a baseball batt that appears in these two pictures of the new floor sitting in its place. It's probably the handle of a mallet or sledge of some sort, but I'm sure there have been a few points where Joe wished he could take a bat to the car in frustration!
So at this point, it's very likely that the project will push past the end of the season into the winter. But as much as this update might sound like so much doom and gloom, I'm actually very enthusiastic and hopeful about the project now. There's nothing like a pile of new parts to get your spirits up, and this past week I helped my friend Joel get his FB on the road, and taught him to drive standard so that he could actually take it out for a spin.
I must admit that driving one again has definitely reminded me of what I've been missing whilst driving my comfy sedan around all summer, but it puts a smile on my face to know that next spring I'll have a "brand new" FB to drive around in, with all wheel discs, limited slip differential, a gorgeous paint job and not a single goddamn spot of rust on it!
Keep up the good work Joe, I can't wait to see the next chapter of this story unfold!
Jon
Joe started working on those floors, and in the process found even more evil rust:
Originally Posted by Joe from ClassicAuto
Have some pics of the floor section (under drivers feet) I'm straightening.
I had to drill the spot welds off of that section, remove it entirely, and hammer the damage out. The otherside I was able to get decent with studs and a slide hammer, but this side was just demo'd.
The last pics are the straightened part just sitting on there. Needs a couple little tweaks when it gets welded back on (after blasting/epoxy)
I'm running into alot of little areas like the seams pictured though. That seam is underneath the removed part, and is a joint for three pieces, the removed part, and the two rotted floor boards. I'm finding alot of seams that will need a section welded in because they're littered with pin holes....just more lovely surprises
I just love what looks like a baseball batt that appears in these two pictures of the new floor sitting in its place. It's probably the handle of a mallet or sledge of some sort, but I'm sure there have been a few points where Joe wished he could take a bat to the car in frustration!
So at this point, it's very likely that the project will push past the end of the season into the winter. But as much as this update might sound like so much doom and gloom, I'm actually very enthusiastic and hopeful about the project now. There's nothing like a pile of new parts to get your spirits up, and this past week I helped my friend Joel get his FB on the road, and taught him to drive standard so that he could actually take it out for a spin.
I must admit that driving one again has definitely reminded me of what I've been missing whilst driving my comfy sedan around all summer, but it puts a smile on my face to know that next spring I'll have a "brand new" FB to drive around in, with all wheel discs, limited slip differential, a gorgeous paint job and not a single goddamn spot of rust on it!
Keep up the good work Joe, I can't wait to see the next chapter of this story unfold!
Jon
Last edited by vipernicus42; 09-05-10 at 01:44 AM.
 09-06-10, 02:41 PM
#7
Wow. This is why used cars from "down east", as we say out here, are to be avoided like the plague. You do see rust like this here too, but usually only on poorly-cared for cars. Makes me glad my 7's never seen salt.
Not to take away from the work being done - but wouldn't it make more sense to find a sun-bleached beater from down in the southern US or something than put so much work into this body? Cutting and patching so much rotten steel's got to be running up the bill on this build in a big way.
Not to take away from the work being done - but wouldn't it make more sense to find a sun-bleached beater from down in the southern US or something than put so much work into this body? Cutting and patching so much rotten steel's got to be running up the bill on this build in a big way.
Trending Topics
09-07-10, 07:02 AM
#8
Not to take away from the work being done - but wouldn't it make more sense to find a sun-bleached beater from down in the southern US or something than put so much work into this body? Cutting and patching so much rotten steel's got to be running up the bill on this build in a big way.
It was impossible to know the extent of this rust before the project started, seeing as most of it was hidden by years of rustproofing tar and road grime, or hidden behind body panels.
So we'll keep going. We'll get there eventually.
Jon
09-08-10, 10:09 AM
#9
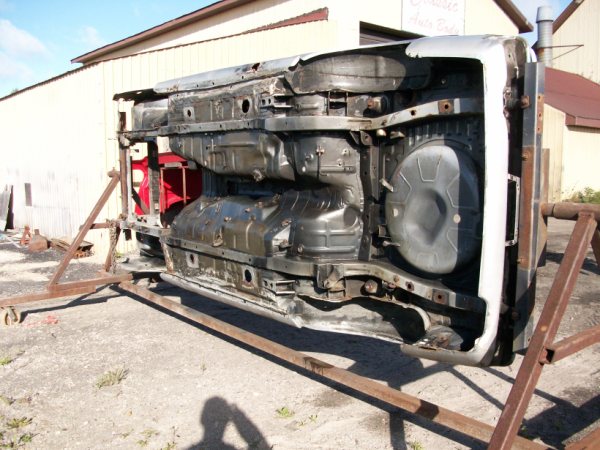
Another update on the Tar-Of-Death on the underside of the car
It's insane. Who would have thought that one of the big challenges of this project would be removing the tar?
Jon
Originally Posted by Joe from ClassicAuto
I'll have some nice little pics in the nextt day or two. The pressure washing attempts just aren't cutting the mustard on the tar underneath that car.
Have a guy coming with an old school steamer tonite to blast at it. We use his services for cleaning grease off of transport truck frames (unreal job) so it should be super clean here very soon, then sandblasting!
Have a guy coming with an old school steamer tonite to blast at it. We use his services for cleaning grease off of transport truck frames (unreal job) so it should be super clean here very soon, then sandblasting!
Jon
09-11-10, 01:15 PM
#10
In the words of Joe:
"1800psi of boiling water was all it took!"
But after all that, it's clean. Now it's time for sandblasting, epoxy, and any remaining metal work. The chassis gets that treatment first, then things like the rear end, control arms, etc...
"1800psi of boiling water was all it took!"
But after all that, it's clean. Now it's time for sandblasting, epoxy, and any remaining metal work. The chassis gets that treatment first, then things like the rear end, control arms, etc...
09-12-10, 12:12 PM
#11
Hey Jon,
Not sure if this might be of interest to you or not, but I have always thought about putting some C-channel steel around the bottom subframe of the chassis for a couple of reasons:
1) Should make the chassis a bit more rigid
2) It will never crush in when you jack it up like the stock one does.
All that needs to be done to the C channel would be to drill holes in the bottom of it, like the stock subframe is to not collect water in there, and you can just do 1/2" welds to support it every inch or so. Shouldn't be too hard to make (provided you can find something that fits almost over there).
09-12-10, 12:19 PM
#12
Yeah I was thinking about that. I asked Joe to brainstorm some ways of making the stock jacking points better. My idea was not to use the frame rails at all, but rather to make big, flat, square areas that you could put a jack on in the "proper" location by welding in some thick sheet steel. I like the C-channel steel idea though... sort of like a reinforcing section that fits snugly over the existing frame rail...
I'm sure he'll come up with something good. I doubt he wants to spend ages pulling out jack-related damage on this car again. I did quite a number on the floorboards, stock jacking points, and frame rails over the years that he's had to fix up as part of this build.
Jon
I'm sure he'll come up with something good. I doubt he wants to spend ages pulling out jack-related damage on this car again. I did quite a number on the floorboards, stock jacking points, and frame rails over the years that he's had to fix up as part of this build.
Jon
09-12-10, 01:05 PM
#13
Its a good thing you thought about it. I wonder if we could have enough buyer to make stamped one made out.
I just bought 2 new rocker panels from mazda (they have them at about 150$ a piece), mine were never in the best condition. One of my neighbor just backed up into my car this morning on the front driver side, so that fender is really getting trashed. I bent most of it back by hand, she was really nice and I don't want to charge her for it. But is was fender, front header panels, and bumper has added another crack to it.
I just bought 2 new rocker panels from mazda (they have them at about 150$ a piece), mine were never in the best condition. One of my neighbor just backed up into my car this morning on the front driver side, so that fender is really getting trashed. I bent most of it back by hand, she was really nice and I don't want to charge her for it. But is was fender, front header panels, and bumper has added another crack to it.
09-12-10, 10:32 PM
#14
Yeah, sometimes it's hard to keep these cars in one piece. I've been very lucky with the rx7, not so much with the Mazda6. The street sweeper gouged two nice big lines in the front bumper, and I did some damage to the rear bumper in an underground lot (let the car roll without e-brake while bending down to pick up my CD case... scraped by a cement pillar at *just* the wrong angle at about 2km/h and peeled some paint off)...
The only thing that ever happened to the 7 was that groundhog hit last year, and thankfully that's being fixed as part of this rebuild.
Jon
The only thing that ever happened to the 7 was that groundhog hit last year, and thankfully that's being fixed as part of this rebuild.
Jon
09-13-10, 03:47 PM
#15
Sam, the problem with using a C-channel on the frame rails is that there's no support above them. Even though it would be stiffer then it is stock - when you jack the car up from the center of the floor, you're picking up about 90% of the weight of the car, and unless there's something like a cage to tie the weight into the reast of the car/distribute the load, you'll simply end up bending the floor upwards even though the frame rail may not bend itself.
I've got an idea for a plate at the front that should work well. At the least, with a plate at the front, you'll be able to jack up the car initially very easy. And then access to the diff/ trailing arm boxes is much easier after the front is in the air. Its pretty basic, but it will essentially be X braces and a large plate near where the frame rails are tripled over behind the engine - tieing those into the pinchweld......
I've got an idea for a plate at the front that should work well. At the least, with a plate at the front, you'll be able to jack up the car initially very easy. And then access to the diff/ trailing arm boxes is much easier after the front is in the air. Its pretty basic, but it will essentially be X braces and a large plate near where the frame rails are tripled over behind the engine - tieing those into the pinchweld......
09-13-10, 06:15 PM
#16
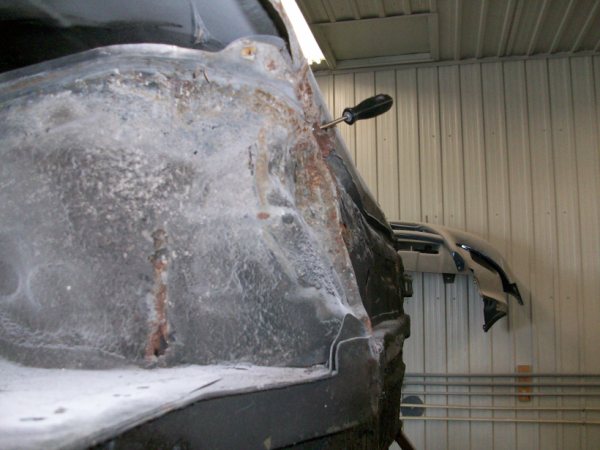
Well here's one case where my usual addage of "If at first you don't succeed, get a bigger hammer" doesn't quite work - when you're trying to pull dents *out* of metal like in the case of my rocker panels.
Joe got it covered though. When slide hammers weren't enough, some heavy duty chain, clamp and presumably a giant weight or puller somewhere off-camera were used to help pull these dents out.
It's quite the sight to behold. It looks like we're almost done repairing the damage that I managed to do to the car myself (way back when I didn't know better), that's gotta be progress!
And the email contained words that I've been just dying to hear:
Hell yes!
Pics! :
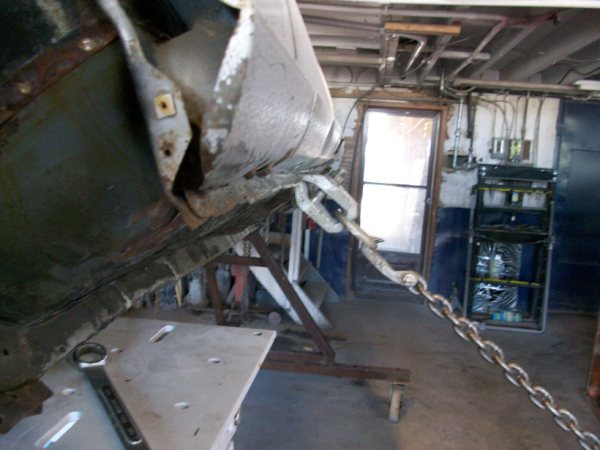
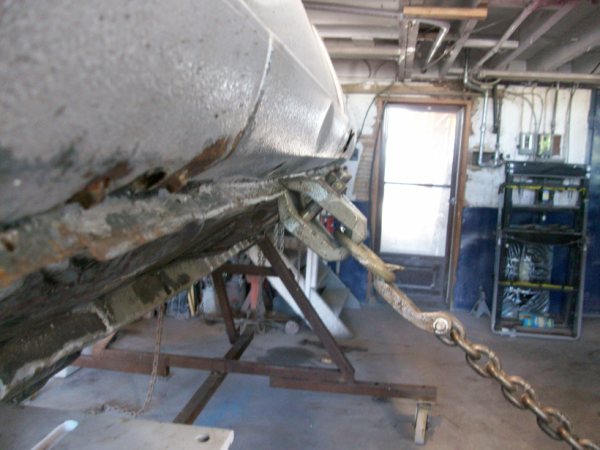

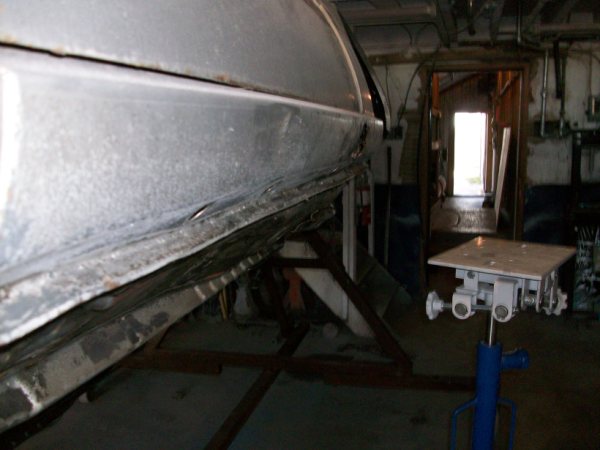
Joe got it covered though. When slide hammers weren't enough, some heavy duty chain, clamp and presumably a giant weight or puller somewhere off-camera were used to help pull these dents out.
It's quite the sight to behold. It looks like we're almost done repairing the damage that I managed to do to the car myself (way back when I didn't know better), that's gotta be progress!
And the email contained words that I've been just dying to hear:
Originally Posted by Joe from Classicauto
...
Sandblasting should take place thursday.
...
Sandblasting should take place thursday.
...
Pics! :
Last edited by vipernicus42; 09-13-10 at 06:18 PM.
09-14-10, 02:17 PM
#18
Ha, that chain puller reminded me of what my neighbor had to do to pull the giant dent out of my Rx-4. He actually attatched a brace to the body and lifted the dent out with an engine crane. He said he had the whole car lifted off the ground at one point.
Anyway, back to the thread. It's looking good and comming along nicely. Keep up the good work guys.
Anyway, back to the thread. It's looking good and comming along nicely. Keep up the good work guys.
09-14-10, 05:44 PM
#19
Included in that price is everything required for me to have driven the car 600km to his shop and drop it off, and then pick it up and drive it the 600km home. ClassicAuto is taking care of everything from the full mechanical dissasembly all the way to the reassembly and test drive and everything in between.
When I originally thought of this project years ago, I was going to have two separate shops do it - one rotary-specific mechanical shop do the dissasembly and reassembly, and one body shop to do the rust/metal work and paint. My former friend Marc did this with his project and the one thing I learned was that coordinating between two shops is very difficult work. There are many more potential pitfalls and problems that come with it and Marc's project ended up going 2+years over schedule. As far as I know, it's still not completed and he's still chasing after loose ends.
So partway through that project, when Joe picked up the pieces and agreed to finish the body work portion of Marc's project car that the first body shop screwed up on, I got talking to Joe and asked if he would do my entire project from start to finish. I had been very impressed by the work I'd seen from his shop, including your car, Marc's car, and a few others. He agreed, and here we are, somewhere near the halfway point of my restoration
Sam, your car was painted at Joe's shop too, wasn't it? Maybe you can share what the cost of that was for comparison, since you did all the dissasembly and reassembly yourself as well as some (if not all) of the metal/rust/bodywork if I remember correctly...
Jon
Last edited by vipernicus42; 09-14-10 at 05:48 PM.
09-14-10, 06:02 PM
#20
And for those who are wondering, yes I know I could have gotten a decent FD for that $19k (project + parts) if I had shopped around for long enough. No, I don't regret it for an instant and would do it again if given the choice.
Though... some day in the future I might add an FD to the collection, but not until I live in a place with a garage large enough to store both ... and another raise or two wouldn't hurt.
Jon
Though... some day in the future I might add an FD to the collection, but not until I live in a place with a garage large enough to store both
... and another raise or two wouldn't hurt.Jon
09-14-10, 10:50 PM
#21
Jeezus over in the 1st Gen Section version of this thread commented that they saw this for Miata frame rails:
http://www.good-win-racing.com/Mazda...ml?id=mKb9hbyF
There was talk that after pulling the dents out of the frame rail, this would be a way to add strength back to it (perhaps enough strength to put a jackstand underneath near the front?)
It's kind of like what Sam was talking about
Just a thought...
Jon
09-16-10, 06:39 AM
#23
the frame rails in my GTR are made out of the same tinfoil material that most japanese sports cars get and theyc all "steel".
While my car doesn't have any rust to speak of, the chassis simply won't take the power levels that I plan on making anymore. Plus I HATED how much they deformed when I would jack the car up. For the first few pumps of jack travel, until all the weight was on the jack, the frame rail would move up 0.5cm for every 1cm I lifted the car.
I thought about doing the C-channel route as a lot of people do that but now, I think I'm actually going to remove the stock rails entirely and replace them with 2x3" thick wall steel tube. They'll be about 20 times stronger than the sheet metal that the OEM rails are made from. It might be something to consider.
 09-29-10, 07:07 PM
#25
Another awesome update from Joe, and this one is the big milestone I've been waiting for!
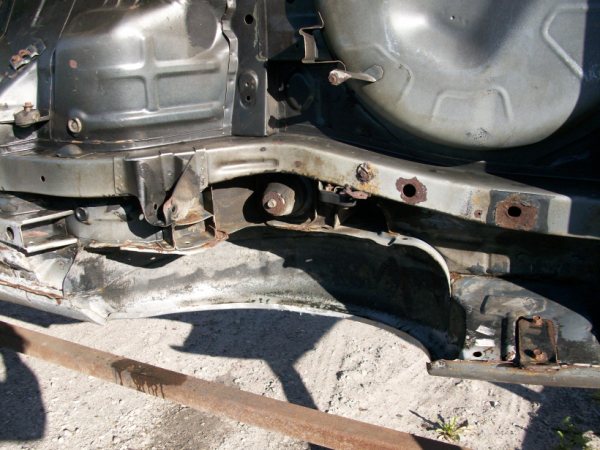
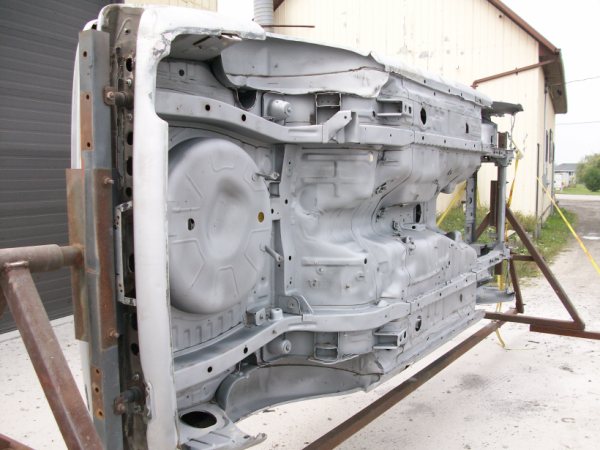
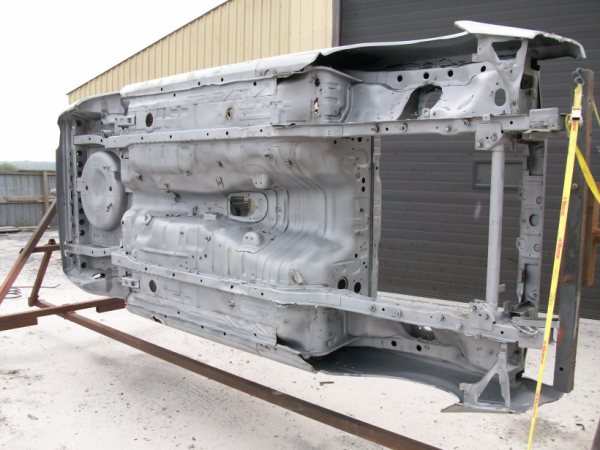
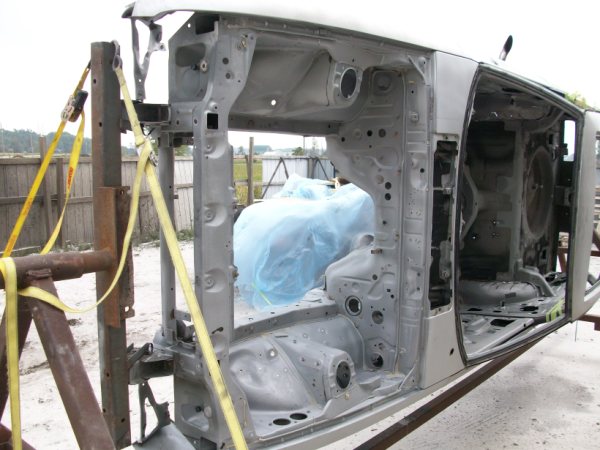
We have finally removed all the paint, bondo, grease, grit, dirt, rust, and everything else that was covering the body of the car! Any perforations, any remaining imperfections in the body have been revealed and are now able to be dealt with. The paint hides no more secrets!
So here are some pictures of what it looks like after 26yrs of everything the world could throw at this car has been removed. As you can see we found a few holes, but nothing Joe's expert metalwork can't fix.
Originally Posted by Joe from ClassicAuto
OK, sandblasting got done last thursday, as it was pouring rain out the thursday before.
Here's the pics of bare chassis, and after epoxy. It still has to have the patching done, but the idea blasting first to expose any other weak areas as well as clean any saveable panels before being patched over (ie. the rear wheel wells).
So it was blasted and primed immediately to prevent any flash rusting. Now when areas get patched the spot will be ground, weld-thru primer applied, patched, and re-epoxy the area. Once thats done, it all gets scuffed, a light coat of epoxy for chem. adhesion, then bedlined.
So here are some pictures of what it looks like after 26yrs of everything the world could throw at this car has been removed. As you can see we found a few holes, but nothing Joe's expert metalwork can't fix.