
Ice Racer/Rally Rx7 build


 10-02-13, 03:58 PM
#102
more "updates!" well a few more events.
engine still runs, its smellier and more oily burning but eh, shocks are even more blown.
Ran hatchless at national tour event.


the El Camazda!
put it back on but took front sway bar off

should have done this long ago. Soon I need to smash the glass and replace it with lexan.
also recently went to an autocross on no swaybars and blown shocks, it was quite fun, I actually ran pretty quick for just drifting around basically on some bald street tires (def bald after I left though)
I do not have pictures of that fun though
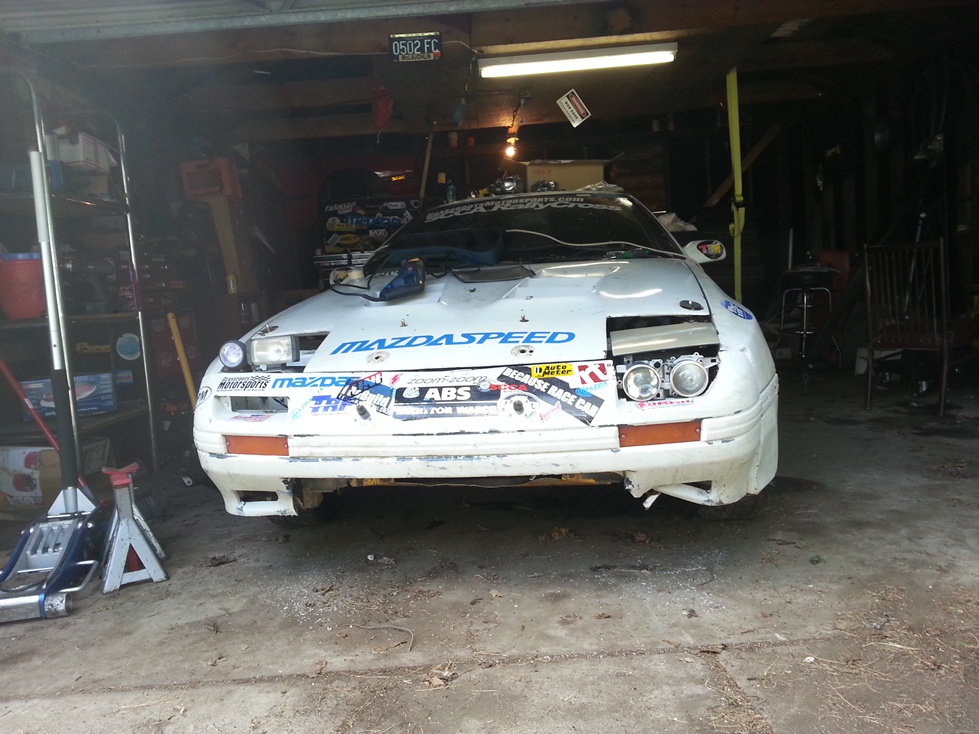
car is looking extra beat up but I have replacement front bumper and fenders waiting for it after winter (read after wheel to wheel ice racing season).
still acquiring more build parts and thinking about replacing the rear shocks before the next event possibly.
engine still runs, its smellier and more oily burning but eh, shocks are even more blown.
Ran hatchless at national tour event.
the El Camazda!
put it back on but took front sway bar off
should have done this long ago. Soon I need to smash the glass and replace it with lexan.
also recently went to an autocross on no swaybars and blown shocks, it was quite fun, I actually ran pretty quick for just drifting around basically on some bald street tires (def bald after I left though)
I do not have pictures of that fun though
car is looking extra beat up but I have replacement front bumper and fenders waiting for it after winter (read after wheel to wheel ice racing season).
still acquiring more build parts and thinking about replacing the rear shocks before the next event possibly.
11-25-13, 09:40 AM
#103
So I have not updated this in a while:
You know when your a tire ***** when...

You know you are rotarded when...

I've have had these for the longest time but never got around to installing them. I powdercoated them (and the brackets) myself when I had the get up and then had mazdaspeed competition bushings installed.

mmmmmmmm tires...

Normally I reserved these wheels for road tires only but they look too damn cool to be not utilized essentially...
Also not pictured are new 205/55/16 WS60 Blizzaks for ice racing season. (potentially) I should be saving for a house but wheel-to-wheel ice racing during every sat/sun of Feb sounds more excellent...
Completely re-wired and re mounted these:

nice GM sealed weather pack connectors, no more shady trailer plug connector.
oh... herro there...

Just on the backs right now, fronts need attention too.
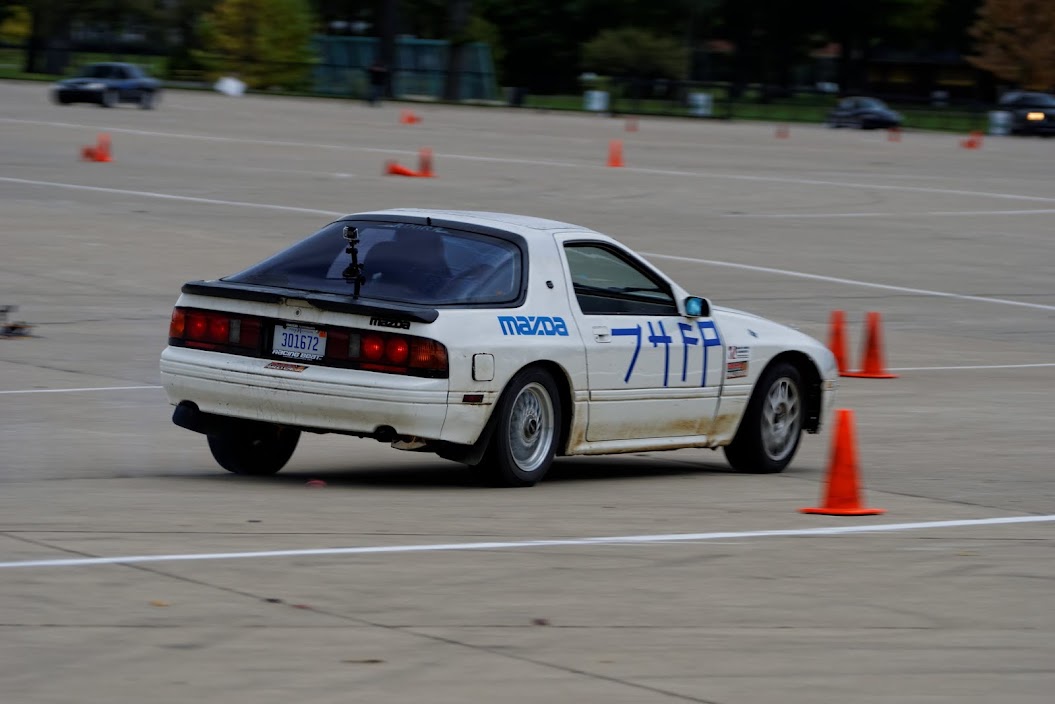
Did pretty good at the day/night rallycross. took 3rd out of 11, only had 1 clean run all day but it was good for RWD FTD!
lots of blue smoke, burned a lot of oil, hard to start in 20 degree weather etc. Only had some minor drama. Fan control relay failed and the engine overheated, coolant pouring out of the overflow and somehow at this same time the oil pressure sending unit failed but we had plenty of oil pressure.


We ran 3 drivers that day, (my 2 roommates and I)

next up:
front shocks
overhaul engine
rear wheel bearings
misc rear suspension link replacement
overhaul diff (maybe)
You know when your a tire ***** when...
You know you are rotarded when...
I've have had these for the longest time but never got around to installing them. I powdercoated them (and the brackets) myself when I had the get up and then had mazdaspeed competition bushings installed.
mmmmmmmm tires...
Normally I reserved these wheels for road tires only but they look too damn cool to be not utilized essentially...
Also not pictured are new 205/55/16 WS60 Blizzaks for ice racing season. (potentially) I should be saving for a house but wheel-to-wheel ice racing during every sat/sun of Feb sounds more excellent...
Completely re-wired and re mounted these:
nice GM sealed weather pack connectors, no more shady trailer plug connector.
oh... herro there...
Just on the backs right now, fronts need attention too.
Did pretty good at the day/night rallycross. took 3rd out of 11, only had 1 clean run all day but it was good for RWD FTD!
lots of blue smoke, burned a lot of oil, hard to start in 20 degree weather etc. Only had some minor drama. Fan control relay failed and the engine overheated, coolant pouring out of the overflow and somehow at this same time the oil pressure sending unit failed but we had plenty of oil pressure.
We ran 3 drivers that day, (my 2 roommates and I)
next up:
front shocks
overhaul engine
rear wheel bearings
misc rear suspension link replacement
overhaul diff (maybe)


 05-12-14, 11:53 AM
#105
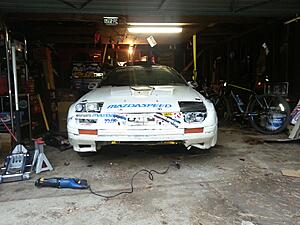
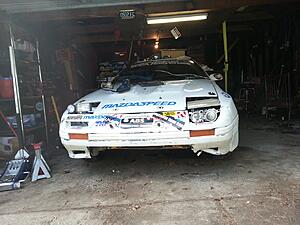
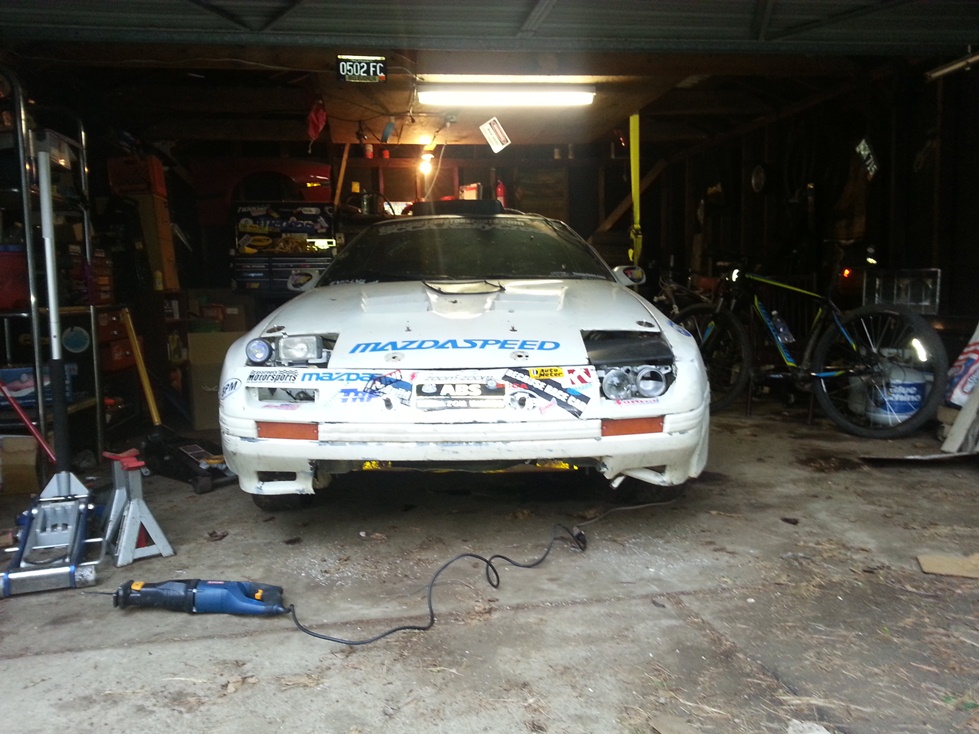
SAFETY SELFIE!

and a shot of Dr. Rotorsteins� laboratory(photo is a bit dated there are more HID/LED lighting setup)

The weekend after the ice racing weekend there was rallycross and it was ROUGH. They cancelled the event after the 1st heat because it was so rough, so rough in fact that I snapped my midpipe on my exhaust and then the exhaust kept bouncing off of the hangers. I have been le tired of it anyways so I took a nap and pondered what to do next.
This was my first event EVER in having a cone free day the problem is that I could not catch the Miatas or the 911s
FIX EXHAUST? CHECK!
Stainless 1 piece exhaust from the header all the way back to the racing beat furai rotor shaped muffler, why? because I am rotarded. Also I am mostly R&Ring stuff by myself and the twin mufflers is a pain to deal with it. Also this car doesn't make much power so I must continue to add lightness!


Here is a video of it idling with the half bridge.
and a shot of Dr. Rotorsteins� laboratory(photo is a bit dated there are more HID/LED lighting setup)
The weekend after the ice racing weekend there was rallycross and it was ROUGH. They cancelled the event after the 1st heat because it was so rough, so rough in fact that I snapped my midpipe on my exhaust and then the exhaust kept bouncing off of the hangers. I have been le tired of it anyways so I took a nap and pondered what to do next.
This was my first event EVER in having a cone free day the problem is that I could not catch the Miatas or the 911s
FIX EXHAUST? CHECK!
Stainless 1 piece exhaust from the header all the way back to the racing beat furai rotor shaped muffler, why? because I am rotarded. Also I am mostly R&Ring stuff by myself and the twin mufflers is a pain to deal with it. Also this car doesn't make much power so I must continue to add lightness!
Here is a video of it idling with the half bridge.
05-12-14, 11:56 AM
#106
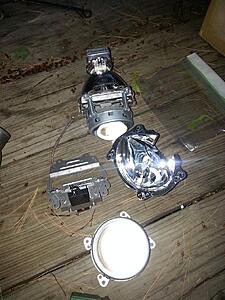
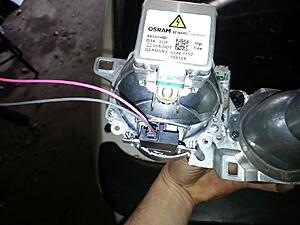
My headlights were of a grand idea but pour execution, and now that I work in automotive lighting, you kind of see things differently, I used to be in the dark about optics and such but now I see the light! And this E36 M3 is bright. Here are some teaser pics:


The front: A regular *** J30 headlight projector unit sub assembly.
The rear: HID retrofit lowbeam maybe even bi-function HID (HB/LB combined but I will just have std HBs on as HD fogs essentially. Legally you can run maximum 4 forward lights on at one time FYI.
What is neat is that you can monitor your adjustment since there is a leveling bubble there. The issue I am having on this how to construct a bracket and where to mount the ballasts. Not sure if I will put the pop up lights back in or not yet either in conjunction with this. TBD - this will be a long project and slow just chip away at the rock.
What to look forward to this season????
New engine is in the works, about half way through porting it. Haven't decided on doing a half bridge yet or just streetport however it will be a frankenwankel consisting of S4/S5 NA/TII parts as well some rx8 and FD components.
DRIVETRAIN:
rx8 6 speed swap, I got a KILLER of a deal on one BNIB. pics to come in future.
It also came with new throwout bearing, clutch fork and fork grommet. Just lacked a shifter which was sourced for 30 dollars. A new wooden shift **** will need to be made since the threads are different but more on that swap later.
05-12-14, 11:56 AM
#107
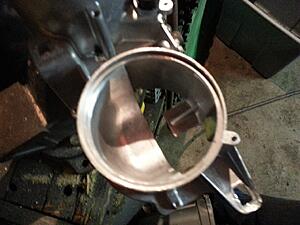
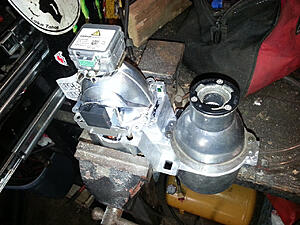
So in preparations, last time the engine was out I placed the two next to each other to get an idea on mounts, maybe hybrid the PPF and stock FC trans mount or have something made from scratch. Not sure exactly yet.
When I recently pulled my engine out for some D&D on the new engine I put the t2 trans next to the rx8 trans to get an idea roughly what I am working with:


Shifter will be farther forward and I have no qualms about making the hole in the floor more egg shaped.
Engine is currently still being ported (maybe 50% done or so) so this engine will have to last likely for the remainder of the season or however long it holds up, I'm kind of curious to see how much more abuse it will take before it ultimately stops working. 2 races scheduled for memorial day weekend. What I can promise though is that this trans will only go in when the engine is ready.
The other issue with an rx8 trans to solve is the driveshaft. Luckily though the rx8 uses the same spline count/diameter as the TII and I have the following extra parts on horde:
+ T2 output trans yoke
+ rx8 output trans yoke
+ N/A driveshaft complete
I still plan on using my NA rear end so I figure I have my bases covered. Right now the vehicle is equipped with a T2 to NA rear end driveshaft from mazdatrix that has serviceable u-joints. I have heard that auto trans FC driveshaft may be a direct fit as well. we shall see. but it looks like there may need to be some adjustment is shaft length (lol) to make this bolt in.
When I recently pulled my engine out for some D&D on the new engine I put the t2 trans next to the rx8 trans to get an idea roughly what I am working with:
Shifter will be farther forward and I have no qualms about making the hole in the floor more egg shaped.
Engine is currently still being ported (maybe 50% done or so) so this engine will have to last likely for the remainder of the season or however long it holds up, I'm kind of curious to see how much more abuse it will take before it ultimately stops working. 2 races scheduled for memorial day weekend. What I can promise though is that this trans will only go in when the engine is ready.
The other issue with an rx8 trans to solve is the driveshaft. Luckily though the rx8 uses the same spline count/diameter as the TII and I have the following extra parts on horde:
+ T2 output trans yoke
+ rx8 output trans yoke
+ N/A driveshaft complete
I still plan on using my NA rear end so I figure I have my bases covered. Right now the vehicle is equipped with a T2 to NA rear end driveshaft from mazdatrix that has serviceable u-joints. I have heard that auto trans FC driveshaft may be a direct fit as well. we shall see. but it looks like there may need to be some adjustment is shaft length (lol) to make this bolt in.
05-12-14, 09:39 PM
#108
I had a TII &RX8 trans side-by-side and iirc, the length input shaft to output shaft was nearly identical. Also, the TII drive shaft fit in the output of the RX8 trans. I would try and see if a TII driveshaft fits in the car without modification. The big difference was the shifter housing. Also, be careful shifting the rx8 trans. They like to bend shift forks. The 09+ RX8 trans is damn near bulletproof though, but good luck finding one cheap.
05-12-14, 10:02 PM
#109
I had a TII &RX8 trans side-by-side and iirc, the length input shaft to output shaft was nearly identical. Also, the TII drive shaft fit in the output of the RX8 trans. I would try and see if a TII driveshaft fits in the car without modification. The big difference was the shifter housing. Also, be careful shifting the rx8 trans. They like to bend shift forks. The 09+ RX8 trans is damn near bulletproof though, but good luck finding one cheap.
06-20-14, 08:17 AM
#110
some updates, I have been busy with house purchasing stuff. I mean buying a garage with a detached house, but more on that later. I did make some progress on my lights though.
Here is kind of a mockup of what it could be vs what it is right now.
The idea is to cut out part of bumper and enclose an area for new HB/LB and fill in the hood with fiberglass where the headlight covers would be. I'm still working on some mounting ideas, tested a bracket or two that failed so back to the drawing board. Also long term idea is to replace front bumper and fenders, clean up the hood and re spray the front end essentially. I have all the parts (minus driver side fender but it could be salvaged) so that will happen at the new shop
So let me walk you through lighting terminolgy and etc. One of the perks of being in the lighting business, ALL THE BALLASTS! ALL THE DS3s!

Don't worry I have plenty more in the basement as well.
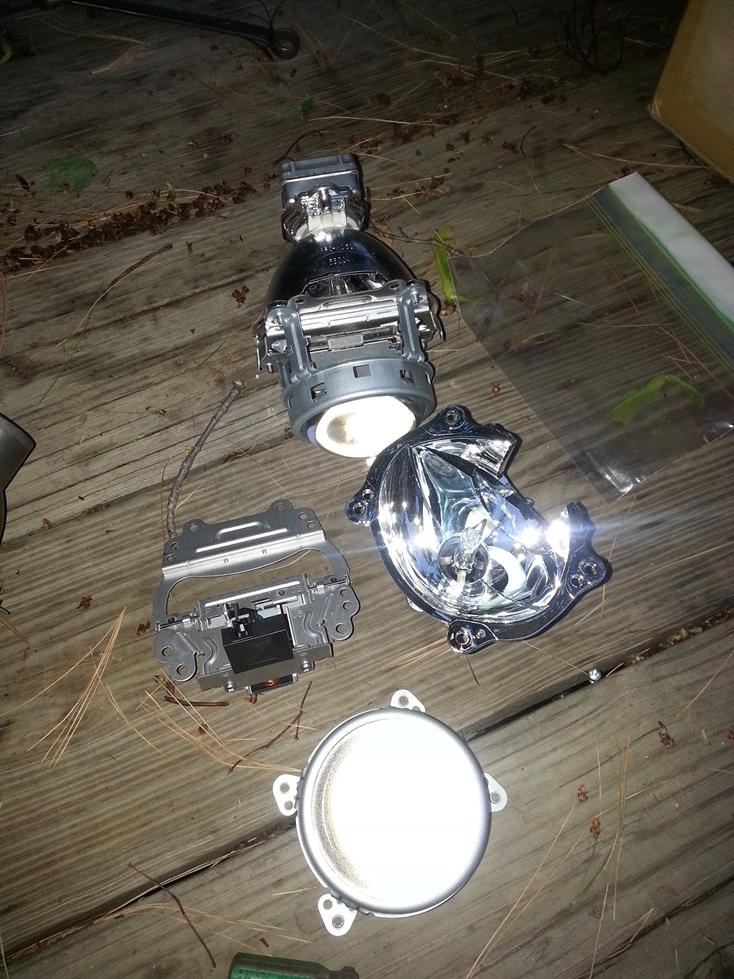
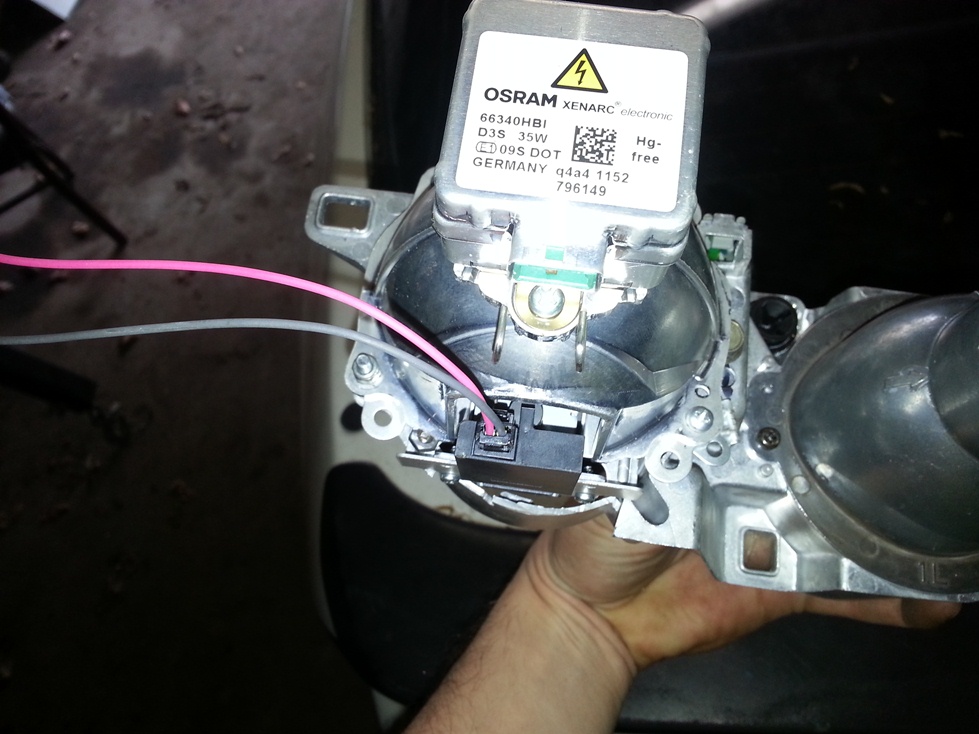
The top assembly is a projector unit or commonly refered to in the biz as a PES, which stands for piezelispode surface or something. Regardless it is made up of a few key parts:
+PES (projector) Lens
+lens holder
+Shade
+reflector
+bulb
Now this shade is unique because it is for a bi-function HID XENON unit. The shade gives you your legal road requirements for light cutoff and utilizing that with the lens gives you that crisp sharp appearance. Now with a bi-function unit it has a solenoid on it that moves a door on a lever to change from your high beam to low beam function, pretty neat stuff. This particular unit is out of a mustang but I'm sure its used in most ford products.
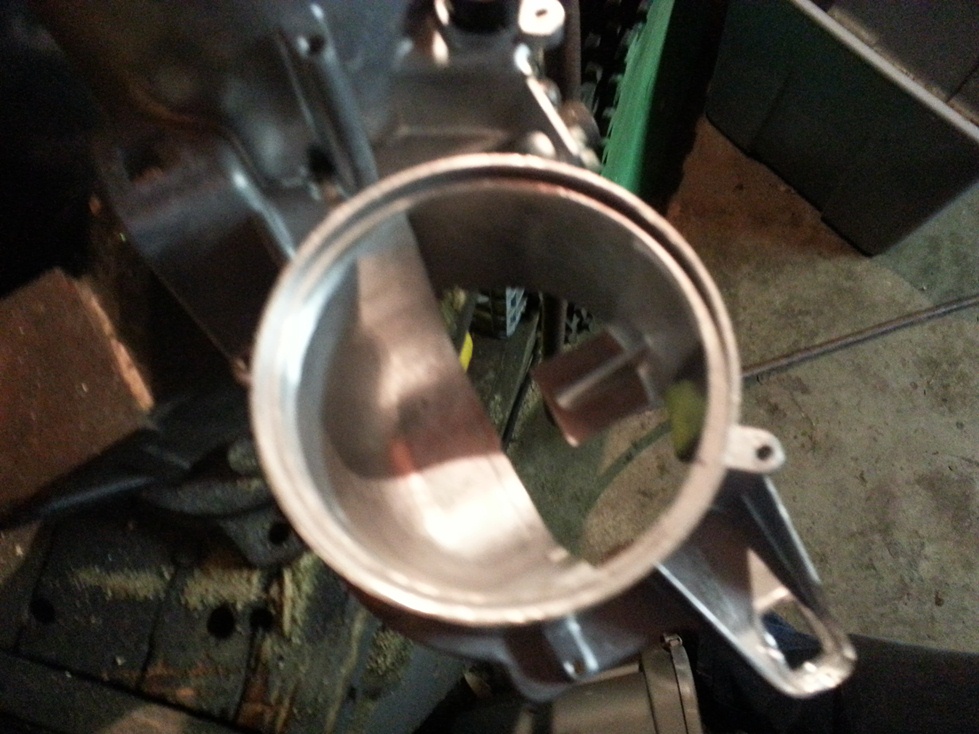
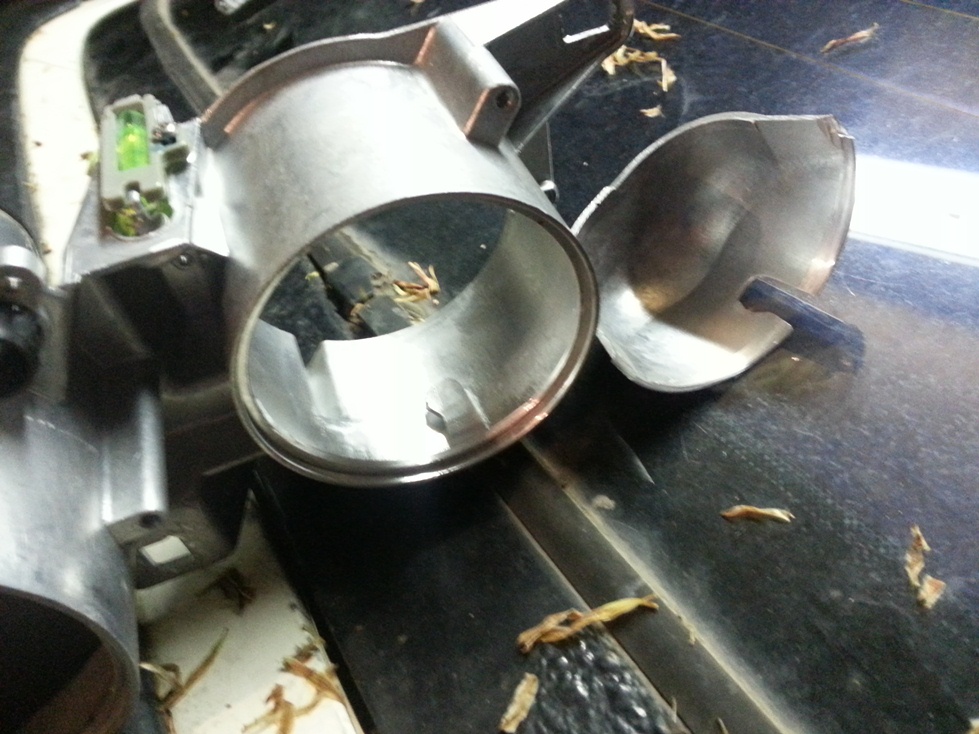
now the fun parts: I wanted to retrofit this low beam halogen into a bi function HID unit so I unbolted the ADC (aluminum die cast) reflector and looked inside. What you see if the low beam shade, instead of being a stamped piece of metal it is actually cast into the unit itself.
So that **** has got to go!
cutoff wheel fits Juuuuuuuust right.
Now that the stock shade is gone, time to graft the bi-function stamped shade to the bad boy.

Luckily the reflector bolts to the shade only one way and the mounting features overlap so I can keep the legal cut off line and have good light pattern isntead of massive glare and blinding all of the drivers on the road. I just had to cut one of the ears off for it to fit, drill and tap 3 holes and BAM. shade accomplished. Now I just need to bolt the shade to the reflector.
Here is kind of a mockup of what it could be vs what it is right now.
The idea is to cut out part of bumper and enclose an area for new HB/LB and fill in the hood with fiberglass where the headlight covers would be. I'm still working on some mounting ideas, tested a bracket or two that failed so back to the drawing board. Also long term idea is to replace front bumper and fenders, clean up the hood and re spray the front end essentially. I have all the parts (minus driver side fender but it could be salvaged) so that will happen at the new shop
So let me walk you through lighting terminolgy and etc. One of the perks of being in the lighting business, ALL THE BALLASTS! ALL THE DS3s!

Don't worry I have plenty more in the basement as well.
The top assembly is a projector unit or commonly refered to in the biz as a PES, which stands for piezelispode surface or something. Regardless it is made up of a few key parts:
+PES (projector) Lens
+lens holder
+Shade
+reflector
+bulb
Now this shade is unique because it is for a bi-function HID XENON unit. The shade gives you your legal road requirements for light cutoff and utilizing that with the lens gives you that crisp sharp appearance. Now with a bi-function unit it has a solenoid on it that moves a door on a lever to change from your high beam to low beam function, pretty neat stuff. This particular unit is out of a mustang but I'm sure its used in most ford products.
now the fun parts: I wanted to retrofit this low beam halogen into a bi function HID unit so I unbolted the ADC (aluminum die cast) reflector and looked inside. What you see if the low beam shade, instead of being a stamped piece of metal it is actually cast into the unit itself.
So that **** has got to go!
cutoff wheel fits Juuuuuuuust right.
Now that the stock shade is gone, time to graft the bi-function stamped shade to the bad boy.
Luckily the reflector bolts to the shade only one way and the mounting features overlap so I can keep the legal cut off line and have good light pattern isntead of massive glare and blinding all of the drivers on the road. I just had to cut one of the ears off for it to fit, drill and tap 3 holes and BAM. shade accomplished. Now I just need to bolt the shade to the reflector.
 06-20-14, 08:18 AM
#111
add wiring pigtail for the bi-function solenoid.
and viola! you are done with your sub assembly, here are some shots next to the other handed unit to show the difference.
Now you can see in the last pictures there are 2 square holes, these will be used for the aiming adjustment screws, some misc hardware from work pop right in then all I need to do is re-insert the correct length adjustment screw.


the black object in the middle top is a plastic bushing that holds a stud on a ball pivot, these 3 items together give me my fulcrum for adjustment.
Next step is mounting and enclosing, stay tunned.
and viola! you are done with your sub assembly, here are some shots next to the other handed unit to show the difference.
Now you can see in the last pictures there are 2 square holes, these will be used for the aiming adjustment screws, some misc hardware from work pop right in then all I need to do is re-insert the correct length adjustment screw.
the black object in the middle top is a plastic bushing that holds a stud on a ball pivot, these 3 items together give me my fulcrum for adjustment.
Next step is mounting and enclosing, stay tunned.
09-30-14, 10:58 AM
#113
took 3rd place in the same event last 2 years in a row, it was a good win.
After coming back from nationals I spent the last month finishing up the shop, moving took a bunch of time but not it is all settled! Mid-West Wankel is now "officially" open for business!!!
I finished assembling the wood bench and assembled the metal shelves, had to clean/sand and paint them then anchor them to the wall but they are sturdy and nice now
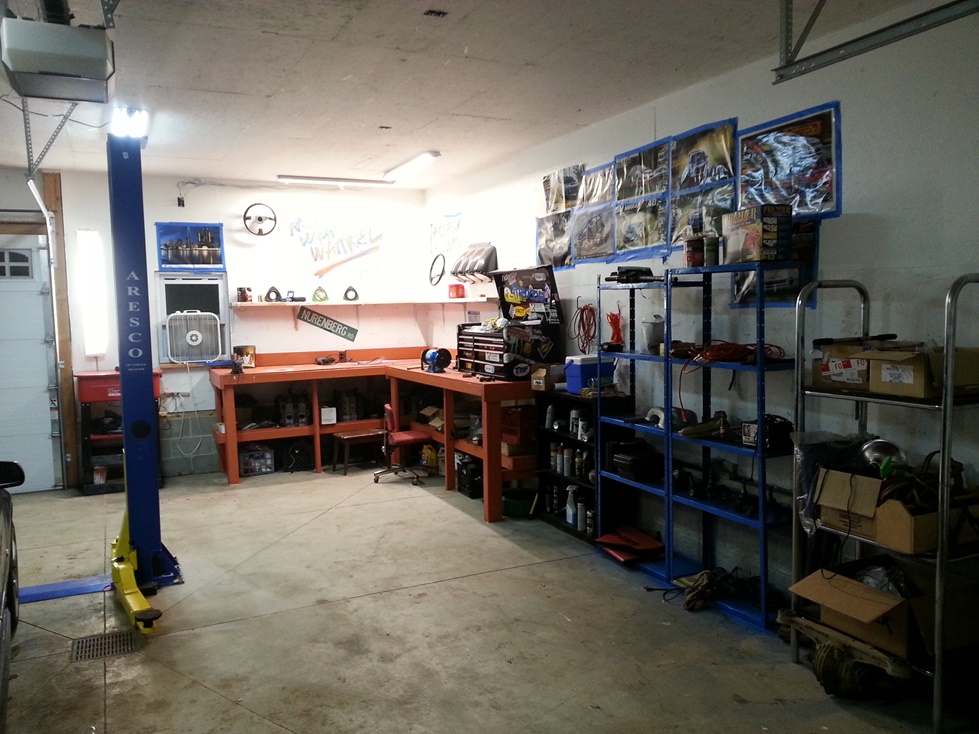
I acquired a parts washer and raised it to be more ergonomic like my bench. I also just picked up a 60 gallon compressor
store all the parts!
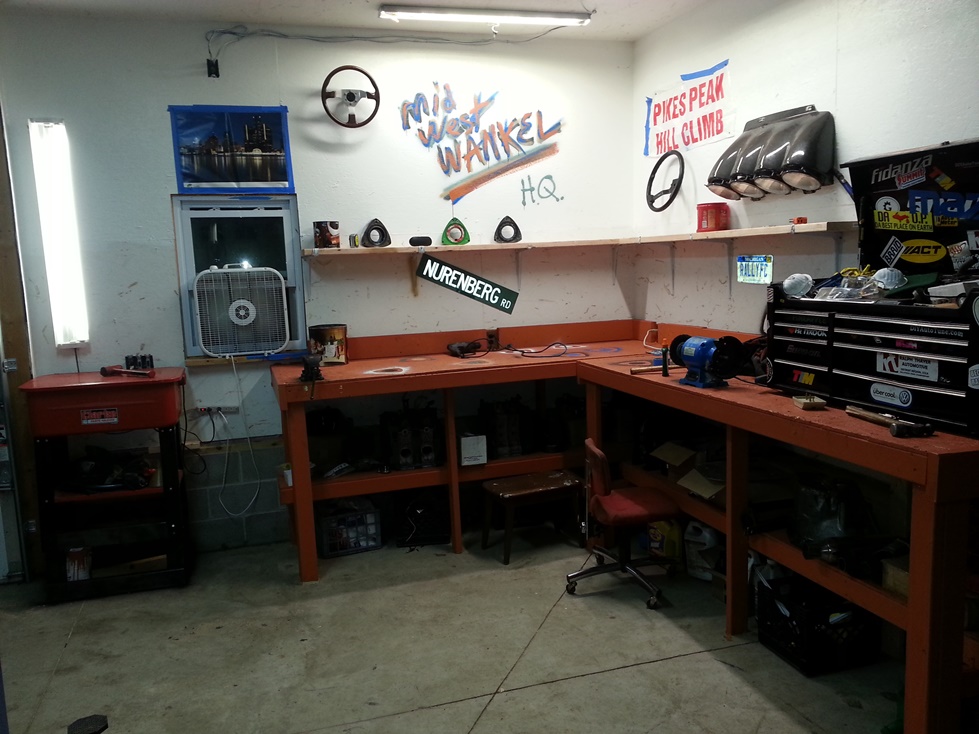
Each section is broken down by engine build essentially.
Engine A, B and C are separated.
but I made more progress on the lighting too during this process.
BACK TO THE DRAWING BOARD!!! It is time to re re re re-design/fungineer my headlamps. I didn't like the way they were going before with a custom bracket and having to custom make an enclosure, it felt like I was trying to re-invent the wheel. Hard part with a custom mountain bracket is vibration and having the light beam bounce around which is bad and likely illegal. Also making a waterproof enclosure was tough from scratch, probably easier to modify something. So I decided to go to the junkyard and grab more J30 headlamps, this time... intact ones...
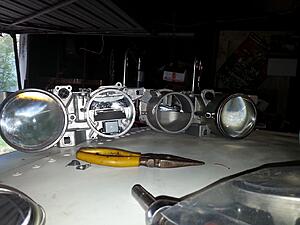
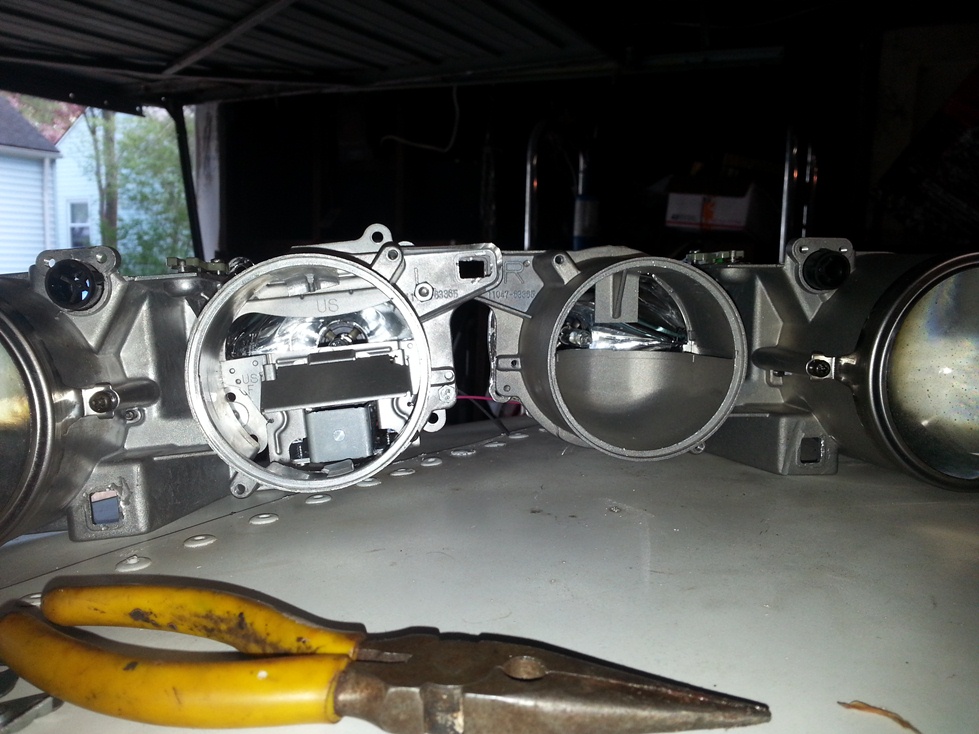
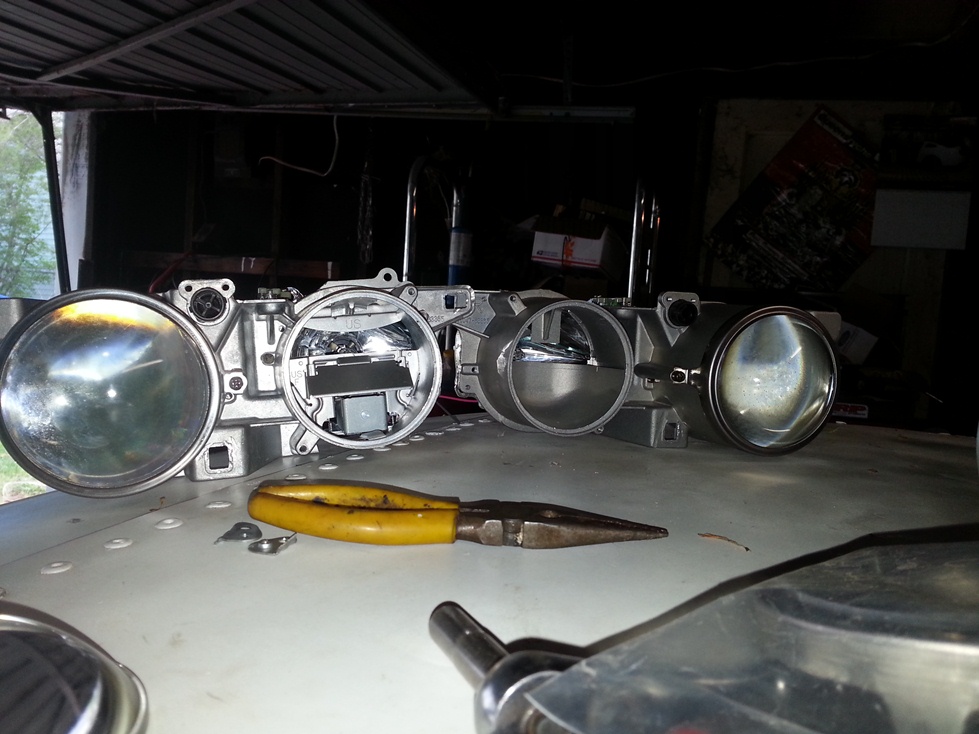
Here is a picture of the modified guts (on the prototype bracket) next to a stock one without a lens next to an intact stock one. The colors may seem funky because I see a lot of reflections in my tie die shirt lol.

Reasons?
1. Multiple Easy mounting locations
2. Its already a lamp!
3. Existing aiming/fixing functions
4. Datums exist there for this design to hold everything in place properly under vibration.
So here are the guts back in their housing using existing hardware.

...and the back side (next to do is fiberglass enclosure of some kind where I can toss a cap on the back to reach the HID bulb)

Nevermind the gorilla glue, I broke a mounting tab, its messy but it fixes the issue lol.
I did not want the flashy chrome bezel, but the bezel is required because it also works as a curtain to block light leaking from surrounding areas, so I thought it would be cool to paint it black!

However I did mask the inside of the chrome ring because the hardware that mounts over the projector lenses is chrome too.

But you can't really tell...
Here is the bench test making sure the circuit works, (and it does) this was an old CPU and I don't think it is very strong because my goal is to turn the high beam bulb on with the same circuit as the solenoid for the bi-function HB actuation (shade actuator) but every time I go to ground that circuit my lights go out, unless I already have the non HID bulb on, might need a relay in there but that is still a work in progress on how to neatly and properly wire it up. The good news is that all functions function functionally.

Here is a shot of it with the lens "on" and unit assembled.

I would rather be porting/assembling my rotary but I lack a compressor at this time and this needs to be done. This simple project has become into a regular project lol.
Next up:
Integrate lamps into vehicle
FINISH PORTING THE GOD DAMN ENGINE!
09-30-14, 11:09 AM
#114
So at GLDRX I exploded my exhaust gasket from the high heat (very early on) and I am not allowed to run DET rallyX events until I quiet it down. So I added a resonator, also while doing so I had got redone the majority of the exhaust!
step 1. start over (kind of a common theme recently)

step 2. Add runner length. (approx 3 feet added)

step 3. Add resonator

step 4. add tape?

step 5. stop and compare (while still tacked)

step 6. re-install, inspect for leaks (NONE!)

Oh and I also snagged this and plumbed the garage the other weekend

3 cyl, 60 gal, 2 stage, 18cfm @ 90psi, belt drive.
Now there is an autoX on Sunday that I will be taking this too to verify if the sound got better or worse or if I can break the engine, if I can't then I have a potential 2 day rallycross on the other side of the state next weekend with a non SCCA affiliated group.
step 1. start over (kind of a common theme recently)
step 2. Add runner length. (approx 3 feet added)
step 3. Add resonator
step 4. add tape?
step 5. stop and compare (while still tacked)
step 6. re-install, inspect for leaks (NONE!)
Oh and I also snagged this and plumbed the garage the other weekend
3 cyl, 60 gal, 2 stage, 18cfm @ 90psi, belt drive.
Now there is an autoX on Sunday that I will be taking this too to verify if the sound got better or worse or if I can break the engine, if I can't then I have a potential 2 day rallycross on the other side of the state next weekend with a non SCCA affiliated group.
10-08-14, 12:03 PM
#115
It is quieter with the addition of the spiral flow however, inside the car you can't tell. With the runners longer you hear each rotor pulse more distinct, which is neat. The moroso spiral flow was a nice touch. I still think I will want to wear ear plugs when breaking in the new engine. The muffler alone is just too loud. Also when I extended the runners I used 14 gauge steel, I figured the thicker the better for sound retention.
oh did I mention I made some progress?

I made some progress, need to finish the rear iron and 100% of the housings still.

The autoX was merely to test the exhaust, and I also discovered my new seating position is painful on the knee for a half hour drive so I absolutely need a new steering wheel to bring closer to me to free up knee room. I drove with blown front shocks, and no sway bars on bald tires. Highlarity ensued:


at the finish was a 90 left turn and my car would tripod the inner rear wheel. I would mat the gas, the RPM goes up but no forward motion and for a few seconds and no smell of clutch.
spun twice the 1st run, then the 2nd run I spun about 5 feet from where I spun the 2nd time. Naturally I just pinned the gas down and let her rip. the course was small so I just wound out 1st to 9k or so, again. Observe:

oh did I mention I made some progress?
I made some progress, need to finish the rear iron and 100% of the housings still.
The autoX was merely to test the exhaust, and I also discovered my new seating position is painful on the knee for a half hour drive so I absolutely need a new steering wheel to bring closer to me to free up knee room. I drove with blown front shocks, and no sway bars on bald tires. Highlarity ensued:
at the finish was a 90 left turn and my car would tripod the inner rear wheel. I would mat the gas, the RPM goes up but no forward motion and for a few seconds and no smell of clutch.
spun twice the 1st run, then the 2nd run I spun about 5 feet from where I spun the 2nd time. Naturally I just pinned the gas down and let her rip. the course was small so I just wound out 1st to 9k or so, again. Observe:
10-31-14, 09:36 AM
#116
So I got some more work done recently, honestly this part should be the start of a new thread because the car is basically going to be totally different and the rotary engine build deserves its own thread .
in summary:
All irons? = ported (not polishing)
All housings? = ported/polished
Final parts required for assembly ETA? = today
Tap ALL the threads! (no seriously) especially the tension bolts, its a bitch and a half with the cast iron being so hard but it ensures even torque. Also its a good practice to get into and makes for an easier installation. When it comes to assembling these guys the minor attention to detail goes a long way (in my opinion) I hate doing it but its worth while.
Here is some comparison between a rough cut and just a scribed port:

Here are some after shots:
w/ the inserts removed:
all cleaned up with the polished inserts in (but not installed)
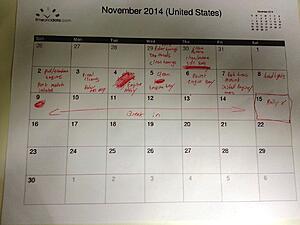
Here is my schedule to complete to make it before rallycross event on the 15th
It is a bit ambitious I know...
However I think if I rush to get it all done in time I will either run out of money to be able to compete or I have to only do the engine build/break in and thats it. However I still need to do these things <strong>MAJOR</strong> things before the car is back on the level:
1. Rear brake pads + passenger rear caliper
2. Assemble front bilstein shocks assemblies (RB springs + new bearings + bilstein B6 HD inserts + gutted shock tubes)
3. 6 speed swap:
A. Verify driveshaft compatibility (might need to be lengthened or shortened or nothing at all!)
B. Fabricate transmission mount,
C. Create room for shifter in chassis
D. Send shift **** out to be converted to wood shift **** (ball so hard) again
4. Headlights (the lamps themselves are now complete) <strong>BUT</strong> they still need to be:
A. Wired up to the chassis
B. Fabricate headlight mount brackets
C. Fabricate splash shield for added water protection
5. Bodywork,
A. Source or repair driver side fender
B. replace passenger side fender (acquired)
C. Replace and modify front bumper (to accommodate new lights, cut out grille, and the rallyboob aux mounting)
D. Fill in hood where headlight cover opening is
E. Paint both fenders, hood and front bumper
F. Clean and paint engine bay.
6. Break in new engine, approx 500 miles of stop and go driving slowly bringing it to redline and slowly increasing load. And with daylight savings time approaching I need headlights to be able to drive the vehicle around to break it in at night and dusk hours. Also I may need to get a new steering wheel because the new seating position is HELL on my knee during transit, the best seating position in my car is WOT (and thats how you should be driving it)
so my ideal goal is to have it all done by Dec 13th for the season ender to be a good shakedown to get ready for 2015 season.
Things left on the engine (before assembly)?
1. Port match intake manifold and gasket
2. Add brake booster port to intake manifold
3. Finish taping all the threads on the irons
4. Clean the berkeley out of everything
5. pull the old engine and salvage tension bolts/apex seals. Or verify if I need new apex seals or not
Ambitious? Now I after writing all what I need to get done I don't know if I can lol....
in summary:
All irons? = ported (not polishing)
All housings? = ported/polished
Final parts required for assembly ETA? = today
Tap ALL the threads! (no seriously) especially the tension bolts, its a bitch and a half with the cast iron being so hard but it ensures even torque. Also its a good practice to get into and makes for an easier installation. When it comes to assembling these guys the minor attention to detail goes a long way (in my opinion) I hate doing it but its worth while.

Here is some comparison between a rough cut and just a scribed port:

Here are some after shots:
w/ the inserts removed:

all cleaned up with the polished inserts in (but not installed)

Here is my schedule to complete to make it before rallycross event on the 15th

It is a bit ambitious I know...
However I think if I rush to get it all done in time I will either run out of money to be able to compete or I have to only do the engine build/break in and thats it. However I still need to do these things <strong>MAJOR</strong> things before the car is back on the level:
1. Rear brake pads + passenger rear caliper
2. Assemble front bilstein shocks assemblies (RB springs + new bearings + bilstein B6 HD inserts + gutted shock tubes)
3. 6 speed swap:
A. Verify driveshaft compatibility (might need to be lengthened or shortened or nothing at all!)
B. Fabricate transmission mount,
C. Create room for shifter in chassis
D. Send shift **** out to be converted to wood shift **** (ball so hard) again
4. Headlights (the lamps themselves are now complete) <strong>BUT</strong> they still need to be:
A. Wired up to the chassis
B. Fabricate headlight mount brackets
C. Fabricate splash shield for added water protection
5. Bodywork,
A. Source or repair driver side fender
B. replace passenger side fender (acquired)
C. Replace and modify front bumper (to accommodate new lights, cut out grille, and the rallyboob aux mounting)
D. Fill in hood where headlight cover opening is
E. Paint both fenders, hood and front bumper
F. Clean and paint engine bay.
6. Break in new engine, approx 500 miles of stop and go driving slowly bringing it to redline and slowly increasing load. And with daylight savings time approaching I need headlights to be able to drive the vehicle around to break it in at night and dusk hours. Also I may need to get a new steering wheel because the new seating position is HELL on my knee during transit, the best seating position in my car is WOT (and thats how you should be driving it)
so my ideal goal is to have it all done by Dec 13th for the season ender to be a good shakedown to get ready for 2015 season.
Things left on the engine (before assembly)?
1. Port match intake manifold and gasket
2. Add brake booster port to intake manifold
3. Finish taping all the threads on the irons
4. Clean the berkeley out of everything
5. pull the old engine and salvage tension bolts/apex seals. Or verify if I need new apex seals or not
Ambitious? Now I after writing all what I need to get done I don't know if I can lol....
10-31-14, 09:36 AM
#117
Oooooh what came in the mail (along with misc seals/springs)....
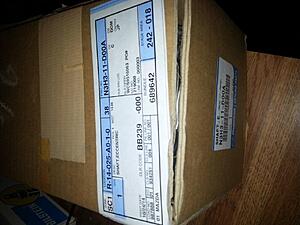
BNIB Rx8 e-shaft (includes pilot bearing/bushing and oil jets) from mazda for only 138 and its .6 lbs lighter and minor taper to the journal for better oiling, otherwise direct bolt in.
We can most certainty do that! Do a mini demonstration. Possibly teardown (of the old engine) and assembly of this one. If anyone is interested I would assume it would be a weekend. Nov 8th or Nov 15th. Right now I'm TBD on the build date because I found a snag...
There is a small area of pitting on one face of the center iron, I fear it might catch the corner piece of the apex seal. Also there appears to be some scratches that I can catch with my fingernail. Not sure if it was damaged in the move or from porting maybe it rested on a burr and dug in...
I might have to send out the iron to get lapped. Then its do I do 1 side or both sides of the center iron...
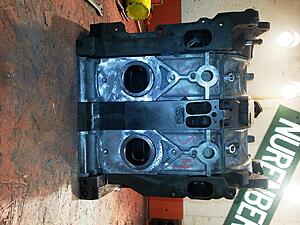
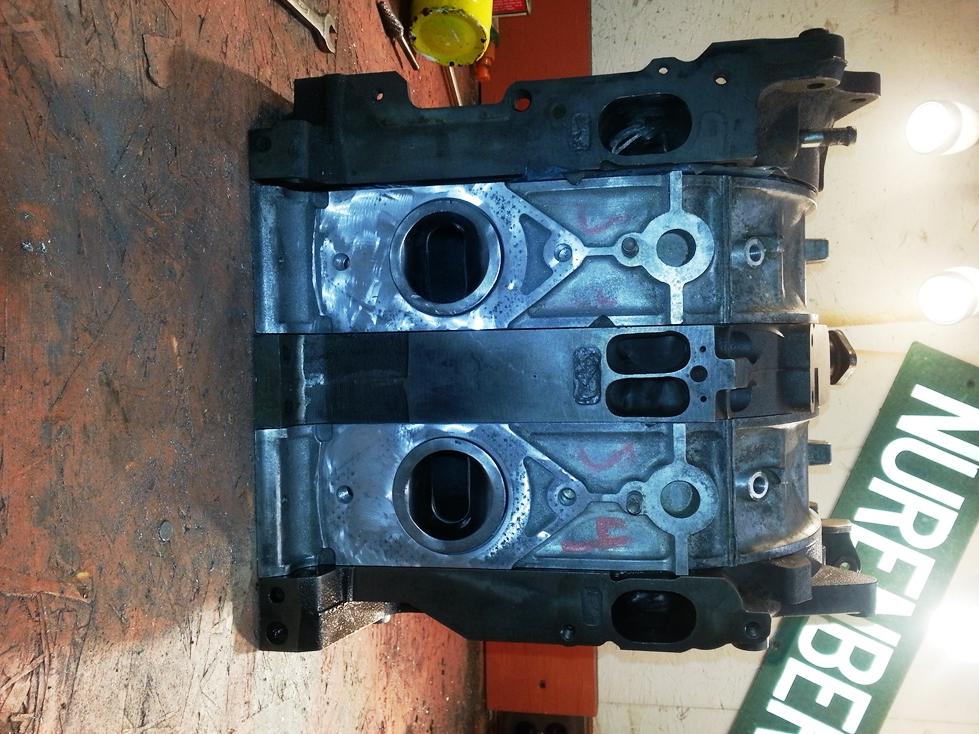
Expect daily updates on this build to see if I am progressing as planned. Last night finished tapping ALL the threads and gave an inspection/touch up on the porting.
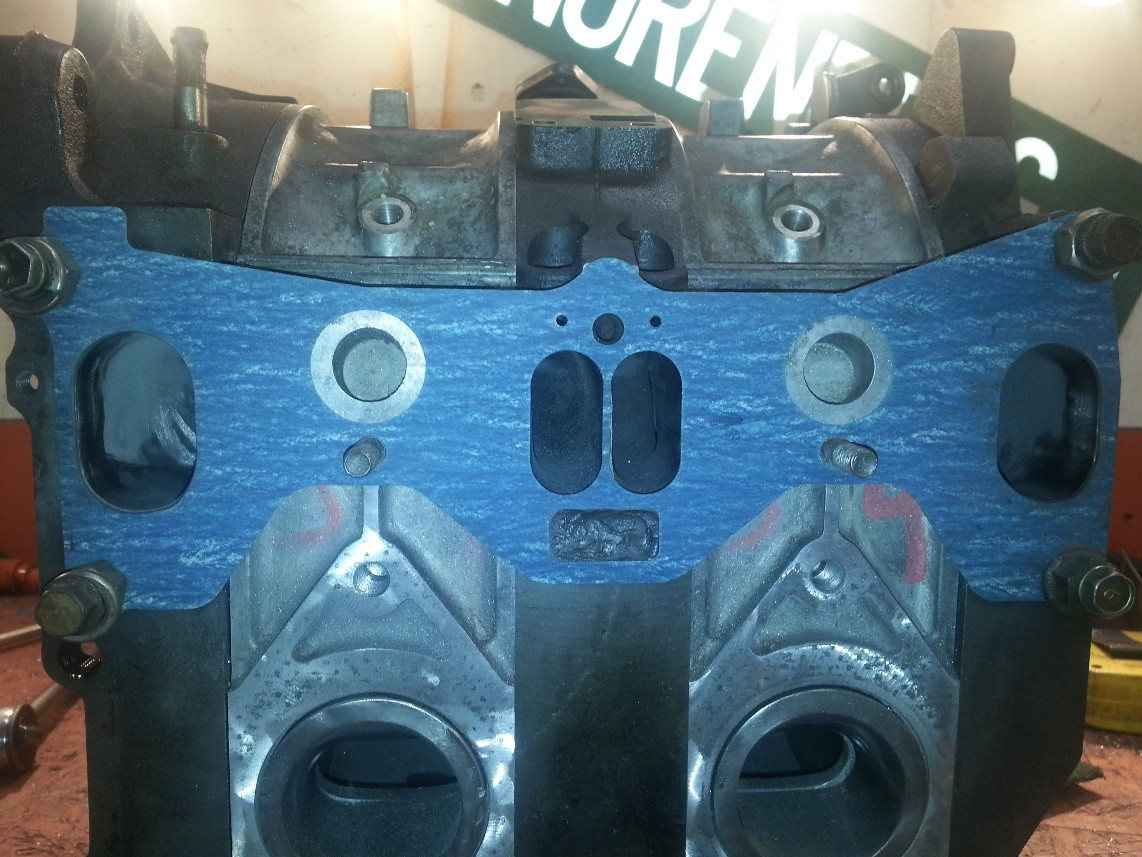
Here are some block shots:

BNIB Rx8 e-shaft (includes pilot bearing/bushing and oil jets) from mazda for only 138 and its .6 lbs lighter and minor taper to the journal for better oiling, otherwise direct bolt in.
We can most certainty do that! Do a mini demonstration. Possibly teardown (of the old engine) and assembly of this one. If anyone is interested I would assume it would be a weekend. Nov 8th or Nov 15th. Right now I'm TBD on the build date because I found a snag...
There is a small area of pitting on one face of the center iron, I fear it might catch the corner piece of the apex seal. Also there appears to be some scratches that I can catch with my fingernail. Not sure if it was damaged in the move or from porting maybe it rested on a burr and dug in...
I might have to send out the iron to get lapped. Then its do I do 1 side or both sides of the center iron...
Expect daily updates on this build to see if I am progressing as planned. Last night finished tapping ALL the threads and gave an inspection/touch up on the porting.
Here are some block shots:
 11-03-14, 11:57 AM
#118
WEEKEND UPDATE WITH COLIN QUINN!
wait actually no. But some **** did go down...
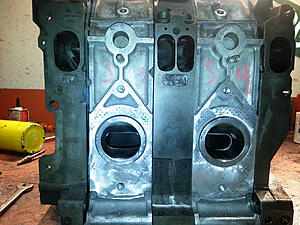
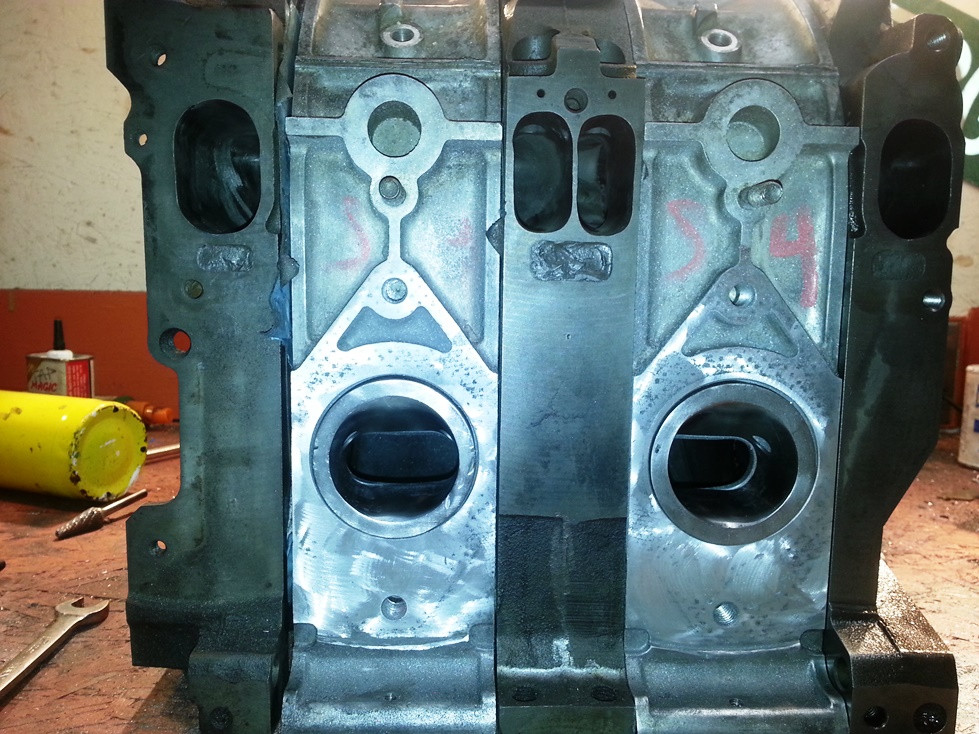
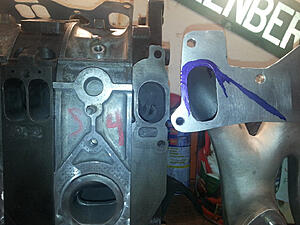
I think I'm going to replace or resurface my center iron, I found some scratches and a small pitted area that I do not want to risk on this engine. But I did get to work on gasket matching the other ports.
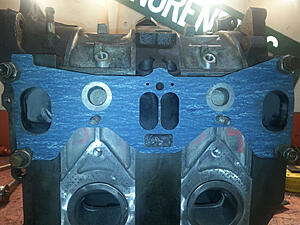
One was nearly spot on, the other took a tad of beveling to correct.
Also, note the size difference in ports between the block and the manifold.
I really dislike atkins rotary products, this is one of them. This manifold would be great on a REW block, but if I could afford that I would have had a better manifold made. Not to mention the fact that they shipped it horribly and got scratches on the gasket mating surface, the part itself was quite dirty and required cleaning to get rid of all of the chips inside of the manifold and the flange area for the carb is not exactly round and the threads for the studs on one went into manifold which would cause a great gas leak. NOT happy with the quality and the price was so-so. Will not be purchasing anything from them again. I have had some minor issues in the past from them and now this is the final nail in the coffin. Do not buy from atkins, /end rant.
ANYWHORE! I got more engine parts cleaned and pulled the powerplant from the car and began my disassembly and inspection.
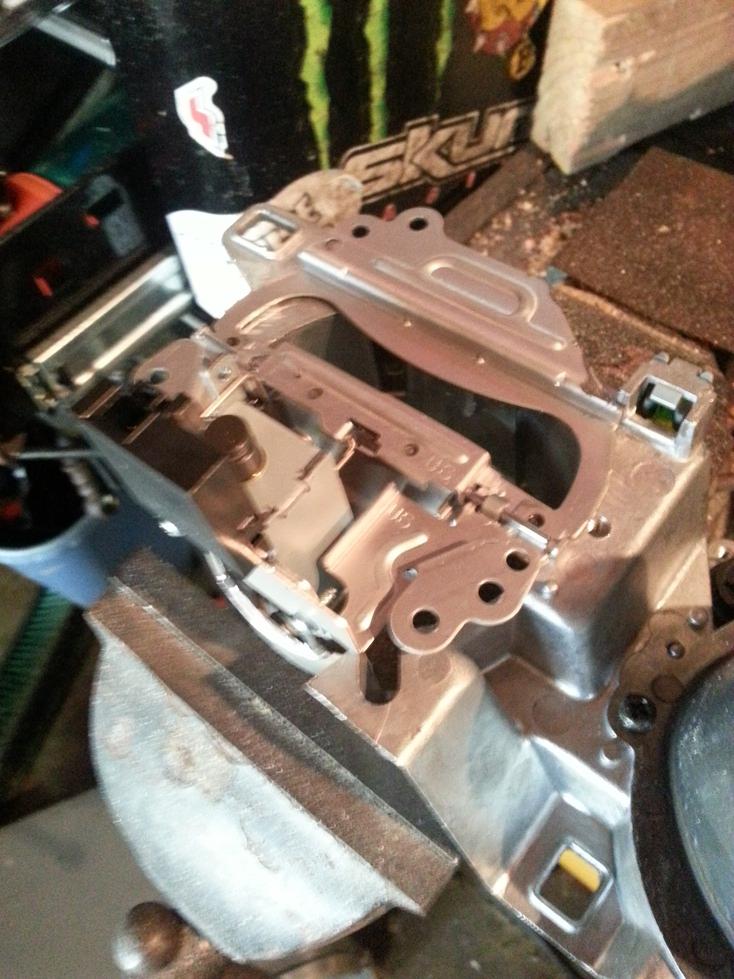
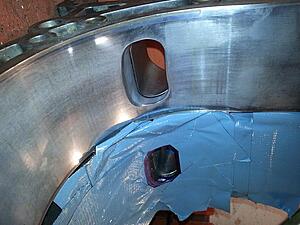
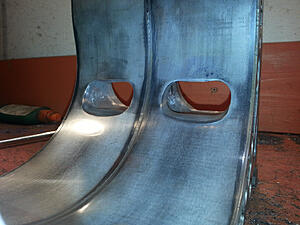
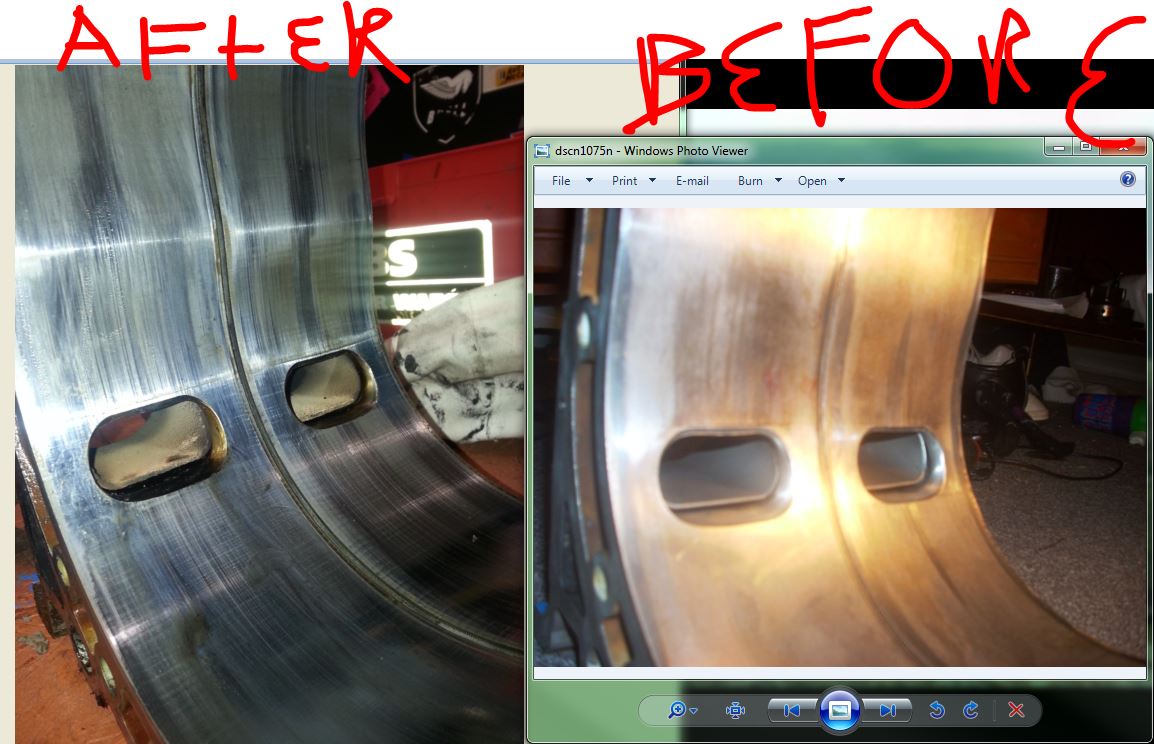
So this engine has had a rough 4.5 years and built on a college budget but how did it do? pretty damn well but this thing was tired. General heavy wear everywhere. I won't bore you all with the photos but step wear increased to drastic measures, I did find some other gouges on other irons but this is a good representation:
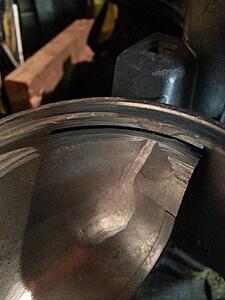
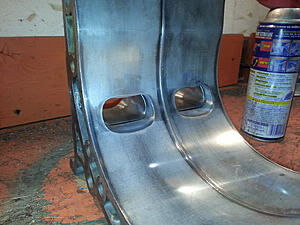
Here is side by side before and after of the rotor housings, everyone said that the RA classics are hard on housings, well I was also hard on the engine but you can see how much less dull it is now.
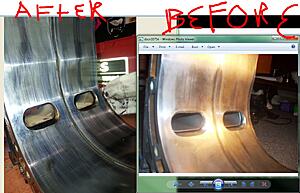
I was expecting more flaking, honestly it really didnt grow or change much (from what I remember)
wait actually no. But some **** did go down...
I think I'm going to replace or resurface my center iron, I found some scratches and a small pitted area that I do not want to risk on this engine. But I did get to work on gasket matching the other ports.
One was nearly spot on, the other took a tad of beveling to correct.
Also, note the size difference in ports between the block and the manifold.

I really dislike atkins rotary products, this is one of them. This manifold would be great on a REW block, but if I could afford that I would have had a better manifold made. Not to mention the fact that they shipped it horribly and got scratches on the gasket mating surface, the part itself was quite dirty and required cleaning to get rid of all of the chips inside of the manifold and the flange area for the carb is not exactly round and the threads for the studs on one went into manifold which would cause a great gas leak. NOT happy with the quality and the price was so-so. Will not be purchasing anything from them again. I have had some minor issues in the past from them and now this is the final nail in the coffin. Do not buy from atkins, /end rant.
ANYWHORE! I got more engine parts cleaned and pulled the powerplant from the car and began my disassembly and inspection.

So this engine has had a rough 4.5 years and built on a college budget but how did it do? pretty damn well but this thing was tired. General heavy wear everywhere. I won't bore you all with the photos but step wear increased to drastic measures, I did find some other gouges on other irons but this is a good representation:
Here is side by side before and after of the rotor housings, everyone said that the RA classics are hard on housings, well I was also hard on the engine but you can see how much less dull it is now.
I was expecting more flaking, honestly it really didnt grow or change much (from what I remember)
11-03-14, 12:15 PM
#119
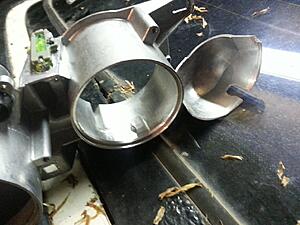
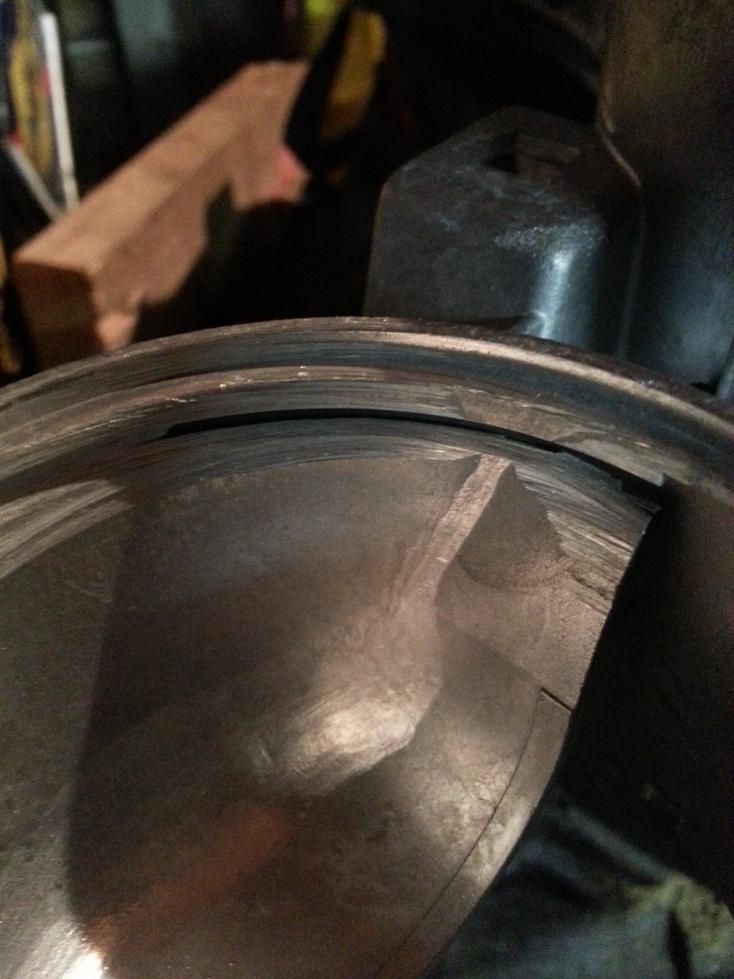
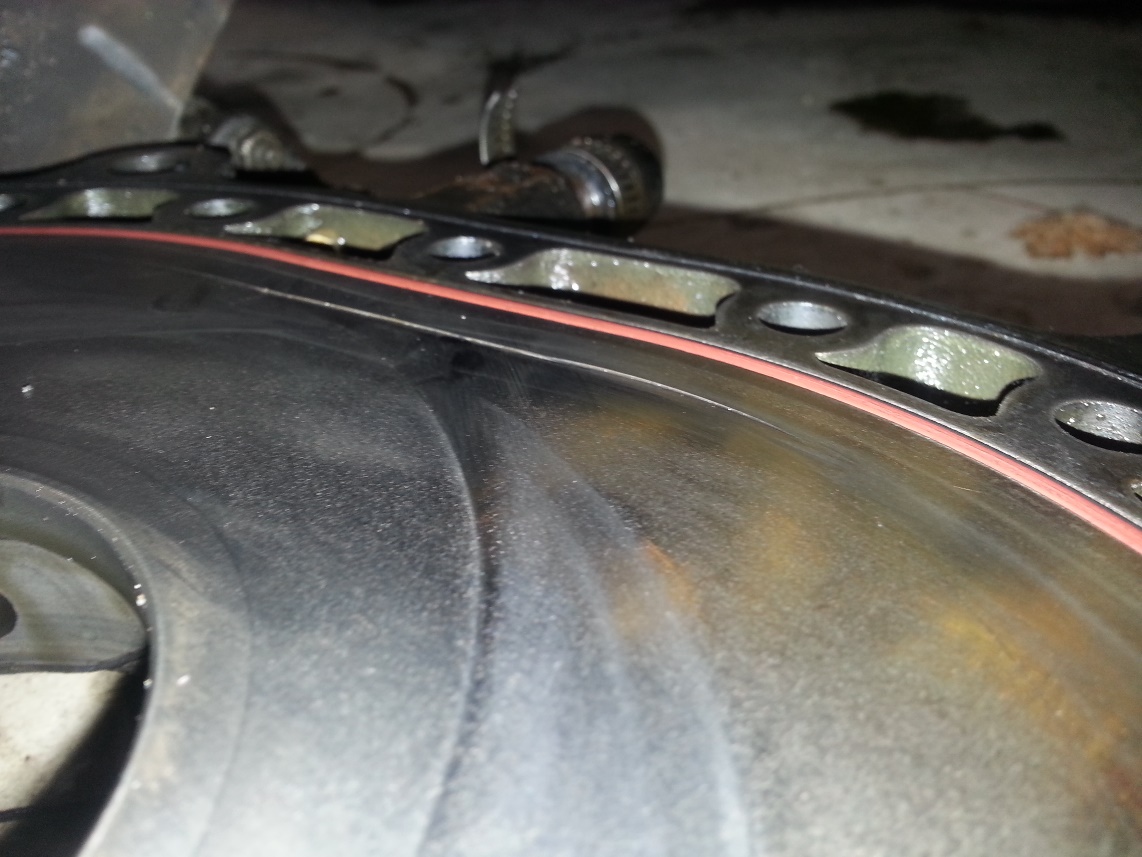
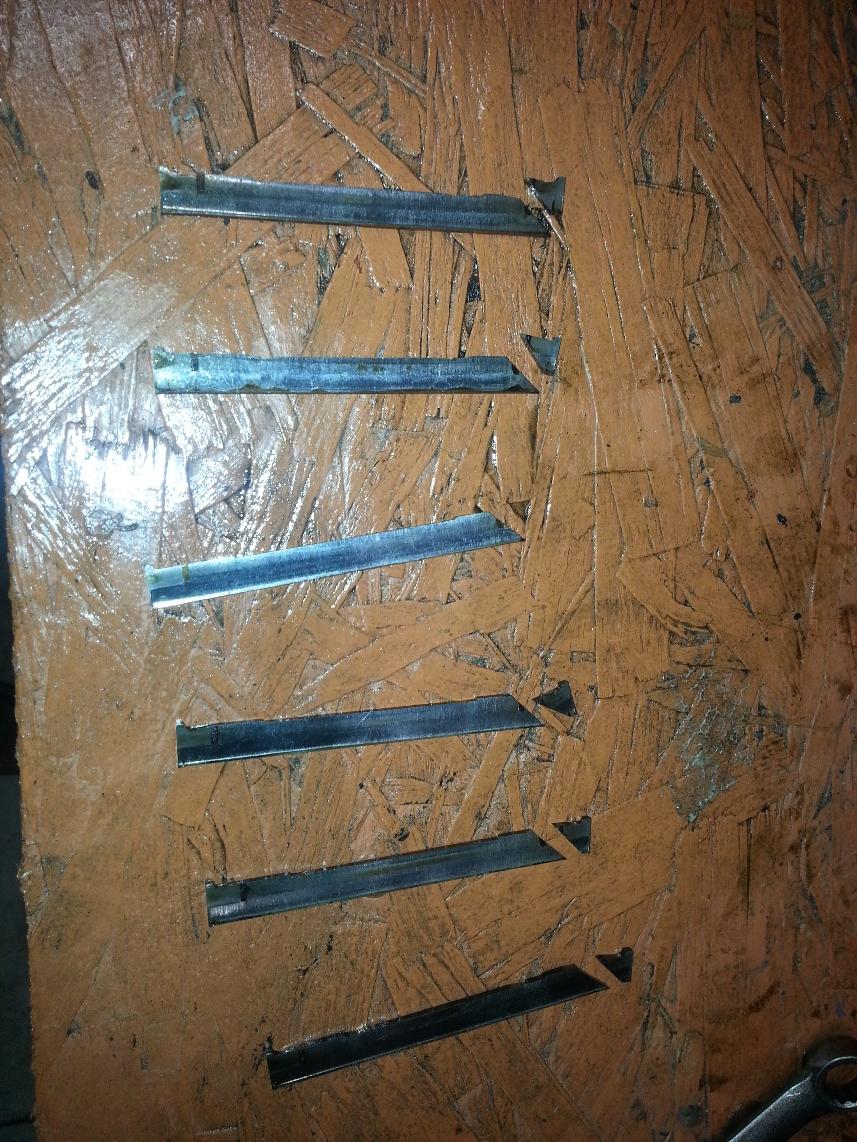
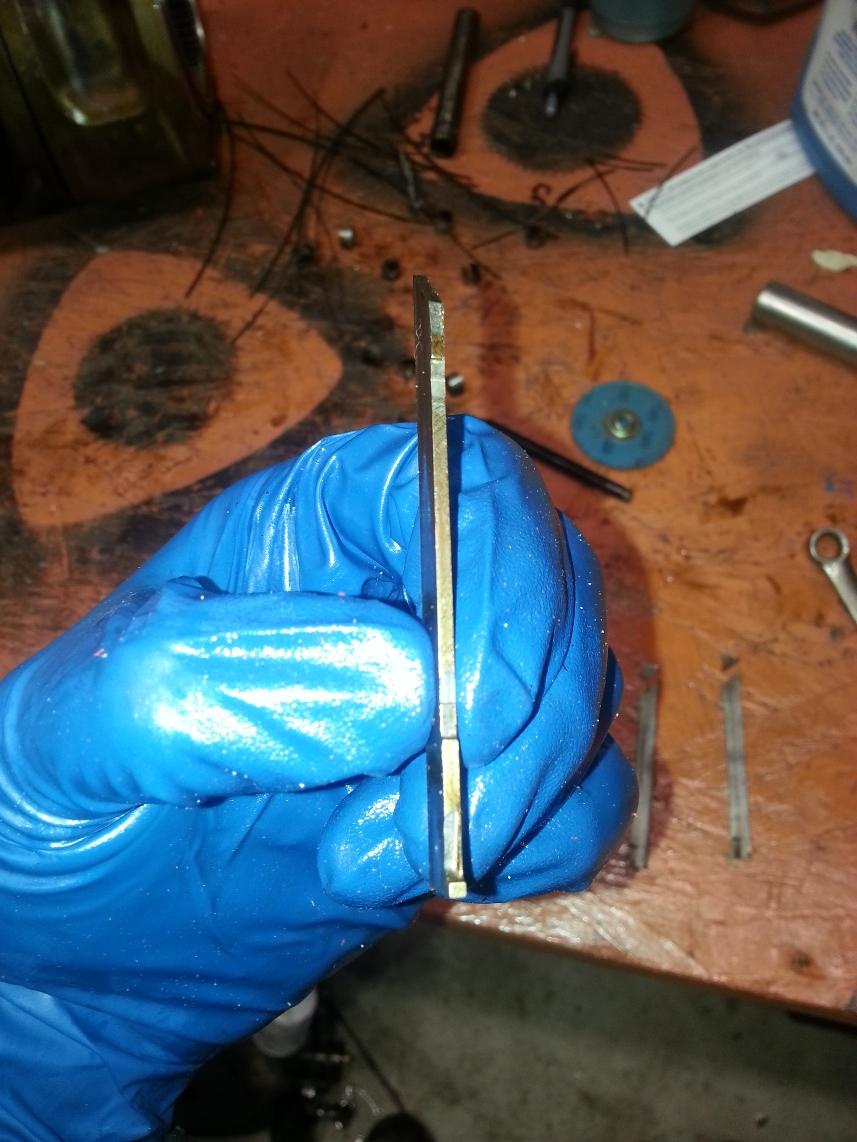
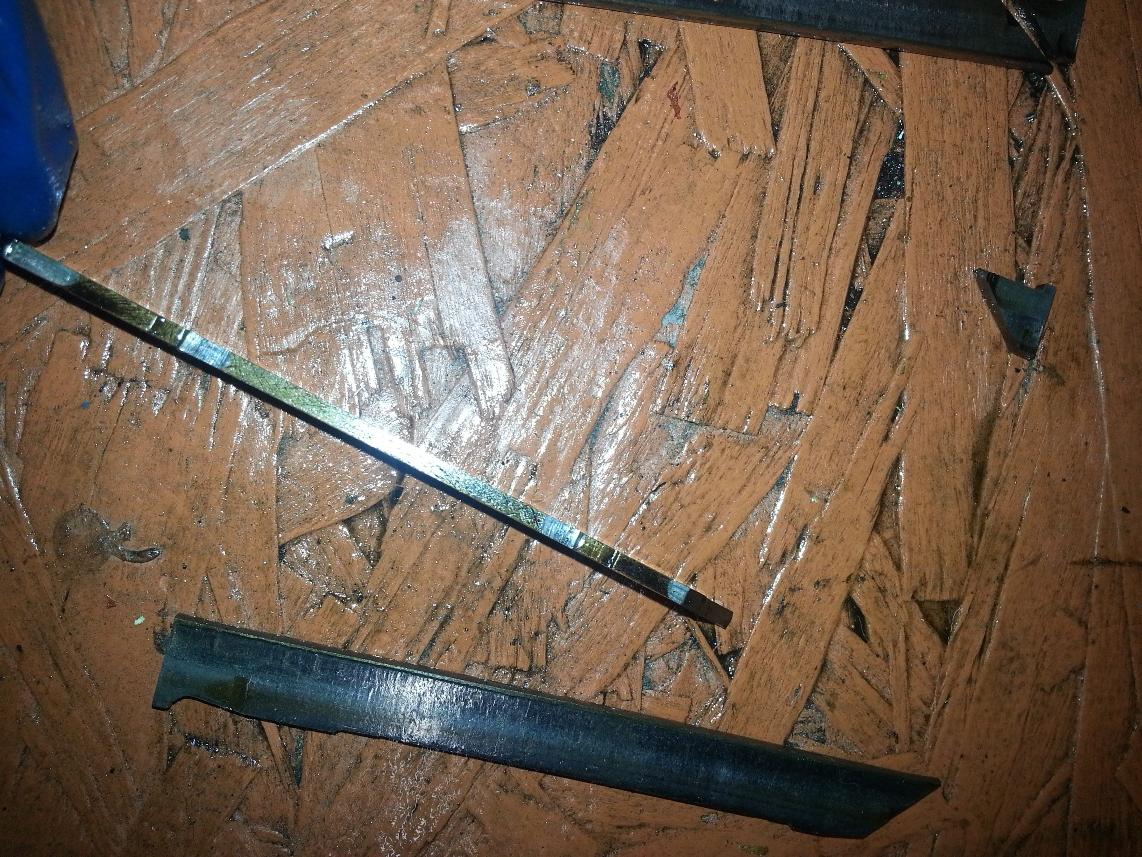
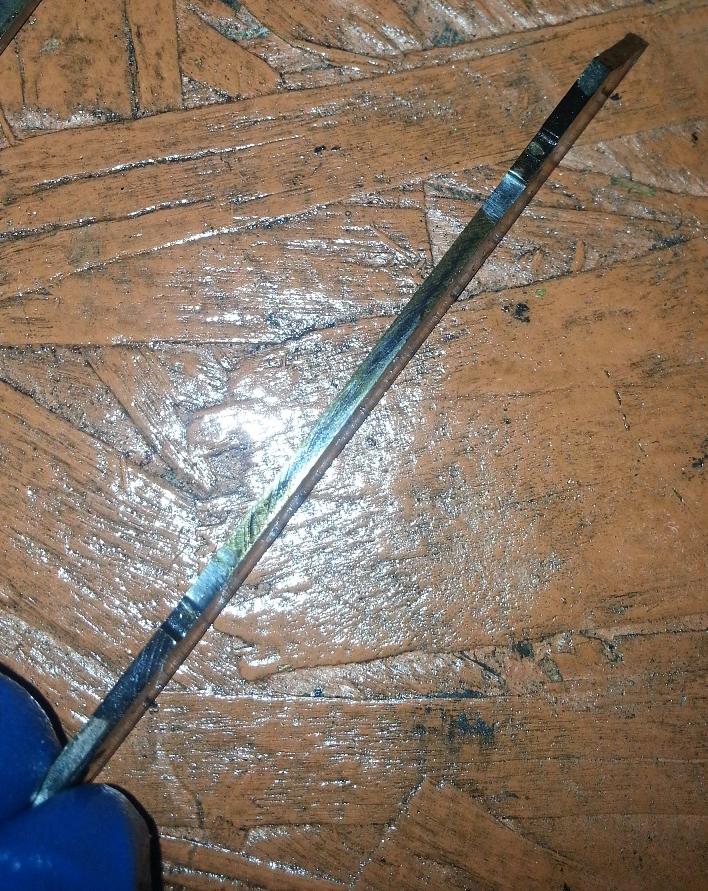
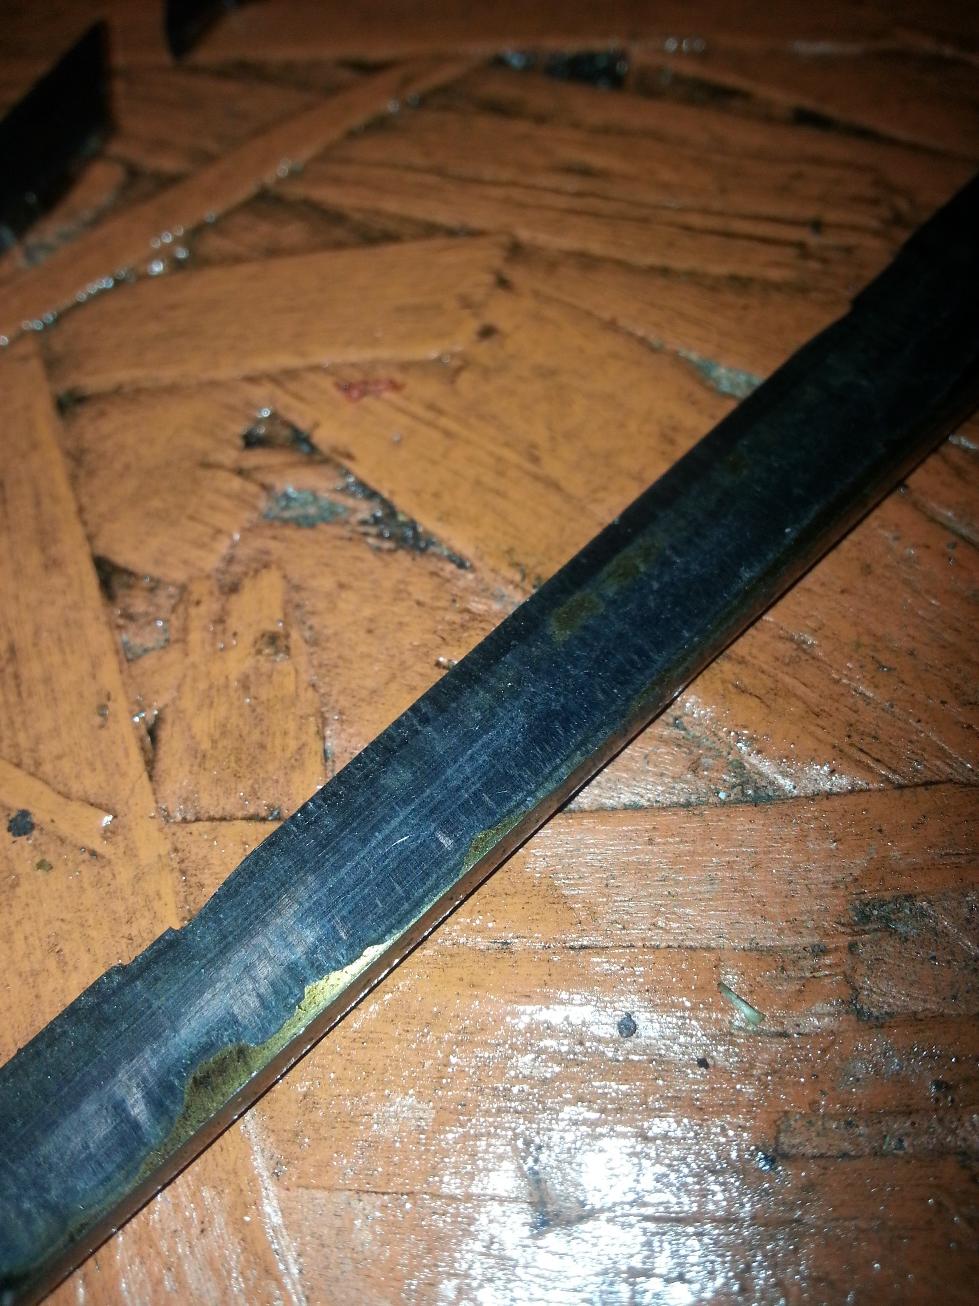
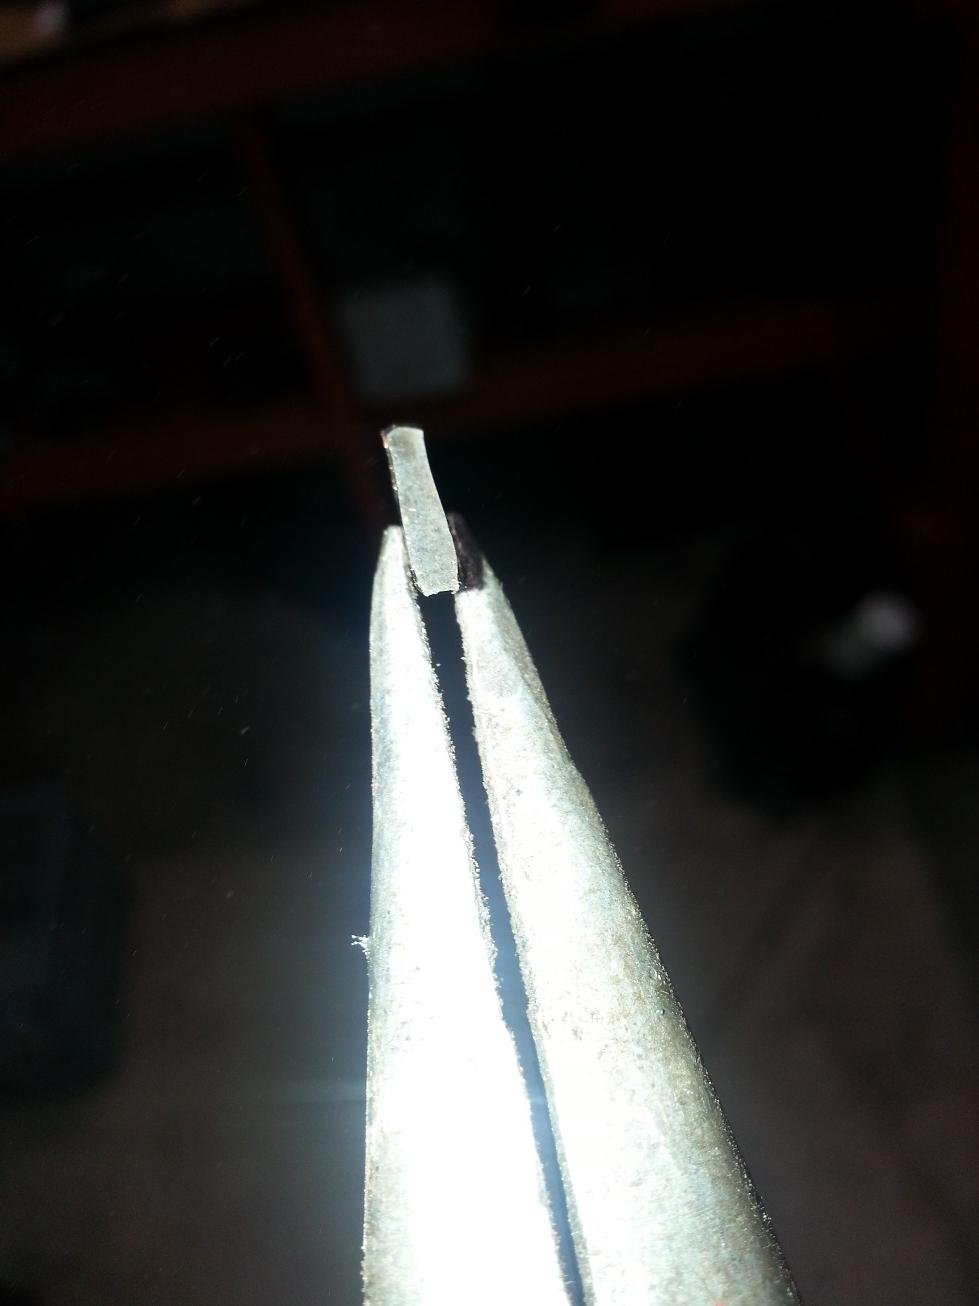
Now the reason I tore down the engine was to re-use the apex seals. overall length/width measured out okay. However the corner pieces did not fair so well (I cannot find the 6th one) and the apex seal springs grooved the seals pretty well. Well lets just look at the photos....

The witness marks are pretty evident.


One of the apex seals looked like it was 'loosing its skin' I've never seen that before.
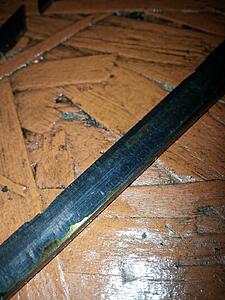
The corner pieces of the apex seals became peanut shaped.
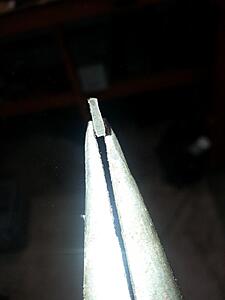
Still cannot find the 6th one...
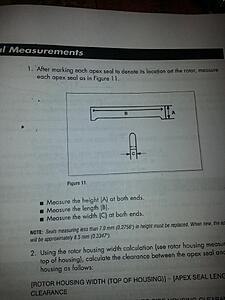
Mazda gives you additional specs for measurement, but they don't actually tell you what the dimensions should be....
Needless to say is that I cannot re-use these. Whats your opinion on these rotards?
I found these issues with the engine upon dissasembly.
1. Oil pump shows scratches (explains "poor" oil pressure)
2. Rear rotor rear face x1 side seal spring broke which cause the seal to collapse into the seal slot
3. Still cant find the 6th apex seal corner piece
4. The hole in my rotor (pics to come, more on that later) DID NOT GROW! overall rotor condition is excellent, even the bearings look only slightly more worn than when I put them in.
5. One of the coolant o-ring seals was starting to leak, very small but notable
6. Funny apex seal wear
7. Rear stat gear bearing was showing LOTS of copper, front looked fine.
More pics/details soon to come.
The witness marks are pretty evident.
One of the apex seals looked like it was 'loosing its skin' I've never seen that before.
The corner pieces of the apex seals became peanut shaped.
Still cannot find the 6th one...
Mazda gives you additional specs for measurement, but they don't actually tell you what the dimensions should be....
Needless to say is that I cannot re-use these. Whats your opinion on these rotards?
I found these issues with the engine upon dissasembly.
1. Oil pump shows scratches (explains "poor" oil pressure)
2. Rear rotor rear face x1 side seal spring broke which cause the seal to collapse into the seal slot
3. Still cant find the 6th apex seal corner piece
4. The hole in my rotor (pics to come, more on that later) DID NOT GROW! overall rotor condition is excellent, even the bearings look only slightly more worn than when I put them in.
5. One of the coolant o-ring seals was starting to leak, very small but notable
6. Funny apex seal wear
7. Rear stat gear bearing was showing LOTS of copper, front looked fine.
More pics/details soon to come.
11-06-14, 11:34 AM
#120
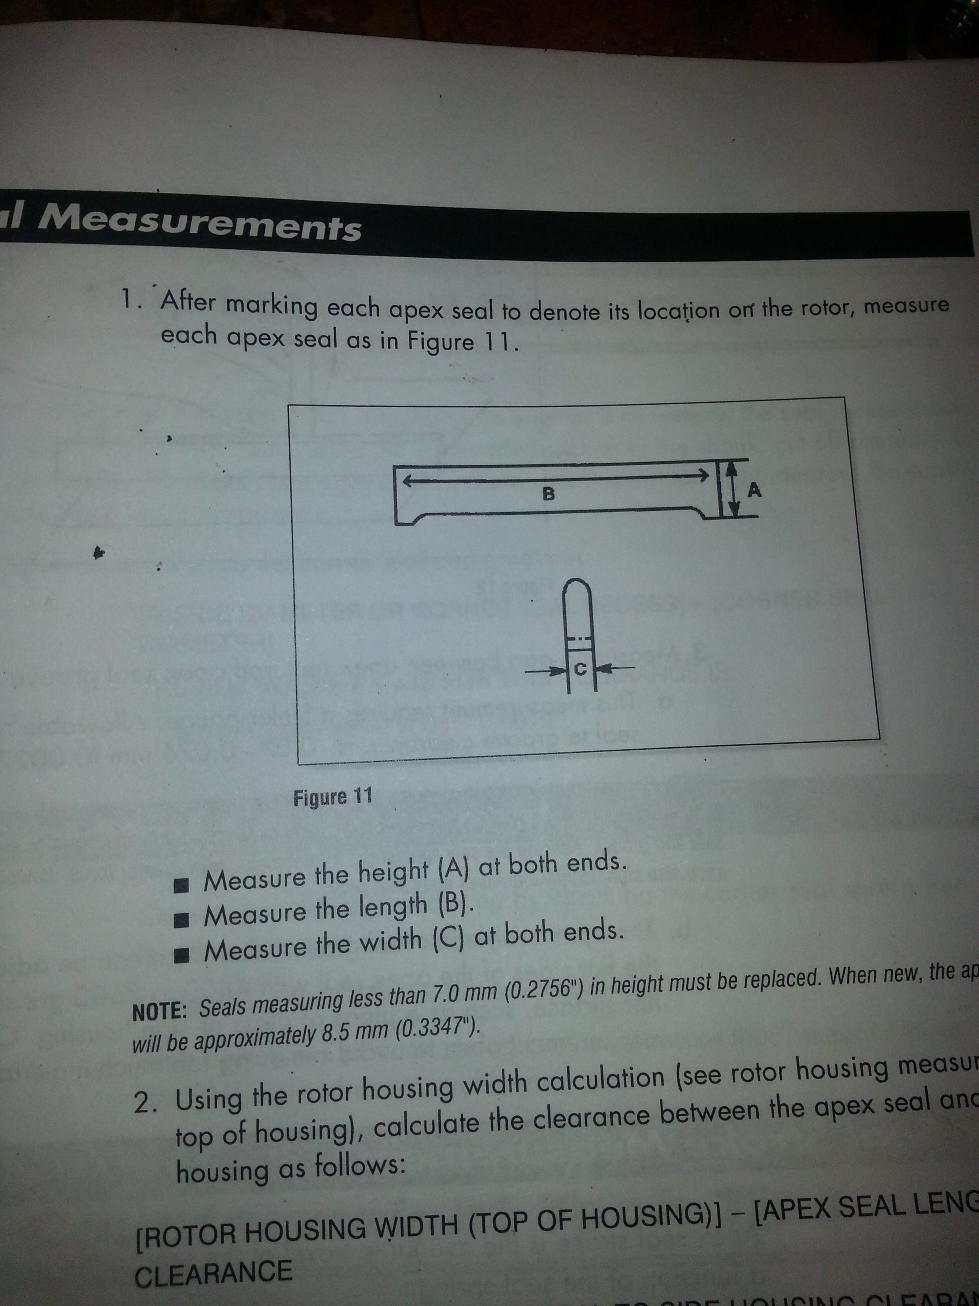
What do you have to do a lot in rotary building? Cleaning and measuring! and it sucks...
I am working on this build a master spec sheet so you can record EVERYTHING. Basic measuring tools required?

1. Dial indicator on magnetic base.
2. feeler gauges as small as .0011"
3. Micrometer 0-1", 1-2" and 2-3"
4. T gages 1.5"-2" (ish) and 2.5"-3.5" (ish)
5. digital or analog calipers
Like I complained about atkins before ALL of the corner seals were .00105" undersized (diameter spec) but I chalk that up to my equipment precision or squeezing the mic too hard. Needless to say I am going to run them.

A seal case is handy in these instances too, mazda wants to charge you a billion dollars but go to any walmart or Meijer or lowes and etc and you can snag one of these for about 7 bucks.

I am working on this build a master spec sheet so you can record EVERYTHING. Basic measuring tools required?
1. Dial indicator on magnetic base.
2. feeler gauges as small as .0011"
3. Micrometer 0-1", 1-2" and 2-3"
4. T gages 1.5"-2" (ish) and 2.5"-3.5" (ish)
5. digital or analog calipers
Like I complained about atkins before ALL of the corner seals were .00105" undersized (diameter spec) but I chalk that up to my equipment precision or squeezing the mic too hard. Needless to say I am going to run them.
A seal case is handy in these instances too, mazda wants to charge you a billion dollars but go to any walmart or Meijer or lowes and etc and you can snag one of these for about 7 bucks.
 11-07-14, 07:37 AM
#122
rally will beat up cars. While I have the engine out I will be redoing the front end body work and under the hood to bring it back to presentable condition. I will not be re using those stepped housings, new block is a 4pt with S5 rotors.
11-10-14, 07:38 AM
#123
Rotary Freak
I love the commentary. I really am interested in if the RX8 gearbox fits. It would be good to have a reasonably priced 6 speed available that bolts in.
Eric
Eric
11-11-14, 12:16 PM
#124
Rx8 trans in FC facts:
1. bell housing bolts up to 13b
2. shifter thread pattern is different
3. use T2 or rx8 PP/disc/flywheel, they are interchangeable (just be sure to match your counterweight up based on your rotating assembly
4. use Rx8 starter, 1 bolt is not the same location as FC starter (also 2Kw motor, stronger than FC)
5. shifter location is shorter so a new hole will need to be made
6. input/output shaft splines are same as turbo rx7 transmissions.
7. 6th gear final drive is worse than FC trans (don't care, race car)
8. rx8 slave cylinder hits older 13B oil filter pedestal, use civic one instead.
PROGRESS!
So according to my schedule I need to be breaking in my engine this week. Well that's not happening. 2 Major setbacks:
1. I need apex seals and lack the funds for them (until later this month) Plan to order Friday and have them by the 21st.
2. I was gifted a t2 oil pump, I had not actually inspected it until recently, its bad. so a new one is in the mail ETA Monday the 17th
Well I got too drunk this weekend (two 30th birthdays for friends) to be able to accomplish relatively anything important on the car so I did what any sane person would do and use up one of my sick days and wrench!
It was a glorious Monday (weather wise) to do bodywork! Since I can't assemble my engine I need to get onwards with the various other tasks I need to accomplish.
Step 1. Remove wiring harness and then POWER WASHER!

Well it kind of sucks but you can see the different between the left and ride hand side with 5 minutes of scrubbing with degreaser and that sweet brush.
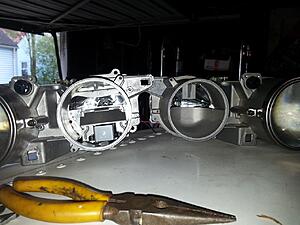
Step 2. Remove shitty fenders and front bumper to mount headlights!

Kinda looks like a sil-80 all naked After all the same company that made the sil-80/silvia lamps made these J30 ones too.
all lit up (low beam only)

With the EU spec prescription on passenger side (EU Driver side) and SAE spec prescription driver side, with general aiming it came out pretty good considering all the science and math that I skipped to do this;

I just wired them up to an old PSU from a PC, you jump 2 pins and BAM instant DC power supply, I recommend anyone to have these in their garage as handy shop equipment for testing electronics. Safer than a battery with jumper cables (for you and your electronics). I still have to integrate these into my existing body wire harness (which may get some revamping due to this) but mounting the ballasts actually is really easy, I have great areas to work with for easy R&R.
Since then I have removed the headlights and cleaned it once more. right now its time for masking and primer for the engine bay. Then paint.
Hood modification and fender/bumper primer/paint should be done this week or at least by end of next week when final parts arrive. All misc other engine parts have been cleaned and put into dry temp control storage (IE, the guest bed room in my house that is vacant, pics to come later)
More updates when progress progresses further more soon.
1. bell housing bolts up to 13b
2. shifter thread pattern is different
3. use T2 or rx8 PP/disc/flywheel, they are interchangeable (just be sure to match your counterweight up based on your rotating assembly
4. use Rx8 starter, 1 bolt is not the same location as FC starter (also 2Kw motor, stronger than FC)
5. shifter location is shorter so a new hole will need to be made
6. input/output shaft splines are same as turbo rx7 transmissions.
7. 6th gear final drive is worse than FC trans (don't care, race car)
8. rx8 slave cylinder hits older 13B oil filter pedestal, use civic one instead.
PROGRESS!
So according to my schedule I need to be breaking in my engine this week. Well that's not happening. 2 Major setbacks:
1. I need apex seals and lack the funds for them (until later this month) Plan to order Friday and have them by the 21st.
2. I was gifted a t2 oil pump, I had not actually inspected it until recently, its bad. so a new one is in the mail ETA Monday the 17th
Well I got too drunk this weekend (two 30th birthdays for friends) to be able to accomplish relatively anything important on the car so I did what any sane person would do and use up one of my sick days and wrench!
It was a glorious Monday (weather wise) to do bodywork! Since I can't assemble my engine I need to get onwards with the various other tasks I need to accomplish.
Step 1. Remove wiring harness and then POWER WASHER!
Well it kind of sucks but you can see the different between the left and ride hand side with 5 minutes of scrubbing with degreaser and that sweet brush.
Step 2. Remove shitty fenders and front bumper to mount headlights!
Kinda looks like a sil-80 all naked
After all the same company that made the sil-80/silvia lamps made these J30 ones too.all lit up (low beam only)
With the EU spec prescription on passenger side (EU Driver side) and SAE spec prescription driver side, with general aiming it came out pretty good considering all the science and math that I skipped to do this;
I just wired them up to an old PSU from a PC, you jump 2 pins and BAM instant DC power supply, I recommend anyone to have these in their garage as handy shop equipment for testing electronics. Safer than a battery with jumper cables (for you and your electronics). I still have to integrate these into my existing body wire harness (which may get some revamping due to this) but mounting the ballasts actually is really easy, I have great areas to work with for easy R&R.
Since then I have removed the headlights and cleaned it once more. right now its time for masking and primer for the engine bay. Then paint.
Hood modification and fender/bumper primer/paint should be done this week or at least by end of next week when final parts arrive. All misc other engine parts have been cleaned and put into dry temp control storage (IE, the guest bed room in my house that is vacant, pics to come later)
More updates when progress progresses further more soon.