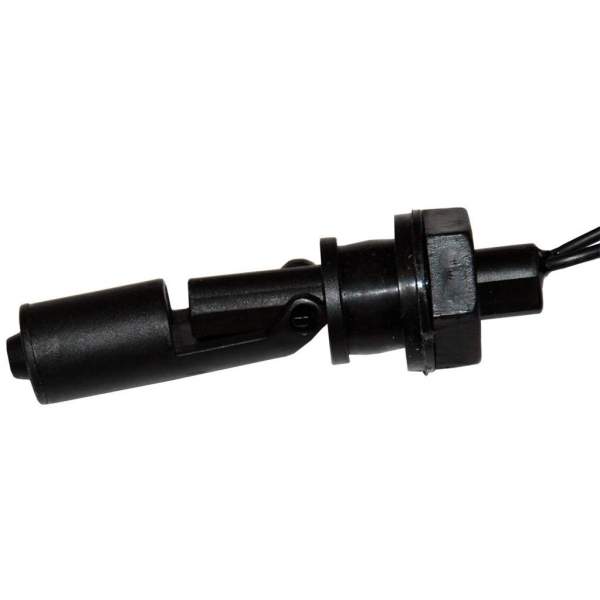
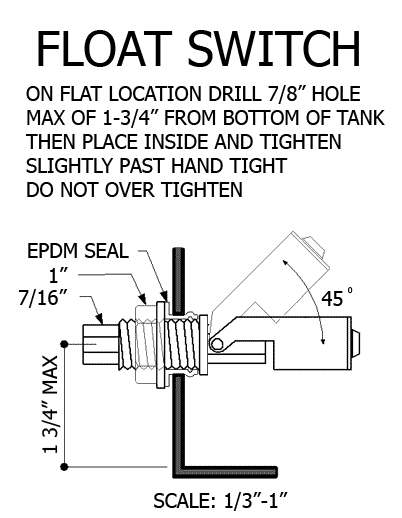
Fluid level sensor
#1
Thread Starter
Joined: Aug 2004
Posts: 4,619
Likes: 120
From: Colorado Springs, CO
Fluid level sensor
When I first installed my water injection and for the last 2 or 3 years, I've used a tank that was rather large, probably 1.5 gallon or so. Recently I decided to clean up my hatch area and instead use the stock rear washer bottle as the tank. Well, that bottle is roughly 1/3 gallon, so needless to say I really have to watch the fluid level a lot more now. Now instead of refilling it every couple months I'm refilling every day or so. However, I am driving the car A LOT more often now and for longer distances.
I have the FJO generation 2 kit and I think I have the map set fairly conservatively, much more than it was anyway, but I'm thinking of thinning out the map a little more. A couple times now I've gotten to the end of my trip and noticed the bottle is empty. These trips are usually from Loveland, CO back home to Colorado Springs (roughly a 2 hr drive). Going to Loveland I don't run out, but coming back home I run out, I'm assuming because Colorado Springs is higher elevation.
Anyway, I've thought about modifying the stock bottle to make it larger, but I also want to use a fluid level sensor. I'd like to keep from drilling any more holes in the bottle if possible, and after doing some searching I found these...
http://www.gemssensors.com/About-Gem...d-Level-Sensor
http://www.medicaldevice-network.com...-sensors4.html
I emailed a company in the Denver area about the ExOsense in the first link, and they said they need to know what material the bottle is made from and also the thickness, then they can give me a quote. Does anyone know the material Mazda used to make these bottles? I'll measure when I get home, but I have no idea what material it is. Would that be in the FSM? If so I can look it up. Also, I'm wondering how to power it. I'm not so good with electrical outside of being told where to connect and splice wires, so with this running off a different voltage than the car, I'm not sure how to power it without destroying something lol.
They also said the sensors are bought in pairs, so I'm thinking about running one closer to the bottom and one about the middle.
If this works out, it might be a good alternative to putting even more holes in the bottle and giving it another possible leak point. They sent me a PDF but it's too big to attach, even when zipped.
#2
What about using a stock sensor from the front tank? Or any other switch from an oem washer tank? From the ones I've taken apart, it's just a float/switch that completes a circuit once the float is below level. It wouldn't be difficult to add one to the rear tank.
#3
Thread Starter
Joined: Aug 2004
Posts: 4,619
Likes: 120
From: Colorado Springs, CO
I didn't even remember the front tank having one. I may end up doing something like that anyway since I can't figure out what material they used to make it, but I'd rather not drill any more holes in the tank than I have to. I'm also trying to see if I can use the bottom half of another tank with the top half of the stock tank, that way I can retain the mounting points and filler neck of the stock tank and also have more volume. I'm wondering if I can cut the top off and somehow affix a different bottom by melting the two together or something. If I did that it would be easier to use one of these sensors because I'd just figure out the material when I bought the aftermarket tank. But then I also wonder if there would be any problems with melting two different materials together, like trying to weld steel to aluminum. Another problem is making sure it doesn't leak.
#4
I got confused and was referring to the level sensor on the fc Rx7. It definitely does have a front level sensor.
Why exactly are you worried about drilling holes in your tank if you are considering Frankenstein-ing your tank?
Have you considered adding a second tank below the stock one? You could add a barb fitting to the bottom of your tank, run a house to a second tank below it, and a hose from that tank to the fill lid as an air bleed. The level sensor could be added to the second tank as well as the feed for the pump. Again, I'm not familiar with the space constraints if FDs, so no clue if there's space or not.
Just a thought.
#5
I understand not wanting to drill holes, but......
I used the front washer tank with a simple float switch I got from Devil's Own (but others sell them) using info in this thread as a guide https://www.rx7club.com/auxiliary-in...ite-up-883642/
The float switch is also wired to a little red LED next to my temp gauge which tells me when it's getting low. Works great, no leaking issues and I can still use the washer if I really needed it. Holds about 2/3 of a gallon. With an M3 nozzle set at ~ 2 psi it lasts between 1/2 and 3/4 of a tank of gas around town...depending on how much I'm in boost. I keep some water in my garage and at my shop and just fill whenever I'm needing gas.
Kind of opposite you....I have a rear tank I bought a couple of years ago and considering 'T'ing it in with the feed line to the pump. Should give me close to a gallon.
#6
Thread Starter
Joined: Aug 2004
Posts: 4,619
Likes: 120
From: Colorado Springs, CO
When I drilled the hole and installed the fitting for the feed line to the pump, I had a bit of an issue getting it to seal. I got it to seal, now I don't really want to go through it again haha. Plus I think I could get two tanks to seal together easier than it was to get the fitting to seal. If I stuck with the stock tank and didn't "frankenstein" it (LOL), I wouldn't have enough room in the bottom of it for a float style sensor anyway. I might in a modified one though. And I might go with a different style sensor since the guy emailed me back today and said these sensors START at around $150 a pair lol.
I did see that thread, but it didn't help me much since all my stuff is mounted in the back. It crossed my mind to have another tank and have them linked in order to add more volume, but I'd rather stick with the one tank behind the stock plastic if I can.
I picked up a plastic welder from Harbor Freight on the way home. I found some links where people fixed their broken plastic pieces, so I'm hopefully this frankenstein thing will work lol.
#7
Good luck and make sure to show us pictures when you're done! You could also try your hand at plastic welding the intake for the pump to the tank. You could also weld plastic fittings to the tank to add a second tank like I mentioned.
Trending Topics
#8
Thread Starter
Joined: Aug 2004
Posts: 4,619
Likes: 120
From: Colorado Springs, CO
I don't know that I'll be THAT good at plastic welding LOL. And actually I'm thinking about just relocating my pump to where Sgtblue has his and use the front washer tank. I'm liking all the positives to mounting the pump there. I'm just trying to decide if I want to tackle the task of mounting the pump or if I'd rather try frankensteining this tank haha.
#9
#10
Thread Starter
Joined: Aug 2004
Posts: 4,619
Likes: 120
From: Colorado Springs, CO
Well that puts a smile on my face LOL. I started looking at that area and I think my pump might fit a little tighter than yours in that location. I didn't see cooling fins on yours and I have them on mine, and it measures (all approx.) 4"x4"x7". 4" out from the frame is pretty close the wiring for the starter, but it might still fit alright. I just need to either borrow my friends pump (the exact same one) before we install it on his car and see how it fits in mine, or just bite the bullet and take mine out and start moving it. But I'm driving to SevenStock next week and I don't really feel like doing all this before I leave. I almost wanna wait until this winter when I can't drive the car much anyway. I think for now I'll just frankenstein the tank and see how that goes. I have my old tank (that I messed up before) still laying around and the top part is still usable, so I don't even have to remove my current setup to do this.
Oh, that first sensor that I had emailed about, the company has a order minimum of 10 and they are $123 each. I don't really feel like paying $1,230 for sensors right now with the good possibility of the rest of them not even selling. I think I'm going to get the float sensor from Cooling Mist since it doesn't need to be dropped inside to mount it.
Thanks!
Oh, do you have a write-up on mounting your pump? I'm just trying to get an idea of exactly how you did it.
#11
Thread Starter
Joined: Aug 2004
Posts: 4,619
Likes: 120
From: Colorado Springs, CO
UPDATE:
I installed my pump where SgtBlue has his (I really like that location) and tapped the bottom of the stock washer fluid tank with a brass 90 degree fitting. It seals alright but I'm looking for something that seals better, because fluid is still just barely seeping out, and I want to seal that thing up tight. I'd love to find something that seals similar to the Devil's Own float switch but is a 90 degree compression fitting. Anyone know of anything? I looked on McMaster Carr last time and didn't really find anything, but maybe I missed it.
I ended up getting the float switch from Devil's Own since it didn't have to be screwed into the tank and had what I felt was a better method of sealing, and also because it was quite a bit cheaper too and it seemed shorter so I could install it where I wanted. I hooked it to a little indicator light that I bought locally and it worked pretty well for the last several months. However, now the light stays on most of the time, even when I have plenty of fluid in the tank. Sometimes it goes off again, but it tends to kick on when I get on the boost pretty hard, but it might just be coincidence.
It's a very simple wiring setup but it's really pissing me off haha. I've had the car up twice already, and each time it seemed like it was fixed but then came back on a while later. Disconnected the ground and the light went off, so that told me the wire wasn't grounding out on the firewall or anywhere further up. I took out the float switch and bench tested it and it was fine. I reinstalled it and it seemed to work, then the light came on the next day, again when there was plenty of fluid. I jacked the car up again last night and did a check with the sensor mounted in the tank and with fluid and it wasn't closing the loop, so I reconnected it and checked the wiring at the gauge. During that time the light went off and stayed off until today, when it came back on while I was driving with plenty of fluid. ARGH!!!!! So I'm really not sure if it's the sensor or wiring somewhere or what. I'm getting really aggravated. I'm almost thinking the float has a pinhole in it and it fills up with fluid and weighs down to close the contacts, but I had it filled for quite a while the other night so the light would have been lit already the next day when I started the car instead of lighting up later. Really confused on this one.
#13
Thread Starter
Joined: Aug 2004
Posts: 4,619
Likes: 120
From: Colorado Springs, CO
I replaced the fitting on the bottom of the tank and troubleshot the float sensor at the same time. Once I finished the fitting, I put a multimeter on the sensor while filling the tank with water. I'm fairly certain it's not the float switch, but I still have no idea what the problem is.
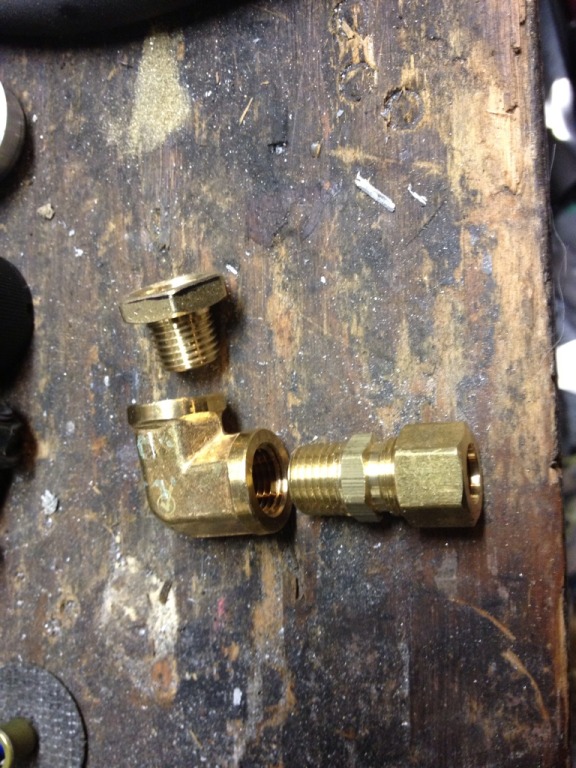
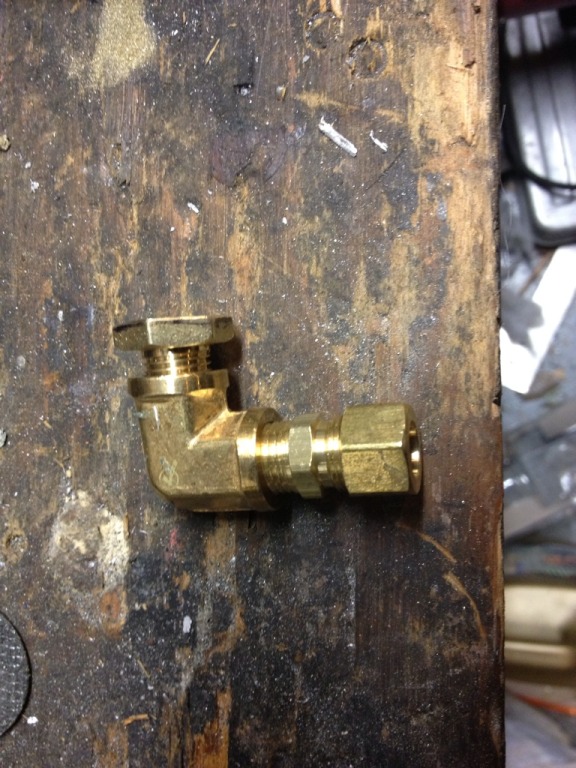
Anyway, here is what happened with the fitting. I got a through-wall fitting from Whisler Bearing (a local store) but it was too big to fit through any of the holes on the tank. Luckily I planned ahead for that and I stopped at Ace Hardware and put together something that worked.
First I chopped the first fitting so the fluid could be at a lower level and still get into the hose...
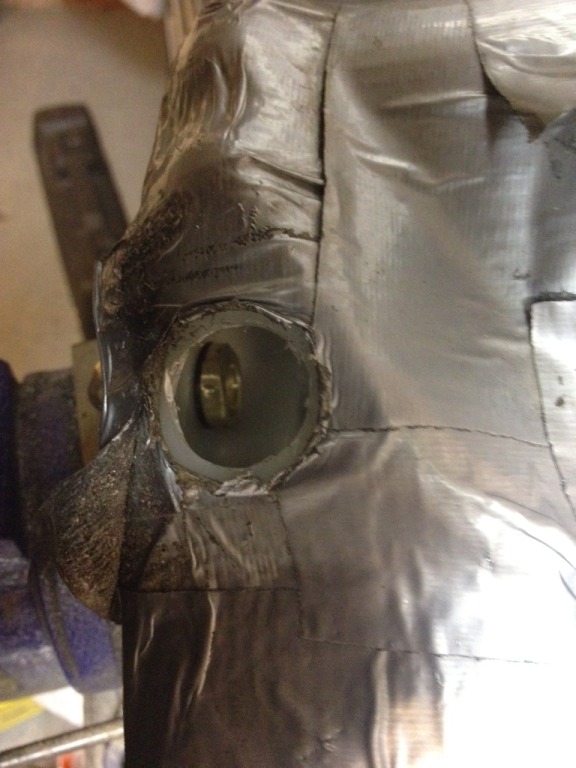
And here it is inside, looking through the float sensor hole...
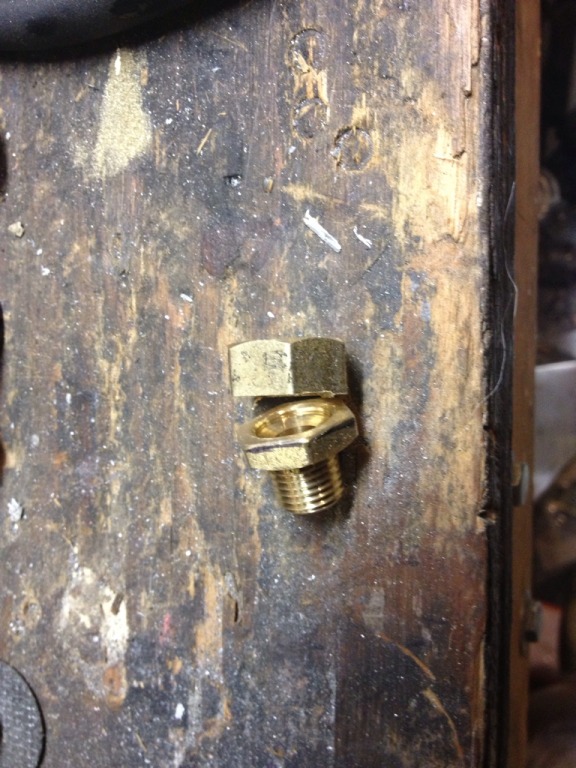
Here are the fittings apart and laying how they will go together, and with them tightened together temporarily to show what it will look like...
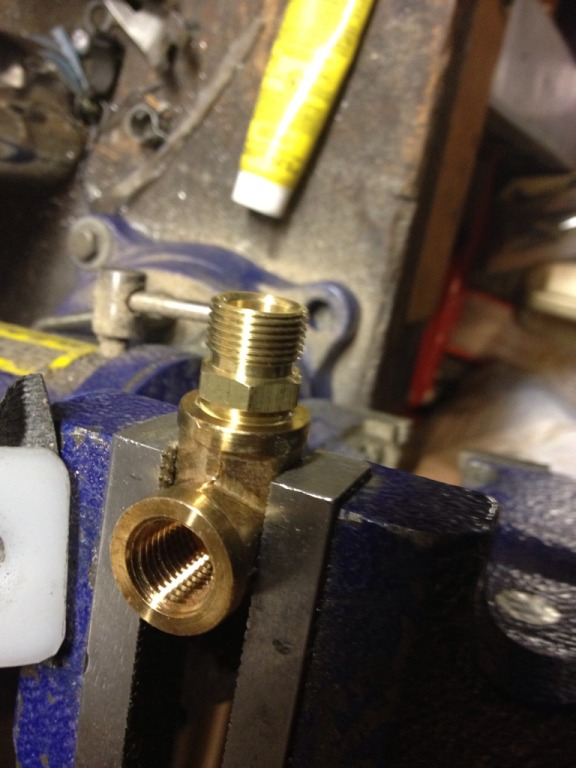
The outlet fitting tightened in permanently...
And mounted, what it looks like on the bottom...
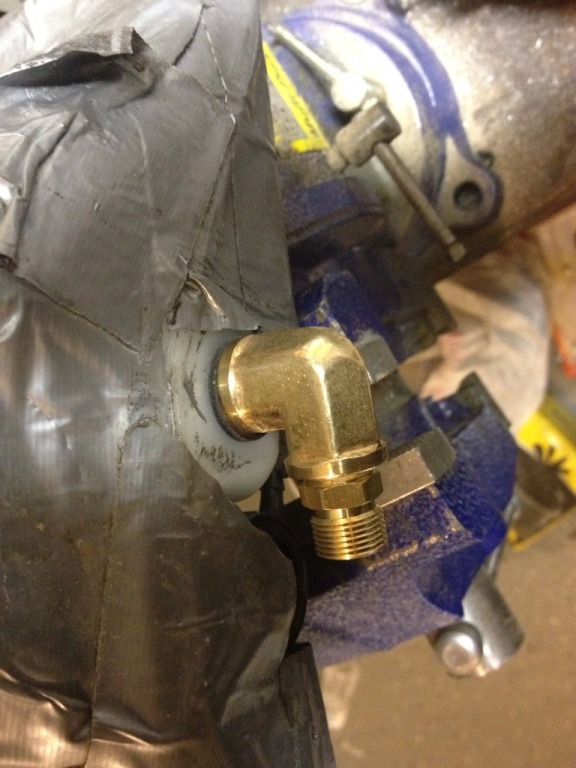
I just used a rubber o-ring on the inside and a fiber washer on the outside (usually used for oil drain plugs) on the outside, and tightened the outside fitting right on the inside fitting, using the outer one as the nut also, mainly because there was no room for a nut and I would have had to make a nut for it anyway haha.
Also, yes that is duct tape all over the tank. I had gotten them brand new and wanted to protect them and keep them nice for as long as possible. Idiotic, I know...especially since you can't see it with the tape on it anyway and I didn't wrap the upper part (filler neck), and that's the part that yellows over time. Oh well.
Anyway, here is what happened with the fitting. I got a through-wall fitting from Whisler Bearing (a local store) but it was too big to fit through any of the holes on the tank. Luckily I planned ahead for that and I stopped at Ace Hardware and put together something that worked.
First I chopped the first fitting so the fluid could be at a lower level and still get into the hose...

And here it is inside, looking through the float sensor hole...

Here are the fittings apart and laying how they will go together, and with them tightened together temporarily to show what it will look like...


The outlet fitting tightened in permanently...

And mounted, what it looks like on the bottom...

I just used a rubber o-ring on the inside and a fiber washer on the outside (usually used for oil drain plugs) on the outside, and tightened the outside fitting right on the inside fitting, using the outer one as the nut also, mainly because there was no room for a nut and I would have had to make a nut for it anyway haha.
Also, yes that is duct tape all over the tank. I had gotten them brand new and wanted to protect them and keep them nice for as long as possible. Idiotic, I know...especially since you can't see it with the tape on it anyway and I didn't wrap the upper part (filler neck), and that's the part that yellows over time. Oh well.
#14
I've been using that very same float switch for almost 3 years with no issues. Not sure why that's giving you trouble. I know you said you bench tested it, so that leaves me to suspect some sort interference with it once installed. 
As for the tank tap, is there a reason you went with the brass fittings? Why were you wanting a 90 deg. fitting? The tank is pretty tough, but could the weight of the brass fittings or tension from the line be making the wall of the tank flex and cause the float switch to bind? ...just thinking out-loud. At any rate, I used one of these Self Sealing Bulk Head from Devil's Own (I'm sure others offer them too) and have had zero leaks or issues. Also comes with a course preliminary filter and push connection. Not a 90 deg. but it was a piece of cake to install, I just had to make sure of placement so there was room for the line under the tank once reinstalled on the car. But that wasn't hard.

As for the tank tap, is there a reason you went with the brass fittings? Why were you wanting a 90 deg. fitting? The tank is pretty tough, but could the weight of the brass fittings or tension from the line be making the wall of the tank flex and cause the float switch to bind? ...just thinking out-loud. At any rate, I used one of these Self Sealing Bulk Head from Devil's Own (I'm sure others offer them too) and have had zero leaks or issues. Also comes with a course preliminary filter and push connection. Not a 90 deg. but it was a piece of cake to install, I just had to make sure of placement so there was room for the line under the tank once reinstalled on the car. But that wasn't hard.
#15
Gems Sensors & Controls - Single Point Level - 164520
Mounts inside the tank so pressure isnt an issue. done and done.
Mounts inside the tank so pressure isnt an issue. done and done.
#16
Thread Starter
Joined: Aug 2004
Posts: 4,619
Likes: 120
From: Colorado Springs, CO
I've been using that very same float switch for almost 3 years with no issues. Not sure why that's giving you trouble. I know you said you bench tested it, so that leaves me to suspect some sort interference with it once installed. 
As for the tank tap, is there a reason you went with the brass fittings? Why were you wanting a 90 deg. fitting? The tank is pretty tough, but could the weight of the brass fittings or tension from the line be making the wall of the tank flex and cause the float switch to bind? ...just thinking out-loud. At any rate, I used one of these Self Sealing Bulk Head from Devil's Own (I'm sure others offer them too) and have had zero leaks or issues. Also comes with a course preliminary filter and push connection. Not a 90 deg. but it was a piece of cake to install, I just had to make sure of placement so there was room for the line under the tank once reinstalled on the car. But that wasn't hard.

As for the tank tap, is there a reason you went with the brass fittings? Why were you wanting a 90 deg. fitting? The tank is pretty tough, but could the weight of the brass fittings or tension from the line be making the wall of the tank flex and cause the float switch to bind? ...just thinking out-loud. At any rate, I used one of these Self Sealing Bulk Head from Devil's Own (I'm sure others offer them too) and have had zero leaks or issues. Also comes with a course preliminary filter and push connection. Not a 90 deg. but it was a piece of cake to install, I just had to make sure of placement so there was room for the line under the tank once reinstalled on the car. But that wasn't hard.
No real reason I went with brass, just because I couldn't find anything in a 90 degree made of anything else. And I wanted the 90 because I was afraid I wouldn't be able to run it straight down without the line hitting the ground. But you were able too huh? I like that fitting you posted because of the seal. Where on the tank did you mount yours? Also, I feel better having a threaded fitting on that part rather than a push connect.
The brass fitting and line isn't flexing the tank wall and the float has a good bit of space around it. I thought maybe the old fitting was catching the float but I looked in from the top with them both installed and it was ok.
Gems Sensors & Controls - Single Point Level - 164520
Mounts inside the tank so pressure isnt an issue. done and done.
Mounts inside the tank so pressure isnt an issue. done and done.
#17
.... I was afraid I wouldn't be able to run it straight down without the line hitting the ground. But you were able too huh? I like that fitting you posted because of the seal. Where on the tank did you mount yours? Also, I feel better having a threaded fitting on that part rather than a push connect.....
In the next week or two I hope to get the car up on the lift and have the belly pan off to change coolant. Maybe I can take a picture that tank tap might help.
#18
Thread Starter
Joined: Aug 2004
Posts: 4,619
Likes: 120
From: Colorado Springs, CO
Yeah that would be cool, thanks! I still had a problem with the light coming on last night and i got the light to go off by jiggling the wires right where they come out of the sensor. I ordered a few new sensors the other day (from different places but they are pretty much identical) and got one today so I swapped that in tonight. Seems like its working but I'll test drive it tomorrow and make sure. Anyway, while swapping the sensor I accidentally rotated the fitting on the bottom and that made it start leaking so I took the tank back out and tightened it back down. Doesn't seem to be leaking anymore.
Ugh lol.
Ugh lol.
#19
What about using the stock radiator fluid level sensor as found in an FC, and probaly also in FD? when using a plastic tank it might not work, but when using an Al tank I think it will work pretty well. just one wire, and the light and buzzer are already there.
#23
Small update. I used the stock sensor and an LM1830N (hard to get but I bought some in hongkong and they are genuine and working). so just one wire from tank to the IC. and it has internal power stage to drive a led. it does just what it does and I would prefer it any day over a float based sensor, especially in a pressureizd tank system.. the lm1830 uses a AC signal trough the probe so it prevents corrosion. after a few month of useage I opened up a sheetmetal alu tank with 50/50 w/m, look like new from the inside!
Thread
Thread Starter
Forum
Replies
Last Post
imitek
3rd Generation Specific (1993-2002)
24
12-01-15 03:35 PM


