
Sunroof Repair Write up 56K warning
 04-23-07, 05:18 PM
#1
Technician
Thread Starter
iTrader: (1)
Join Date: Aug 2006
Location: Virginia
Posts: 1,008
Likes: 0
Received 0 Likes
on
0 Posts
Sunroof Repair Write up 56K warning
This write up is long over due. For a subject as often covered on the forum I figure that it should deserve a well writen write up and pictures (I'm sorry there won't be any pictures today of it, but tomorrow... I didn't have a card in the camera and so it stored all the pictures on the internal memory, please be patient).
The sun roof assembly is often the most annoying piece to have break on you because if it breaks at the worst time possible letting rain water and leaves in. For those who have this problem or any of the symptoms of this problem suchs as:
1) Annoying pops or loud clicks and the sun roof doesn't raise or lower without help
2) One track slides while the other lags behind and there by makes the motor click
3) The alignment of the tracks keeps getting thrown off and thereby makes it impossible to close the window
4) When using the wrench it takes alot of force to close/open it.
5) You hear rather loud noises coming from the motor as it struggles to close/open the window.
Here are the preliminaries if you haven't already done these, please do these before attempting anything else in this write up.
supplies you will need:
-----------------------------
Brake Cleaner Spray Can
Clothes/Towels
Lithium Grease
Instructions:
----------------
1) Manually crank the window open.
2) Spray the brake cleaner onto the tracks and where ever else looks dirty
(Take special care not to get it on any good paint as it will ruin your paint job)
3) Manually close the window until a majority of the "spring" is visable in the track
4) Spray the brake cleaner onto the tracks and springs and everywhere else
5) Repeat steps 1-4 using the clothes to sop up the brake cleaner, and to clean the track
Now, if you have done this to the best of your ability and it still has not helped with your problem you may need to do a little more work on the sun roof, this is what follows:
Supplies needed:
---------------------
Brake Cleaner
Towels
Lithium Grease
very small shims/or plastic pieces
Instructions motor removal and repair:
------------------------------------------------
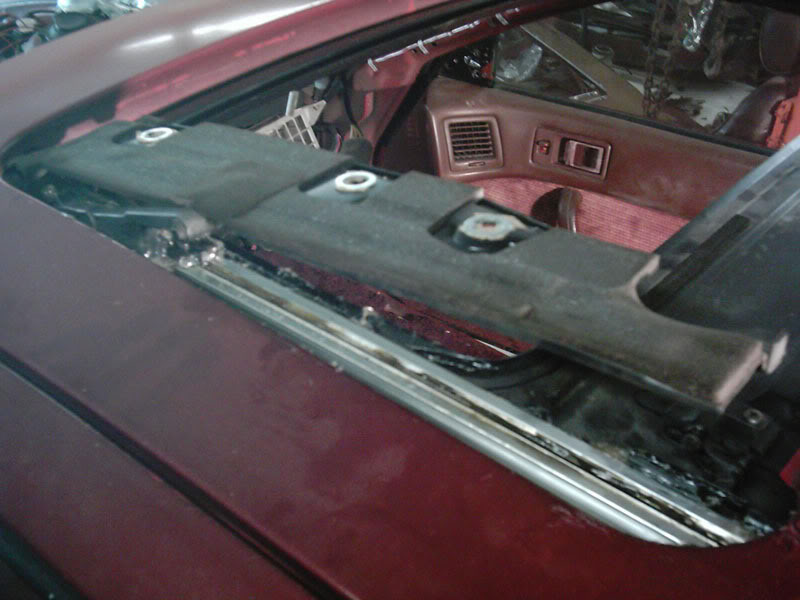
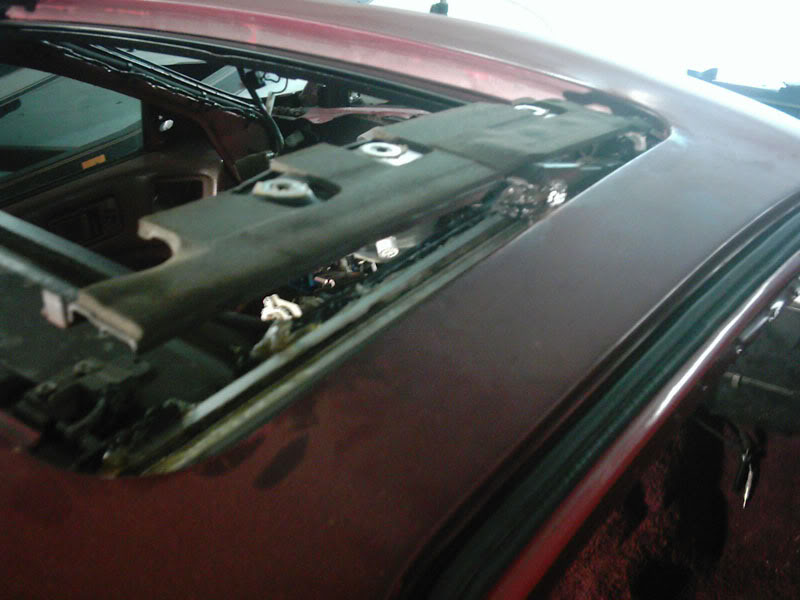
Step 1: Pull the head liner down so you have enough access to the motor as well as the sun roof panel. If you wish (and I highly recommend it) remove the liner from the sun roof panel as well. This will insure that you have easy access to everything you need and are able to determine which pieces may need shims later on.
Step 2: Remove the sun roof panel by unbolting the 6 nuts (3 on each side) so that the track assemblies can operate independently.
Step 3: Manually open and close your sun roof to check your alignment. If one falls behind then make a mental note of it. It will most likely be the one that needs the shims.
Step 4: Remove the motor. We will now focus on the motor for right now:
Step A: Check the movement of the motors internals by manually turning the hex piece (IE, as if you were trying to open the sun roof manually--but with out it connected). If it is difficult to turn then we will need to open it. Mine was rather on the hard side of things to turn. (this next piece of information I did on the spur of the moment. I'm not exactly sure how it will effect the performance of the electric motor itself, but after completing this the movement of the sunroof became alot easier)
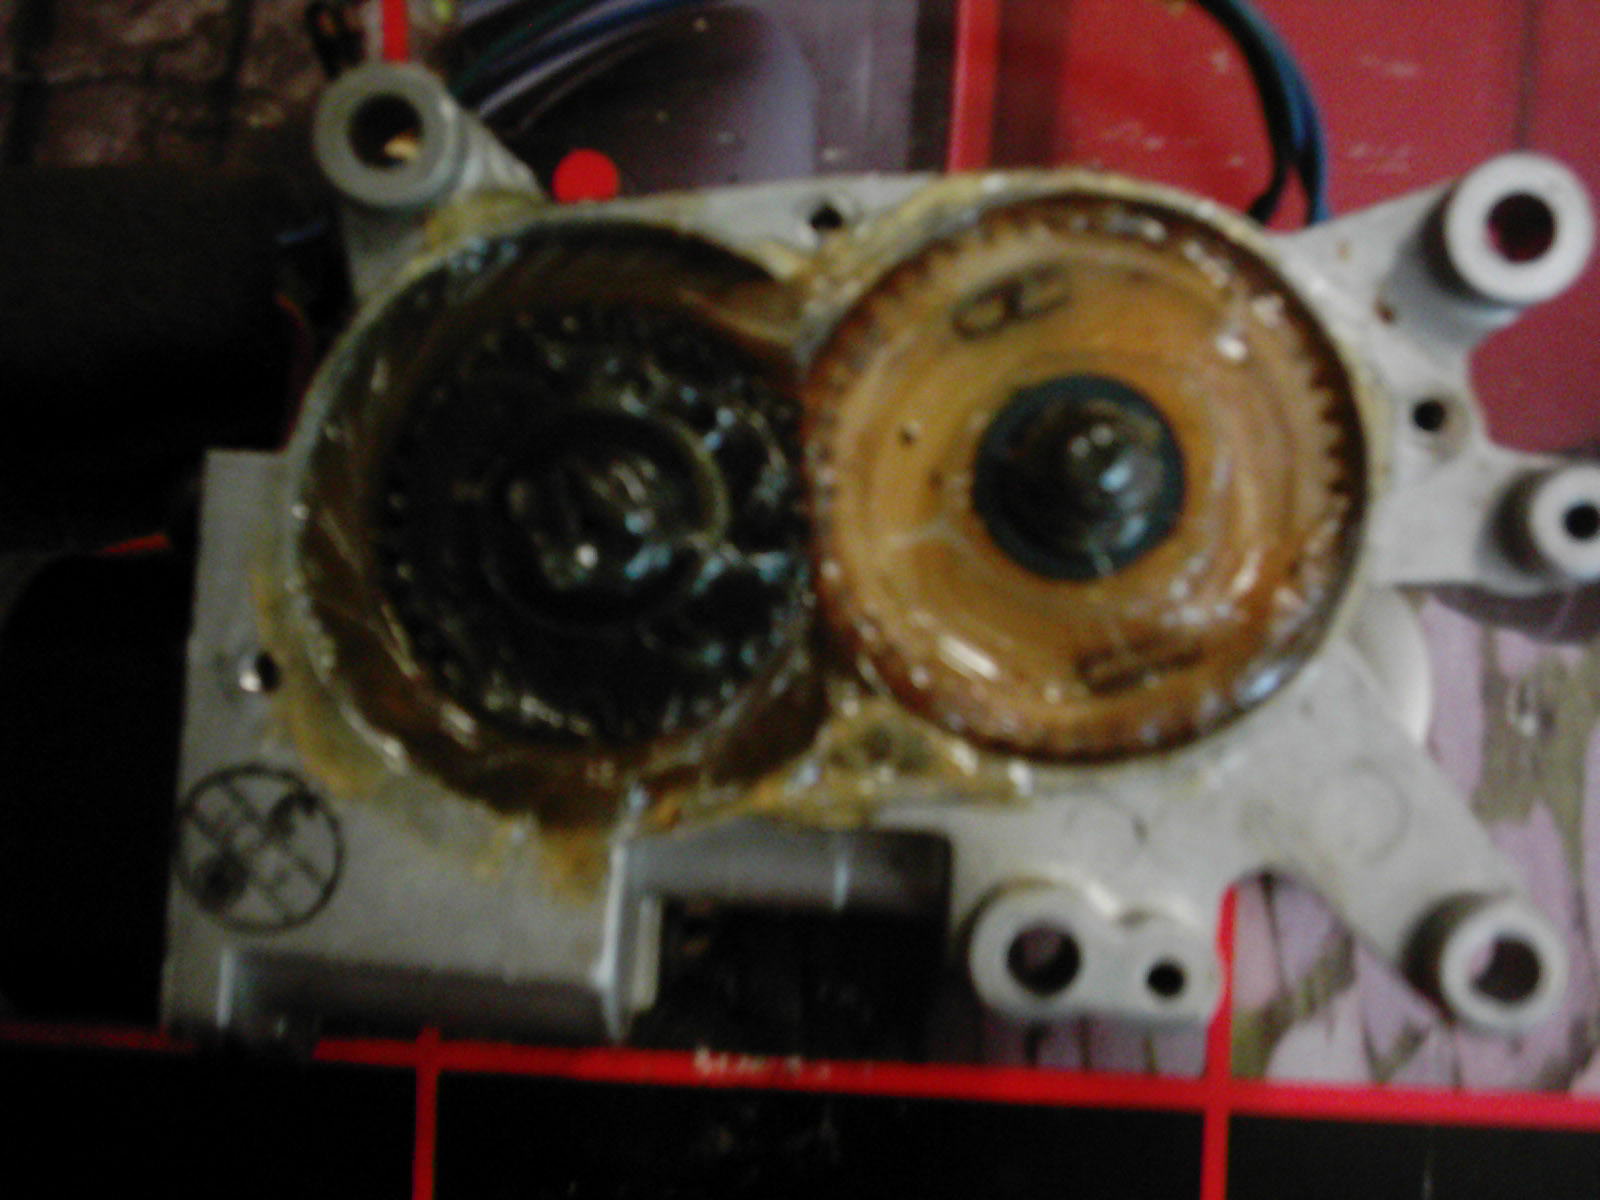
Step B: Use the Brake cleaner to clean off the driving gear (the piece that moves the "springs"). Make sure to remove all the old grease, and inspect the outside casing for any visable damage.
Step C: Remove the Codder clip and and remove the driving gear as well as the spacer underneath that. Further clean those three pieces and remove excess grease and dirt. Use a pocket knife to clean inbetween the spokes of the drive gear. Inspect the gear for any damage. If there is more than one tooth visably damaged I would recommend buying a new one. IF there isn't significant damage then it will be fine to be re-used.
Step D: Remove the top plate and expose the internals of the motor gearing. Please be mindful of the four little black washers that are in there too. Do not loose them. Also prying up the plate is a little difficult it seems that it needed a screw driver and some TLC to get it to pop off. Do not rush, but take your time. It will come. Try to pull it off evenly as to not damage any of the gears inside.
Step E: Remove any debris and old grease (if any--Mine was completely dry and rust had started to propogate on the metal gear inside). Use the brake cleaner to desolve the old grease and remove the dirt. Allow to dry and mop up excess brake cleaner.
Step F: Repack the housing with lithium grease and move the gears back and forth to spread it around. Apply it generously as to cover everything. And repeat this step as often as needed until the grease is everywhere inside the casing.
Step G: Reinstall the cover plate, and washers. Install the spacer, the drive gear, and the codder clip. Apply grease to these generously.
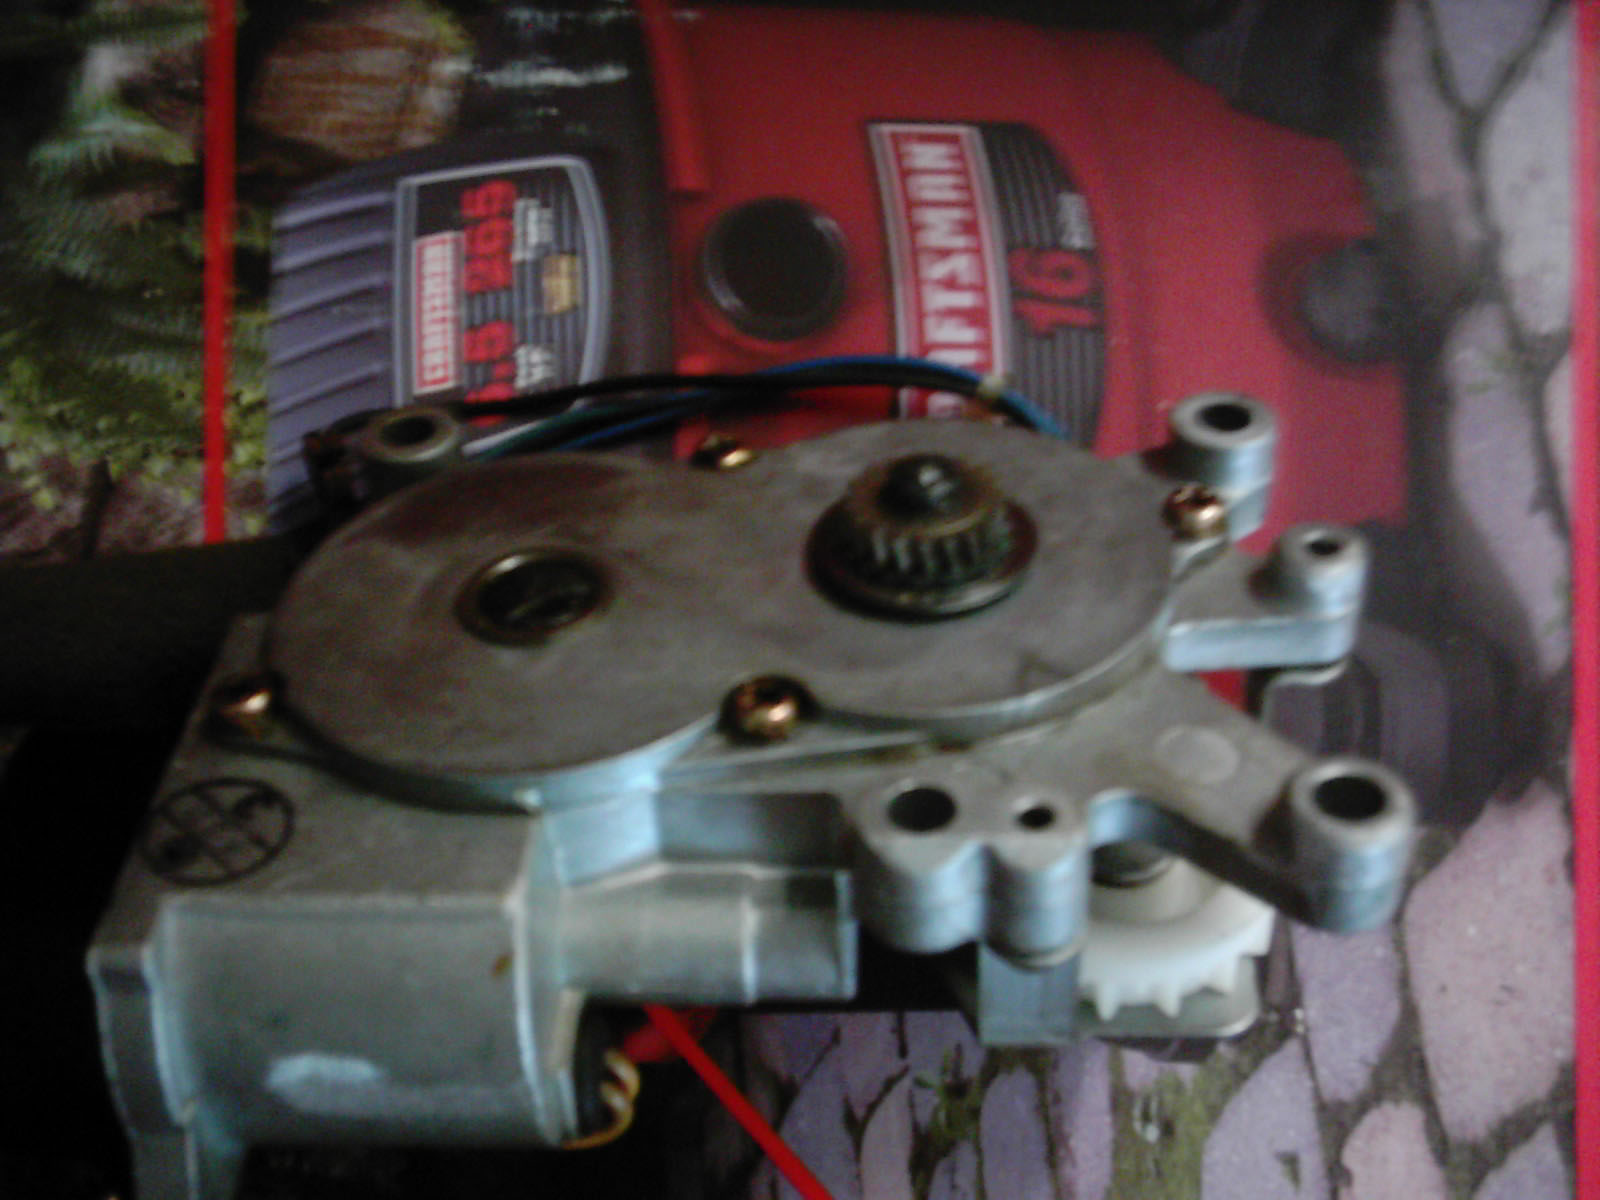
Step 5: Remember the track that was lagging behind before and didn't want to move? Well now we get to fix it. This will require you to install the motor several times until you get it perfect. Notice on the sunroof assembly side that the tracks go above and below the driving gear. If you're facing forward the lower one goes to the right side, and the upper one goes to the left. Above the upper one there is a Black thin strip of metal sitting on a silver block of metal, and on the lower track there is a similiar piece below it. This is where the shims go. I placed shims on both of mine to insure proper contact with the drive gear. What you do is take a pocket knife and pry open the black metal from the silver block a little bit (no more than a few mm is all that's needed). Take a small shim, I recommend 1mm, or .5 mm plastic shims (they work pretty well) and place them inbetween the black piece and silver piece. This forces the "spring" closer to the drive wheel forcing it to move instead of slip.
Step 6: Make sure alignment is accurate by forcing each track piece forward as far as possible (with the motor still not connected!). Make sure they're even this will make it easier to troubleshoot which side needs more shims than the other. Install the motor and manually crank it open/close to see if they both work. Use the entire range of motion. If one slips, or you hear pops, install more shims.
That's the write up, any questions or comments please post it up, and please remember that the pictures will be up tomorrow.
The sun roof assembly is often the most annoying piece to have break on you because if it breaks at the worst time possible letting rain water and leaves in. For those who have this problem or any of the symptoms of this problem suchs as:
1) Annoying pops or loud clicks and the sun roof doesn't raise or lower without help
2) One track slides while the other lags behind and there by makes the motor click
3) The alignment of the tracks keeps getting thrown off and thereby makes it impossible to close the window
4) When using the wrench it takes alot of force to close/open it.
5) You hear rather loud noises coming from the motor as it struggles to close/open the window.
Here are the preliminaries if you haven't already done these, please do these before attempting anything else in this write up.
supplies you will need:
-----------------------------
Brake Cleaner Spray Can
Clothes/Towels
Lithium Grease
Instructions:
----------------
1) Manually crank the window open.
2) Spray the brake cleaner onto the tracks and where ever else looks dirty
(Take special care not to get it on any good paint as it will ruin your paint job)
3) Manually close the window until a majority of the "spring" is visable in the track
4) Spray the brake cleaner onto the tracks and springs and everywhere else
5) Repeat steps 1-4 using the clothes to sop up the brake cleaner, and to clean the track
Now, if you have done this to the best of your ability and it still has not helped with your problem you may need to do a little more work on the sun roof, this is what follows:
Supplies needed:
---------------------
Brake Cleaner
Towels
Lithium Grease
very small shims/or plastic pieces
Instructions motor removal and repair:
------------------------------------------------
Step 1: Pull the head liner down so you have enough access to the motor as well as the sun roof panel. If you wish (and I highly recommend it) remove the liner from the sun roof panel as well. This will insure that you have easy access to everything you need and are able to determine which pieces may need shims later on.
Step 2: Remove the sun roof panel by unbolting the 6 nuts (3 on each side) so that the track assemblies can operate independently.
Step 3: Manually open and close your sun roof to check your alignment. If one falls behind then make a mental note of it. It will most likely be the one that needs the shims.
Step 4: Remove the motor. We will now focus on the motor for right now:
Step A: Check the movement of the motors internals by manually turning the hex piece (IE, as if you were trying to open the sun roof manually--but with out it connected). If it is difficult to turn then we will need to open it. Mine was rather on the hard side of things to turn. (this next piece of information I did on the spur of the moment. I'm not exactly sure how it will effect the performance of the electric motor itself, but after completing this the movement of the sunroof became alot easier)
Step B: Use the Brake cleaner to clean off the driving gear (the piece that moves the "springs"). Make sure to remove all the old grease, and inspect the outside casing for any visable damage.
Step C: Remove the Codder clip and and remove the driving gear as well as the spacer underneath that. Further clean those three pieces and remove excess grease and dirt. Use a pocket knife to clean inbetween the spokes of the drive gear. Inspect the gear for any damage. If there is more than one tooth visably damaged I would recommend buying a new one. IF there isn't significant damage then it will be fine to be re-used.
Step D: Remove the top plate and expose the internals of the motor gearing. Please be mindful of the four little black washers that are in there too. Do not loose them. Also prying up the plate is a little difficult it seems that it needed a screw driver and some TLC to get it to pop off. Do not rush, but take your time. It will come. Try to pull it off evenly as to not damage any of the gears inside.
Step E: Remove any debris and old grease (if any--Mine was completely dry and rust had started to propogate on the metal gear inside). Use the brake cleaner to desolve the old grease and remove the dirt. Allow to dry and mop up excess brake cleaner.
Step F: Repack the housing with lithium grease and move the gears back and forth to spread it around. Apply it generously as to cover everything. And repeat this step as often as needed until the grease is everywhere inside the casing.
Step G: Reinstall the cover plate, and washers. Install the spacer, the drive gear, and the codder clip. Apply grease to these generously.
Step 5: Remember the track that was lagging behind before and didn't want to move? Well now we get to fix it. This will require you to install the motor several times until you get it perfect. Notice on the sunroof assembly side that the tracks go above and below the driving gear. If you're facing forward the lower one goes to the right side, and the upper one goes to the left. Above the upper one there is a Black thin strip of metal sitting on a silver block of metal, and on the lower track there is a similiar piece below it. This is where the shims go. I placed shims on both of mine to insure proper contact with the drive gear. What you do is take a pocket knife and pry open the black metal from the silver block a little bit (no more than a few mm is all that's needed). Take a small shim, I recommend 1mm, or .5 mm plastic shims (they work pretty well) and place them inbetween the black piece and silver piece. This forces the "spring" closer to the drive wheel forcing it to move instead of slip.
Step 6: Make sure alignment is accurate by forcing each track piece forward as far as possible (with the motor still not connected!). Make sure they're even this will make it easier to troubleshoot which side needs more shims than the other. Install the motor and manually crank it open/close to see if they both work. Use the entire range of motion. If one slips, or you hear pops, install more shims.
That's the write up, any questions or comments please post it up, and please remember that the pictures will be up tomorrow.
 04-23-07, 06:32 PM
#3
Buildup Thread Encourager
iTrader: (1)
Join Date: Jun 2005
Location: Miami, FL
Posts: 1,170
Likes: 0
Received 0 Likes
on
0 Posts
Originally Posted by lax-rotor
(I'm sorry there won't be any pictures today of it, but tomorrow... I didn't have a card in the camera and so it stored all the pictures on the internal memory, please be patient).
Originally Posted by YaNi
Nice writeup, but pics don't show

 04-23-07, 06:53 PM
#5
Winter sucks
Join Date: Jan 2004
Location: Newberg, Oregon
Posts: 3,083
Likes: 0
Received 0 Likes
on
0 Posts

 04-23-07, 08:24 PM
#7
Technician
Thread Starter
iTrader: (1)
Join Date: Aug 2006
Location: Virginia
Posts: 1,008
Likes: 0
Received 0 Likes
on
0 Posts
As soon as I load up the pictures I would hope that people will vote to have it placed in the archives. Also if during the course of your repair; if you run into any trouble or have a question post it in here so that we as a forum can resolve it and the community can benefit.
Trending Topics
04-23-07, 08:56 PM
#8
fc3s
Join Date: Jun 2005
Location: bay area
Posts: 177
Likes: 0
Received 0 Likes
on
0 Posts
lax-rotor, instead of brake cleaner can i use Super Tech Engine Degrease? the little note on the can says, "Quickly removes grease, dirt, and grime from all auto, marine, and tractor engines. Safe on most underhood rubber, plastic, and paint." It comes out as foam though lol..
04-24-07, 07:29 AM
#9
Technician
Thread Starter
iTrader: (1)
Join Date: Aug 2006
Location: Virginia
Posts: 1,008
Likes: 0
Received 0 Likes
on
0 Posts
Originally Posted by HeyITZthatFC
lax-rotor, instead of brake cleaner can i use Super Tech Engine Degrease? the little note on the can says, "Quickly removes grease, dirt, and grime from all auto, marine, and tractor engines. Safe on most underhood rubber, plastic, and paint." It comes out as foam though lol..
04-24-07, 08:24 AM
#10
Technician
Thread Starter
iTrader: (1)
Join Date: Aug 2006
Location: Virginia
Posts: 1,008
Likes: 0
Received 0 Likes
on
0 Posts
Pictures w/ write up
This write up is long over due. For a subject as often covered on the forum I figure that it should deserve a well writen write up and pictures.
The sun roof assembly is often the most annoying piece to have break on you because if it breaks at the worst time possible letting rain water and leaves in. For those who have this problem or any of the symptoms of this problem suchs as:
1) Annoying pops or loud clicks and the sun roof doesn't raise or lower without help
2) One track slides while the other lags behind and there by makes the motor click
3) The alignment of the tracks keeps getting thrown off and thereby makes it impossible to close the window
4) When using the wrench it takes alot of force to close/open it.
5) You hear rather loud noises coming from the motor as it struggles to close/open the window.
Here are the preliminaries if you haven't already done these, please do these before attempting anything else in this write up.
supplies you will need:
-----------------------------
Brake Cleaner Spray Can
Clothes/Towels
Lithium Grease
Instructions:
----------------
1) Manually crank the window open.
2) Spray the brake cleaner onto the tracks and where ever else looks dirty
(Take special care not to get it on any good paint as it will ruin your paint job)
3) Manually close the window until a majority of the "spring" is visable in the track
4) Spray the brake cleaner onto the tracks and springs and everywhere else
5) Repeat steps 1-4 using the clothes to sop up the brake cleaner, and to clean the track
6) Use the lithium grease to re-lube the tracks and every contact that will touch the assembly.
Now, if you have done this to the best of your ability and it still has not helped with your problem you may need to do a little more work on the sun roof, this is what follows:
Supplies needed:
---------------------
Brake Cleaner
Towels
Lithium Grease
very small shims/or plastic pieces
Instructions motor removal and repair:
------------------------------------------------
Step 1: Pull the head liner down so you have enough access to the motor as well as the sun roof panel. If you wish (and I highly recommend it) remove the liner from the sun roof panel as well. This will insure that you have easy access to everything you need and are able to determine which pieces may need shims later on.
Step 2: Remove the sun roof panel by unbolting the 6 nuts (3 on each side) so that the track assemblies can operate independently.
This is what both sides should look like:

(the right side)

(the left side)
Step 3: Manually open and close your sun roof to check your alignment. If one falls behind then make a mental note of it. It will most likely be the one that needs the shims.
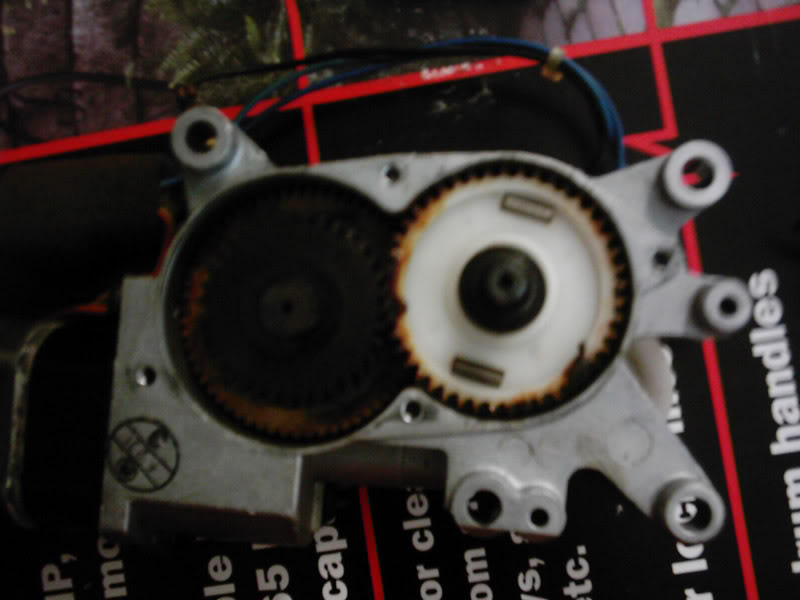
Step 4: Remove the motor. We will now focus on the motor for right now:
Step A: Check the movement of the motors internals by manually turning the hex piece (IE, as if you were trying to open the sun roof manually--but with out it connected). If it is difficult to turn then we will need to open it. Mine was rather on the hard side of things to turn. (this next piece of information I did on the spur of the moment. I'm not exactly sure how it will effect the performance of the electric motor itself, but after completing this the movement of the sunroof became alot easier)
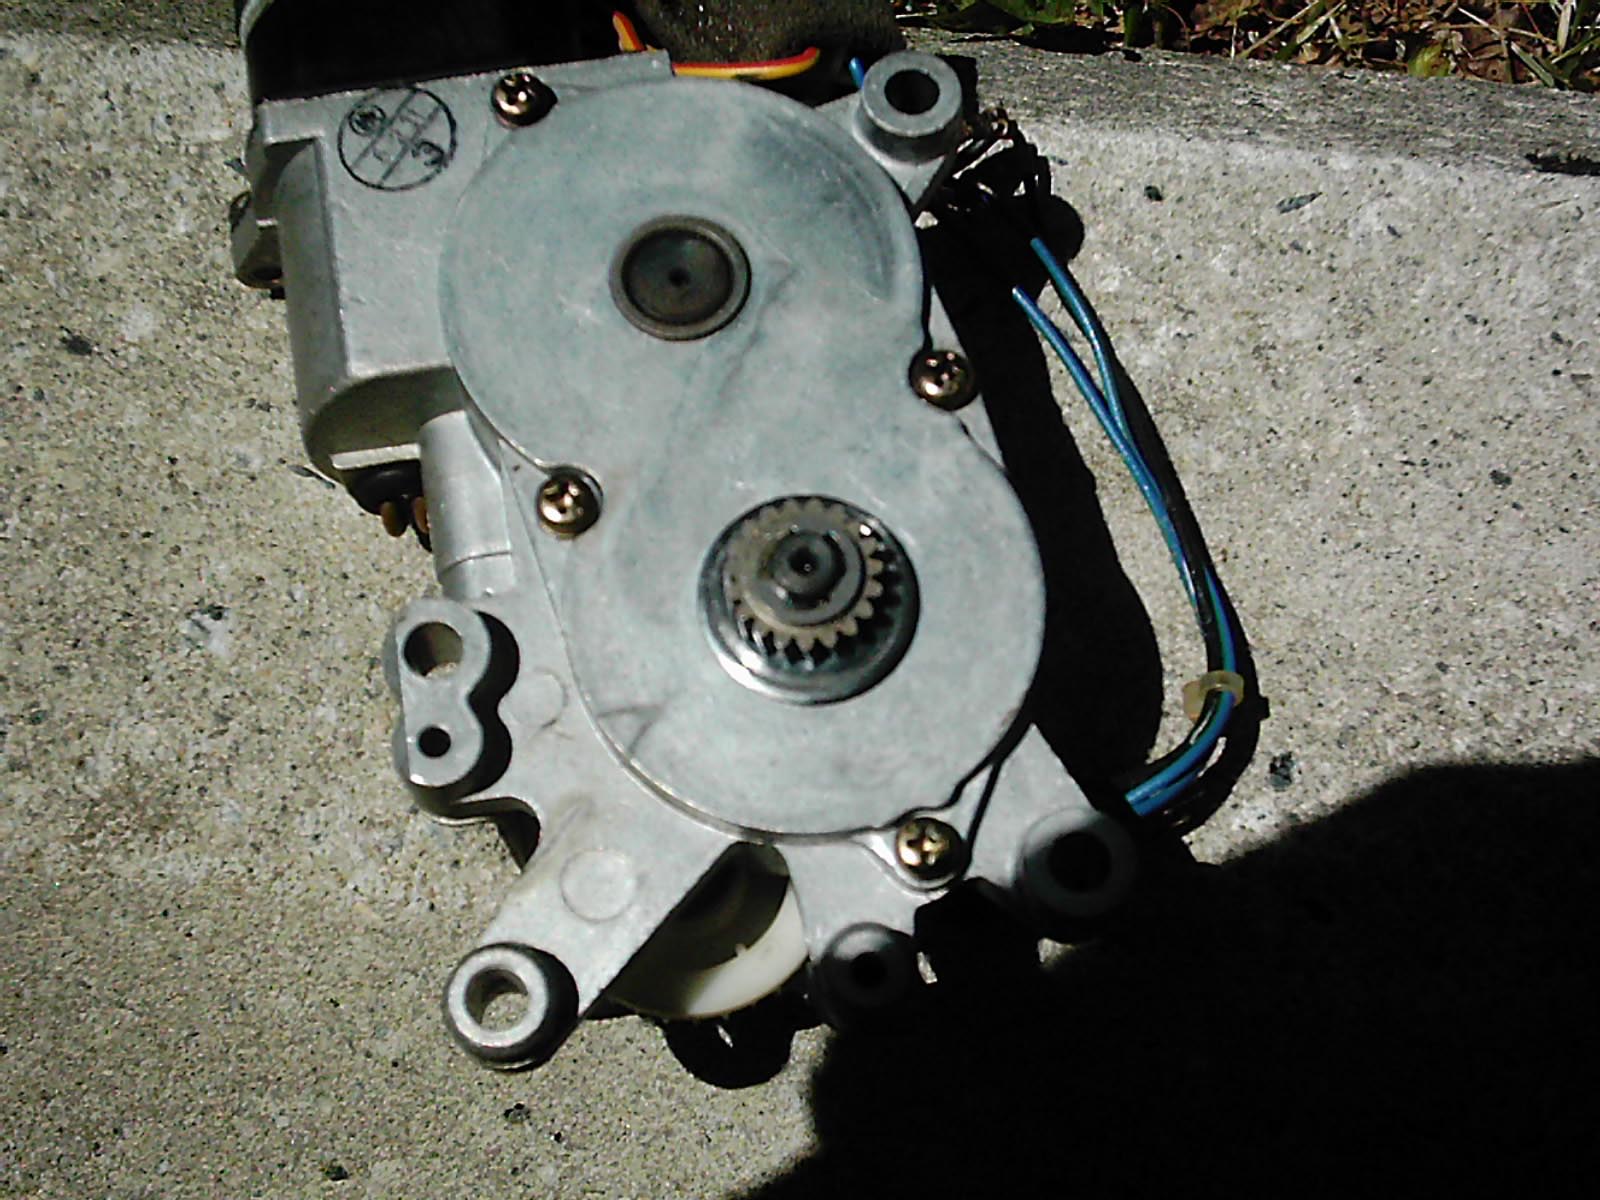
Step B: Use the Brake cleaner to clean off the driving gear (the piece that moves the "springs"). Make sure to remove all the old grease, and inspect the outside casing for any visable damage.
The sun roof assembly is often the most annoying piece to have break on you because if it breaks at the worst time possible letting rain water and leaves in. For those who have this problem or any of the symptoms of this problem suchs as:
1) Annoying pops or loud clicks and the sun roof doesn't raise or lower without help
2) One track slides while the other lags behind and there by makes the motor click
3) The alignment of the tracks keeps getting thrown off and thereby makes it impossible to close the window
4) When using the wrench it takes alot of force to close/open it.
5) You hear rather loud noises coming from the motor as it struggles to close/open the window.
Here are the preliminaries if you haven't already done these, please do these before attempting anything else in this write up.
supplies you will need:
-----------------------------
Brake Cleaner Spray Can
Clothes/Towels
Lithium Grease
Instructions:
----------------
1) Manually crank the window open.
2) Spray the brake cleaner onto the tracks and where ever else looks dirty
(Take special care not to get it on any good paint as it will ruin your paint job)
3) Manually close the window until a majority of the "spring" is visable in the track
4) Spray the brake cleaner onto the tracks and springs and everywhere else
5) Repeat steps 1-4 using the clothes to sop up the brake cleaner, and to clean the track
6) Use the lithium grease to re-lube the tracks and every contact that will touch the assembly.
Now, if you have done this to the best of your ability and it still has not helped with your problem you may need to do a little more work on the sun roof, this is what follows:
Supplies needed:
---------------------
Brake Cleaner
Towels
Lithium Grease
very small shims/or plastic pieces
Instructions motor removal and repair:
------------------------------------------------
Step 1: Pull the head liner down so you have enough access to the motor as well as the sun roof panel. If you wish (and I highly recommend it) remove the liner from the sun roof panel as well. This will insure that you have easy access to everything you need and are able to determine which pieces may need shims later on.
Step 2: Remove the sun roof panel by unbolting the 6 nuts (3 on each side) so that the track assemblies can operate independently.
This is what both sides should look like:
(the right side)
(the left side)
Step 3: Manually open and close your sun roof to check your alignment. If one falls behind then make a mental note of it. It will most likely be the one that needs the shims.
Step 4: Remove the motor. We will now focus on the motor for right now:
Step A: Check the movement of the motors internals by manually turning the hex piece (IE, as if you were trying to open the sun roof manually--but with out it connected). If it is difficult to turn then we will need to open it. Mine was rather on the hard side of things to turn. (this next piece of information I did on the spur of the moment. I'm not exactly sure how it will effect the performance of the electric motor itself, but after completing this the movement of the sunroof became alot easier)
Step B: Use the Brake cleaner to clean off the driving gear (the piece that moves the "springs"). Make sure to remove all the old grease, and inspect the outside casing for any visable damage.
04-24-07, 08:43 AM
#12
Technician
Thread Starter
iTrader: (1)
Join Date: Aug 2006
Location: Virginia
Posts: 1,008
Likes: 0
Received 0 Likes
on
0 Posts
Write up w/ pictures continued...
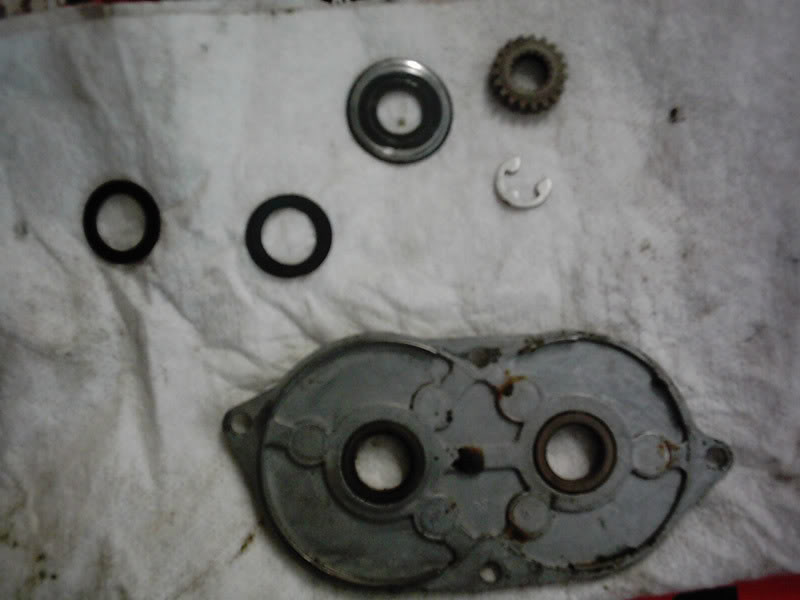
Step C: Remove the Codder clip and and remove the driving gear as well as the spacer underneath that.
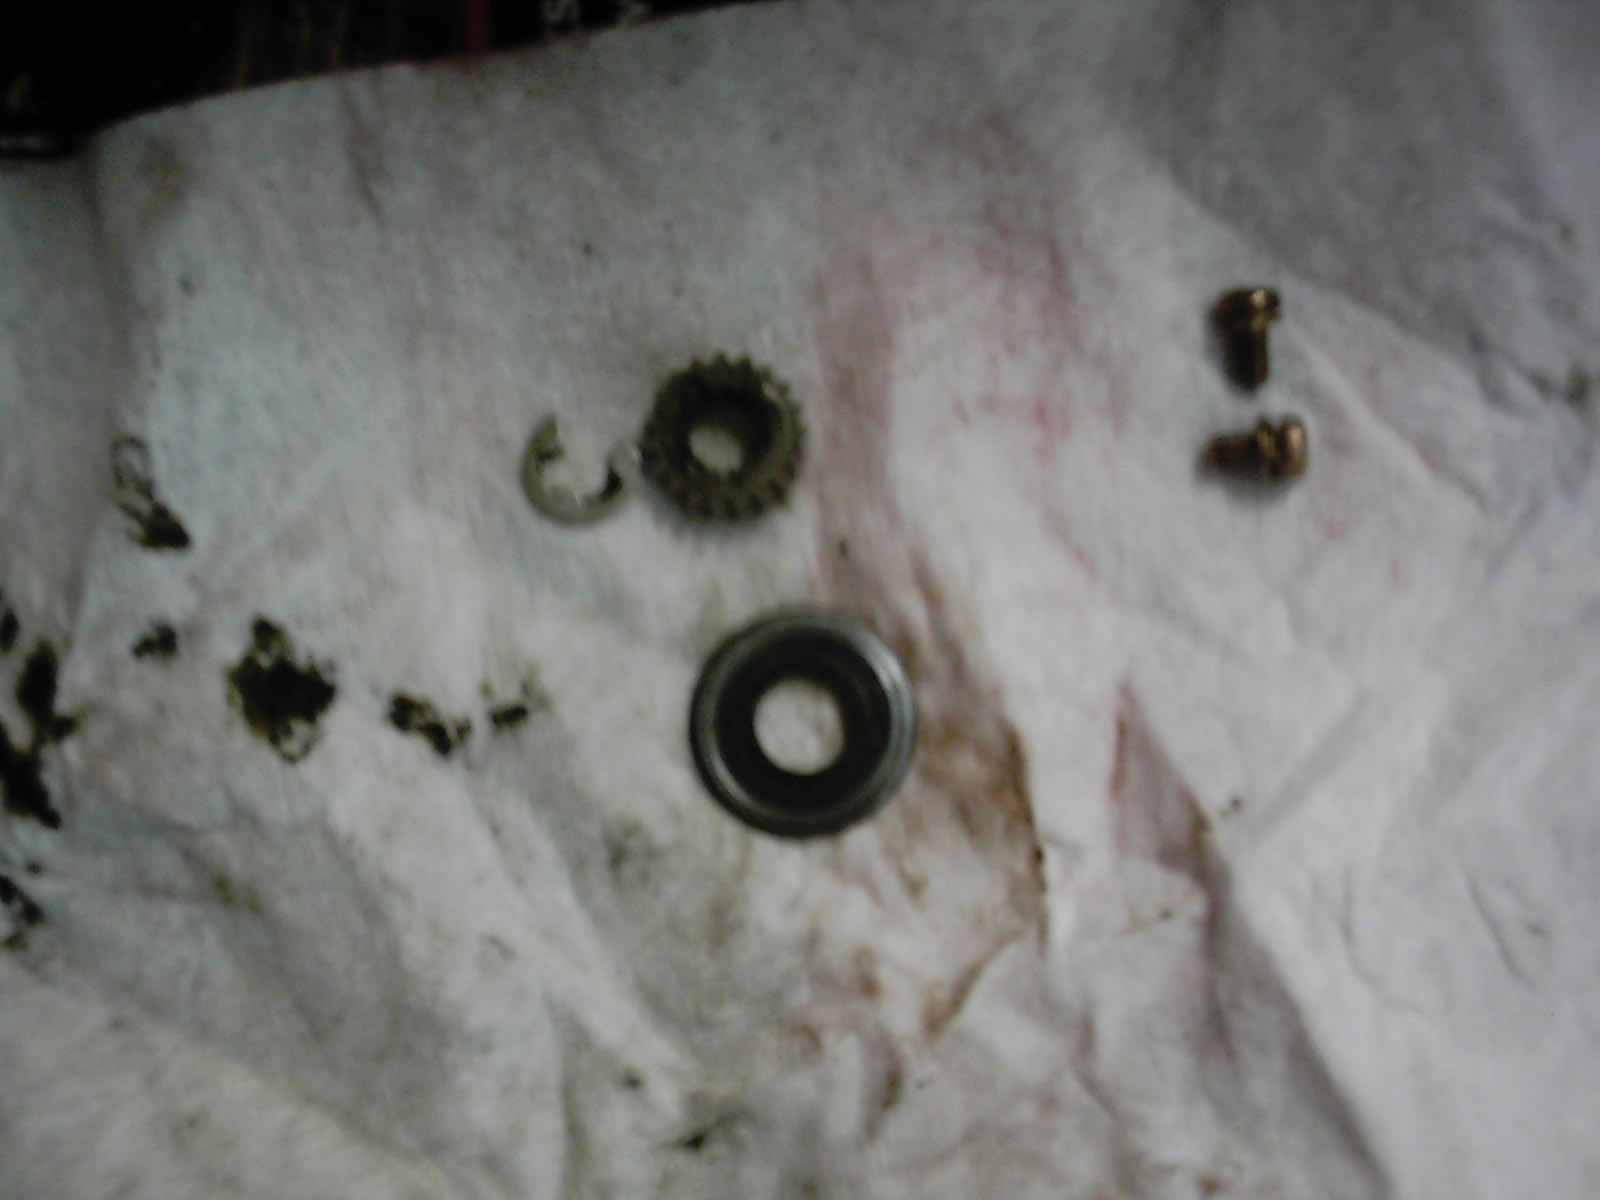
Further clean those three pieces and remove excess grease and dirt. Use a pocket knife to clean inbetween the spokes of the drive gear. Inspect the gear for any damage. If there is more than one tooth visably damaged I would recommend buying a new one. IF there isn't significant damage then it will be fine to be re-used.
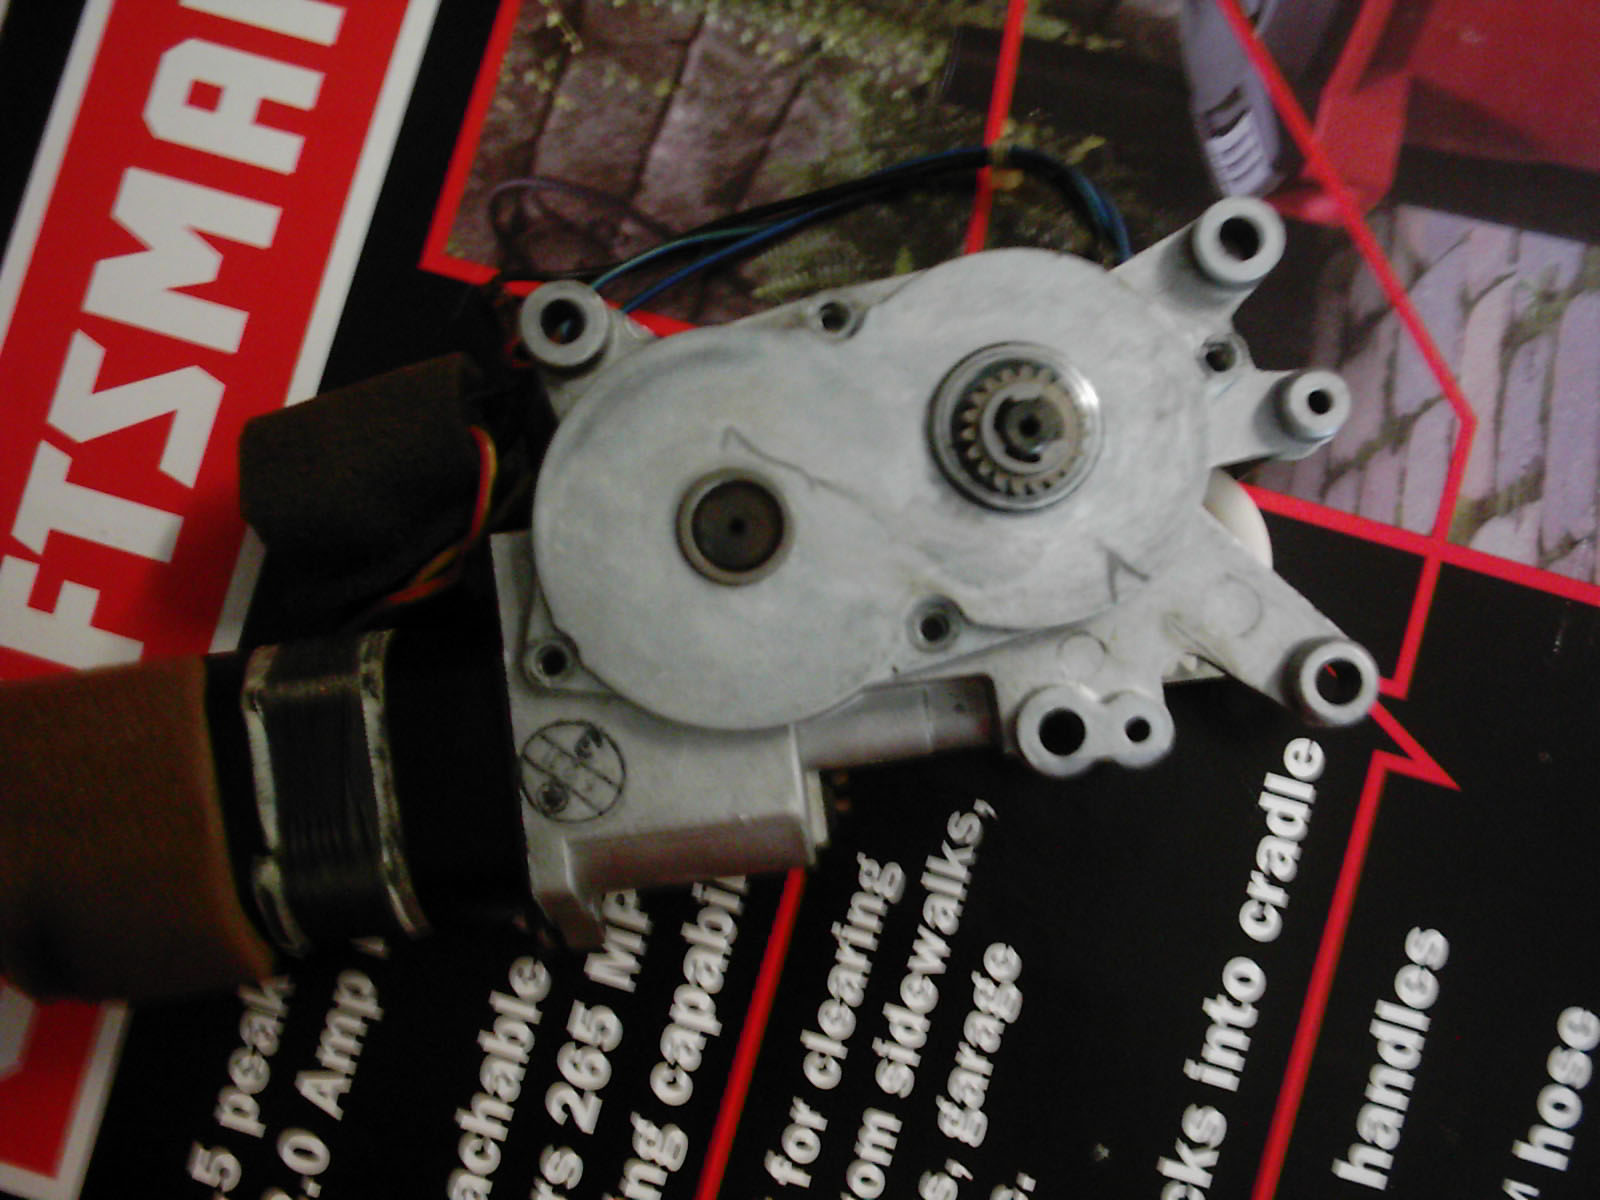
Step D: Remove the top plate and expose the internals of the motor gearing.
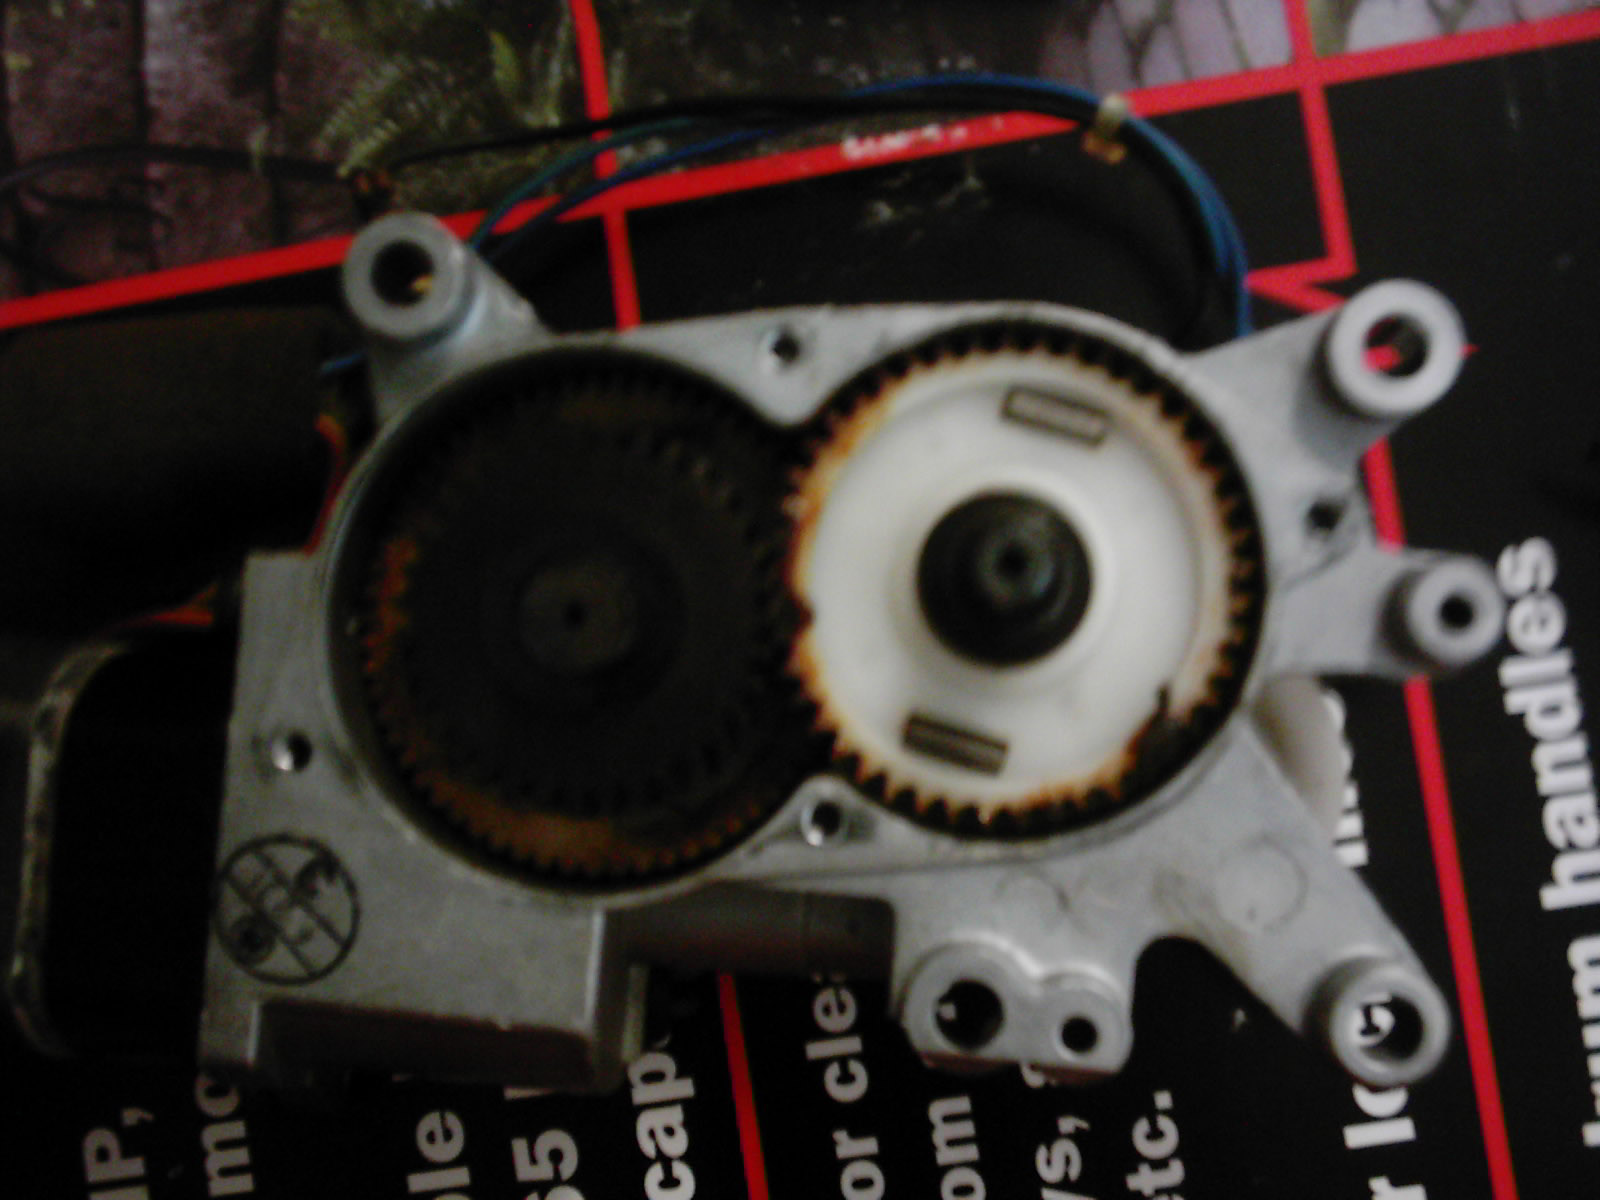
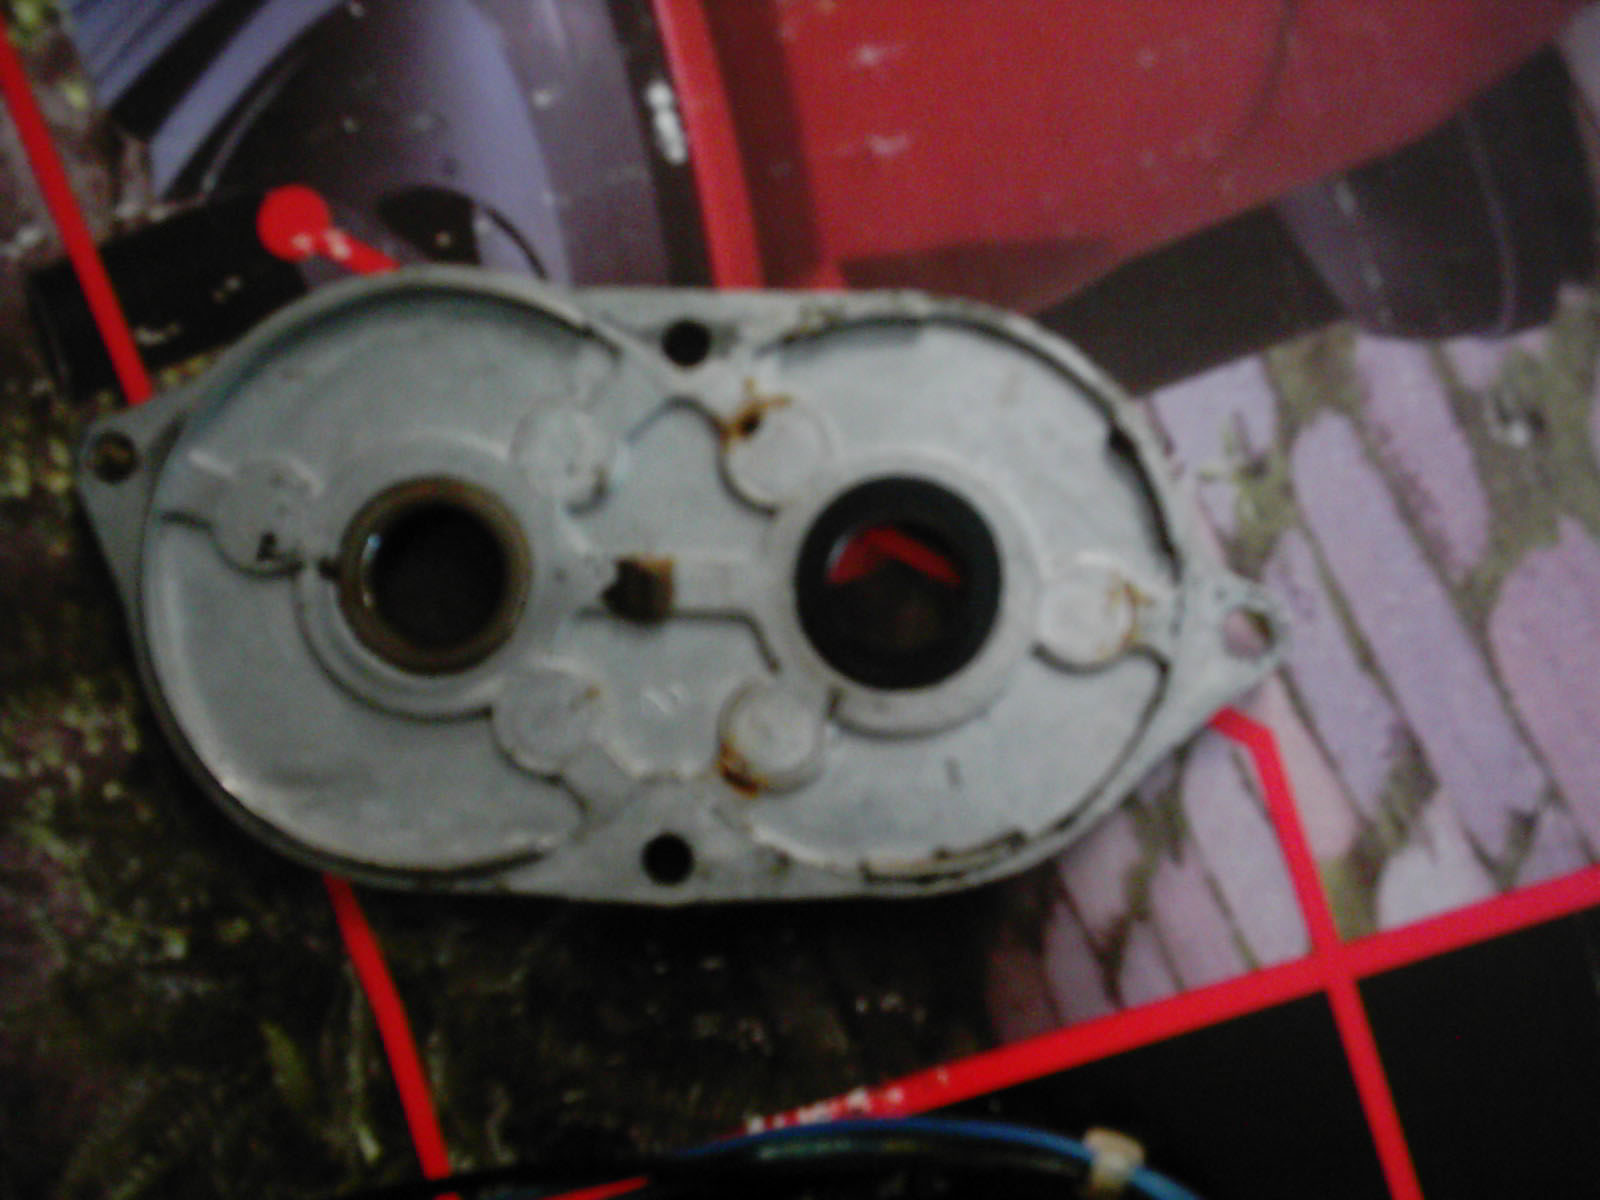
Please be mindful of the four little black washers that are in there too. Do not loose them. Also prying up the plate is a little difficult it seems that it needed a screw driver and some TLC to get it to pop off. Do not rush, but take your time. It will come. Try to pull it off evenly as to not damage any of the gears inside.
Further clean those three pieces and remove excess grease and dirt. Use a pocket knife to clean inbetween the spokes of the drive gear. Inspect the gear for any damage. If there is more than one tooth visably damaged I would recommend buying a new one. IF there isn't significant damage then it will be fine to be re-used.
Step D: Remove the top plate and expose the internals of the motor gearing.
Please be mindful of the four little black washers that are in there too. Do not loose them. Also prying up the plate is a little difficult it seems that it needed a screw driver and some TLC to get it to pop off. Do not rush, but take your time. It will come. Try to pull it off evenly as to not damage any of the gears inside.
04-24-07, 08:44 AM
#13
Technician
Thread Starter
iTrader: (1)
Join Date: Aug 2006
Location: Virginia
Posts: 1,008
Likes: 0
Received 0 Likes
on
0 Posts
Originally Posted by My5ABaby
Yeah, those pictures are TOO big. I'm all for good quality, but it'd be nice to fit them on a screen in 1280x1024.
04-24-07, 08:55 AM
#14
Technician
Thread Starter
iTrader: (1)
Join Date: Aug 2006
Location: Virginia
Posts: 1,008
Likes: 0
Received 0 Likes
on
0 Posts
Write up w/ Pictures Continued...
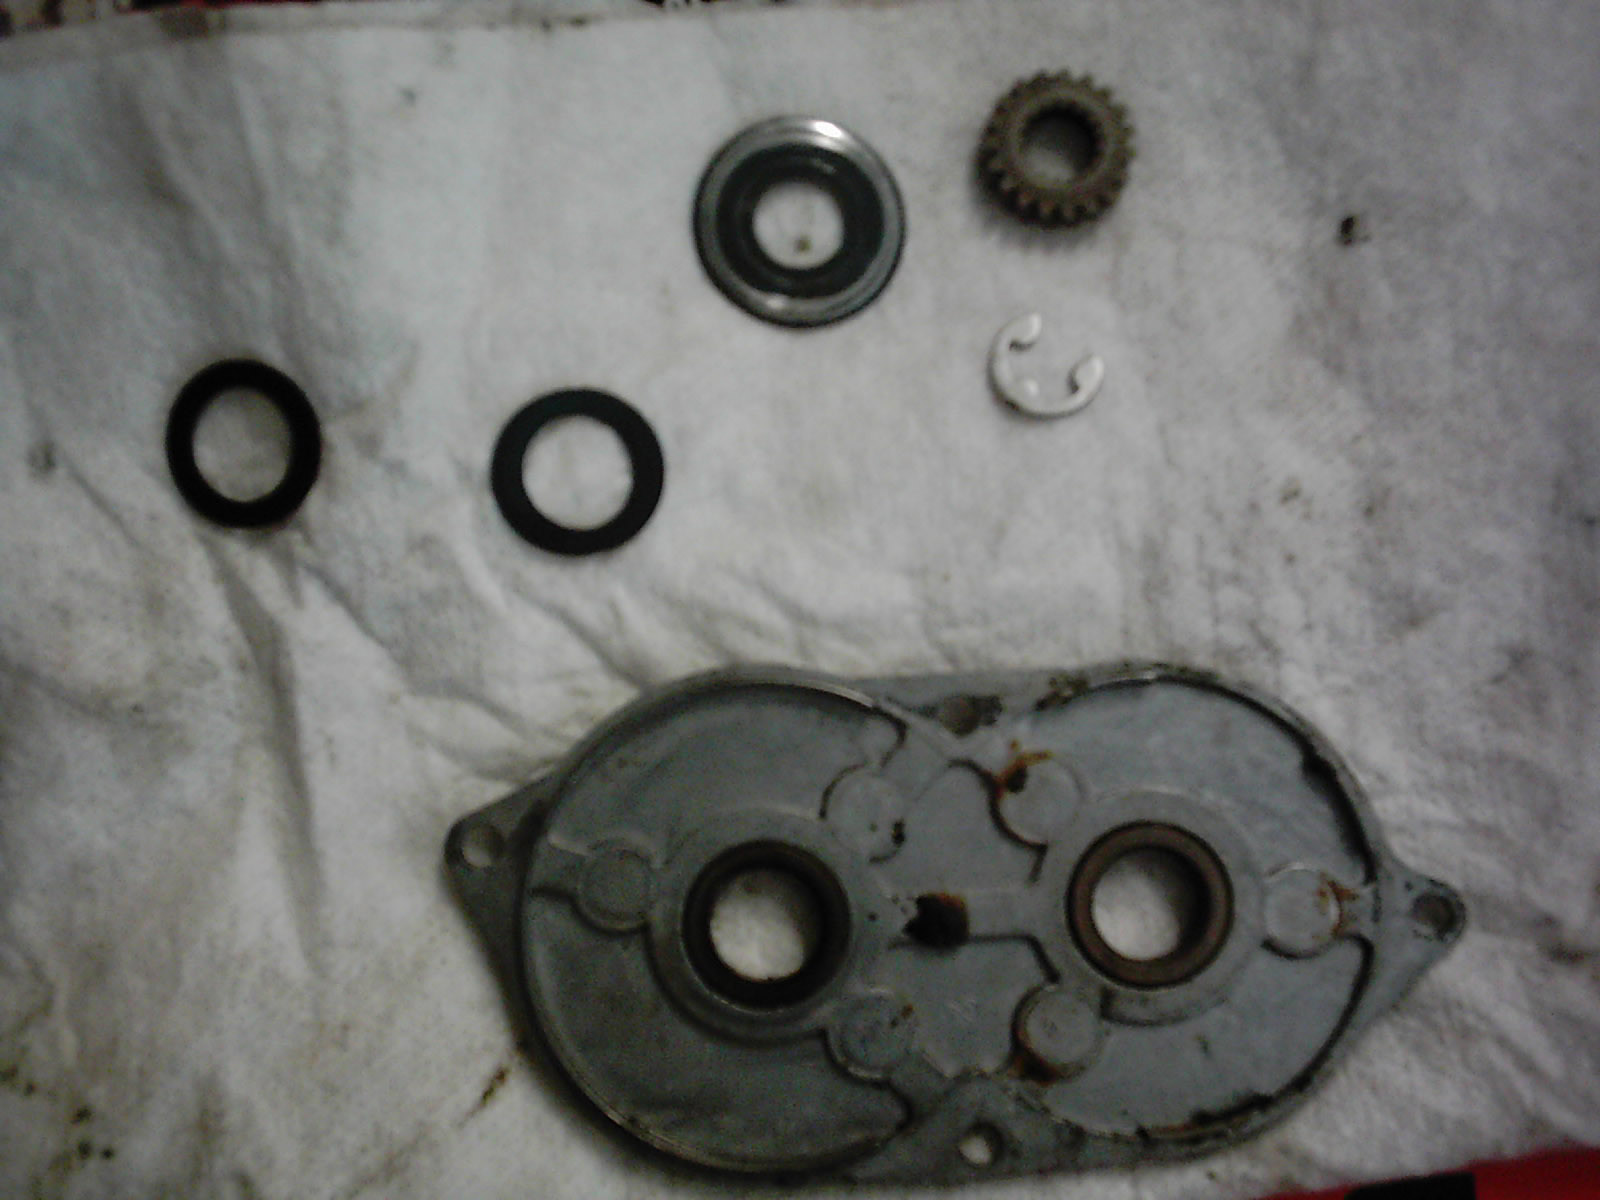
Notice the small black washers--do not loose those.
Step E: Remove any debris and old grease (if any--Mine was completely dry and rust had started to propogate on the metal gear inside). Use the brake cleaner to desolve the old grease and remove the dirt. Allow to dry and mop up excess brake cleaner.
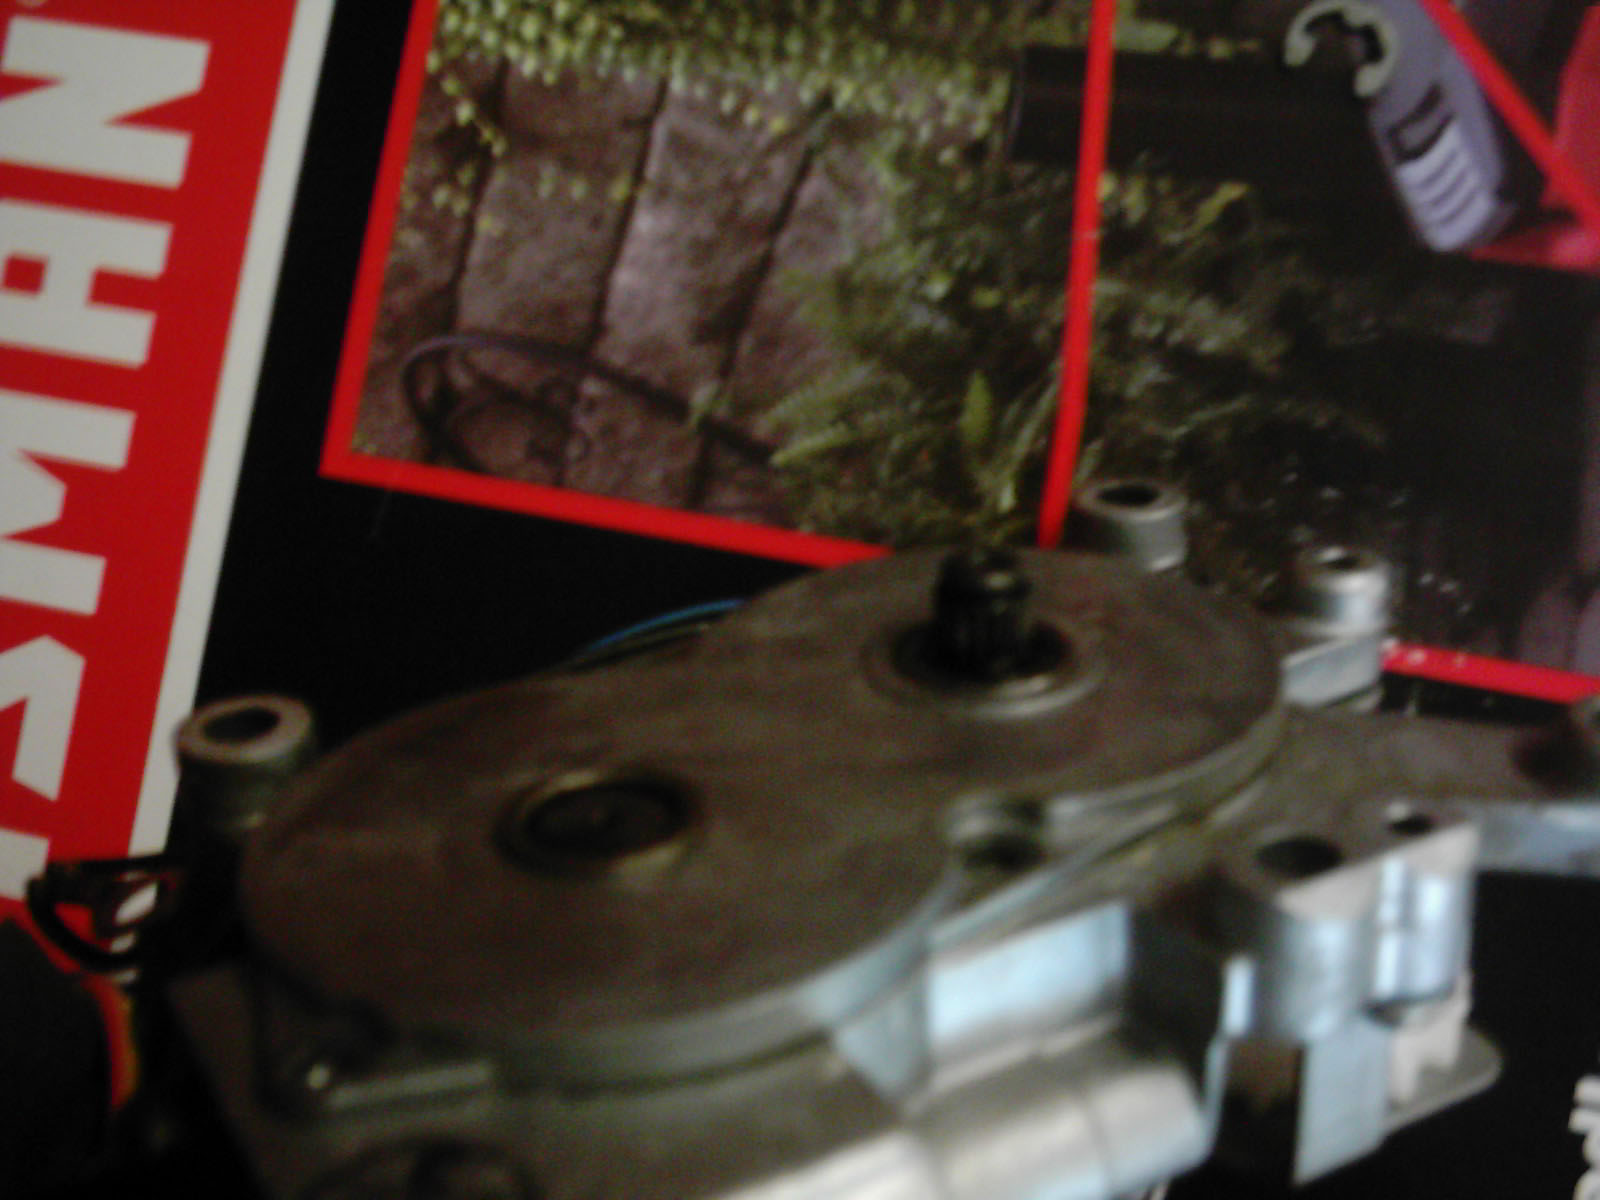
Step F: Repack the housing with lithium grease and move the gears back and forth to spread it around.
Apply it generously as to cover everything. And repeat this step as often as needed until the grease is everywhere inside the casing.
Step G: Reinstall the cover plate, and washers. Install the spacer, the drive gear, and the codder clip. Apply grease to these generously.
 04-24-07, 09:00 AM
#15
Technician
Thread Starter
iTrader: (1)
Join Date: Aug 2006
Location: Virginia
Posts: 1,008
Likes: 0
Received 0 Likes
on
0 Posts
Write up w/ Pictures Concluded
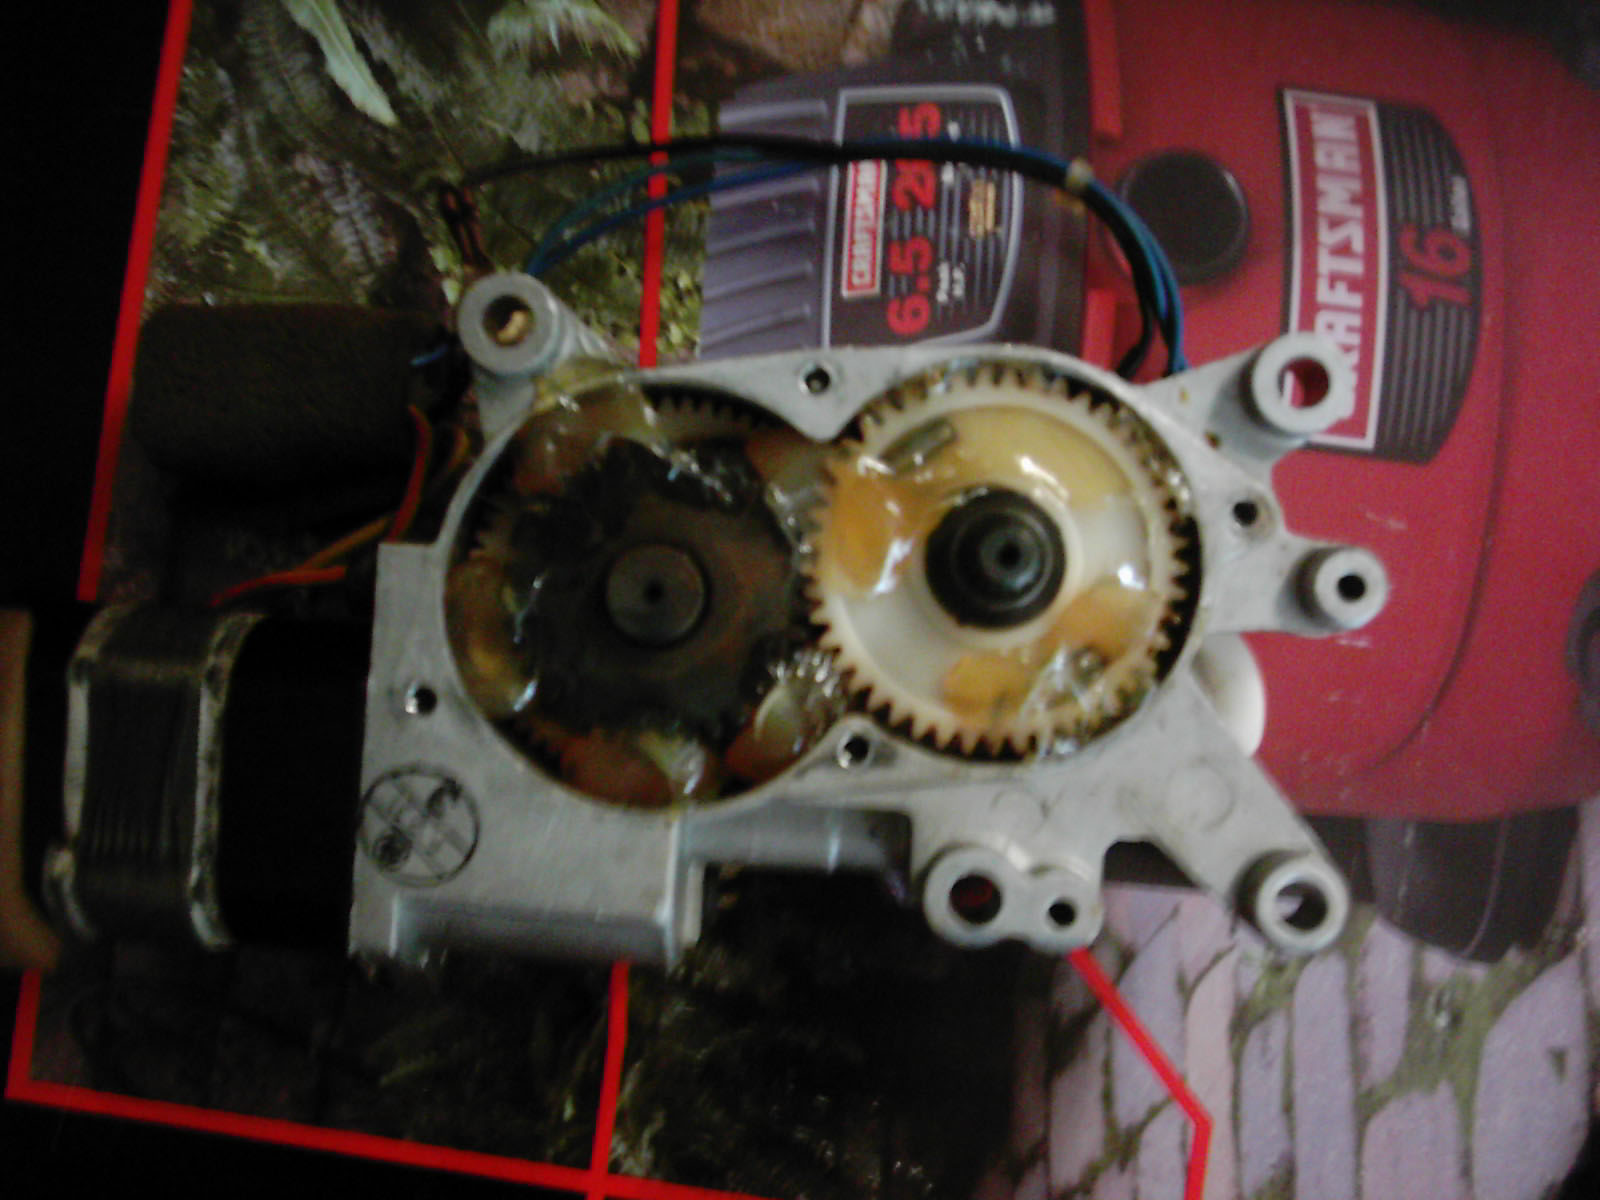
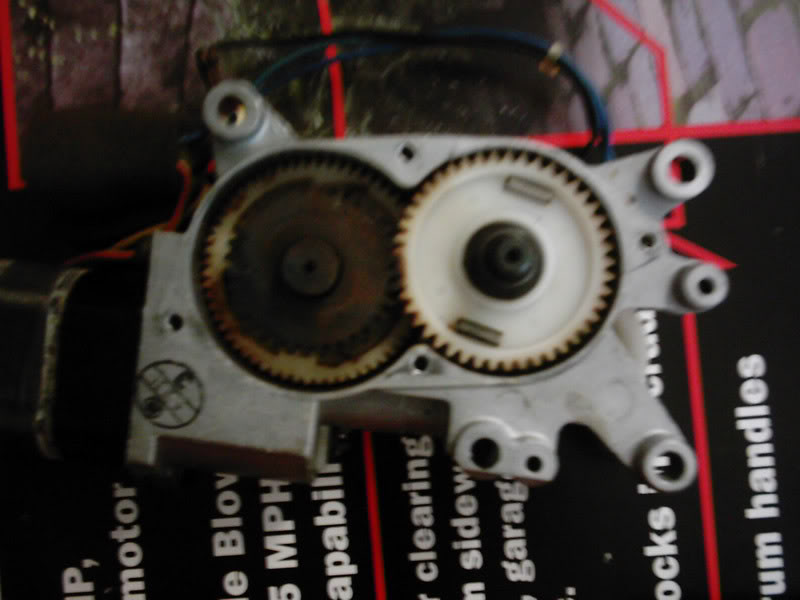
Step 5: Remember the track that was lagging behind before and didn't want to move? Well now we get to fix it. This will require you to install the motor several times until you get it perfect. Notice on the sunroof assembly side that the tracks go above and below the driving gear.

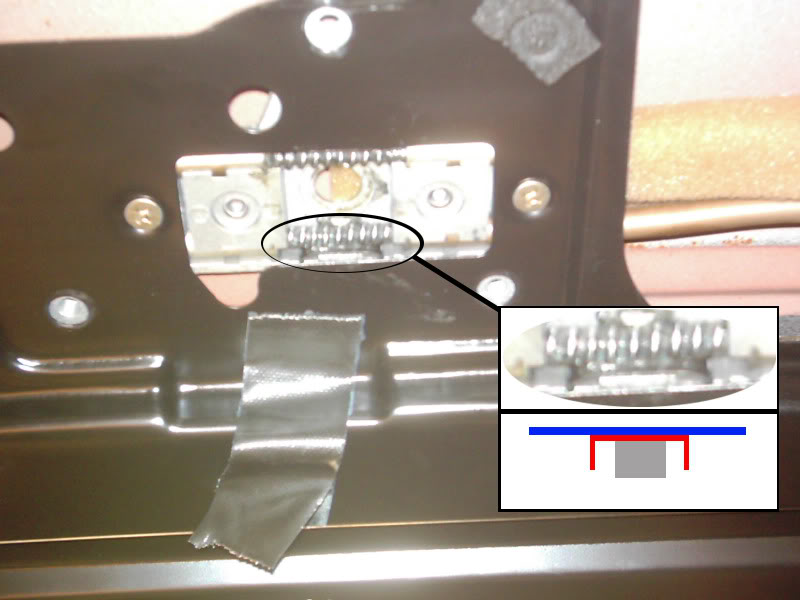
If you're facing forward the lower one goes to the right side, and the upper one goes to the left. Above the upper one there is a Black thin strip of metal sitting on a silver block of metal, and on the lower track there is a similiar piece below it. This is where the shims go. I placed shims on both of mine to insure proper contact with the drive gear. What you do is take a pocket knife and pry open the black metal from the silver block a little bit (no more than a few mm is all that's needed). Take a small shim, I recommend 1mm, or .5 mm plastic shims (they work pretty well) and place them inbetween the black piece and silver piece. This forces the "spring" closer to the drive wheel forcing it to move instead of slip.

The Blue line, is the "spring." the red is the black metal piece, and the Grey box is the silver bit. You want to place your shims inbetween the Red and the grey.
Step 6: Make sure alignment is accurate by forcing each track piece forward as far as possible (with the motor still not connected!). Make sure they're even this will make it easier to troubleshoot which side needs more shims than the other. Install the motor and manually crank it open/close to see if they both work. Use the entire range of motion. If one slips, or you hear pops, install more shims.
If you're facing forward the lower one goes to the right side, and the upper one goes to the left. Above the upper one there is a Black thin strip of metal sitting on a silver block of metal, and on the lower track there is a similiar piece below it. This is where the shims go. I placed shims on both of mine to insure proper contact with the drive gear. What you do is take a pocket knife and pry open the black metal from the silver block a little bit (no more than a few mm is all that's needed). Take a small shim, I recommend 1mm, or .5 mm plastic shims (they work pretty well) and place them inbetween the black piece and silver piece. This forces the "spring" closer to the drive wheel forcing it to move instead of slip.
The Blue line, is the "spring." the red is the black metal piece, and the Grey box is the silver bit. You want to place your shims inbetween the Red and the grey.
Step 6: Make sure alignment is accurate by forcing each track piece forward as far as possible (with the motor still not connected!). Make sure they're even this will make it easier to troubleshoot which side needs more shims than the other. Install the motor and manually crank it open/close to see if they both work. Use the entire range of motion. If one slips, or you hear pops, install more shims.
04-24-07, 10:47 AM
#17
Winter sucks
Join Date: Jan 2004
Location: Newberg, Oregon
Posts: 3,083
Likes: 0
Received 0 Likes
on
0 Posts
You can toss them on my wiki if you'd like.... that'll make appropriately sized ones (640x480).
http://www.rotorwiki.com (sign up and read the wiki cheat sheet on the front)
http://www.rotorwiki.com (sign up and read the wiki cheat sheet on the front)
04-24-07, 11:34 AM
#19
Technician
Thread Starter
iTrader: (1)
Join Date: Aug 2006
Location: Virginia
Posts: 1,008
Likes: 0
Received 0 Likes
on
0 Posts
Originally Posted by micaheli
You can toss them on my wiki if you'd like.... that'll make appropriately sized ones (640x480).
http://www.rotorwiki.com (sign up and read the wiki cheat sheet on the front)
http://www.rotorwiki.com (sign up and read the wiki cheat sheet on the front)
04-24-07, 11:46 AM
#20
Technician
Thread Starter
iTrader: (1)
Join Date: Aug 2006
Location: Virginia
Posts: 1,008
Likes: 0
Received 0 Likes
on
0 Posts
fixed
The sun roof assembly is often the most annoying piece to have break on you because if it breaks at the worst time possible letting rain water and leaves in. For those who have this problem or any of the symptoms of this problem suchs as:
1) Annoying pops or loud clicks and the sun roof doesn't raise or lower without help
2) One track slides while the other lags behind and there by makes the motor click
3) The alignment of the tracks keeps getting thrown off and thereby makes it impossible to close the window
4) When using the wrench it takes alot of force to close/open it.
5) You hear rather loud noises coming from the motor as it struggles to close/open the window.
Here are the preliminaries if you haven't already done these, please do these before attempting anything else in this write up.
supplies you will need:
-----------------------------
Brake Cleaner Spray Can
Clothes/Towels
Lithium Grease
Instructions:
----------------
1) Manually crank the window open.
2) Spray the brake cleaner onto the tracks and where ever else looks dirty
(Take special care not to get it on any good paint as it will ruin your paint job)
3) Manually close the window until a majority of the "spring" is visable in the track
4) Spray the brake cleaner onto the tracks and springs and everywhere else
5) Repeat steps 1-4 using the clothes to sop up the brake cleaner, and to clean the track
6) Use the Lithium grease to re-lube the track and everything else that may need it.
Now, if you have done this to the best of your ability and it still has not helped with your problem you may need to do a little more work on the sun roof, this is what follows:
Supplies needed:
---------------------
Brake Cleaner
Towels
Lithium Grease
very small shims/or plastic pieces
Instructions motor removal and repair:
------------------------------------------------
Step 1: Pull the head liner down so you have enough access to the motor as well as the sun roof panel. If you wish (and I highly recommend it) remove the liner from the sun roof panel as well. This will insure that you have easy access to everything you need and are able to determine which pieces may need shims later on.
Step 2: Remove the sun roof panel by unbolting the 6 nuts (3 on each side) so that the track assemblies can operate independently.
Step 3: Manually open and close your sun roof to check your alignment. If one falls behind then make a mental note of it. It will most likely be the one that needs the shims.
Step 4: Remove the motor. We will now focus on the motor for right now:

Step A: Check the movement of the motors internals by manually turning the hex piece (IE, as if you were trying to open the sun roof manually--but with out it connected). If it is difficult to turn then we will need to open it. Mine was rather on the hard side of things to turn. (this next piece of information I did on the spur of the moment. I'm not exactly sure how it will effect the performance of the electric motor itself, but after completing this the movement of the sunroof became alot easier)
Step B: Use the Brake cleaner to clean off the driving gear (the piece that moves the "springs"). Make sure to remove all the old grease, and inspect the outside casing for any visable damage.

Step C: Remove the Codder clip and and remove the driving gear as well as the spacer underneath that. Further clean those three pieces and remove excess grease and dirt. Use a pocket knife to clean inbetween the spokes of the drive gear. Inspect the gear for any damage. If there is more than one tooth visably damaged I would recommend buying a new one. IF there isn't significant damage then it will be fine to be re-used.

Step D: Remove the top plate and expose the internals of the motor gearing. Please be mindful of the four little black washers that are in there too. Do not loose them. Also prying up the plate is a little difficult it seems that it needed a screw driver and some TLC to get it to pop off. Do not rush, but take your time. It will come. Try to pull it off evenly as to not damage any of the gears inside.
Step E: Remove any debris and old grease (if any--Mine was completely dry and rust had started to propogate on the metal gear inside). Use the brake cleaner to desolve the old grease and remove the dirt. Allow to dry and mop up excess brake cleaner.
Step F: Repack the housing with lithium grease and move the gears back and forth to spread it around. Apply it generously as to cover everything. And repeat this step as often as needed until the grease is everywhere inside the casing.


Step G: Reinstall the cover plate, and washers. Install the spacer, the drive gear, and the codder clip. Apply grease to these generously.

Step 5: Remember the track that was lagging behind before and didn't want to move? Well now we get to fix it. This will require you to install the motor several times until you get it perfect. Notice on the sunroof assembly side that the tracks go above and below the driving gear. If you're facing forward the lower one goes to the right side, and the upper one goes to the left. Above the upper one there is a Black thin strip of metal sitting on a silver block of metal, and on the lower track there is a similiar piece below it. This is where the shims go. I placed shims on both of mine to insure proper contact with the drive gear. What you do is take a pocket knife and pry open the black metal from the silver block a little bit (no more than a few mm is all that's needed). Take a small shim, I recommend 1mm, or .5 mm plastic shims (they work pretty well) and place them inbetween the black piece and silver piece. This forces the "spring" closer to the drive wheel forcing it to move instead of slip.
Step 6: Make sure alignment is accurate by forcing each track piece forward as far as possible (with the motor still not connected!). Make sure they're even this will make it easier to troubleshoot which side needs more shims than the other. Install the motor and manually crank it open/close to see if they both work. Use the entire range of motion. If one slips, or you hear pops, install more shims.
1) Annoying pops or loud clicks and the sun roof doesn't raise or lower without help
2) One track slides while the other lags behind and there by makes the motor click
3) The alignment of the tracks keeps getting thrown off and thereby makes it impossible to close the window
4) When using the wrench it takes alot of force to close/open it.
5) You hear rather loud noises coming from the motor as it struggles to close/open the window.
Here are the preliminaries if you haven't already done these, please do these before attempting anything else in this write up.
supplies you will need:
-----------------------------
Brake Cleaner Spray Can
Clothes/Towels
Lithium Grease
Instructions:
----------------
1) Manually crank the window open.
2) Spray the brake cleaner onto the tracks and where ever else looks dirty
(Take special care not to get it on any good paint as it will ruin your paint job)
3) Manually close the window until a majority of the "spring" is visable in the track
4) Spray the brake cleaner onto the tracks and springs and everywhere else
5) Repeat steps 1-4 using the clothes to sop up the brake cleaner, and to clean the track
6) Use the Lithium grease to re-lube the track and everything else that may need it.
Now, if you have done this to the best of your ability and it still has not helped with your problem you may need to do a little more work on the sun roof, this is what follows:
Supplies needed:
---------------------
Brake Cleaner
Towels
Lithium Grease
very small shims/or plastic pieces
Instructions motor removal and repair:
------------------------------------------------
Step 1: Pull the head liner down so you have enough access to the motor as well as the sun roof panel. If you wish (and I highly recommend it) remove the liner from the sun roof panel as well. This will insure that you have easy access to everything you need and are able to determine which pieces may need shims later on.
Step 2: Remove the sun roof panel by unbolting the 6 nuts (3 on each side) so that the track assemblies can operate independently.
Step 3: Manually open and close your sun roof to check your alignment. If one falls behind then make a mental note of it. It will most likely be the one that needs the shims.
Step 4: Remove the motor. We will now focus on the motor for right now:
Step A: Check the movement of the motors internals by manually turning the hex piece (IE, as if you were trying to open the sun roof manually--but with out it connected). If it is difficult to turn then we will need to open it. Mine was rather on the hard side of things to turn. (this next piece of information I did on the spur of the moment. I'm not exactly sure how it will effect the performance of the electric motor itself, but after completing this the movement of the sunroof became alot easier)
Step B: Use the Brake cleaner to clean off the driving gear (the piece that moves the "springs"). Make sure to remove all the old grease, and inspect the outside casing for any visable damage.
Step C: Remove the Codder clip and and remove the driving gear as well as the spacer underneath that. Further clean those three pieces and remove excess grease and dirt. Use a pocket knife to clean inbetween the spokes of the drive gear. Inspect the gear for any damage. If there is more than one tooth visably damaged I would recommend buying a new one. IF there isn't significant damage then it will be fine to be re-used.
Step D: Remove the top plate and expose the internals of the motor gearing. Please be mindful of the four little black washers that are in there too. Do not loose them. Also prying up the plate is a little difficult it seems that it needed a screw driver and some TLC to get it to pop off. Do not rush, but take your time. It will come. Try to pull it off evenly as to not damage any of the gears inside.
Step E: Remove any debris and old grease (if any--Mine was completely dry and rust had started to propogate on the metal gear inside). Use the brake cleaner to desolve the old grease and remove the dirt. Allow to dry and mop up excess brake cleaner.
Step F: Repack the housing with lithium grease and move the gears back and forth to spread it around. Apply it generously as to cover everything. And repeat this step as often as needed until the grease is everywhere inside the casing.
Step G: Reinstall the cover plate, and washers. Install the spacer, the drive gear, and the codder clip. Apply grease to these generously.
Step 5: Remember the track that was lagging behind before and didn't want to move? Well now we get to fix it. This will require you to install the motor several times until you get it perfect. Notice on the sunroof assembly side that the tracks go above and below the driving gear. If you're facing forward the lower one goes to the right side, and the upper one goes to the left. Above the upper one there is a Black thin strip of metal sitting on a silver block of metal, and on the lower track there is a similiar piece below it. This is where the shims go. I placed shims on both of mine to insure proper contact with the drive gear. What you do is take a pocket knife and pry open the black metal from the silver block a little bit (no more than a few mm is all that's needed). Take a small shim, I recommend 1mm, or .5 mm plastic shims (they work pretty well) and place them inbetween the black piece and silver piece. This forces the "spring" closer to the drive wheel forcing it to move instead of slip.
Step 6: Make sure alignment is accurate by forcing each track piece forward as far as possible (with the motor still not connected!). Make sure they're even this will make it easier to troubleshoot which side needs more shims than the other. Install the motor and manually crank it open/close to see if they both work. Use the entire range of motion. If one slips, or you hear pops, install more shims.
 02-24-10, 01:52 AM
#22
Nice write-up but you forgot Q-Tips as one of the needs supplies. Those suckers are great for cleaning out the tracks. I followed your guide pretty much to the letter, and the window move forward and backwards very nice/smoothly. However, the window still "sticks" on the initial opening/final closing. I have to nudge it with one hand while holding down the open/close button.
So any ideas on what might be going on here? I didn't use any shims on mine, as both sides moved in sync with each other.
So any ideas on what might be going on here? I didn't use any shims on mine, as both sides moved in sync with each other.
Last edited by 3vil; 02-24-10 at 01:54 AM. Reason: spelling/grammar
02-24-10, 09:05 AM
#23
Nice write-up but you forgot Q-Tips as one of the needs supplies. Those suckers are great for cleaning out the tracks. I followed your guide pretty much to the letter, and the window move forward and backwards very nice/smoothly. However, the window still "sticks" on the initial opening/final closing. I have to nudge it with one hand while holding down the open/close button.
So any ideas on what might be going on here? I didn't use any shims on mine, as both sides moved in sync with each other.
So any ideas on what might be going on here? I didn't use any shims on mine, as both sides moved in sync with each other.
02-24-10, 09:23 AM
#24
I would suggest relaying the motor.
Just like our power window system, the motor gets all it's power through the switch which can have significant current drop.
Interpose a relay and use the switch to activate it, your motor will get full power and probably work perfectly.
Just like our power window system, the motor gets all it's power through the switch which can have significant current drop.
Interpose a relay and use the switch to activate it, your motor will get full power and probably work perfectly.
02-24-10, 11:58 AM
#25
there is no helper spring, its all on the motor. like clokker said the main issue with the sunroof is old electrical wiring and switches dropping voltage causing the motor to be too weak to operate normally.
i like the idea behind this writeup because the old grease definitely doesn't help the sunroof acuation but it really is just a temporary fix until the grease accumulates and bakes again bridging the gap to the point that the motor will be too weak to function again.
i like the idea behind this writeup because the old grease definitely doesn't help the sunroof acuation but it really is just a temporary fix until the grease accumulates and bakes again bridging the gap to the point that the motor will be too weak to function again.