
Vaccum hose replacement problem
 07-14-08, 12:34 PM
#1
Senior Member
Thread Starter
Join Date: Apr 2008
Location: Milton keynes,UK
Posts: 320
Likes: 0
Received 0 Likes
on
0 Posts
Vaccum hose replacement problem
ok today i started replacing my vaccum hoses
(little bastard thingys - takes some time to get to them :] )
anyway i had some boost leaks etc - nevermind , and i think i found my problem
one of them vaccum hoses was jnust hanging there, and i havent got a clue where it could be possibly connected to(tried to track it - no joy) i have taken a pic so you can see it (dont worry about white thingys-they got numbers on it so i wont mess it up) basically the thing im holding connect to the UIM and i circled it - i know it must go there but what about the other end?

ok the other thing is that i know that behind the circled thing (i think its called solenoid rack) there is some hoses to replace, my problem is -i dont know how to take it off without messing it up, besides i dont know how its mounted, its got one philips screw on the front(and three at the back apparently), but at the back everything is blocked with some weirid wires/hoses - u name it, and i cant get to them(dont want to strip the head ) - my question is have you got your ways to get the bastard thing off?

thank you for any help
(little bastard thingys - takes some time to get to them :] )
anyway i had some boost leaks etc - nevermind , and i think i found my problem
one of them vaccum hoses was jnust hanging there, and i havent got a clue where it could be possibly connected to(tried to track it - no joy) i have taken a pic so you can see it (dont worry about white thingys-they got numbers on it so i wont mess it up) basically the thing im holding connect to the UIM and i circled it - i know it must go there but what about the other end?
ok the other thing is that i know that behind the circled thing (i think its called solenoid rack) there is some hoses to replace, my problem is -i dont know how to take it off without messing it up, besides i dont know how its mounted, its got one philips screw on the front(and three at the back apparently), but at the back everything is blocked with some weirid wires/hoses - u name it, and i cant get to them(dont want to strip the head
) - my question is have you got your ways to get the bastard thing off?thank you for any help
 07-14-08, 01:00 PM
#2
HAH! Welcome to HELL. 
That being said, I feel your pain brother.
All of my vaccum hoses crumbled to **** when I pulled the intake manifold so at least you have an IDEA of where they went originally - I had to do everything by diagram. Anyhoo, look in the FAQ for vacuum hose routing diagrams. While you are at it, order some of Dale Clarks check valves and throw the original ones away.
As far as the vacuum rack- I removed the rear fuel line, unbolted it somewhat from the block (you can get a few bolts loose on the frame of it if you pull the coil packs), pried it up in the rear and used a stubby screwdriver on it. PRAY you don't strip a screw. When you reinstall, replace the screws with small hex bolts.
I did strip one screw. I did a quick tack weld of a small nut on the stripped head and unscrewed it with a wrench. There is raw fuel under there so wash it away if you have to do something so drastic. If I had to do it again, I would probably use a small piece of JB Weld instead of busting out the welder.
Hey - those big blue hoses you are using for the charge relief valve and pressuer release valve look pretty cool. Are they pretty sturdy?
07-14-08, 01:42 PM
#3
Senior Member
Thread Starter
Join Date: Apr 2008
Location: Milton keynes,UK
Posts: 320
Likes: 0
Received 0 Likes
on
0 Posts
hehe good to know that someone went through it and got it done :] im giving myself few days to get it done:]
what do you mean by Dale Clarks check valves?
i got the vaccum diagram printed out mate :] idea of replacing hoses and what was where/where to remove what taken from:
http://www.rx7.org/Robinette/hoses.htm
but still id rather someone to stick a pic of where the hose should go or explain to me like to a fresh fd owner (i had it 3 months)
im just thinking of this vaccum rack mate, well the thing is i can touch them hoses and they still pretty flexible, so maybe i dont need to replace it?(and avoid the most difficult thing) but on the other way i got it so far and it would be a shame if i had to do it again coz i havent done these four hoses... dont know what tyo do coz it sounbds so hard to get done..
as to the CRV AND BOV hoses yes mate, i would even reccomend replacing them rubber shitty hoses with nice colored silicone ones that r much more efficient (in my case i had a boost leak and my BOV wasnt working properly, after i replaced them everything was fine) and it looks better :] i want to make my engine bay look as nice as some of those here in the engine bays thread :]
what do you mean by Dale Clarks check valves?
i got the vaccum diagram printed out mate :] idea of replacing hoses and what was where/where to remove what taken from:
http://www.rx7.org/Robinette/hoses.htm
but still id rather someone to stick a pic of where the hose should go or explain to me like to a fresh fd owner (i had it 3 months)
im just thinking of this vaccum rack mate, well the thing is i can touch them hoses and they still pretty flexible, so maybe i dont need to replace it?(and avoid the most difficult thing) but on the other way i got it so far and it would be a shame if i had to do it again coz i havent done these four hoses...
dont know what tyo do coz it sounbds so hard to get done..as to the CRV AND BOV hoses yes mate, i would even reccomend replacing them rubber shitty hoses with nice colored silicone ones that r much more efficient (in my case i had a boost leak and my BOV wasnt working properly, after i replaced them everything was fine) and it looks better :] i want to make my engine bay look as nice as some of those here in the engine bays thread :]
07-14-08, 02:34 PM
#4
Dale Clark sells upgraded check valves on here and on ebay. Search viton check valves. You should get a set and save yourself a headache. They are cheap insurance.
You definitely want to remove the vacuum rack and things get crispier the deeper you dig. You might as well do ALL the hoses and you can't reach them without pulling the rack.
Also - its easier to route all the small hoses with the rack on a table instead of trying to do them on the car all bent over like a prison bitch.
I figured two days for mine and it took 2 months. Nearly every solenoid nipple and check valve shattered when I so much as dared touch it. Most of that 2 months was sourcing parts and waiting for them. I also ended up replacing my OMP lines. THEN, to top it off I had to do it all again because I had a massive vacuum leak at the injectors since I had to pull the fuel rails to reach the OMP lines. (If you replace those lines and pull the fuel rails - the bolts are different lengths for the primay and secondaries!!! Don't mix them up! )
You definitely want to remove the vacuum rack and things get crispier the deeper you dig. You might as well do ALL the hoses and you can't reach them without pulling the rack.
Also - its easier to route all the small hoses with the rack on a table instead of trying to do them on the car all bent over like a prison bitch.
I figured two days for mine and it took 2 months. Nearly every solenoid nipple and check valve shattered when I so much as dared touch it. Most of that 2 months was sourcing parts and waiting for them. I also ended up replacing my OMP lines. THEN, to top it off I had to do it all again because I had a massive vacuum leak at the injectors since I had to pull the fuel rails to reach the OMP lines. (If you replace those lines and pull the fuel rails - the bolts are different lengths for the primay and secondaries!!! Don't mix them up!
)
07-14-08, 03:11 PM
#5
Hey just relax and contact dale Clark and order some "one way check valves". they are the replacements for the oem ones. And don't get mad or up set if the task seems to be taking longer and for ever to change the lines out. I have been doing vac lines since 95 on the FDs and and it still takes a good 4.5 hours to do so.
Just keep in mind one at a time so you don't lose track of where one came off of and be patient about it.
Just keep in mind one at a time so you don't lose track of where one came off of and be patient about it.
07-14-08, 05:23 PM
#6
Senior Member
Thread Starter
Join Date: Apr 2008
Location: Milton keynes,UK
Posts: 320
Likes: 0
Received 0 Likes
on
0 Posts
yeah im trying to take it easy as it really takes much longer then i thought, just contacted dale clark about the valves  cheers guys :]
tommorow ill try to figure out how to take the solenoid rack off(i know its gonna be a pain) cant figure out how to get them 3 back screws out but ill give it a try ..
btw:
where r the fuel rails? and OMP lines?
cheers
cheers guys :]tommorow ill try to figure out how to take the solenoid rack off(i know its gonna be a pain) cant figure out how to get them 3 back screws out but ill give it a try ..
btw:
where r the fuel rails? and OMP lines?
cheers
07-14-08, 05:28 PM
#7
sickboy--- down load the fsm(full service manuel) free http://foxed.ca/foxed/index.php?page=rx7manual
and make sure you do some searching before asking questions some of the seasoned members get really pissed when a person just ask without having done a search! LOL cheers good luck and keep us posted.
and make sure you do some searching before asking questions some of the seasoned members get really pissed when a person just ask without having done a search! LOL cheers good luck and keep us posted.
Trending Topics
07-14-08, 08:57 PM
#9
Full Member
iTrader: (1)
Join Date: Jul 2002
Location: Sunnyvale
Posts: 52
Likes: 0
Received 0 Likes
on
0 Posts
http://www.sears.com/shc/s/p_10153_1...7478000P?mv=rr
If the screws are on really tight, you could try getting a vise grip onto the screws instead.
07-15-08, 03:04 AM
#10
Senior Member
Thread Starter
Join Date: Apr 2008
Location: Milton keynes,UK
Posts: 320
Likes: 0
Received 0 Likes
on
0 Posts
ichibandan
yeah i thouht that would be the only way..gotta go and buy that ratchet..thanks
FDSeoul
i have the manual the thing is i asked coz we were already talking about it - thought i just sneak a quick one :]
yeah i thouht that would be the only way..gotta go and buy that ratchet..thanks
FDSeoul
i have the manual the thing is i asked coz we were already talking about it - thought i just sneak a quick one :]
Last edited by sickboy2345; 07-15-08 at 03:13 AM.
 07-15-08, 01:41 PM
#14
Senior Member
Thread Starter
Join Date: Apr 2008
Location: Milton keynes,UK
Posts: 320
Likes: 0
Received 0 Likes
on
0 Posts
.....been working on it since 9:00 till now..got the hard bit done (i think) but i couldnt do it as robinette described..what dave boots said about the back screw on the solenoid rack was like the best advice ever - but , i couldnt strip this screw, someone has already done it for me ...dont even want to describe what i been through to get around this thing...i didnt take the whole rack out, only the top bit(helt with 3 screws)(number one on the pic), then unplugged all the hoses marking them before(went shopping this morning, bought adapter for my ratchet so i was able to use screwdriver bits with it - that is THE tool for this job, and silver paint marker-really thin so i was able to mark all the little *******...) then i had to tak few things out (if you coold please tell me what is it) fisrt one number 3 on the pic ,and then that longish pipe?(number 4) whatever it is held with two bolts and third one at the front was holding fuel pipe i had to undo it so fuel was leaking for a while but thanks to that got them 4 really hard to get hoses done
then as i was putting it all back together i was replacing rest of the hoses(had few difficulkt ones but not as hard as them 4 ******* hidden behind the rack...)
when i was putting my solenoid rack back together one of the solenoids(g) snapped at the base so i glued it with some kinda super glue so the base wont come off - you can see it hanging(number 2) and rapped with tape(only untill it gets hard-tommorow)
now bad news
whilst replacing,pulling doing whatever to get the job done i wiped few hoses and i havent got a clu where they r supposed to be going...
so tommorow once i put my solenoid rack back together(didnt doi it coz of taht snapped solenoid) i'll sit there with my new bible(http://www.rx7.org/Robinette/images/hoses.gif) and i'll check every single hose in the rats nest, even if that means il have to spend al day and get nothing done - the last thing i want is to start the engine and find out that i have done something wrong and i have to come back to hell...
BTW:
little off topic(though iu sneak it here coz i got few people already replying) but i really think of removing double throttle whilst i got my UIM off can someone tell me what size of tap should i use to thread the hole thats left after removing them butterflies? and once i have done that , can i remove the actuator and blang the vaccum hoses off?(ones for double throttle)
what i can say after what i have done so far - THIS IS THE PIG OF ALL THE JOBS I HAVE DONE ON MY CAR SO FAR!

cheers for reading - ill keep you updated :]
...dont even want to describe what i been through to get around this thing...i didnt take the whole rack out, only the top bit(helt with 3 screws)(number one on the pic), then unplugged all the hoses marking them before(went shopping this morning, bought adapter for my ratchet so i was able to use screwdriver bits with it - that is THE tool for this job, and silver paint marker-really thin so i was able to mark all the little *******...) then i had to tak few things out (if you coold please tell me what is it) fisrt one number 3 on the pic ,and then that longish pipe?(number 4) whatever it is held with two bolts and third one at the front was holding fuel pipe i had to undo it so fuel was leaking for a while but thanks to that got them 4 really hard to get hoses donethen as i was putting it all back together i was replacing rest of the hoses(had few difficulkt ones but not as hard as them 4 ******* hidden behind the rack...)
when i was putting my solenoid rack back together one of the solenoids(g) snapped at the base so i glued it with some kinda super glue so the base wont come off - you can see it hanging(number 2) and rapped with tape(only untill it gets hard-tommorow)
now bad news
whilst replacing,pulling doing whatever to get the job done i wiped few hoses and i havent got a clu where they r supposed to be going...
so tommorow once i put my solenoid rack back together(didnt doi it coz of taht snapped solenoid) i'll sit there with my new bible(http://www.rx7.org/Robinette/images/hoses.gif) and i'll check every single hose in the rats nest, even if that means il have to spend al day and get nothing done - the last thing i want is to start the engine and find out that i have done something wrong and i have to come back to hell...
BTW:
little off topic(though iu sneak it here coz i got few people already replying
) but i really think of removing double throttle whilst i got my UIM off can someone tell me what size of tap should i use to thread the hole thats left after removing them butterflies? and once i have done that , can i remove the actuator and blang the vaccum hoses off?(ones for double throttle)what i can say after what i have done so far - THIS IS THE PIG OF ALL THE JOBS I HAVE DONE ON MY CAR SO FAR!
cheers for reading - ill keep you updated :]
07-15-08, 01:43 PM
#15
^^^ I only had to remove a couple of the rear hoses and after removing the hex bolts holding the frame to the block I was able to reach the screws with a stubby screwdriver.
You have to pry the frame up a little bit but at least you don't have to take all the hoses off.
As always though - whatever works for you.
You have to pry the frame up a little bit but at least you don't have to take all the hoses off.
As always though - whatever works for you.
07-15-08, 02:16 PM
#16
sickboy-- looks good you'll see and realize after all is done and the Fd is running smooth that in the end all the pain and suffering is worth a million. Keep up the great job.
BTW have you ordered the check valves from Dale!!! if you have already ordered them they should arrive very soon he is one fast shipper.
BTW have you ordered the check valves from Dale!!! if you have already ordered them they should arrive very soon he is one fast shipper.
07-15-08, 02:27 PM
#17
Senior Member
Thread Starter
Join Date: Apr 2008
Location: Milton keynes,UK
Posts: 320
Likes: 0
Received 0 Likes
on
0 Posts
just got a message from him saying he will be sending them tommorow, ill try to sort my hoses out till then and put some of the stuff back in, im also rebuilding my brakes(just fitted brand new rotors, replaced the lines with ss braides ones, and got my calipers taken off and waiting for my repair kit for them ) - what im trying to say is that even if i have to wait few days ill still got lots to do :]
im on holiday this week but i cant call it resting :]
cheers
btw:
does anyone know about this double throttle thingy?
) - what im trying to say is that even if i have to wait few days ill still got lots to do :]im on holiday this week but i cant call it resting :]
cheers
btw:
does anyone know about this double throttle thingy?
07-16-08, 02:19 PM
#20
Senior Member
Thread Starter
Join Date: Apr 2008
Location: Milton keynes,UK
Posts: 320
Likes: 0
Received 0 Likes
on
0 Posts
late but always handy mate :] thx for that:]
ok little update:

had some problems coz this diagram is a bit different then what i actually have in my car...
basically my solenoid D from this diagram is missing(2) and i havent got 4 pipes coming out this thingy (1)- there is 3 and the nipple on the UIM that goes from solenoid d hav been blanked off, oh and this little pipe connecting solenoid A and B - in my car gos from B to B(front nipple to the bottom nipple)
also i had problems finding these nipples(circle without the number) - there is nothing on the diagram! hoses just end there...

well hope it will work ok when i put it all back together(still waiting for check valves)
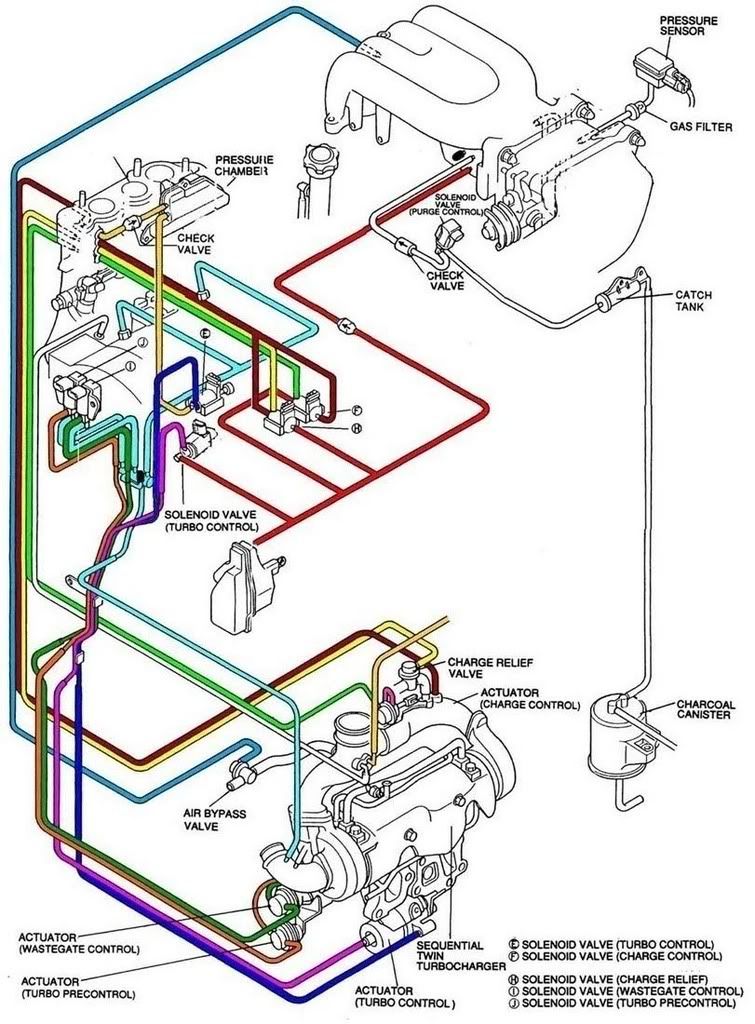
does anyone know where is this diagram from?(what model) and why is it different?
ok little update:
had some problems coz this diagram is a bit different then what i actually have in my car...
basically my solenoid D from this diagram is missing(2) and i havent got 4 pipes coming out this thingy (1)- there is 3 and the nipple on the UIM that goes from solenoid d hav been blanked off, oh and this little pipe connecting solenoid A and B - in my car gos from B to B(front nipple to the bottom nipple)
also i had problems finding these nipples(circle without the number) - there is nothing on the diagram! hoses just end there...
well hope it will work ok when i put it all back together(still waiting for check valves)
does anyone know where is this diagram from?(what model) and why is it different?
07-16-08, 02:45 PM
#21
I'm sure you know this but there is a difference in the california emission version and also some of the hard pipes are for automatic version. other then that the works looks great!!!! keep it up,
BTW i hope your waiting to install the new valves before closing her up!!!
BTW i hope your waiting to install the new valves before closing her up!!!
07-16-08, 04:01 PM
#22
Senior Member
Thread Starter
Join Date: Apr 2008
Location: Milton keynes,UK
Posts: 320
Likes: 0
Received 0 Likes
on
0 Posts
yeah thats why i left it like that, need to get them, besides i got some other things to do (brakes, removing double throttle) so its gonna take me a bit longer...
btw:
have you ever seen this diagram? someone told me i should get rid of everything apart from whats on here..:
btw:
have you ever seen this diagram? someone told me i should get rid of everything apart from whats on here..:
07-16-08, 05:02 PM
#24
Senior Member
Thread Starter
Join Date: Apr 2008
Location: Milton keynes,UK
Posts: 320
Likes: 0
Received 0 Likes
on
0 Posts
thats the explanation i got...maybe i shoul go for the simplyfied version??
Basically that diagram is the simplified version of the rats nest. All the emissions BS removed so all that remains is actually functional to the seq system.
Thus in turn reducing the number of vacuum hoses to go wrong. Therefore making your car more reliable.
I would also advise Viton Check Valves for a much quicker change-over.
The manual boost controllers basically replace the I & J solenoids. They are simple and easy to use. Just turn the nozzle. Again this is a more reliable form of using the seq system. No electrics to go wrong as they are just controlled by using a spring.
Yes you can still run the stock ECU and perform the above mods.
If you really want the b33z n33z go for 100psi uprated solenoids. I guarantee you will never regret it.
07-16-08, 06:22 PM
#25
You can eliminate most of the vacuum lines simply just by removing the emissions components without re-routing the vacuum/pressure lines. If you think you understand the turbo control system enough to understand "why" the lines are being changed to different locations, go ahead. If you don't, then don't do it.