
Questions before undertaking Turbo rebuild...
 03-04-04, 10:22 AM
#76
Rotary Freak
Join Date: Aug 2002
Location: nyc+li, ny
Posts: 2,690
Likes: 0
Received 0 Likes
on
0 Posts
Word of warning in case you haven't read about it already. I remember reading about one bolt in particular where the directions say to torque to a certain setting but its not enough and the bolt loosens. Can't find the thread right now... I think its one of the bolts that hold the turbine on.
 03-04-04, 10:33 AM
#77
il Cosa Nostra e vivo!!
Thread Starter
iTrader: (1)
Join Date: May 2003
Location: Dove le cose sono fatte il vecchio moda il senso
Posts: 2,097
Likes: 0
Received 0 Likes
on
0 Posts
The following photo illustrates all the new and old componets/parts involved with the rebuild. The Seal Plate is shown from the interior view. Notice the new Seal on the Plate that will have to be pressed into the Plate.
Also, note the broken Turbine Seal and O-Ring. The broken Turbine Seal was in that condition on the Seal seat. That was probably the cause of the Turbo smokes.

Also, note the broken Turbine Seal and O-Ring. The broken Turbine Seal was in that condition on the Seal seat. That was probably the cause of the Turbo smokes.
Last edited by dgeesaman; 06-18-07 at 11:25 AM.
03-04-04, 10:38 AM
#78
il Cosa Nostra e vivo!!
Thread Starter
iTrader: (1)
Join Date: May 2003
Location: Dove le cose sono fatte il vecchio moda il senso
Posts: 2,097
Likes: 0
Received 0 Likes
on
0 Posts
Originally posted by alberto_mg
Word of warning in case you haven't read about it already. I remember reading about one bolt in particular where the directions say to torque to a certain setting but its not enough and the bolt loosens. Can't find the thread right now... I think its one of the bolts that hold the turbine on.
Word of warning in case you haven't read about it already. I remember reading about one bolt in particular where the directions say to torque to a certain setting but its not enough and the bolt loosens. Can't find the thread right now... I think its one of the bolts that hold the turbine on.
Anyway,..thanks for the info.
Last edited by areXseven; 03-04-04 at 11:05 AM.
03-04-04, 10:42 AM
#79
il Cosa Nostra e vivo!!
Thread Starter
iTrader: (1)
Join Date: May 2003
Location: Dove le cose sono fatte il vecchio moda il senso
Posts: 2,097
Likes: 0
Received 0 Likes
on
0 Posts
This photo shows a new and old Shaft Bearing. The new bearing (both) marked an inside diameter measurement of 3.00675. While both old Bearings marked an inside diameter measurement of 3.008.
No More Shaft Play!

No More Shaft Play!
Last edited by dgeesaman; 06-18-07 at 11:26 AM.
03-04-04, 11:04 AM
#80
Originally posted by areXseven
The only "bolts" having anything to do with the turbine (Turbo??) are the three Hex screws that bolt the Thrust Bearing onto the Bearing Housing,..and the Bearing Housing bolts (6) w/retainers clips (3) that secure it to the Manifold (external).?? No more "bolts" involved in this area.
The only "bolts" having anything to do with the turbine (Turbo??) are the three Hex screws that bolt the Thrust Bearing onto the Bearing Housing,..and the Bearing Housing bolts (6) w/retainers clips (3) that secure it to the Manifold (external).?? No more "bolts" involved in this area.
03-04-04, 11:08 AM
#81
il Cosa Nostra e vivo!!
Thread Starter
iTrader: (1)
Join Date: May 2003
Location: Dove le cose sono fatte il vecchio moda il senso
Posts: 2,097
Likes: 0
Received 0 Likes
on
0 Posts
Originally posted by ISUposs
I'm guessing that he is talking about one of my threads. The compressor nut torque specs in the included instructions is pretty light. 12ft-lb if i remember correctly. I tightened it down to that and used loctite and it still came loose. Just use good judgement. Also, ideally you should use a T-handle wrench on the compressor nut you don't put any unneccessary loads on the turbine shaft. I didn't learn that until after my turbo rebuild and mine turned out fine.
I'm guessing that he is talking about one of my threads. The compressor nut torque specs in the included instructions is pretty light. 12ft-lb if i remember correctly. I tightened it down to that and used loctite and it still came loose. Just use good judgement. Also, ideally you should use a T-handle wrench on the compressor nut you don't put any unneccessary loads on the turbine shaft. I didn't learn that until after my turbo rebuild and mine turned out fine.
03-04-04, 04:13 PM
#83
il Cosa Nostra e vivo!!
Thread Starter
iTrader: (1)
Join Date: May 2003
Location: Dove le cose sono fatte il vecchio moda il senso
Posts: 2,097
Likes: 0
Received 0 Likes
on
0 Posts
I'm not sure I'll be using the new Compressor Nut. It looks too cheesy. The stock nut seems to be made with better quality. Just my opinion. I'm not a Metalurgist  But I'll post a photo later this evening so all can see what I'm speaking of.
But I'll post a photo later this evening so all can see what I'm speaking of.
03-04-04, 07:34 PM
#84
il Cosa Nostra e vivo!!
Thread Starter
iTrader: (1)
Join Date: May 2003
Location: Dove le cose sono fatte il vecchio moda il senso
Posts: 2,097
Likes: 0
Received 0 Likes
on
0 Posts
As stated before, the Bearing Housing Cover Plate has a Seal that has to be punched out and replaced with a new one. Do do the install, you'll have to press the new Seal in. This can be done with simple tools.
The attached photo shows the Plate, Seal and all the tools I used. Just a couilple of boxed wrenches, a bolt, a few washers and a couple of nuts.
I pressed the Seal in using the Maxcooper way!!. And it worked pretty good. Only took about a minute to press it in.
Here's a photo...

The attached photo shows the Plate, Seal and all the tools I used. Just a couilple of boxed wrenches, a bolt, a few washers and a couple of nuts.
I pressed the Seal in using the Maxcooper way!!. And it worked pretty good. Only took about a minute to press it in.
Here's a photo...
Last edited by dgeesaman; 06-18-07 at 11:27 AM.
03-04-04, 07:38 PM
#85
il Cosa Nostra e vivo!!
Thread Starter
iTrader: (1)
Join Date: May 2003
Location: Dove le cose sono fatte il vecchio moda il senso
Posts: 2,097
Likes: 0
Received 0 Likes
on
0 Posts
This next photo shows the Seal aligned in the center of the Plate with the "home made press" ready to do it's job. Just hold the bottom nut with the wrench while you turn the top nut with another wrench, pressing in the Seal flush.
.......

Just hold the bottom nut with the wrench while you turn the top nut with another wrench, pressing in the Seal flush........
Last edited by dgeesaman; 06-18-07 at 11:27 AM.
03-04-04, 07:43 PM
#86
il Cosa Nostra e vivo!!
Thread Starter
iTrader: (1)
Join Date: May 2003
Location: Dove le cose sono fatte il vecchio moda il senso
Posts: 2,097
Likes: 0
Received 0 Likes
on
0 Posts
Presto!..
Here's a photo of the finished product....

Here's a photo of the finished product....
Last edited by dgeesaman; 06-18-07 at 11:27 AM.
03-04-04, 10:06 PM
#88
il Cosa Nostra e vivo!!
Thread Starter
iTrader: (1)
Join Date: May 2003
Location: Dove le cose sono fatte il vecchio moda il senso
Posts: 2,097
Likes: 0
Received 0 Likes
on
0 Posts
The following photo is a close-up of one of the new Shaft Bearings. A total of two will be installed. I'll soak them with 20-50 motor oil before installing them in the Bearing Housing.

Last edited by dgeesaman; 06-18-07 at 11:28 AM.
03-04-04, 10:51 PM
#89
il Cosa Nostra e vivo!!
Thread Starter
iTrader: (1)
Join Date: May 2003
Location: Dove le cose sono fatte il vecchio moda il senso
Posts: 2,097
Likes: 0
Received 0 Likes
on
0 Posts
.I've been trying to post additional photos but the server is too slow. I'll try again tomorrow.
Last edited by areXseven; 03-04-04 at 10:56 PM.
03-05-04, 01:07 AM
#92
Full Member

Join Date: Jul 2003
Location: Torrance, CA
Posts: 169
Likes: 0
Received 0 Likes
on
0 Posts
No need to soak everything in oil before you put it together. Just put a couple drops of oil on there and wipe it down with your fingers. A light coat will do. You'll get enough oil through the system before the turbos spin up to cause any damage. Just make sure the rotating group gets a light film of oil as everything goes together.
12 ft-lbs = 144 in-lbs... sounds about right to me. I can't say for sure but I wouldn't have thought that to be low.
Inspect the center housing and make sure there isn't any coking going on. I'd recommend soaking the center housing in a parts cleaner for a couple of minutes and steam it real good. Areas to focus on - oil drain passage and turbine seal ring bore. These are the main places that coking will begin at.
Rebuild progress looks good!
03-05-04, 02:20 AM
#93
The Overattempter
iTrader: (3)
Join Date: Apr 2003
Location: Iowa
Posts: 197
Likes: 0
Received 0 Likes
on
0 Posts
Lookin good man If youre concerned about the holes on the thrust plate, just drill two of them out to a larger size and vola. I would reccomend having them balanced when youre done rebuilding them to ensure optimum performance. I think I might check locally on a price for balancing a set of twins just so you'd have an idea.
If youre concerned about the holes on the thrust plate, just drill two of them out to a larger size and vola. I would reccomend having them balanced when youre done rebuilding them to ensure optimum performance. I think I might check locally on a price for balancing a set of twins just so you'd have an idea.
03-05-04, 06:56 AM
#94
il Cosa Nostra e vivo!!
Thread Starter
iTrader: (1)
Join Date: May 2003
Location: Dove le cose sono fatte il vecchio moda il senso
Posts: 2,097
Likes: 0
Received 0 Likes
on
0 Posts
Originally posted by Stan94GT
No need to soak everything in oil before you put it together. Just put a couple drops of oil on there and wipe it down with your fingers. A light coat will do. You'll get enough oil through the system before the turbos spin up to cause any damage. Just make sure the rotating group gets a light film of oil as everything goes together.
12 ft-lbs = 144 in-lbs... sounds about right to me. I can't say for sure but I wouldn't have thought that to be low.
Inspect the center housing and make sure there isn't any coking going on. I'd recommend soaking the center housing in a parts cleaner for a couple of minutes and steam it real good. Areas to focus on - oil drain passage and turbine seal ring bore. These are the main places that coking will begin at.
Rebuild progress looks good!
Not to much coking in the center Chamber. I already cleaned it out. There was extreme coking on the Turbine top platform and Turbine Heat Cover (beneath and on top). The Turbine Seal was broken so oil was escaping through that area. I cleaned that up pretty good. I installed everything back in to place last night but couldn't post pics. I'll post some more tonight.
It only take about 5 minutes to install the Kit once you know what goes where. Thanks for you input.
03-05-04, 07:02 AM
#95
il Cosa Nostra e vivo!!
Thread Starter
iTrader: (1)
Join Date: May 2003
Location: Dove le cose sono fatte il vecchio moda il senso
Posts: 2,097
Likes: 0
Received 0 Likes
on
0 Posts
Originally posted by TitaniumCranium
Lookin good man If youre concerned about the holes on the thrust plate, just drill two of them out to a larger size and vola. I would reccomend having them balanced when youre done rebuilding them to ensure optimum performance. I think I might check locally on a price for balancing a set of twins just so you'd have an idea.
Lookin good man
If youre concerned about the holes on the thrust plate, just drill two of them out to a larger size and vola. I would reccomend having them balanced when youre done rebuilding them to ensure optimum performance. I think I might check locally on a price for balancing a set of twins just so you'd have an idea.
03-05-04, 10:30 AM
#96
il Cosa Nostra e vivo!!
Thread Starter
iTrader: (1)
Join Date: May 2003
Location: Dove le cose sono fatte il vecchio moda il senso
Posts: 2,097
Likes: 0
Received 0 Likes
on
0 Posts
More photos....
This photo was taken from the Compressor side of the Bearing Housing. Take note of the small snap-ring in the center below level. It's the only thing that prevents the Shaft Bearing from sliding or dropping into the Bearing Housing Chamber. Also, note the O-Ring groove situated around the outer surface of the Bearing Housing. When the Seal Plate is installed, it will press against the O-Ring which will prevent oil from escaping out through the Compressor side.

This photo was taken from the Compressor side of the Bearing Housing. Take note of the small snap-ring in the center below level. It's the only thing that prevents the Shaft Bearing from sliding or dropping into the Bearing Housing Chamber. Also, note the O-Ring groove situated around the outer surface of the Bearing Housing. When the Seal Plate is installed, it will press against the O-Ring which will prevent oil from escaping out through the Compressor side.
Last edited by dgeesaman; 06-18-07 at 11:29 AM.
03-05-04, 10:44 AM
#97
il Cosa Nostra e vivo!!
Thread Starter
iTrader: (1)
Join Date: May 2003
Location: Dove le cose sono fatte il vecchio moda il senso
Posts: 2,097
Likes: 0
Received 0 Likes
on
0 Posts
The next photo shows the seated Shaft Bearing and the O-Ring.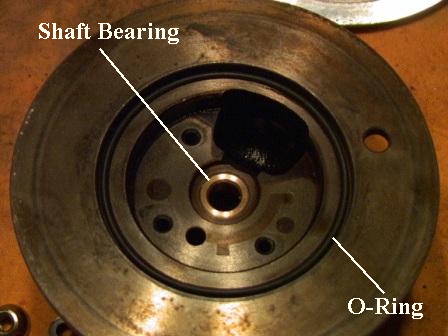
Last edited by dgeesaman; 06-18-07 at 11:29 AM.
03-05-04, 11:21 AM
#98
development
Great thread bro! Most informative 
You've now taken the fear out of me...
Thanks for sharing the great pics and experience.
I don't think it's ever a bad idea to have a set of twins re-blue printed (considering age, and you saying they looked like they've never been rebuilt) Something to think about...shouldn't be expensive and what the hell you already have them off the car.
03-05-04, 02:32 PM
#99
il Cosa Nostra e vivo!!
Thread Starter
iTrader: (1)
Join Date: May 2003
Location: Dove le cose sono fatte il vecchio moda il senso
Posts: 2,097
Likes: 0
Received 0 Likes
on
0 Posts
Originally posted by dubulup
Great thread bro! Most informative
You've now taken the fear out of me...
Thanks for sharing the great pics and experience.
I don't think it's ever a bad idea to have a set of twins re-blue printed (considering age, and you saying they looked like they've never been rebuilt) Something to think about...shouldn't be expensive and what the hell you already have them off the car.
Last edited by areXseven; 03-05-04 at 02:38 PM.
03-05-04, 02:52 PM
#100
il Cosa Nostra e vivo!!
Thread Starter
iTrader: (1)
Join Date: May 2003
Location: Dove le cose sono fatte il vecchio moda il senso
Posts: 2,097
Likes: 0
Received 0 Likes
on
0 Posts
On to more photos..
The following photo represents how the Thrust Bearing goes installed. I took this photo just to demonstrate it's position. Note that I didn't screw it in (it takes 3 hex screws)
It is easier to install the Turbine Shaft (inserted through the other end of the Bearing Housing) if the Compressor Bearing and Thrust Bearing is not installed. They can be installed after the Turbine Shaft is in place.
Here's the photo...
Last edited by dgeesaman; 06-18-07 at 11:30 AM.