Quad Pod ( 60mm ) for the FD
 01-17-13, 09:57 AM
#1

Quad Pod ( 60mm ) for the FD
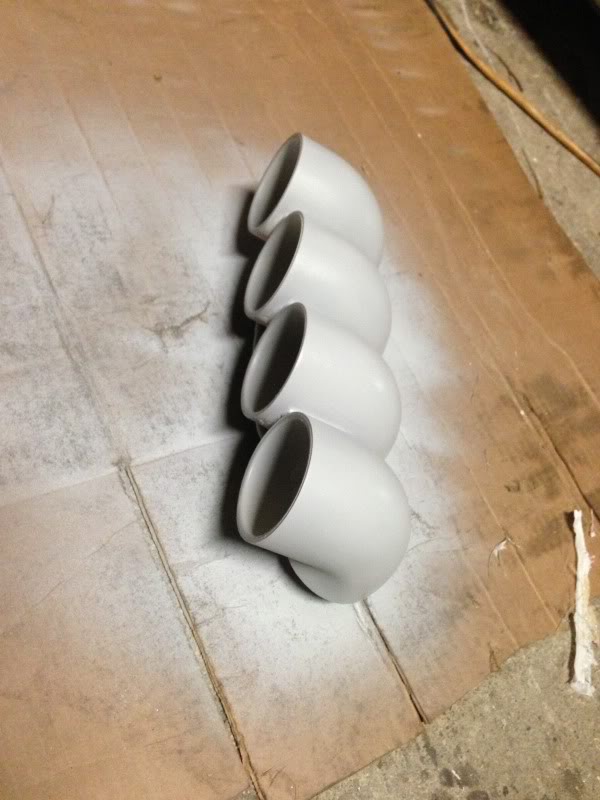
Ok so I have been asked by some to make a tutorial on building a Quad Pod out of PVC. I made a 52mm which was harder because the PVC pieces were no long enough to accommodate the deep gauges. The 60mm however was a little easier to work with, but still took many many hours to build.
Here are some pics of the process
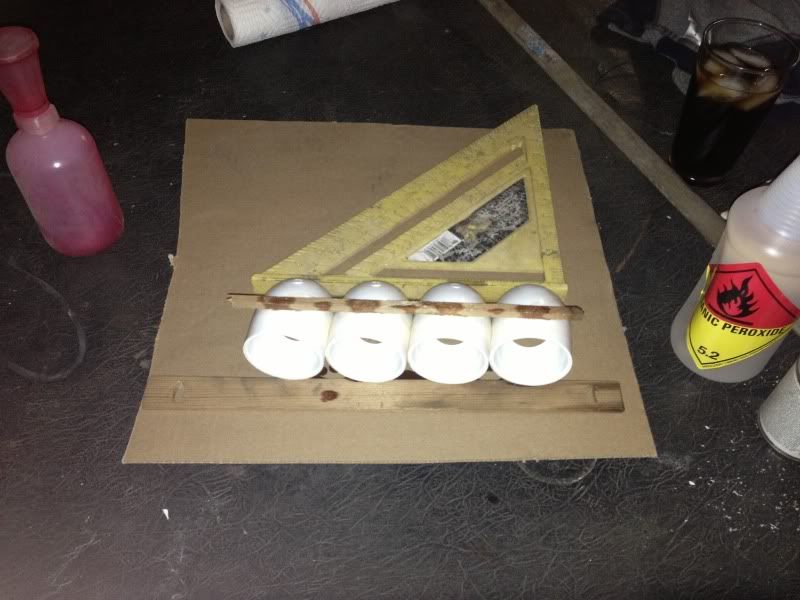
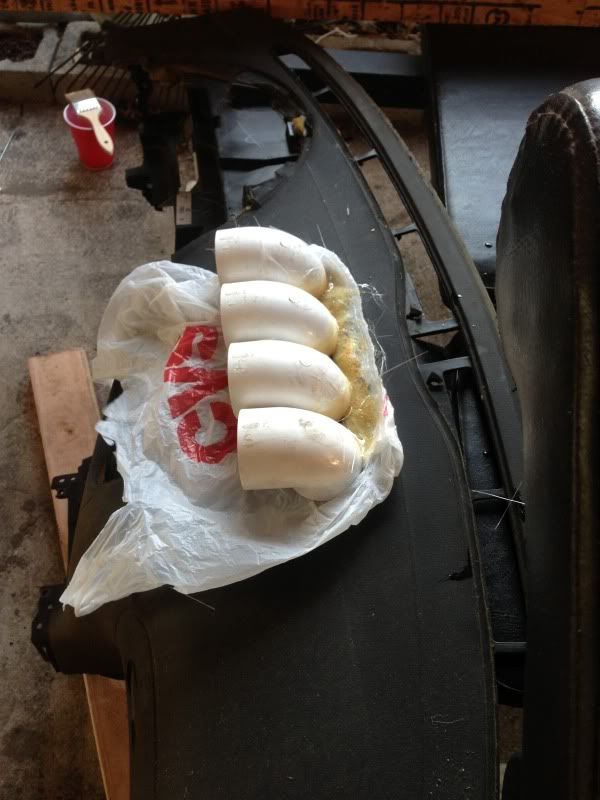
Placing them on a spare dash I acquired from a very good friend ( Thanks Gringo Grande )
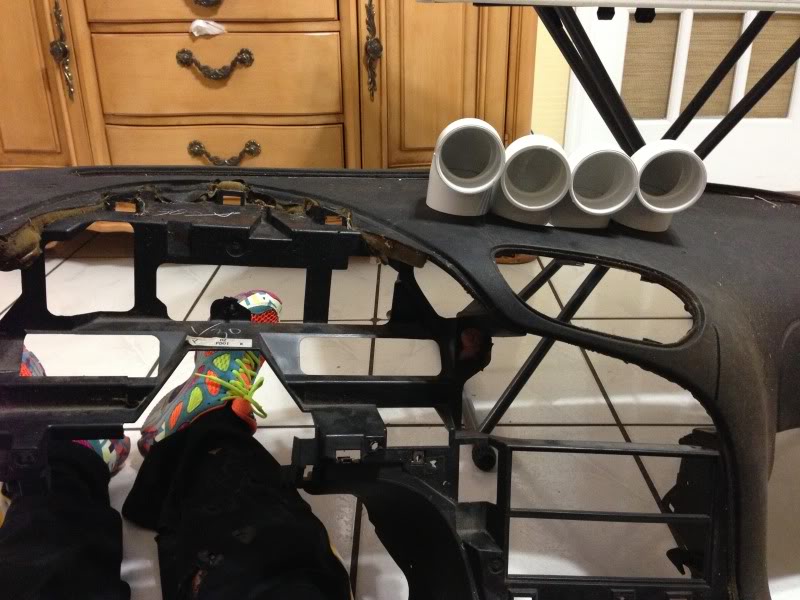
Laying them out and making sure the back of the gauges all line up. After I got them to where I wanted them i used PVC glue to stick them together.

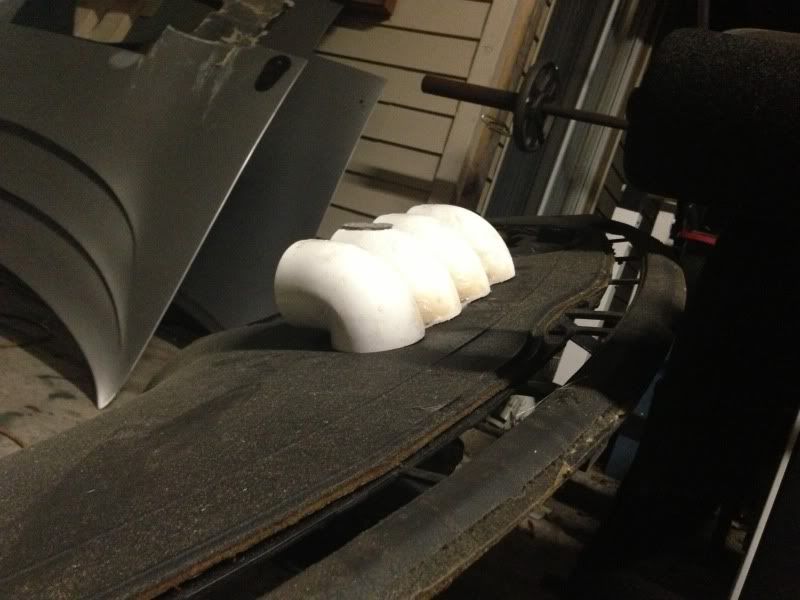
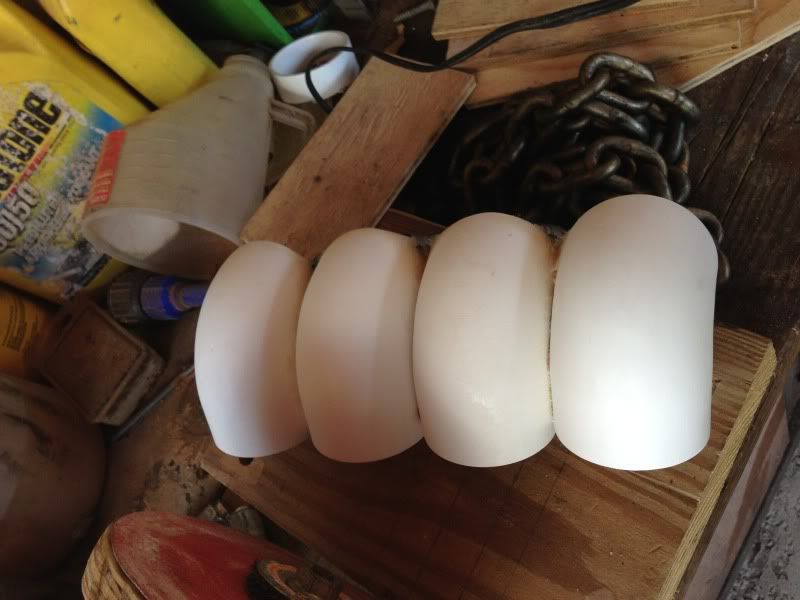
Glued in place and placing it on the dash to see how it looked

Glued in place with the gauges in the pod

Finally placed the original speaker grill on the dash without the metal mesh and fiber glassed the pod to the dash piece.

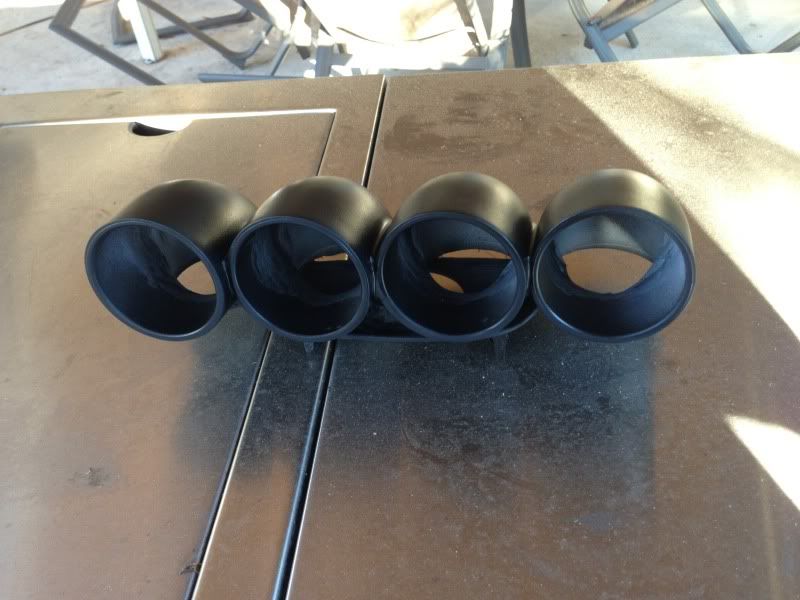
Now comes the hard work. Sand paper and a big arm workout. Sand paper used was mostly 100-150 to take away the heavier urethane build up

More of sanding and urethane body filler
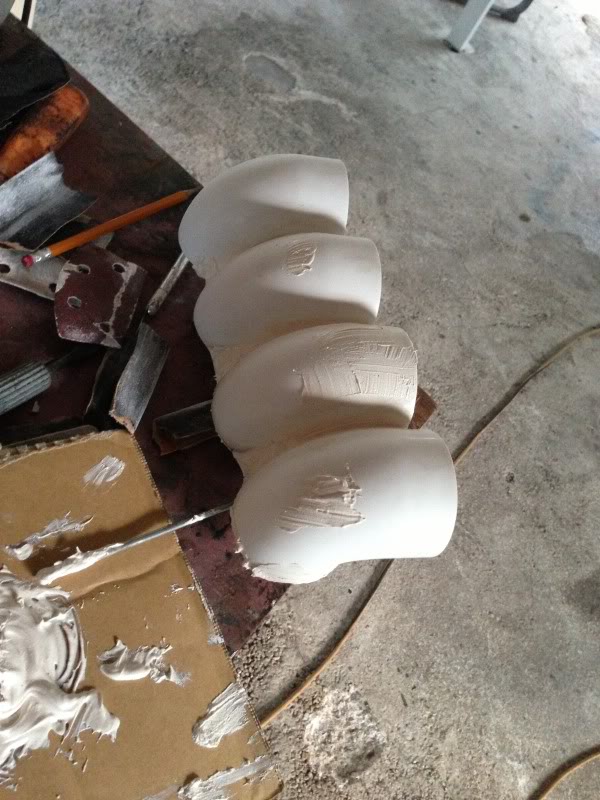
Moar sanding
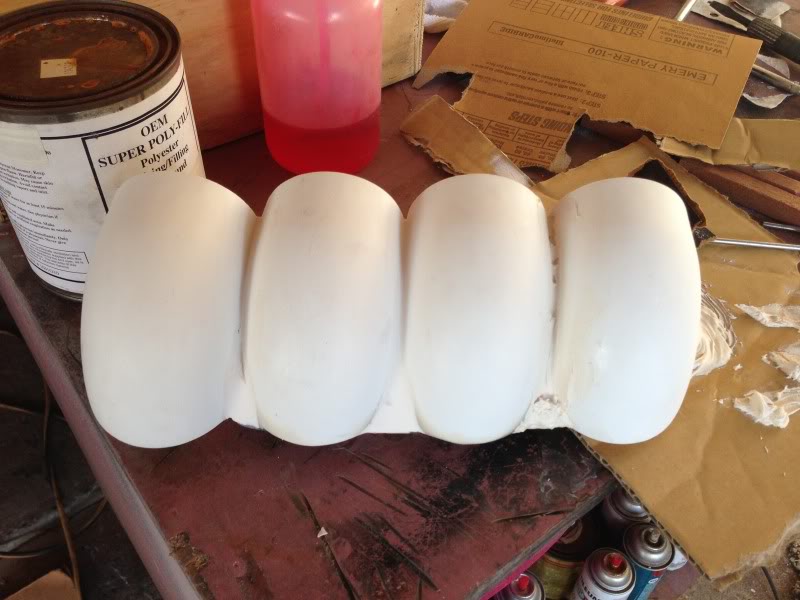
First coat of primer
Fine sanding in between primer coats, The sand paper used here was 220 after the first coat and 320 after the second.
Second coat
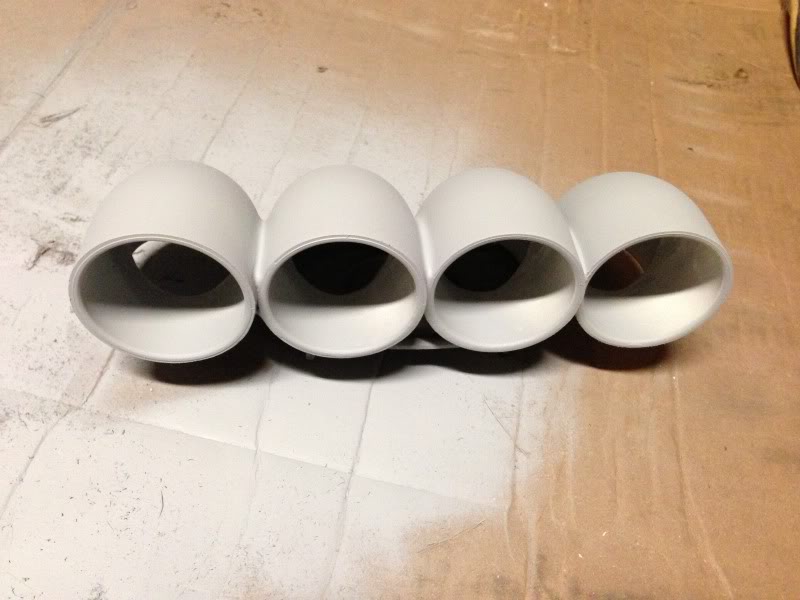
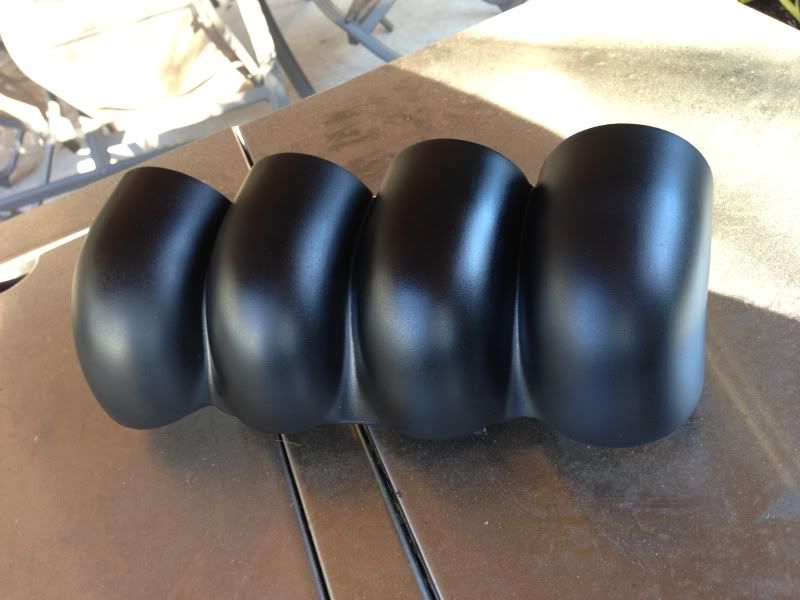
This is the last step after sanding the second coat of primer, painting the pod. I used flat black paint since I am not a fan of shiny interior pieces.


I hope you guys enjoyed reading this and if you decide to tackle this I will be more than happy to assist any of you. The entire cost of supplies between PVC, glue, fiberglass, resin, and sand paper was close to $60 in case anyone wants to know :-)
Here are some pics of the process
Placing them on a spare dash I acquired from a very good friend ( Thanks Gringo Grande )
Laying them out and making sure the back of the gauges all line up. After I got them to where I wanted them i used PVC glue to stick them together.
Glued in place and placing it on the dash to see how it looked
Glued in place with the gauges in the pod
Finally placed the original speaker grill on the dash without the metal mesh and fiber glassed the pod to the dash piece.
Now comes the hard work. Sand paper and a big arm workout. Sand paper used was mostly 100-150 to take away the heavier urethane build up
More of sanding and urethane body filler
Moar sanding
First coat of primer
Fine sanding in between primer coats, The sand paper used here was 220 after the first coat and 320 after the second.
Second coat
This is the last step after sanding the second coat of primer, painting the pod. I used flat black paint since I am not a fan of shiny interior pieces.
I hope you guys enjoyed reading this and if you decide to tackle this I will be more than happy to assist any of you. The entire cost of supplies between PVC, glue, fiberglass, resin, and sand paper was close to $60 in case anyone wants to know :-)
 01-17-13, 01:09 PM
#2
RX-7 Bad Ass
iTrader: (55)
Turned out really nice and a good DIY! Thanks for sharing that!
Dale
Dale
01-17-13, 01:26 PM
#3

 01-17-13, 02:08 PM
#6
LOL I am not sure about a group buy. There is not easy way of molding this out of Fiberglass to make a easier piece. It takes a lot of time and finess getting it done right.
I would not mind making some for you guys, but dont expect them to be done in a week. Also I need the dash speaker grill to attach it to the pod.
I would not mind making some for you guys, but dont expect them to be done in a week. Also I need the dash speaker grill to attach it to the pod.
Trending Topics
 01-21-13, 03:52 PM
#11
Full Member

hi
hi!!! can u make it a two 60mm pod? instead of four!!!!cant find it anywhere for my 2 apexi 60mm gauges.let me know ?????
Ok so I have been asked by some to make a tutorial on building a Quad Pod out of PVC. I made a 52mm which was harder because the PVC pieces were no long enough to accommodate the deep gauges. The 60mm however was a little easier to work with, but still took many many hours to build.
Here are some pics of the process
Placing them on a spare dash I acquired from a very good friend ( Thanks Gringo Grande )

Laying them out and making sure the back of the gauges all line up. After I got them to where I wanted them i used PVC glue to stick them together.
Glued in place and placing it on the dash to see how it looked
Glued in place with the gauges in the pod
Finally placed the original speaker grill on the dash without the metal mesh and fiber glassed the pod to the dash piece.
Now comes the hard work. Sand paper and a big arm workout. Sand paper used was mostly 100-150 to take away the heavier urethane build up
More of sanding and urethane body filler

Moar sanding

First coat of primer

Fine sanding in between primer coats, The sand paper used here was 220 after the first coat and 320 after the second.
Second coat

This is the last step after sanding the second coat of primer, painting the pod. I used flat black paint since I am not a fan of shiny interior pieces.
I hope you guys enjoyed reading this and if you decide to tackle this I will be more than happy to assist any of you. The entire cost of supplies between PVC, glue, fiberglass, resin, and sand paper was close to $60 in case anyone wants to know :-)
Here are some pics of the process
Placing them on a spare dash I acquired from a very good friend ( Thanks Gringo Grande )
Laying them out and making sure the back of the gauges all line up. After I got them to where I wanted them i used PVC glue to stick them together.
Glued in place and placing it on the dash to see how it looked
Glued in place with the gauges in the pod
Finally placed the original speaker grill on the dash without the metal mesh and fiber glassed the pod to the dash piece.
Now comes the hard work. Sand paper and a big arm workout. Sand paper used was mostly 100-150 to take away the heavier urethane build up
More of sanding and urethane body filler
Moar sanding
First coat of primer
Fine sanding in between primer coats, The sand paper used here was 220 after the first coat and 320 after the second.
Second coat
This is the last step after sanding the second coat of primer, painting the pod. I used flat black paint since I am not a fan of shiny interior pieces.
I hope you guys enjoyed reading this and if you decide to tackle this I will be more than happy to assist any of you. The entire cost of supplies between PVC, glue, fiberglass, resin, and sand paper was close to $60 in case anyone wants to know :-)
 01-22-13, 09:00 AM
#14
[QUOTE=zombiemaniac;11351706]hi!!! can u make it a two 60mm pod? instead of four!!!!cant find it anywhere for my 2 apexi 60mm gauges.let me know ?????
I will give that a shot tonight. I will line the pods tonight and post some pics so you can see what it looks like and go from there. I need to you send me your 5th speaker grill though.
I will give that a shot tonight. I will line the pods tonight and post some pics so you can see what it looks like and go from there. I need to you send me your 5th speaker grill though.
01-22-13, 01:54 PM
#15
Full Member
sounds cool!but rememeber I want them to be facing the driver a bit not straight!! for better reading when driving!!!
[QUOTE=mr2dude9161;11352434]
[QUOTE=mr2dude9161;11352434]
hi!!! can u make it a two 60mm pod? instead of four!!!!cant find it anywhere for my 2 apexi 60mm gauges.let me know ?????
I will give that a shot tonight. I will line the pods tonight and post some pics so you can see what it looks like and go from there. I need to you send me your 5th speaker grill though.
I will give that a shot tonight. I will line the pods tonight and post some pics so you can see what it looks like and go from there. I need to you send me your 5th speaker grill though.
01-22-13, 03:15 PM
#16
[QUOTE=zombiemaniac;11352740]sounds cool!but rememeber I want them to be facing the driver a bit not straight!! for better reading when driving!!!
I got you man. Ill send pics of different angles. Which ever one you like ill build.
I got you man. Ill send pics of different angles. Which ever one you like ill build.
01-24-13, 08:08 AM
#17
Full Member
01-24-13, 12:47 PM
#19
Thanks Re-Amemiya. I havent been able to get anything yet. I got into replacing the twins on my car and I decided to go an rip out the rats nest and go non sequential.
As soon as I get that under control ill shoot you some pics.
As soon as I get that under control ill shoot you some pics.
