
My Brembo BBK Rebuild Project - *Pic Heavy*
 10-03-13, 06:28 PM
#1
My Brembo BBK Rebuild Project - *Pic Heavy*
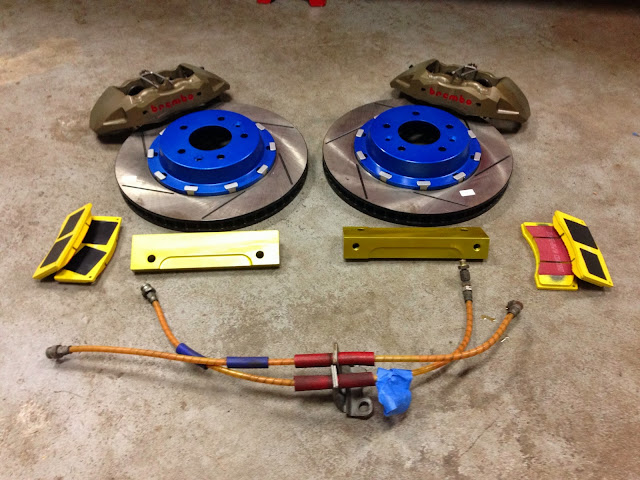
I picked up a used Brembo BBK about a month ago. The kit was in need of some serious TLC before i could put them on the car. Here is a picture of the kit after unboxing:

And some close ups:


And some close ups:
 10-03-13, 06:37 PM
#2
The first order of business was to take everything apart for inspection


Pistons needed some cleaning as well:

On the list of things to replace included pressure seals, rotor rings, and brake pads. Everything else seemed to be in good condition, just required some cleaning.
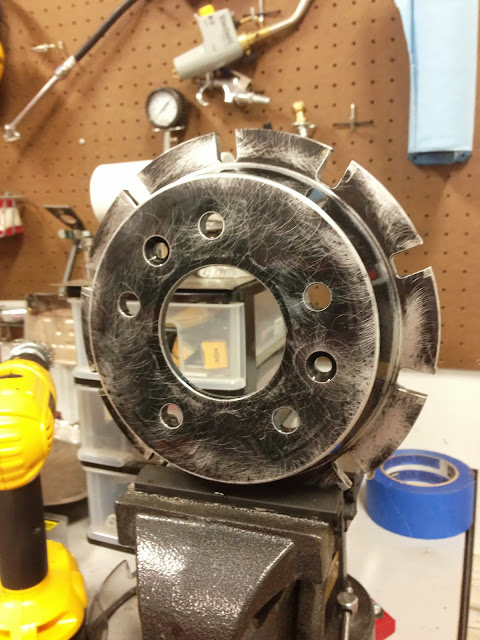
After determining what needed to be replaced, i moved on to cleaning the remaining parts, starting first with the calipers. Using a dremel with a wire wheel, i was able to remove most of the baked on brake dust. Here is one of the calipers after cleaning:


I also cleaned up the rotor hat and hardware so i could paint them:

Pistons needed some cleaning as well:
On the list of things to replace included pressure seals, rotor rings, and brake pads. Everything else seemed to be in good condition, just required some cleaning.
After determining what needed to be replaced, i moved on to cleaning the remaining parts, starting first with the calipers. Using a dremel with a wire wheel, i was able to remove most of the baked on brake dust. Here is one of the calipers after cleaning:
I also cleaned up the rotor hat and hardware so i could paint them:
10-03-13, 06:48 PM
#3
The replacement parts came in a few days after i ordered them. I opted for Racing Brake rotor rings 330x28mm mainly because it was cost effective at $400 for a pair. Stoptech rotor rings would've cost $600+ and Brembo's $950+. Most likely when the time comes to replace these rotors i'll switch back to Brembo rotor rings.


A quick test fit with my rotor hat and hardware to make sure it fits

For brake pads i went with EBC yellow's since i wanted some with low dust for the street. I don't have any plans to track the car heavily in the short term. Eventually when i do start doing more track days i'll probably upgrade the pads then.

Next up was to put in the new seals and press my freshly cleaned pistons back into the calipers:

New seals in place:

Pistons installed:

A quick test fit with my rotor hat and hardware to make sure it fits
For brake pads i went with EBC yellow's since i wanted some with low dust for the street. I don't have any plans to track the car heavily in the short term. Eventually when i do start doing more track days i'll probably upgrade the pads then.
Next up was to put in the new seals and press my freshly cleaned pistons back into the calipers:
New seals in place:
Pistons installed:
10-03-13, 07:05 PM
#4
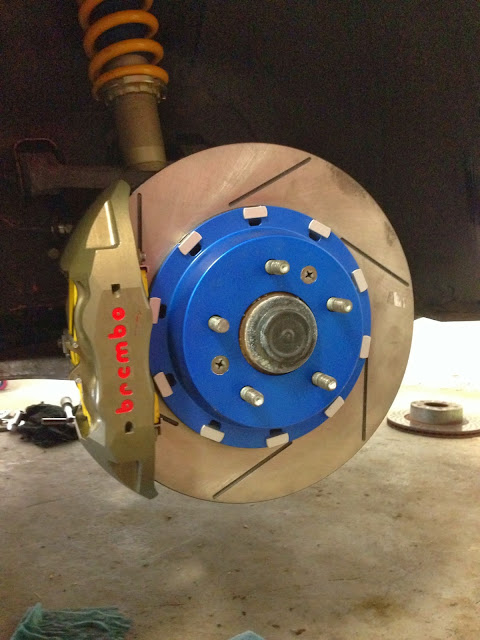
Next step was paint. I wanted to give it an anodized look so i opted for the Duplicolor metal cast spray paint. I was originally going to paint the rotor hat yellow with blue hardware, but last minute changed my mind and went with a blue hat and silver hardware:


After letting the paint dry and harden a couple of days i was finally able to put everything together and have a BBK ready to install:
Here's what it was replacing:


Some comparison photos between the stock caliper and the Brembo caliper


And a comparison of the rotor:

After letting the paint dry and harden a couple of days i was finally able to put everything together and have a BBK ready to install:
Here's what it was replacing:
Some comparison photos between the stock caliper and the Brembo caliper
And a comparison of the rotor:
10-03-13, 07:06 PM
#5
The installation turned out to be quite simple. Everything lined up perfectly without any fitment issues. And here it is finally installed on the car after a month of work:
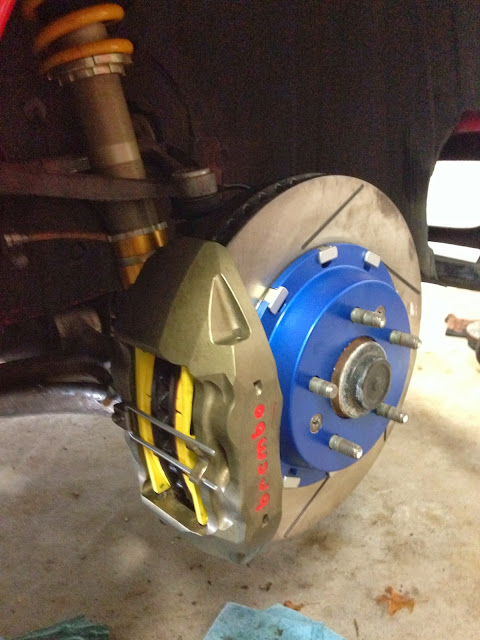


After taking the car out for a test drive after the install, i was quite surprised by how quiet they were. Actually, i don't really hear anything. I guess i was expecting them to be kind of noisy since they weren't exactly street brakes, but i was pleasantly surprised to find out i was wrong. As far as the braking power, i haven't been on the track yet so i can't really provide any real performance feedback. The only observation i can make is that engaging the ABS is not too difficult. But then again, i never really tried with my stock brakes so it's not a really good gauge for performance.
And that's pretty much it. It's projects like this that really make owning an older car like an RX-7 so much fun. I wish all of my projects worked out as nicely as this one did.
10-03-13, 07:53 PM
#7
For every day street driving, there's no noticeable difference in the braking feel. A typical rear brake upgrade to match the majority of the 13inch front BBKs is to get the 99spec caliper bracket which allows you to run a larger diameter rotor. I believe RB used to have a kit for sale but i heard it was discontinued. SBG also appears to be in the process of developing a rear upgrade kit as well, probably similar, if not better, than RB's. For me, i'm currently just running the stock rears, but i'm planning to upgrade to the 99spec caliper bracket with larger rotors in the near future.
Trending Topics
10-04-13, 09:54 AM
#8
RX-7 Bad Ass
iTrader: (55)
Very nice!
Just goes to show that a little research, elbow grease, and time go a long way. I've seen many cases where people see stuff like that and think "this is dirty junk, it's no good any more". Nothing a wire wheel and paint can't handle.
Also, mods like this don't stay new forever. People look at an old, tired OEM part and replace it with a shiny new aftermarket part and think they're done. Over time that shiny new part will get old and crappy too.
Also, the fasteners holding the hat to the outer rotor, I would think about safety wiring those if you didn't do so. If those come loose you're in a bad way.
Dale
10-04-13, 03:29 PM
#9
 . It's interesting, the hardware for the rotor hat are Brembo T-type bobbins. They aren't standard rotor hat hardware like those supplied with the RB rotors. The cost of 1 T-type bobbin is $17. Even without the nut on the other end of the bobbin, once installed, it locks the rotor hat to the rotor. The nut on the other end only requires 12Nm (or roughly 9 lbs) to torque it down so it's definitely not a high tension point in the rotor.
here's a description of the T-type bobbin from some Brembo doc. Apparently this type of hardware is only used in their race applications:
 10-04-13, 04:00 PM
#13
i think the best option would be to hard anodize it...but i've not done much research on that and i'm sure it's considerably more costly than some spray cans.
10-05-13, 10:42 AM
#15
Thanks Fritz. I got the kit off Yahoo Auctions Japan. It actually sat on the auction house for a while before i bought them. It got relisted quite a few times so i wasn't sure if there was something wrong with it or if it was even legit. I did a good amount of research on it before bit the bullet. In the end, i'm glad i did.
10-06-13, 07:52 AM
#16
How is the experience of buying through Yahoo Auctions Japan and would you say you saved money by purchasing used from this site versus sourcing the BBK kit from the US ? Sorry for the questions, just interested in how the process works. Excellent work on the refurbishing job and great find on the Brembo's.
10-07-13, 02:59 PM
#17
How is the experience of buying through Yahoo Auctions Japan and would you say you saved money by purchasing used from this site versus sourcing the BBK kit from the US ? Sorry for the questions, just interested in how the process works. Excellent work on the refurbishing job and great find on the Brembo's.


Thread
Thread Starter
Forum
Replies
Last Post
Jeff20B
1st Generation Specific (1979-1985)
73
09-16-18 07:16 PM
Under PSI
3rd Generation Specific (1993-2002)
19
09-23-15 11:47 PM