When you click on links to various merchants on this site and make a purchase, this can result in this site earning a commission. Affiliate programs and affiliations include, but are not limited to, the eBay Partner Network.
Take all the dampers off and check them, documenting with photos. Something isn't set up right.
I can't give you the exact height, since I'm measuring with a tape measure, but the fronts are nominally about 12 and 13 cm right and left?
I don't have the height of the rear pinch welds on hand. I was only looking at the relative height of the fenders.
I just ordered a pair of used 9-inch rims to at least make the front end a bit more symmetrical.
Interestingly, when I jacked the front of the car by the middle of the subframe, there was still a discrepancy in the same direction, so I wonder if the body isn't just like that? Or the weight is simply balanced like that.
I think there is significantly more weight on the right side of RHD cars that don't have batteries in the stock location.
How much of a difference would it take to compress 16 kg/mm springs with an 1.5x lever ratio by 10 mm more? 100 kg?
Well, I guess that's almost 10% of the car's total weight...
I will try to see how level my garage is when I get home.
I have my bumper off right now, so I tried measuring the heights from the little shelf the oil coolers hang on, and they were indeed two different heights by 10-ish mm.
If the car is not bent and coilovers are set to the same heights R-L, the ride heights will be within millimeters of each other. RHD, LHD, battery relocations, those are not going to make much of a difference in your heights.
The oil cooler brackets are easily bent. Measure the same point on the subframe or pinch welds and provide those pinch weld numbers.
Do you have aftermarket fenders or bumpers? Pics will help.
The fenders are stock, but they fronts have been bent before (from a front impact), so I take ride height measurements from them with a grain of salt.
I took measurements from the reflectors, too, and they show a similar discrepancy as the pinch welds.
The bumper is an FRP aftermarket piece that has been repaired (by me), so I know the fitment isn't going to be perfect.
I had originally thought it was the bumper until I realized the ride height was actually significantly different.
I wasn't taking measurements from the oil cooler brackets, but the little shelf the top bracket attaches to. Both sides look perfectly straight to me.
I think you need to eliminate some variables and get some more info. If the front and fenders have been damaged, it calls into question any measurements taken there and whether the car is straight. Can you borrow some wheels/tires that are all the same, and take it to someplace to see whether the measured difference shows up in corner weights?
Or at least, get it on a level surface and test what happens when you roll the coilover perch up a bit on the low corner, or down on the opposite corner (Usually the distance on the coilover is about half what you'll see in effect on the car).
If the car isn't straight, it wasn't caused by that crash. All I did was sent the car into a big foam crash pad at relative low speed. The FRP bumper (not the same as the current bumper, though the same design) took the brunt of it, and the fenders only bent because they are connected to the bumper.
I have some stock-size front wheels I can throw on for the sake of comparison. Just have to get them out of the basement...
I could take the car to get corner weighted, I just don't want to explain to the wife why someone is coming to pick the car up again right after it finally came back home. Haha.
It would also cost $300-400, and I just got the car aligned.
The car actually seemed to drive fine on the track (though its totally a lost cause in the wet).
By opposite, do you mean the same axle, or the opposite corner? Because I suppose having the rear right too high (compared to the rear left) might put a lot of weight on the front left.
I'm not sure what these units are to the pinch weld. CM?
Relatively speaking, if I'm reading right, the 13.5/13 cross measurement is perfect, you should be a little higher at the rear, and the highest (14) is across from the lowest (12.5). These aren't huge differences at all, and might be partially due to the oddball wheel, but I'd try a combo of lowering 14 and raising 12.5. Splitting that difference to get to 13/13.5 (assuming the .5 higher is in the rear), and you'd be set.
Yes, adjusting any will have some effect on all, but this seems well within the range of doable.
Yes, CM. The caret is pointing forward. The rear is a bit lower than the front. I seem to recall the FD gets squirrely with rake.
I kind of want to go up, just so I can get the car out of the garage with the bumper on.
I did notice that the rear shocks' case lengths were identical, and the spring perch positions were within 2 mm of each other, but the total length were about 10 mm different in full droop.
I wonder why... Maybe just friction in the bushings?
The first thing is, whatever difference you see on the shocks, or the amount you move the perch will be roughly double what you see on the car, so a little goes a long way. I'm still not understanding how 15cm is preventing the car from leaving the driveway,especially as the front is higher on one side (14). If you futzed with those perch heights to get the car at about 13/13 front, 13.5/13.5 rear that would be fine. You do want a little rake in the car. I run my rear about 1/4" higher than front.
What are you calling "case length", and where are you measuring from? (That is not a common terminology).
If the overall length (OAL) are the same, you will not be able to get more droop on one side of the car then the other l, unless something is binding and preventing the shocks from extending to full length when installed. I think you need to define and look at this first before trying to make your heights even.
You may need to mark out the tire footprint locations and then use a VERY accurate machinists level with a straight bar, etc., (or "water level") to shim the low spots until they ARE level (or at least at the same inclination). Being >1/2" off between the 2 ends of the car is not uncommon even when it "looks" level. When I have a garage at a racetrack I measure and shim like that to do alignment, because I don't have room in my tow rig to carry a setup platform.
The first thing is, whatever difference you see on the shocks, or the amount you move the perch will be roughly double what you see on the car, so a little goes a long way. I'm still not understanding how 15cm is preventing the car from leaving the driveway,especially as the front is higher on one side (14). If you futzed with those perch heights to get the car at about 13/13 front, 13.5/13.5 rear that would be fine. You do want a little rake in the car. I run my rear about 1/4" higher than front.
Yeah, I understand the lever ratio.
It's a very, very steep ramp up into the garage. My daily driver barely almost scrapes on it. I have actually damaged the bumper getting it in/out of of the garage. If the car is any lower, I will have a hard time jacking it up. Haha.
The muffler actually scrapes unless I put the car in diagonally.
Originally Posted by Billj747
What are you calling "case length", and where are you measuring from? (That is not a common terminology).
If the overall length (OAL) are the same, you will not be able to get more droop on one side of the car then the other l, unless something is binding and preventing the shocks from extending to full length when installed. I think you need to define and look at this first before trying to make your heights even.
It's the term used in the HKS documentation. I interpreted it to mean the length from the center of the pivot point to to the top of the shock insert, since it isn't very clear what it actually means.
I wonder if maybe it isn't binding at the pivot point, since that's the only stock bushing left. I don't know if the FSM says this bushing needs to be tightened with weight on the wheel or not. I didn't install the suspension this time..
Originally Posted by j9fd3s
i went through this myself, and the floor looks flat but isn't. i forget how much mine was off, but it was quite a bit.
you can pour water on it (the floor), and look for puddles
Originally Posted by DaveW
You may need to mark out the tire footprint locations and then use a VERY accurate machinists level with a straight bar, etc., (or "water level") to shim the low spots until they ARE level (or at least at the same inclination). Being >1/2" off between the 2 ends of the car is not uncommon even when it "looks" level. When I have a garage at a racetrack I measure and shim like that to do alignment, because I don't have room in my tow rig to carry a setup platform.
I put a small ($1) level on a long piece of wood to get a basic idea of how slanted the floor was. The bubble was wasn't perfectly centered on the horizontal axis, but it was within the lines. I think maybe the floor is slanted by some fraction of a degree to the right.
The bubble was basically centered on the longitudinal axis.
I was planning on shimming it if I actually attempt to do a home alignment.
Japanese translations of technical manuals are usually terrible. Did they provide any drawings of where to measure? If you provided photos, that would help greatly.
There are a lot of things that "pivot". Are you referring to the bottom "eyelid"? (The spherical bearing or bushing mounted at the bottom of the damper).
What are you calling the "top of the shock insert"?
Being more descriptive and precise with your terminology would also help a lot.
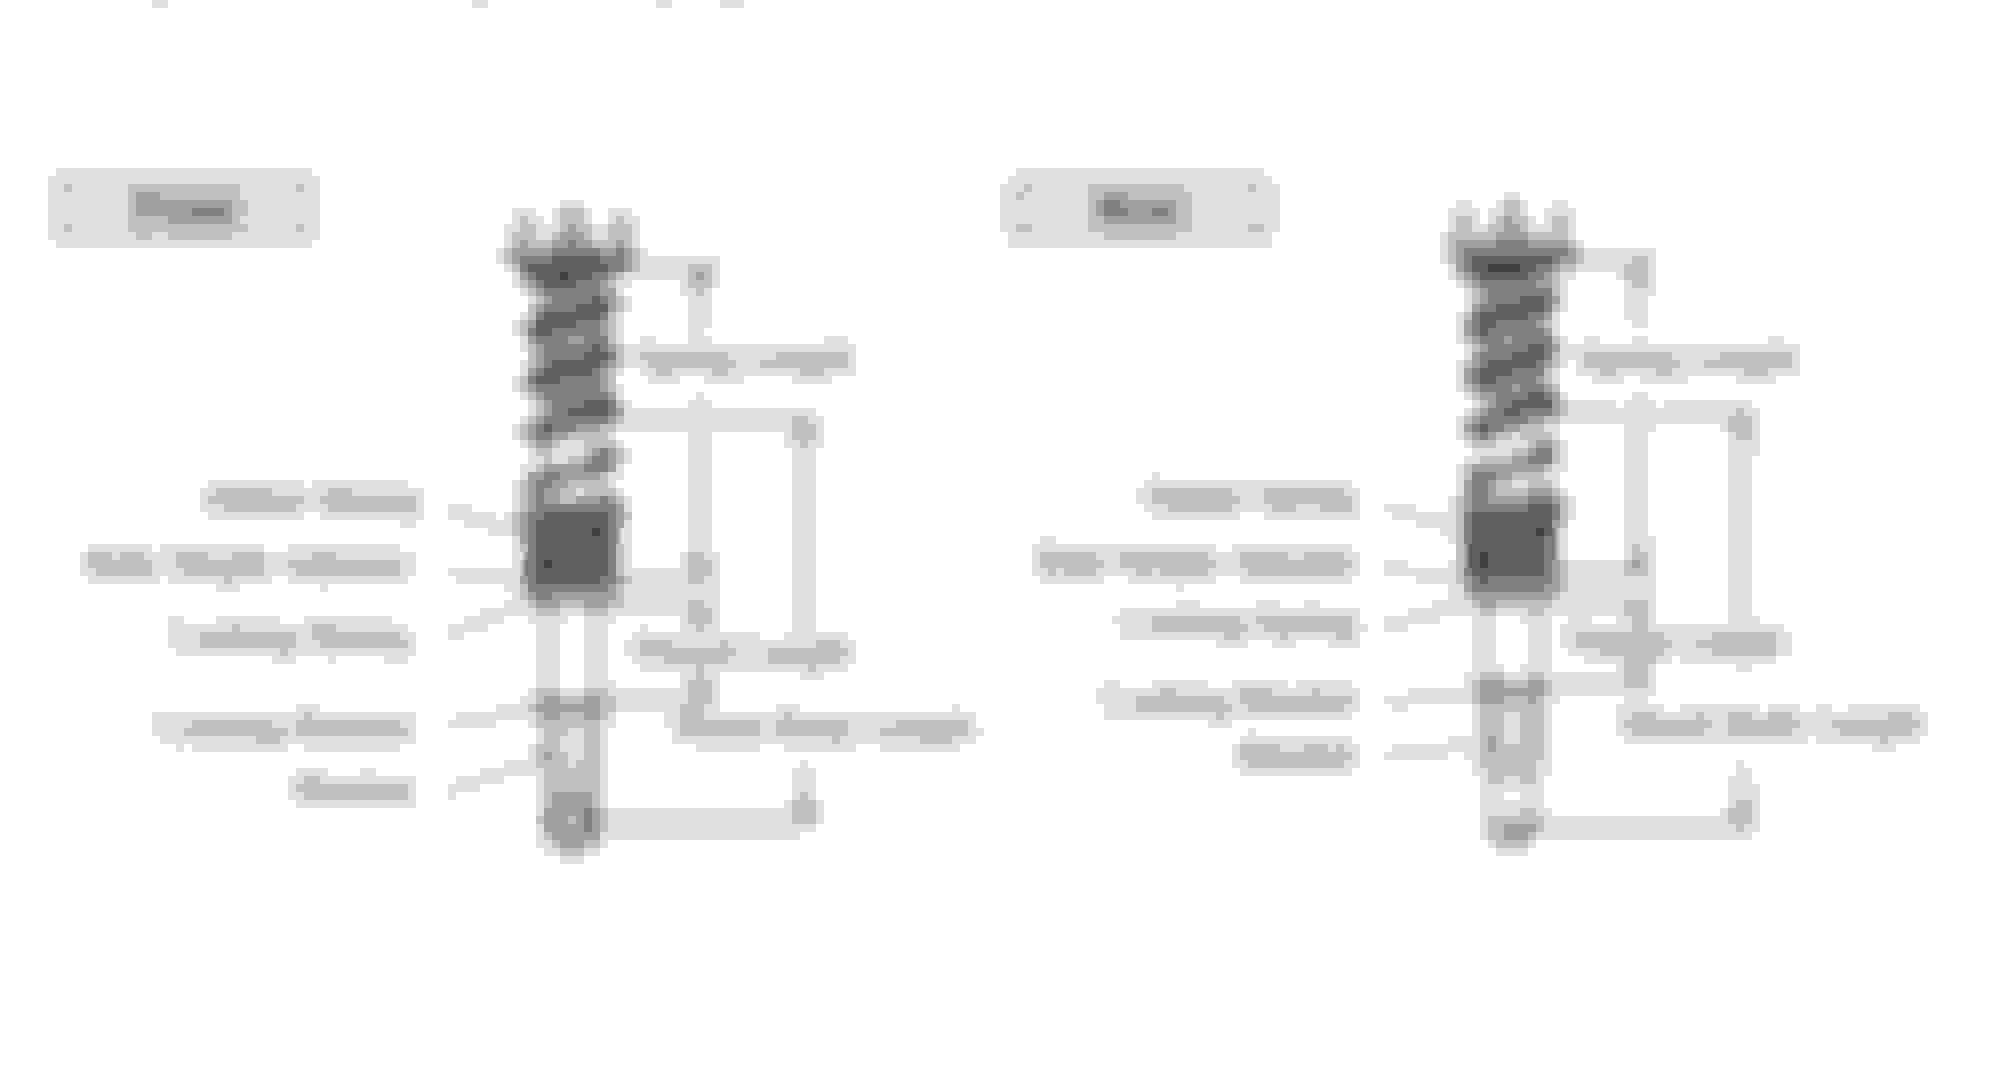
For the OAL, it may be easier to measure from the top of the spring (which will not move) to the top of the lower damper body (that's not threaded) where it meets the lower locking collar. This will tell you the effective difference of the OAL when comparing the right to left side.
You can also measure the top of the spring to the top of the spring perch collar (which the helper spring sits on) to easily measure your preload.
Make sure the blue and red measurements are the same right to left.
Edit: Wood is not straight. A $1 level won't have much resolution. Get a $50 self-leveling laser from lowes and a machinist ruler to determine how "level" your floor is. You'll need to shim scales to be within 1mm of each other, and each scale pad needs to be measured on all 4 corners and also must be within 1mm of each other. Basically, unless you get proper scales or a leveling plate, it's not worth trying to corner balance a car, especially (no offense) if measuring OALs and spring preloads are a challenge.
Corner balancing is significantly more time consuming and difficult than checking to make sure your dampers are set to the same heights right to left. I've seen semi-pro race team mechanics mess this up frequently.
Just for clarification, I'm reading it in the original Japanese. Haha.
This is the top of the shock insert I am talking about. I don't have the dust boots installed (for racecar reasons).
Yes, the middle of the eyelet where the shock mounts onto the arm.
I construed "case length" to be the distance between these two parts.
The technical data gives three different lengths.
The "case length," the "spring set length," and the "windup dimension." The last of these refers to the gap between the two lock rings, according to the HKS website.
I didn't actually measure this when assembling the shocks, because I didn't know what it meant at the time.
I assumed as long "case length" and "spring set length" (which I took to mean the free length minus preload) were right, any other dimension would therefore be correct.
I was within two mm or so on both axles.
I set the "spring set length" (the blue marks) to the specified length before the shocks were put on the car.
The "shock body length" ("case length") may be difficult to measure accurately on the car. The RED measurement in my previous photo accomplishes the same thing and is much easier to measure to quickly verify if your "shock body length" is even right to left.
*The swaybars should be disconnected to ensure there is no preload on the suspension. The entire car should be in the air as well on jackstands.
If you are certain the shock body length and spring stack length (main spring and helper spring total height) are the same right to left, and if you have the same size wheels and tires R-L, then any uneven heights would be in your control arms, bushings, or chassis.
I found this Hypermax manual and it has decent translations:
Nah, just need a straight edge and a tape measure. I think I just needed to refine my technique for it to be sufficiently consistent.
I put my old stock size front wheels on, adjusted the rear shocks to be exactly the same (within a mm or two), unhooked the rear sway bar, and measured again using a more accurate technique.
Here are the new measurements.
Front
14.2 13.5
14.4 13.5
Rear
Keep in mind my right rear pinch welds have been mangled a bit over the years. These are also different sized front tires, and I'm using a different measurement technique.
The measurement points might also be different from the first ones I gave. I am now using the same points each time.
I will check the fronts again later with the front ARBs unhooked when I have time.
I am thinking that raising the right rear would even things out a bit.
For a second there, I thought I'd never got one of the lock rings loose...
The tires are the same height now. I just don't use these particular front wheels any more, since I prefer a square setup.
I unhooked the front ARB (had a bitch of a time with that) and moved the front right spring perch up just a smidge (2 mm or so) to better match the left.
Now all for corners are within a squint of 14 cm (they all measured 14.0 except for the front left, which was 14.3).
Then I realized the little perch the oil cooler brackets hang off was, in fact, bent down slightly on the right side.
So I persuaded it with my floor jack a bit. Now they're within 5 mm of each other off the floor.
It also improved clearance between my fender and my right light cover. So, I am hoping this fixes the cockeyed look.
Might replace the ARB links with adjustable ones, since one of them feels a little sloppy.

 10-07-24 | 08:35 PM