When you click on links to various merchants on this site and make a purchase, this can result in this site earning a commission. Affiliate programs and affiliations include, but are not limited to, the eBay Partner Network.
I am also working on making my hi beams operational. I knew I needed a diode in my circuit but was still trying to figure out the best part for the job. Seems a 15A rectifier diode is the answer. I guess I will try a ROHM part number RFV15TJ6SGC9 diode. Unless anyone recommends something different.
Retrofit Source MotoControl H4 harness is what I use with my RX350BX retrofit, you can find them on eBay for ~$20. It's a relay harness that drive your lights and correct the high beam issue.
I found when I installed the LED projectors into the housings with the supplied H4 adaptors, the units were at a big angle (relative to the front-rear axis of the car), so the beam pattern was way, way off. Instead of being horizontal out in front with a little kick up to the left hand side (my car is RHD), it was rotated around 25 degrees up to the right. Have a small water jet at work though, so was pretty simple to make some new adaptors.
I'd pay a few bucks for a kit to mount them properly. New H4 mount, include the diodes and connectors. Buy your own projectors. Could see this becoming super popular for ~$200 all in, about 1/2 the cost of the other options out there
Retrofit Source MotoControl H4 harness is what I use with my RX350BX retrofit, you can find them on eBay for ~$20. It's a relay harness that drive your lights and correct the high beam issue.
Thanks for the info on the harness I have seen it before but didn't even think about it. Unfortunately someone cut out the H4 pigtails in my car. Just ordered some new female pigtails and the harness to clean everything up.
Any pointers where to get the sonar housings these days? I tried eBay but no luck atm�.
I recently found these "Spyder" housings in stock on Amazon, haven't purchased yet. They look like they'll work for projectors, but from the picture, it also looks like you'll need to cut out the center reflector piece that would cover a normal halogen bulb to get a projector assembly in there.
The original post link to Alibaba says the lights are 127mm, does anyone know if they changed the product and length? I can�t find them on eBay, hoping to still track down a correct pair.
�Sanvi New 2.5 inch S8 MINI Auto Bi LED Projector lens Headlight 35W 6000k�
The original post link to Alibaba says the lights are 127mm, does anyone know if they changed the product and length? I can�t find them on eBay, hoping to still track down a correct pair.
�Sanvi New 2.5 inch S8 MINI Auto Bi LED Projector lens Headlight 35W 6000k�
I've just acquired the parts in August but haven't actually performed the retrofit yet.
That being said, I believe the Aliexpress projector listing is still valid -
The length is ~127mm as advertised but to the base of the stem is ~115mm like stated in the first post.
I was also able to snag a pair of Sonar housings from seller "car-jp.sushi" via this listing: https://www.ebay.com/itm/165594465197?
The price has increased from $133 to $150 since I purchased. If you have the ability to purchase from YAJ, they're available for much less!
Even smaller & easier to fit B-LED projectors available
So I just started planning & gathering the parts to do this Bi-LED conversion on my FD, and just sharing a few relevant things I found for the project:
Housings - Just ordered a pair of these housings off of Amazon. Not a bad deal at $105.xx, they are similar to the Spyder/Sonar housings folks are using for these conversions, and they state they are for LHD and meet DOT regs (with regular halogen bulbs), so if my Bi-LED projectors ever fail, I can go back to regular halogen bulbs with them:
On the projectors, I'll probably end up getting the same Sanvi 2.5" diameter Bi-LED projectors the OP used, but in doing some market research and confirming specs and such, I stumbled across these 2" diameter Bi-LED projectors made by the same company on AliExpress. Not only are they smaller in diameter, but more importantly, they are shorter in length - which should make installation even easier. According to the link below, the 2.0" diam. projectors are only 100mm long from tip of the lens to the base of the projector where it will seat in the housing. I can't vouch for how well they light up the road as I've never seen them in action, but they should be similar to the ones the OP used as they have the same 35W power rating, assuming the scaled down projector lens are as good optically.
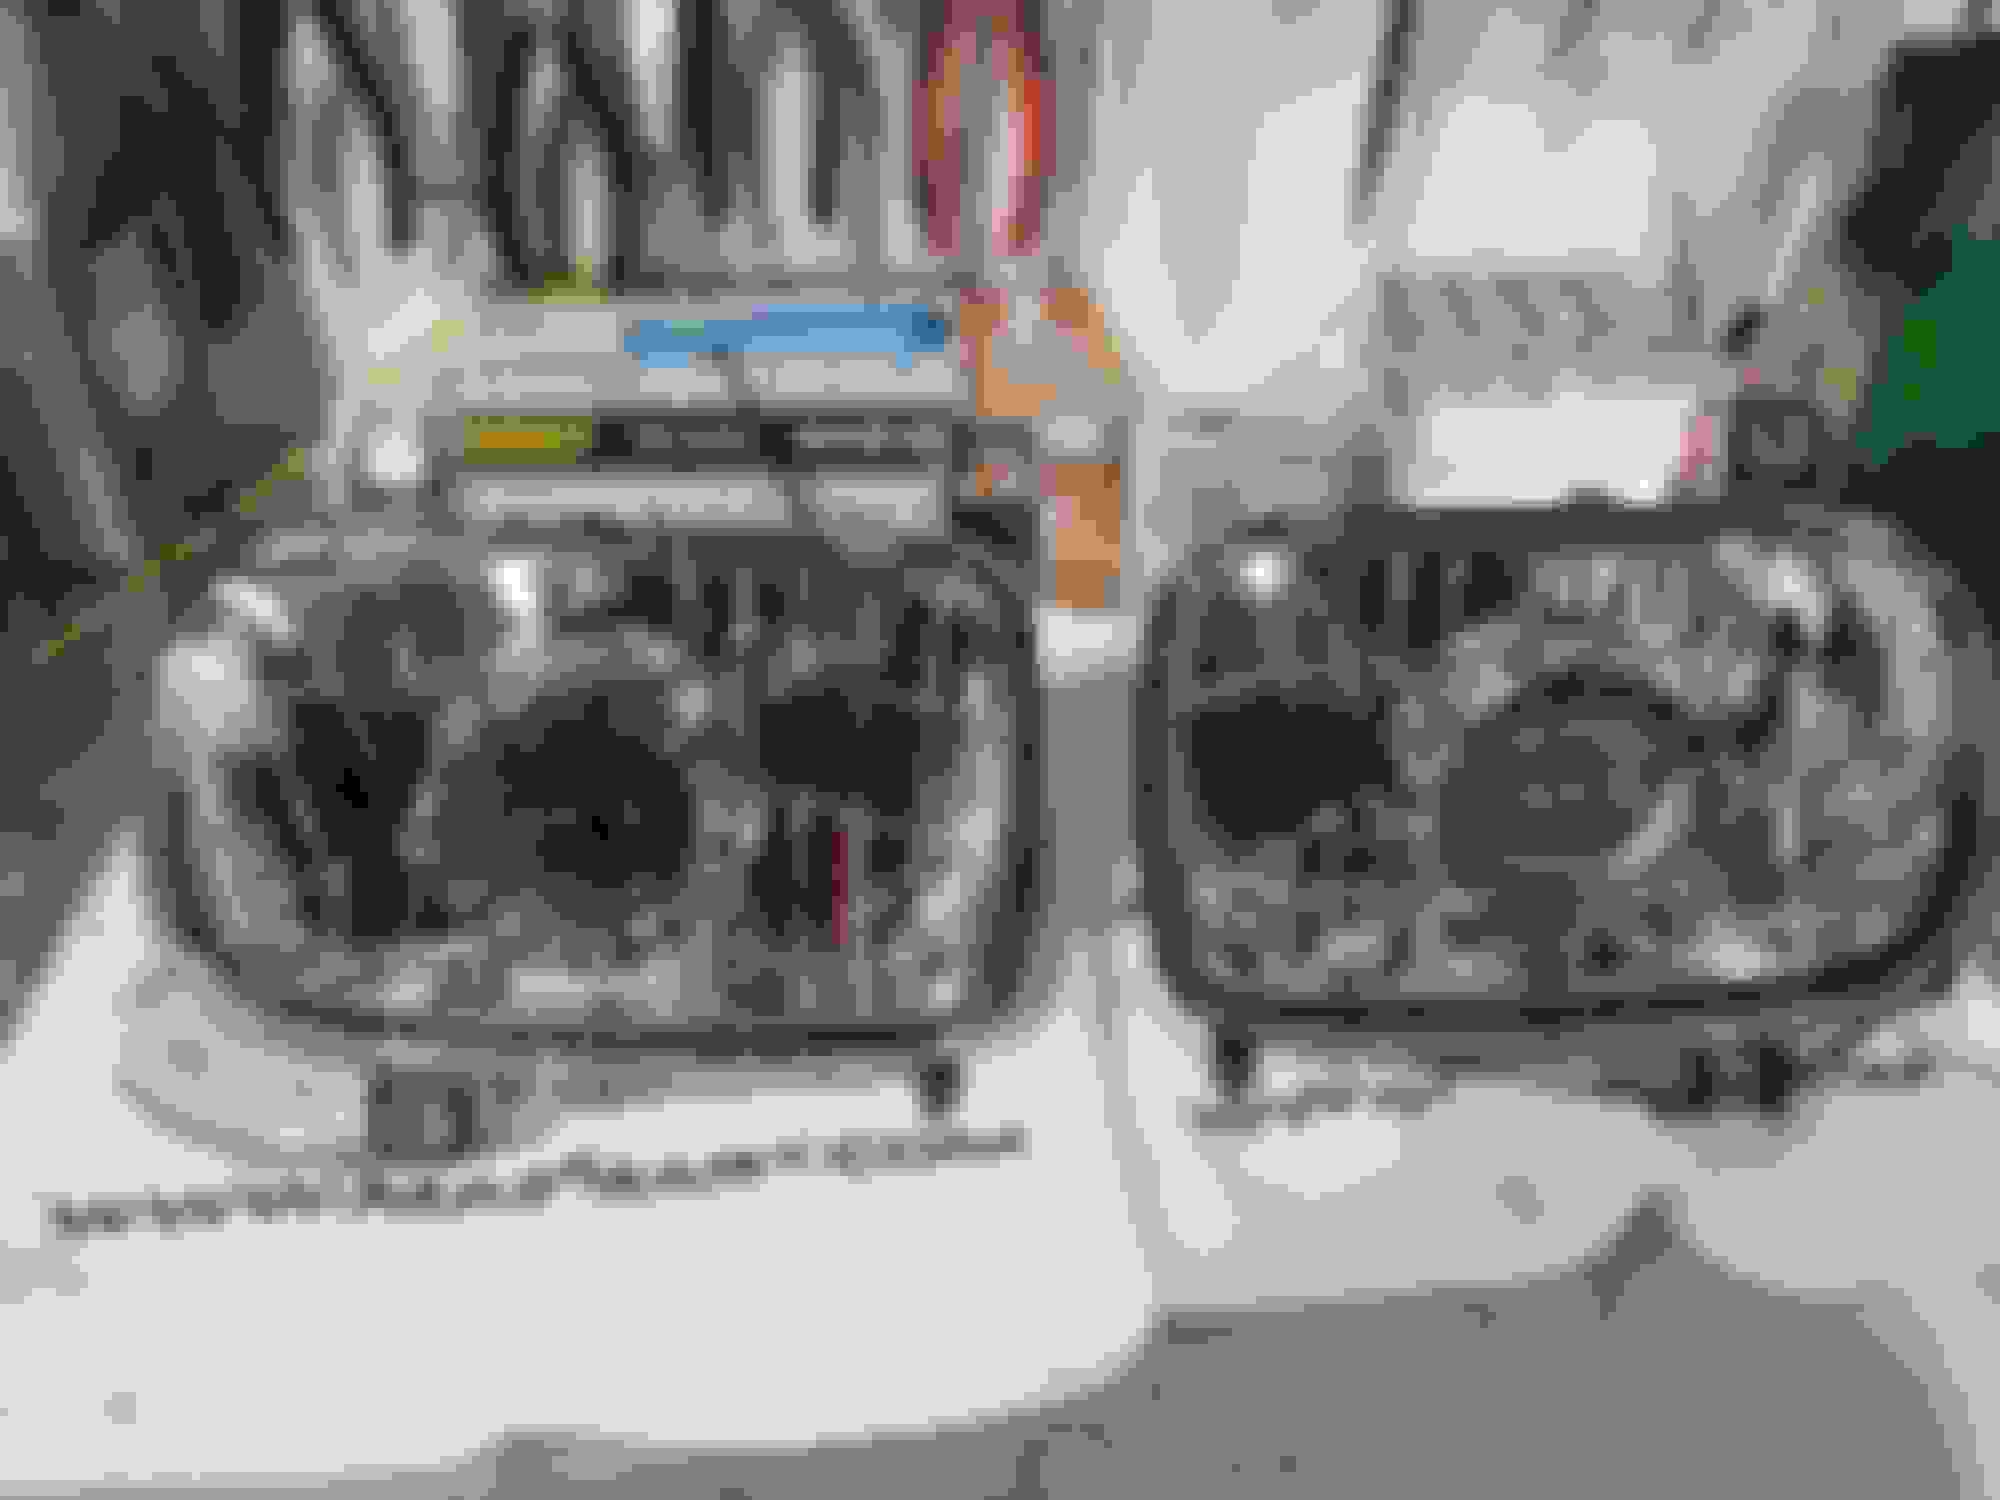
So my housings arrived from Amazon today - despite the oddball name from the Amazon vendor, these things are actually Spyder housings as indicated on the box.
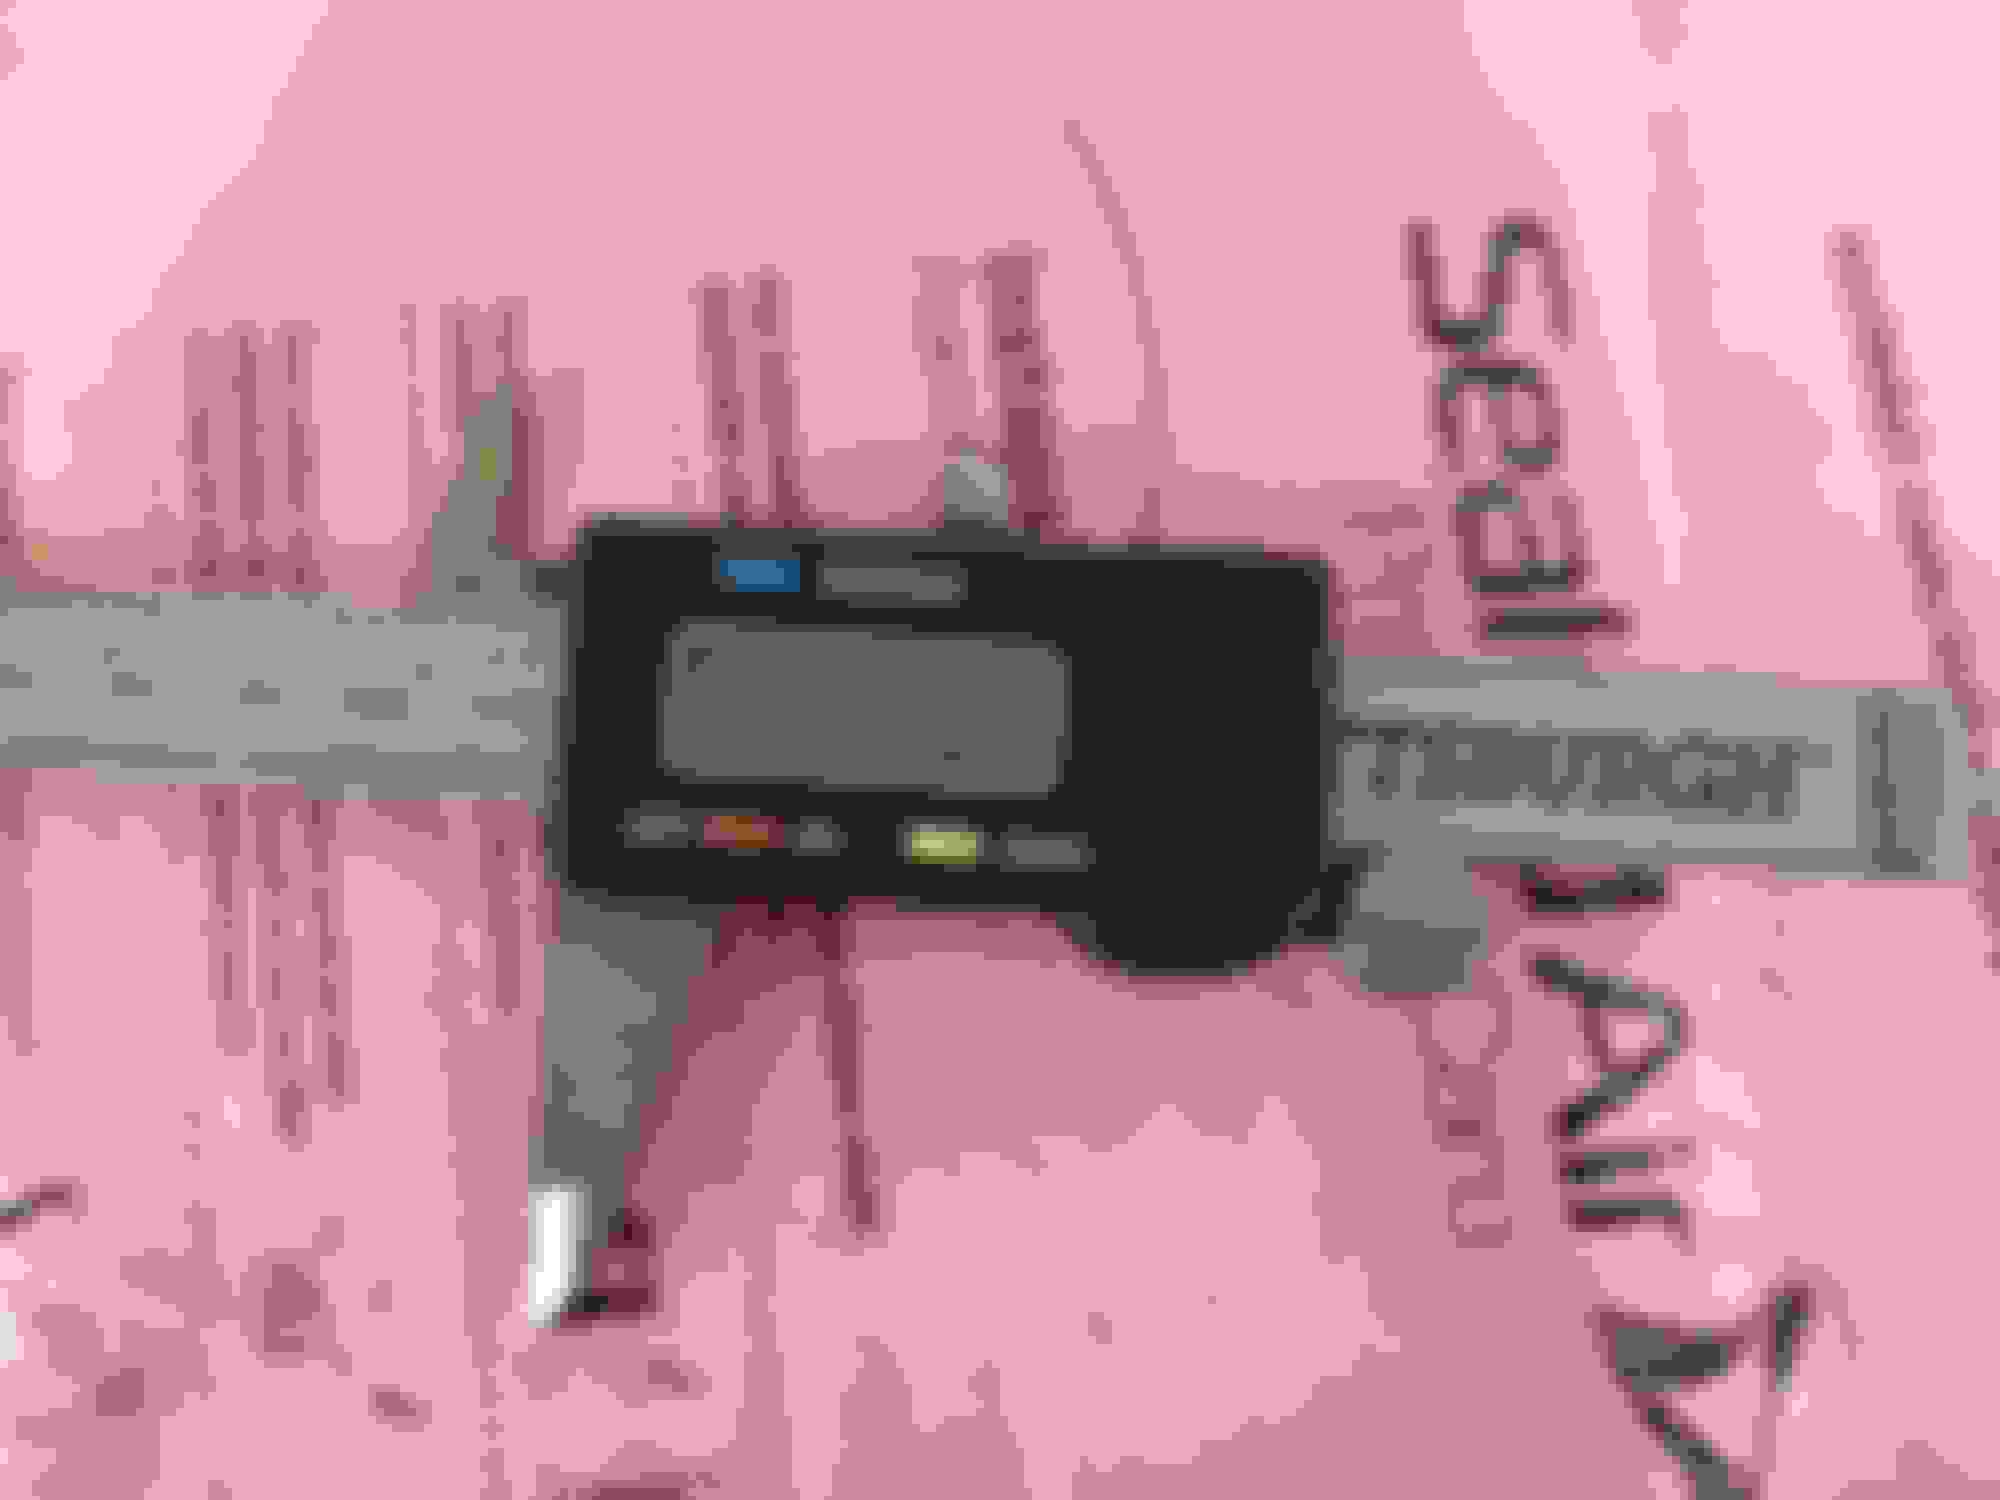
Anyway, for myself and anyone else doing a retrofit, I took depth measurements from where the projector will be seated against the base of the housing and the housing lens. Bottom line is you have just about 106mm of depth to play with. So use that dimension when selecting projectors. That's based on my 112.32 mm measurement (pictured below), after subtracting about 6mm to account for the thickness of the housing material (my depth measurement was to the outside edge).
So given this measurement, I decided to buy the smaller 2" diameter 100mm deep Bi-LED projectors that I linked in my prior post. That way I should have enough depth to use the silicone washer on the base that the OP said he had to omit on his installation. AliExpress says to expect them around 29 Nov, so it will be a long wait - add this one to the FD's winter project queue.
Last edited by Pete_89T2; 11-02-22 at 04:13 PM.
Reason: added detail/info
I don't quite know how you will hack up the housings to make your lights fit, so maybe these would not fit the bill? I am assuming these are too deep for use?
I do know from experience the Morimoto products are high quality.
Hi David, I did, those were on my short list but unfortunately they are too long to fit inside the housing as-is with zero modification. Like the OP, I'm shooting for a simple "bolt on" type of job this time around that doesn't require any housing fabrication work.
Originally Posted by David Hayes
I don't quite know how you will hack up the housings to make your lights fit, so maybe these would not fit the bill? I am assuming these are too deep for use?
I do know from experience the Morimoto products are high quality.
Look forward to seeing how it turns out for you.
Bingo - Most of the projectors on the market, whether they are HID or Bi-LED type are too large to fit inside the headlight housing for an FD. Basically to make them fit, it involves cutting a big hole at the base of the housings, and using something like a PVC pipe cap or fabricated AL equivalent to form a new "base" for your projector to seat to, so when you re-install the housing lens it won't touch the projector lens. And you need to figure out how to get the optical alignment of the projector in the housing just right in all 3 dimensions so that you can aim the beams correctly with the normal OEM adjustment screws. Went that route with my FC, when I retrofitted a set of Morimoto mini-H1 Bi-Xenon HID projectors inside a set of aftermarket halogen bulb housings that replaced the old 5x7" sealed beam bulbs the FC had originally. End result was worth it, but what a PITA that project was!
I have a retrofit, and both both LED projectors have gone dim. All the other lighting systems work as normal. What would cause both bulbs to go dim at once?
Bad ballasts or burnt out LED bulbs? I've had charging system issues recently, under AND over volting.
Thanks!
I have a retrofit, and both both LED projectors have gone dim. All the other lighting systems work as normal. What would cause both bulbs to go dim at once?
Bad ballasts or burnt out LED bulbs? I've had charging system issues recently, under AND over volting.
Thanks!
LEDs don't use "ballasts" per se - that's an HID lighting term for the electronic box that basically cranks up the voltage that the HID bulbs need to start & stay illuminated from your automotive 12VDC power system. That said, LEDs also have some power conditioning circuitry, either internal or in an external box that is there to regulate the 12 ~ 14VDC power from the car's power bus to a tighter range to keep the LED chips happy and operating to specs. It's possible that your under/over charging problems may have stressed your LED power conditioning circuitry to failure, but it could also be due to a wiring failure associated with your LED projectors.
Best way to quickly test for that would be to substitute power to each LED projector - unplug both of them from your car's wiring, and run power/ground jumper wires direct from the battery to test each LED projector. Test both low & high beam functions that way. If both LED projectors are now illuminating normally (as they used to), your problem lies in the car's wiring. If both are still dim, then the LEDs are done.
Thanks didn't know what to call the external box. I'll try jumping to the lights, and see if they're full bright.
Just to be clear, if those external boxes came with your LED projectors, you'll need to jump your battery power/ground to the input terminals on that box.
what housing is being used? I did not see that mentioned.
Scroll up to post #64 and you'll see an Amazon link to the specific housings that I purchased. The OP & others have posted up what they used for housings, which will also work just fine. Alternatively, you can google "1993 Mazda RX7 Headlight housing" and come up with a few other possible choices. You DO NOT want to use a set of used/new Mazda OEM housings for this project, as the glass lens is not clear, and it will bugger up the focus of the LED projectors shining thru them - you want a housing that has a plain crystal clear plastic cover.
I have a retrofit, and both both LED projectors have gone dim. All the other lighting systems work as normal. What would cause both bulbs to go dim at once?
Bad ballasts or burnt out LED bulbs? I've had charging system issues recently, under AND over volting.
Thanks!
Originally Posted by Pete_89T2
LEDs don't use "ballasts" per se - that's an HID lighting term for the electronic box that basically cranks up the voltage that the HID bulbs need to start & stay illuminated from your automotive 12VDC power system. That said, LEDs also have some power conditioning circuitry, either internal or in an external box that is there to regulate the 12 ~ 14VDC power from the car's power bus to a tighter range to keep the LED chips happy and operating to specs. It's possible that your under/over charging problems may have stressed your LED power conditioning circuitry to failure, but it could also be due to a wiring failure associated with your LED projectors.
Best way to quickly test for that would be to substitute power to each LED projector - unplug both of them from your car's wiring, and run power/ground jumper wires direct from the battery to test each LED projector. Test both low & high beam functions that way. If both LED projectors are now illuminating normally (as they used to), your problem lies in the car's wiring. If both are still dim, then the LEDs are done.
Good news. It was just fried boxes, and not some harness issue. Was able to replace the boxes, and am back to full brightness.
So my LED Projectors arrived about a week early via China from Ali Express. Anyway, here's an update on my iteration of this project so far...
As I mentioned in post #65, I opted to buy the smaller 2" diameter Bi-LED projectors from Ali Express (2" with the optional masks). These are just under 100mm long, base to lens, so they will fit within your Spyder or equivalent housings with zero modification and you can use the included silicone cushion washer. The 2.5" diameter projectors the OP used are a little longer, and he said he was unable to install them with the silicone washer. Link here: https://www.aliexpress.us/item/32568...86360280%21rec
Pictures of the unpacking & measuring the projectors: Unpacking - they were packed well and arrived without any damage. Another unpacking picture, showing all the contents. Here you can see that they didn't route the high beam solenoid wiring thru the hollow stem as they should have. Which means if you don't want to drill a hole in your housing, to route the high beam wires thru the stem, you'll simply snip off the cheap connector first to fit them thru the stem. Length of projector from stem base to top of lens is just under 100mm. Easy fit within the Spyder housings
Initial Review of the product:
Pros:
1. After bench testing, I found they are very bright, with a comfortable white (~5000*K color temp) light with a well defined beam pattern typical of any good HID/LED projector. Functionally they seem fine; fans operate as they should and low/high beam function works. Using a bench +12VDC power supply from an old computer and letting them stay on for about an hour didn't kill them. Haven't installed these on my FD yet, so on-the-road review will have to wait, and long term durability is obviously TBD. Thing is that this install is 100% completely reversible - if they ever fail, I can pop in a set of regular halogen bulbs or perhaps another/better LED projector.
Cons:
1. There were zero instructions/documentation included in the package. But it was easy enough to figure out the wiring just based on the info available on the Ali Express website.
2. There were no screws included to secure the optional shrouds that I purchased to the LED projectors. Easy enough to fix though, as I used 4x short M3 machine screws that I had laying around the shop to secure the shrouds to the LED projectors.
3. As shipped, the high beam solenoid wiring would require you to drill a hole in your housing to run the wires out. Not sure why, as there is plenty of room to route them thru the hollow mounting stem, so I nipped off the cheap plastic connector on the high beam wires so I could run the wires thru the stem. I'm going to replace all the crappy connectors on this thing with Deutsch DTM connectors anyway to keep all the wiring water tight & corrosion free.
4. I had the same problem with beam alignment that ZacMan reported - The included H4 adapter washers if used as-is would roll the beam about 20* off of horizontal, up on the left. My solution was to modify the H4 washer by grinding off the keying tab, and using it in conjunction with one of the other included adapter washers that I super-glued on top of the modified H4 washer at the correct alignment angle that I determined after bench testing. Pictures might describe this better...
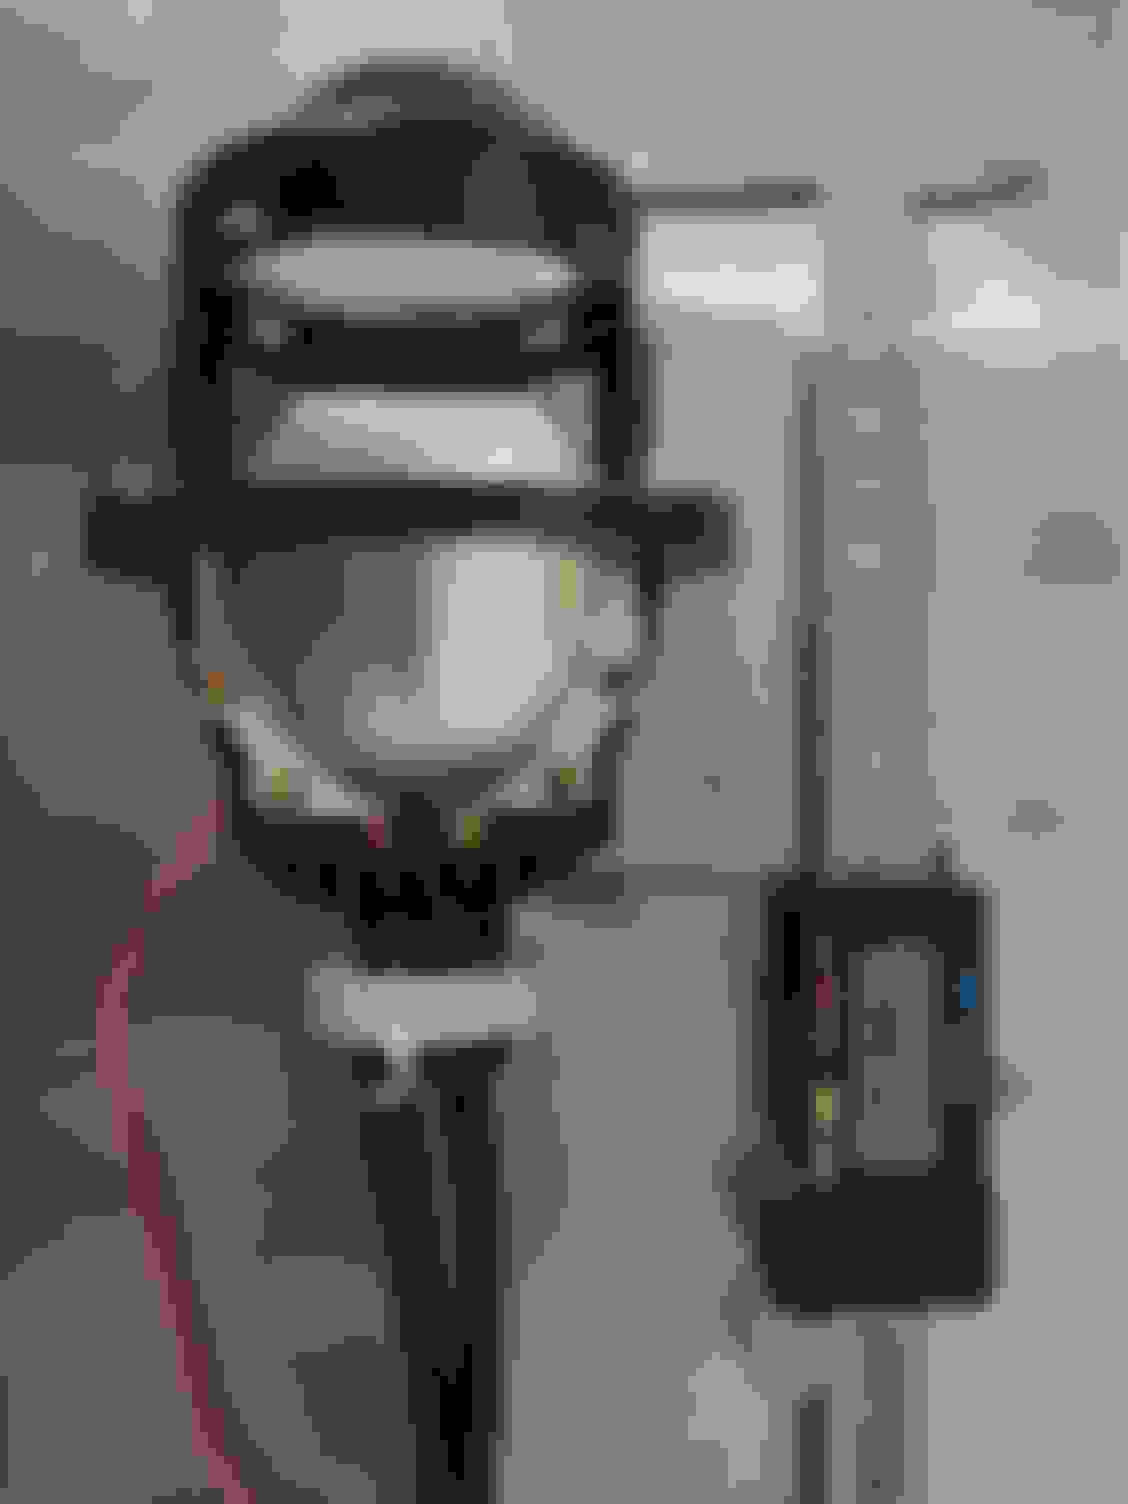
Setting up to test beam alignment. I'm using the unmodified H4 washer as-is here, housing is sitting level on a surface as it would be when installed in the FD, and projecting against opposite wall in my basement. And here's the twisted beam pattern - it should be level & horizontal The left is the unmodified H4 washer as-is; in the center is the H4 washer after grinding off the alignment key, and to the right is the other alignment washer I'm going to glue to the modified H4 washer to make it work! And here you can see my new alignment washer, that consists of the modified H4 washer and the other alignment washer glued on top after testing alignment & marking up prior to gluing. Installed in the housing with modified washers
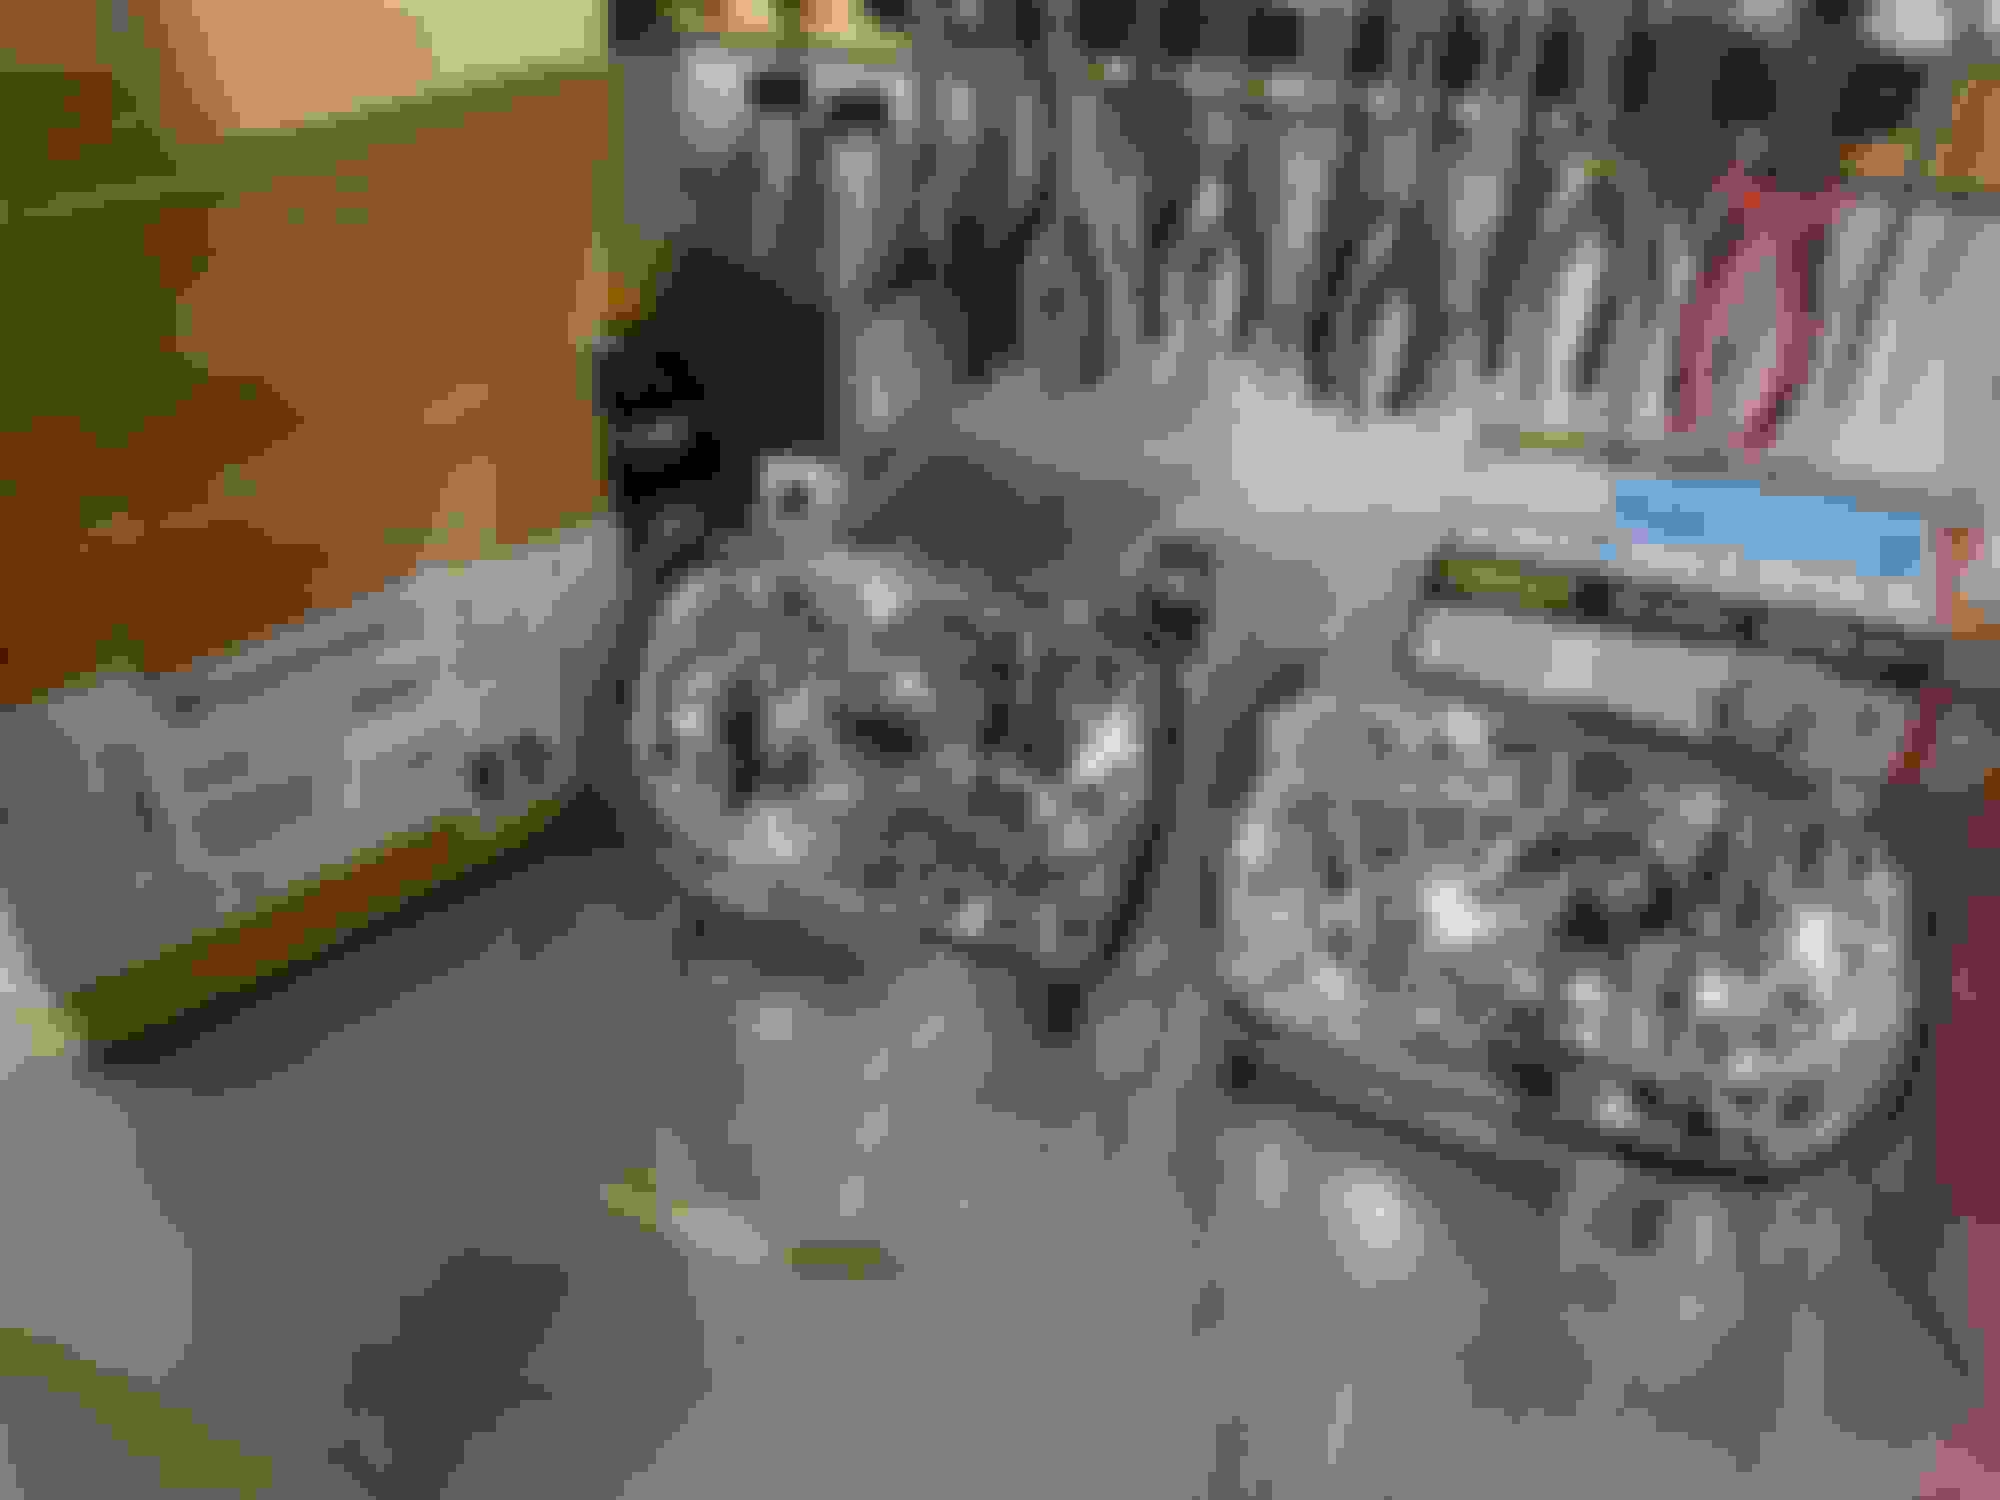
Finished Housing & Bi-LED Projector assemblies
So now I'm just waiting for a few Deutsch DTM connectors and a Morimoto H4/9003 Bi-HID/LED wiring relay kit to arrive so I can install & wire these into my FD properly.
Last edited by Pete_89T2; 11-23-22 at 12:23 PM.
Reason: fix typos


 01-28-22, 10:24 AM