S4 2+2/4 bolt/ auto becomes GTU (Big A55 project)

 10-18-09, 09:48 PM
#27
Well the truck's transmission does need to be replaced. It's not as bad as I thought at first though. It still drives, but whines. Apparently, there are rubber plugs on top of the tranny that should be replaced with steel ones. I didn't know about it and ruined an other wise reliable SUV.
I did get to the shop today.

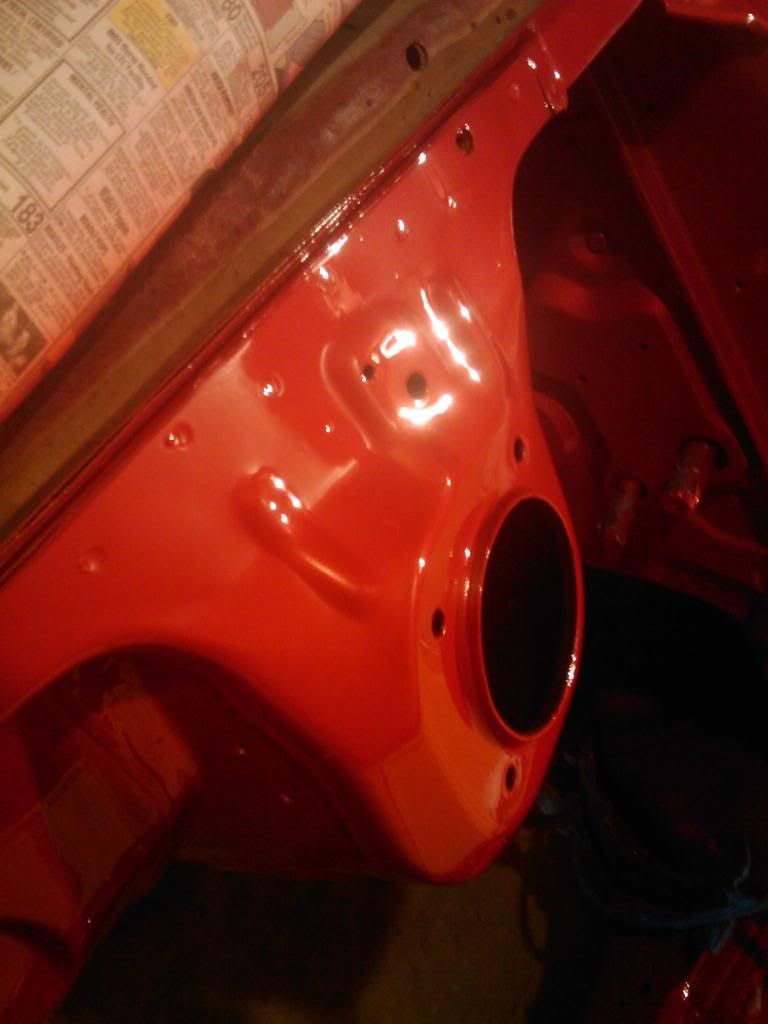
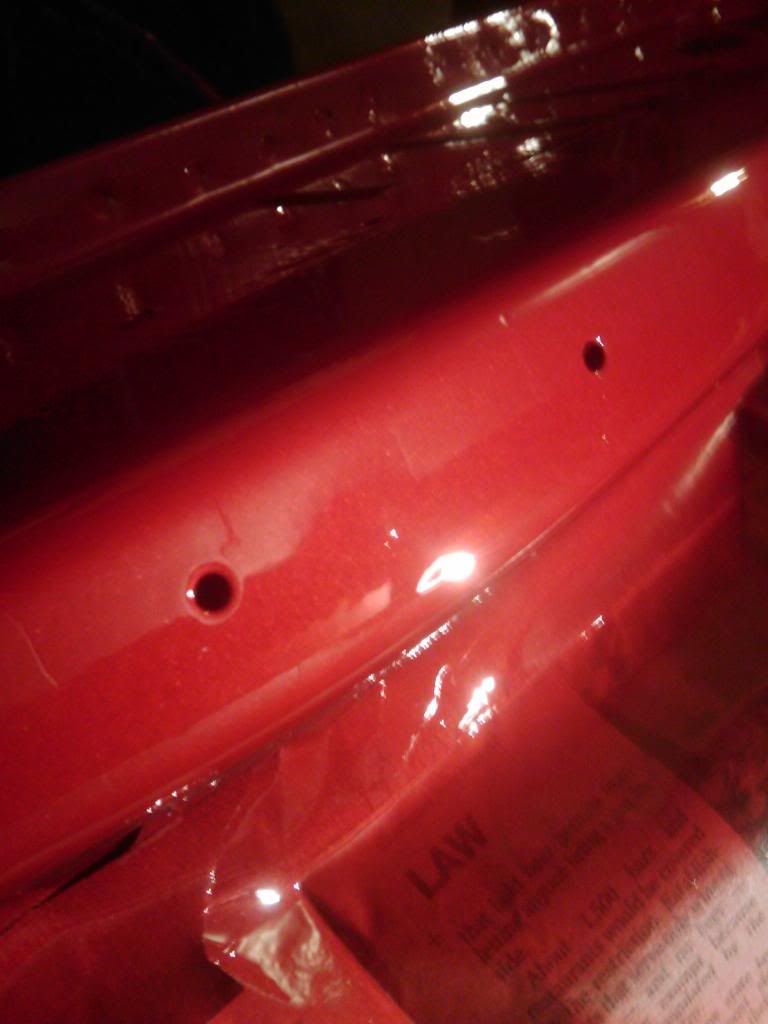
I should have taken a better picture. This one was just after the first coat on one side. After this dried, I hung it from the rafters and it was much easier. I did get some dust in this coat.
I will take a better pic tomorrow. I also took the pieces that didn't paint to well back down to metal and started over.
I regret taking the fenders and head lights off. I broke off too many bolts. But it will make painting much easier. I'm having trouble removing the power brake booster. Any suggestions?
I didn't want to get this involved. It's too late now though. I'm worried that I will not finish in my allotted time. Work could pick up and really busy any time now.
I did get to the shop today.
I should have taken a better picture. This one was just after the first coat on one side. After this dried, I hung it from the rafters and it was much easier. I did get some dust in this coat.
I will take a better pic tomorrow. I also took the pieces that didn't paint to well back down to metal and started over.
I regret taking the fenders and head lights off. I broke off too many bolts. But it will make painting much easier. I'm having trouble removing the power brake booster. Any suggestions?
I didn't want to get this involved. It's too late now though. I'm worried that I will not finish in my allotted time. Work could pick up and really busy any time now.
10-19-09, 05:22 PM
#28
I got a little done today. I plan on returning to the shop later tonight.
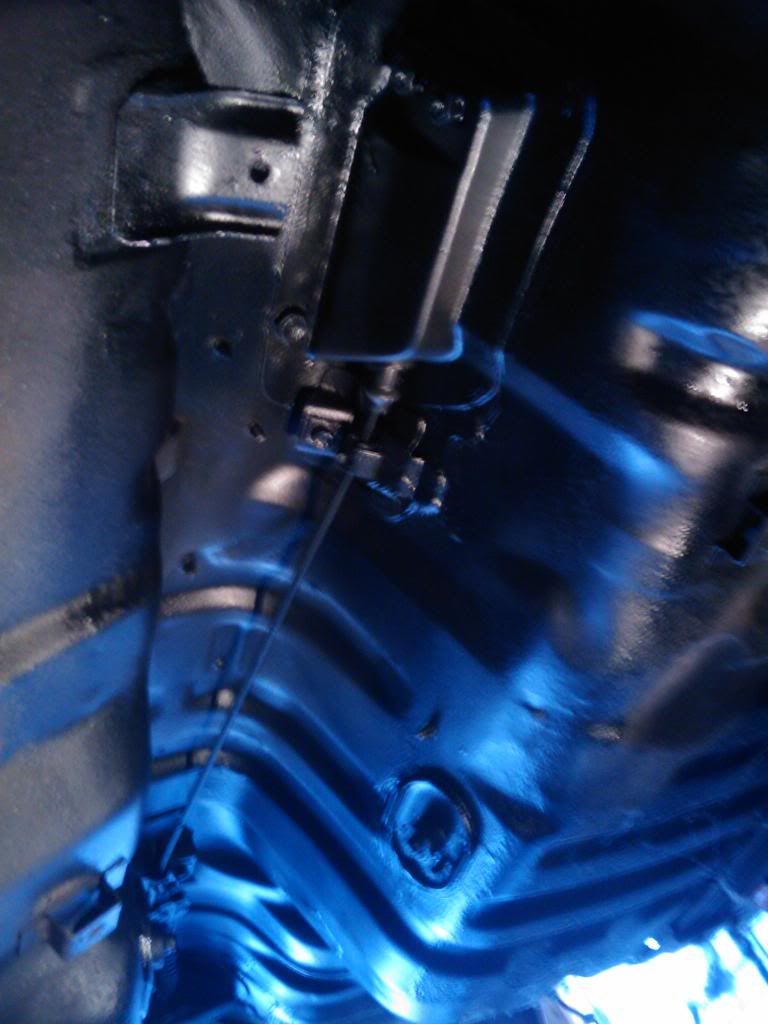
I sprayed the under belly with truck bed liner. I scuffed it first with a scotch brite pad soaked in parts cleaner. Then i wiped it down with carb cleaner and sprayed. I did the same thing to all of the wheel wells. too. I haven't done the transmission hump yet because i still have to weld in the new mounts for the 5 speed.

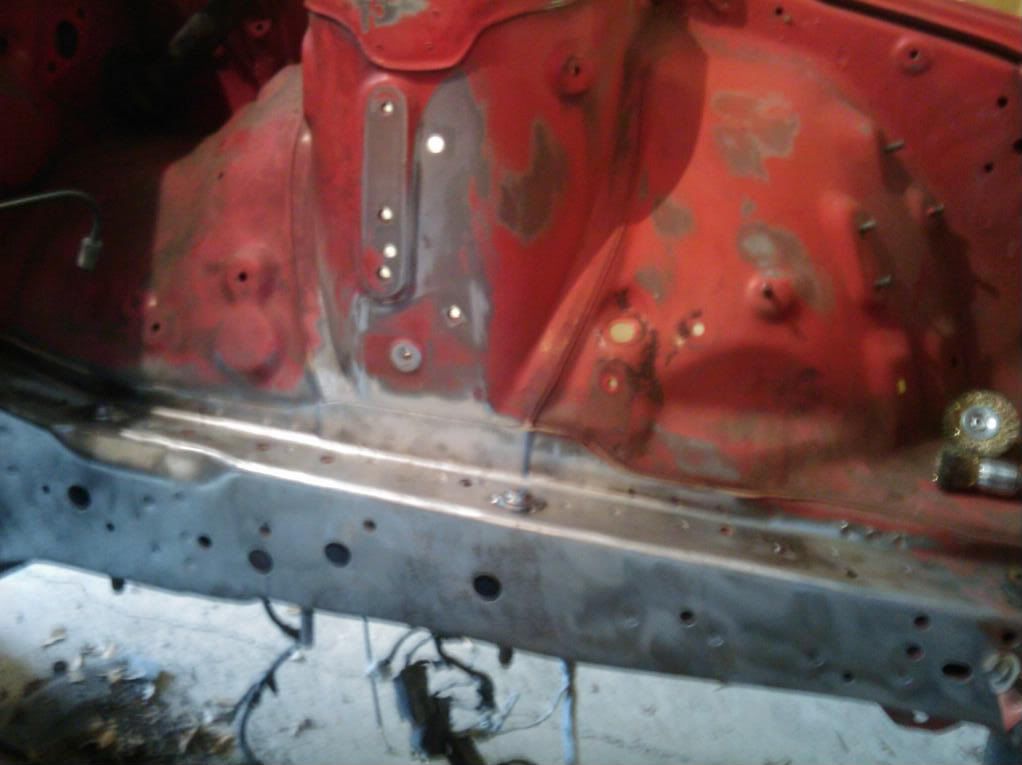
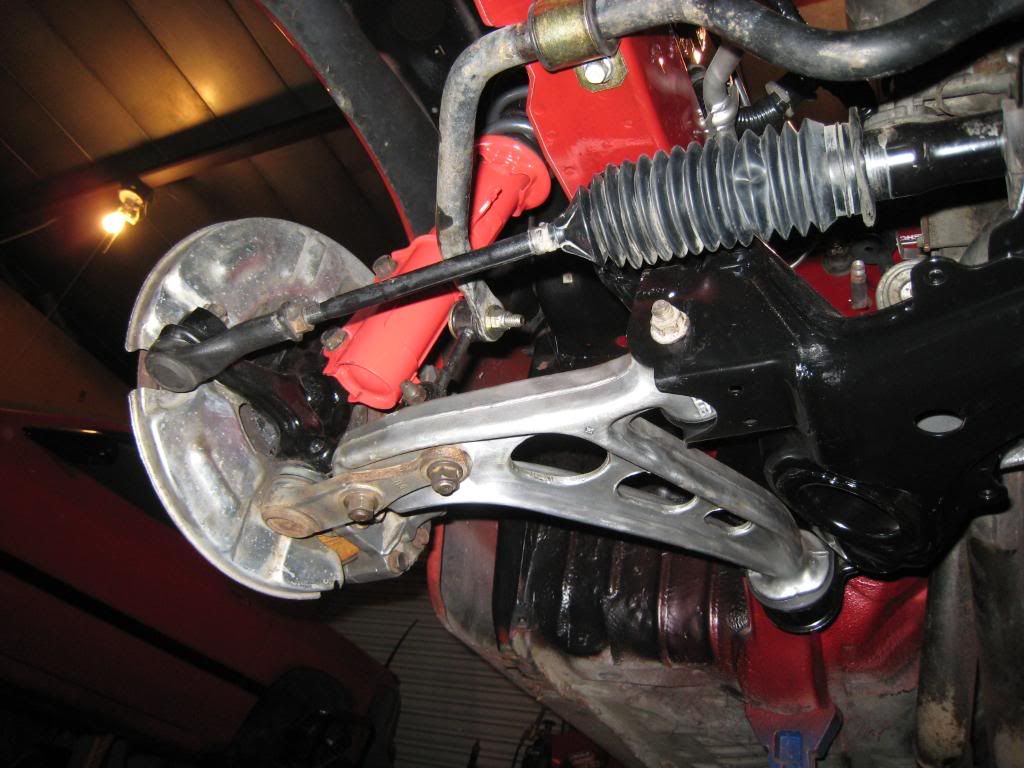
I also took a better pic of the cross member and steering rack.


I ordered the AGX shocks today. But remembered I haven't bought my sway bars yet. Darn! I'm running over budget all ready and haven't begun to dismantle the cancer patient yet.
Also today I drove the cancer patient and when i pulled into the driveway, I noticed an oil spot. It dose not excite me to put a leaking motor into an engine bay I'm about to repaint. There is no way i can talk my wife into the rebuild now. That comes later. man I have some plans for the motor. I'm looking to make 350+ HP. But turbos and porting take money, time, and a Microtech
 . that is not happening before I finish this and paint the exterior. I'm hoping the leak will be something I can fix while the motor is out. like the oil cooler lines or something. Maybe I'll get really lucky and it will be just the oil drain plug. Naw, my luck is never that good.
A question I just thought about. I'm going to use some Enkie 18 x 8. they have 140 mm back spacing. Any body know what size spacers i'm going to need for the front. I will also be using ST lowering springs so I will be .8" lower than stock.
I sprayed the under belly with truck bed liner. I scuffed it first with a scotch brite pad soaked in parts cleaner. Then i wiped it down with carb cleaner and sprayed. I did the same thing to all of the wheel wells. too. I haven't done the transmission hump yet because i still have to weld in the new mounts for the 5 speed.
I also took a better pic of the cross member and steering rack.
I ordered the AGX shocks today. But remembered I haven't bought my sway bars yet. Darn! I'm running over budget all ready and haven't begun to dismantle the cancer patient yet.
Also today I drove the cancer patient and when i pulled into the driveway, I noticed an oil spot.
It dose not excite me to put a leaking motor into an engine bay I'm about to repaint. There is no way i can talk my wife into the rebuild now. That comes later. man I have some plans for the motor. I'm looking to make 350+ HP. But turbos and porting take money, time, and a Microtech. that is not happening before I finish this and paint the exterior. I'm hoping the leak will be something I can fix while the motor is out. like the oil cooler lines or something. Maybe I'll get really lucky and it will be just the oil drain plug. Naw, my luck is never that good. A question I just thought about. I'm going to use some Enkie 18 x 8. they have 140 mm back spacing. Any body know what size spacers i'm going to need for the front. I will also be using ST lowering springs so I will be .8" lower than stock.
Last edited by tweaked; 10-19-09 at 05:25 PM. Reason: poor spelling.
10-19-09, 05:38 PM
#29
May not seem like it but you'll appreciate it later.
What is the problem removing the booster?
The four nuts should be pretty simple since they're in cabin and not subject to the elements and after that, what's left?
10-19-09, 08:57 PM
#30
Better to deal with recalcitrant hardware now than after paint.
May not seem like it but you'll appreciate it later.
What is the problem removing the booster?
The four nuts should be pretty simple since they're in cabin and not subject to the elements and after that, what's left?
May not seem like it but you'll appreciate it later.
What is the problem removing the booster?
The four nuts should be pretty simple since they're in cabin and not subject to the elements and after that, what's left?
Life just threw another **** bag at me. I drove my wife's car to Autozone. when I came out, It wouldn't start. After much cussing and a little diagnostics, it's a $250 fuel pump after i filled the tank with gas before Autozone. I hate Chevy, this just adds more fuel to the fire... Fire! what a great idea. I can have a fuel fire and insurance will buy her another car. Too bad it is sitting directly in front of the doors. I'm sure those guys have extinguishers.
10-20-09, 02:05 PM
#31
(Since you went kinda off topic...) Fuel pump replacement is a bitch when there's no access cover to get to it. Just did one on a '94 Blazer and the tank had to come down. Then I got the wrong pump, since there are two possible pumps for the same 4.3 V6 (one is CPI, one is TBI and pressure specs. are different). So the tank had to come down again. PM me if you need more info.
10-20-09, 03:33 PM
#32
(Since you went kinda off topic...) Fuel pump replacement is a bitch when there's no access cover to get to it. Just did one on a '94 Blazer and the tank had to come down. Then I got the wrong pump, since there are two possible pumps for the same 4.3 V6 (one is CPI, one is TBI and pressure specs. are different). So the tank had to come down again. PM me if you need more info.
I didn't mean to get off topic, but it is interfering with the project.
10-21-09, 11:15 PM
#34
HOLY CRAP!
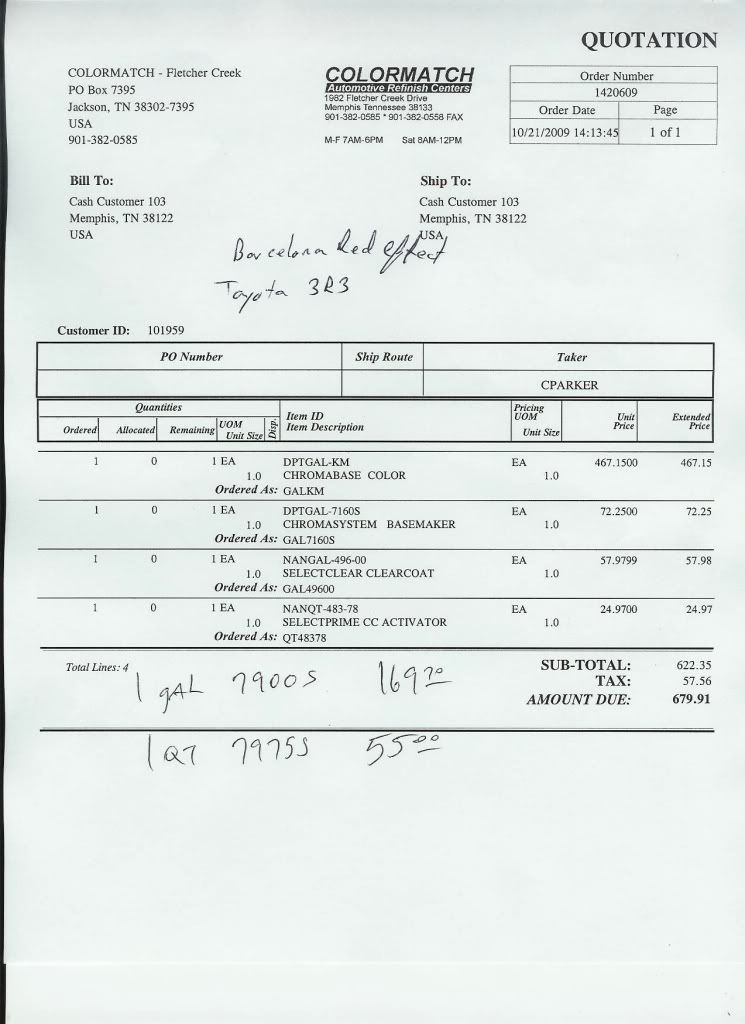
It's been a few years since I bought car paint. The last time I bought paint and clear, the paint was $80 and the clear was $50. this is outrageous. It's a beautiful color though.
I got a bit done today. I sanded all that was rusted from the brake fluid leaking.
I plan on going back tonight and finishing feather edging the paint and spraying the self etching primer. the the filling primer tomorrow.
I have also finished all of the small parts. Everything is painted except for the engine bay. I still haven't figured out how i'm going to spray the paint since there is no power outlet heavy duty enough for my compressor. I guess i will rent a gas powered one.
I bought a bunch of plastic tarp so i can make a spray booth. I already have a blower fan w/ 2 micron filters from a former project. so i will have a clean environment to spray. Luckily, when I spray the body, I have a friend that lives about an hour form here with a full downdraft climate controlled spray booth at his house. he said i can use it, but he has a hot rod in there now and i will have to wait.
Does anyone know of a good resource to buy those plastic clips and retainers i broke off in the engine bay? The paint store doesn't carry them. They can order, but I have to know the part numbers.
I think tomorrow I will get a quote for the same paint from PPG and Sherwin Williams. Who make water based paint? I know they make it because you can't spray anything else in Calli as I understand it. I would rather use the water based. I can't imagine it would be more expensive.
By the end of day tomorrow, I plan to have the entire bay primed and ready for paint. I hope.

 11-04-09, 09:51 PM
#37
So i haven't posted any progress in a while. I had to stay out of town for a whole week. By the way, Decatur GA is one of the coolest, best-est towns out there.
So I got back yesterday and sprayed the base coat. I love this color. In the can, i thought it was going to be too light. But after I sprayed it, I love it!
I got back from work in Nashville today a little late. But I really wanted to spray the clear before the evening chill, and cooler tomorrow.
Got to the shop, fired up the generator to let it warm before I turned on the compressor. I couldn't find my new tack cloth, but figured it would be okay since nothing had moved since I sprayed the color. I blew it off with the spray gun, but I should have gone and bought another tack cloth. I got a few dust nips, mostly on the radiator cross bar. One small run no one will be able to see.
I have enough to do two more light coats of clear. I may, might! wet sand and spray more clear. I'm short on time. I only have until the 21st to complete this project on time.
I plan on getting the cancer patient in for dismantling by saturday. I

The color looks great outside of of the camera. for some reason it looks really orange in the pics.
I am having lots of trouble getting the rubber bushings off the lower control arms. Anybody have any tips.
So I got back yesterday and sprayed the base coat. I love this color. In the can, i thought it was going to be too light. But after I sprayed it, I love it!
I got back from work in Nashville today a little late. But I really wanted to spray the clear before the evening chill, and cooler tomorrow.
Got to the shop, fired up the generator to let it warm before I turned on the compressor. I couldn't find my new tack cloth, but figured it would be okay since nothing had moved since I sprayed the color. I blew it off with the spray gun, but I should have gone and bought another tack cloth. I got a few dust nips, mostly on the radiator cross bar. One small run no one will be able to see.
I have enough to do two more light coats of clear. I may, might! wet sand and spray more clear. I'm short on time. I only have until the 21st to complete this project on time.
I plan on getting the cancer patient in for dismantling by saturday. I
The color looks great outside of of the camera. for some reason it looks really orange in the pics.
I am having lots of trouble getting the rubber bushings off the lower control arms. Anybody have any tips.
11-10-09, 05:34 AM
#41
I'm really sweating the dead line. I know work is going to send me out a lot in the near future and the holidays are coming fast. I keep running into delays. For instance. Does anyone know why Energy Suspension made the rear control arm bushings too big?!?! I cannot get these things in. I had those control arms painted and all kinds of pretty, but now there are really beat up. I'm not repainting them. Each one of those stupid things were are hard as the engine cross member alone. Then add the rear cross member. Some times i think I'm seriously crazy. I even painted the steering column.
I am making progress though.
the engine is ready to be pulled. Then i will have to track down the oil leak. I think I might have more than one leak really. I see oil stains around the OMP. I think one of the braided oil lines is leaking. I notices a minor crack in the oil level sensor. and it looks like oil is coming from the oil filter mount. Are there gaskets in these areas that should be replaced. Naturally I don't want to just start replacing gaskets. Are there problematic ones close?
These pics are from yesterday. I have made more progress today. The engine cross member, steering rack, front sway bar are all in. I put the shocks and spring together, but they have to come back apart. I forgot to buy boots for the shocks. They are supposed to be here on Thursday. Due to time and money constrains, i have decided to run with the stock sway bars for now. I'm still going to install the poly bushings in them though. the new ST sway bars will come with some.
Most of the interior is swapped or already pulled from the donor. Pedals are in. new switches for the E-fan and fuel pump are in, too. I was wanting to install some Dynamat before installing the door panels and rear plastic. I'm really waiting on the engine and tranny to really button up that part.
I'm going to try and source a cherry picker tomorrow and yank that motor. I will feel better when that is in it's new home.
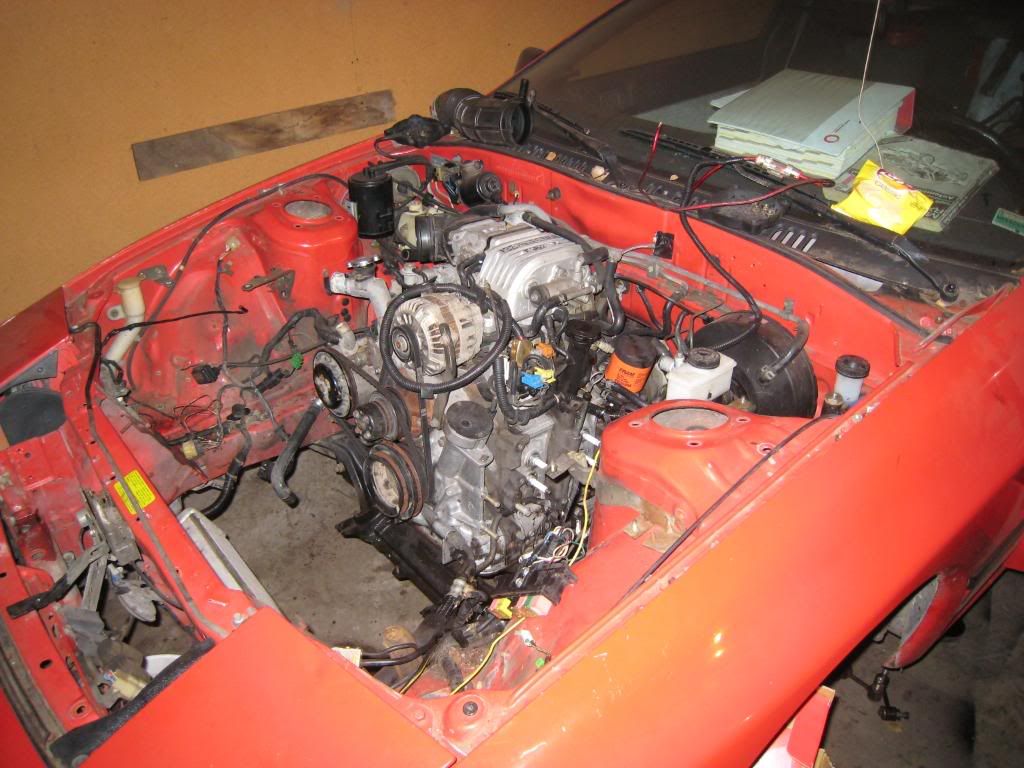
Most of the parts in the engine bay that can go in, without being in the way of the motor swap, is in. most hard lines are in, so are the hydraulic lines. All of the little brackets. Which look sooo good against the red. Since i have unplugged the engine wire harness from the ECU instead of from the motor, I have saved a lot of time. but things like the cruise control and carbon filter have to wait to go in.
Engine is ready to come out. Although I don't know where it will go since i am out of room.
I am making progress though.
the engine is ready to be pulled. Then i will have to track down the oil leak. I think I might have more than one leak really. I see oil stains around the OMP. I think one of the braided oil lines is leaking. I notices a minor crack in the oil level sensor. and it looks like oil is coming from the oil filter mount. Are there gaskets in these areas that should be replaced. Naturally I don't want to just start replacing gaskets. Are there problematic ones close?
These pics are from yesterday. I have made more progress today. The engine cross member, steering rack, front sway bar are all in. I put the shocks and spring together, but they have to come back apart. I forgot to buy boots for the shocks. They are supposed to be here on Thursday. Due to time and money constrains, i have decided to run with the stock sway bars for now. I'm still going to install the poly bushings in them though. the new ST sway bars will come with some.
Most of the interior is swapped or already pulled from the donor. Pedals are in. new switches for the E-fan and fuel pump are in, too. I was wanting to install some Dynamat before installing the door panels and rear plastic. I'm really waiting on the engine and tranny to really button up that part.
I'm going to try and source a cherry picker tomorrow and yank that motor. I will feel better when that is in it's new home.
Most of the parts in the engine bay that can go in, without being in the way of the motor swap, is in. most hard lines are in, so are the hydraulic lines. All of the little brackets. Which look sooo good against the red. Since i have unplugged the engine wire harness from the ECU instead of from the motor, I have saved a lot of time. but things like the cruise control and carbon filter have to wait to go in.
Engine is ready to come out. Although I don't know where it will go since i am out of room.
11-10-09, 07:37 PM
#43
zoom zoom go boom
Man your really pushing that deadline. Hope you can make it. This thing is coming together so nicely though! Too bad your not more local or hell id give you a hand. Hey did you say free parts? Man I'm in desperate need of some door handles. My car literally has none.
11-11-09, 05:44 AM
#44
Horray!
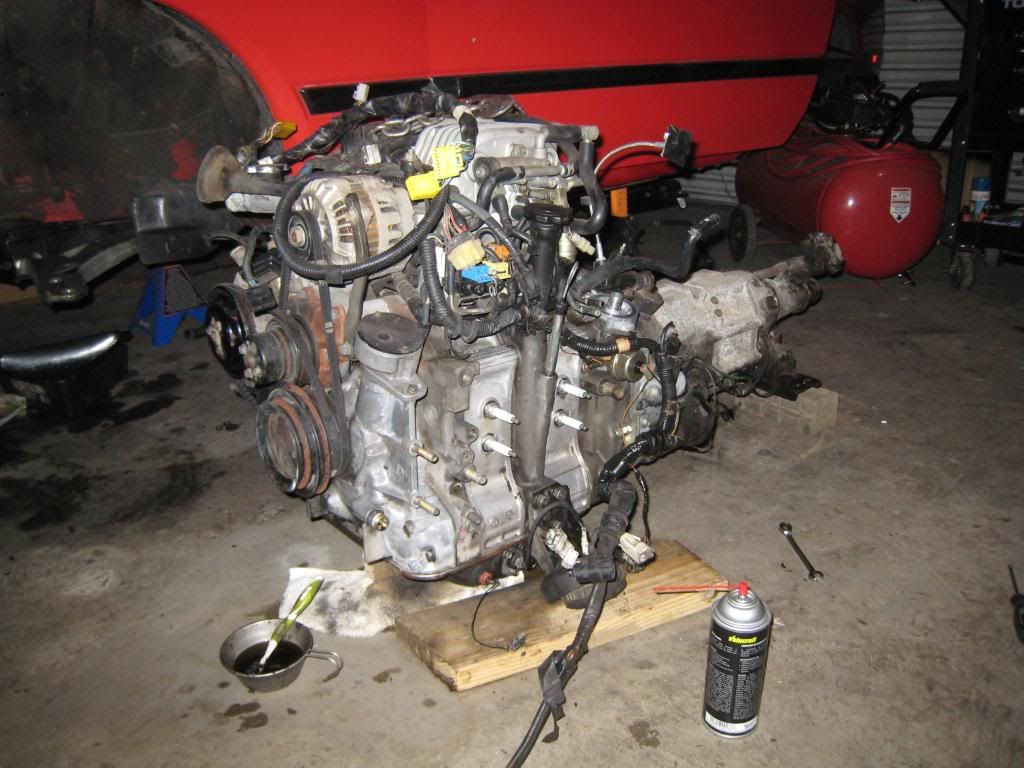
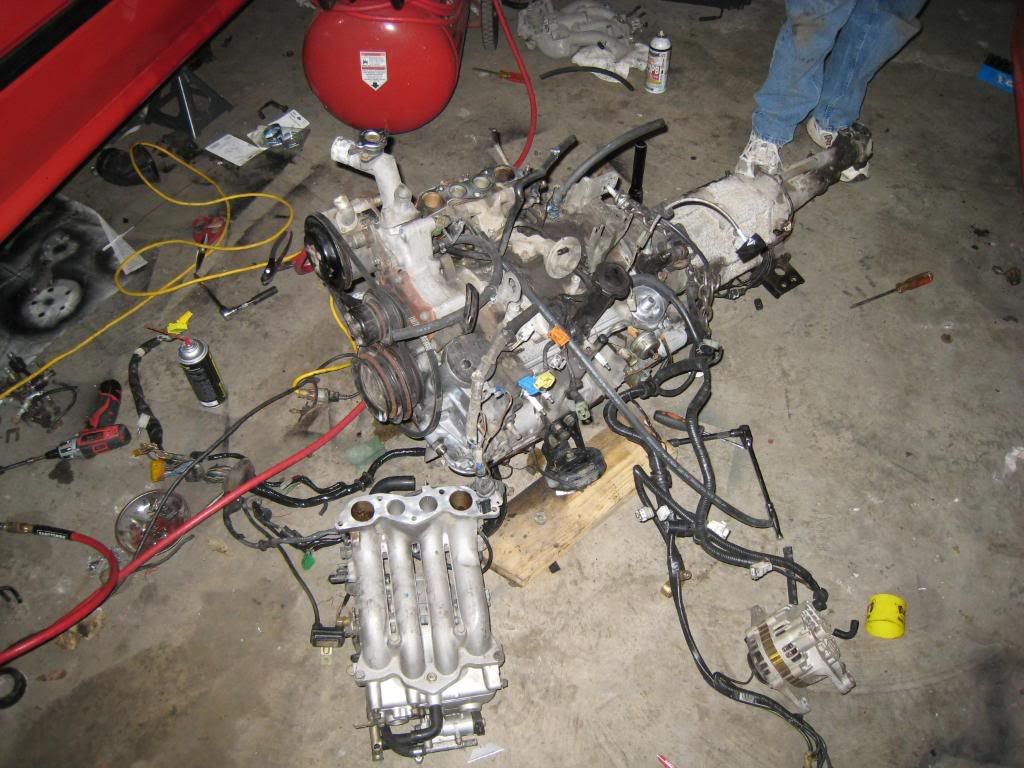
motor is out!

Now, this dirty, old, greasy, 177,000 mile motor...
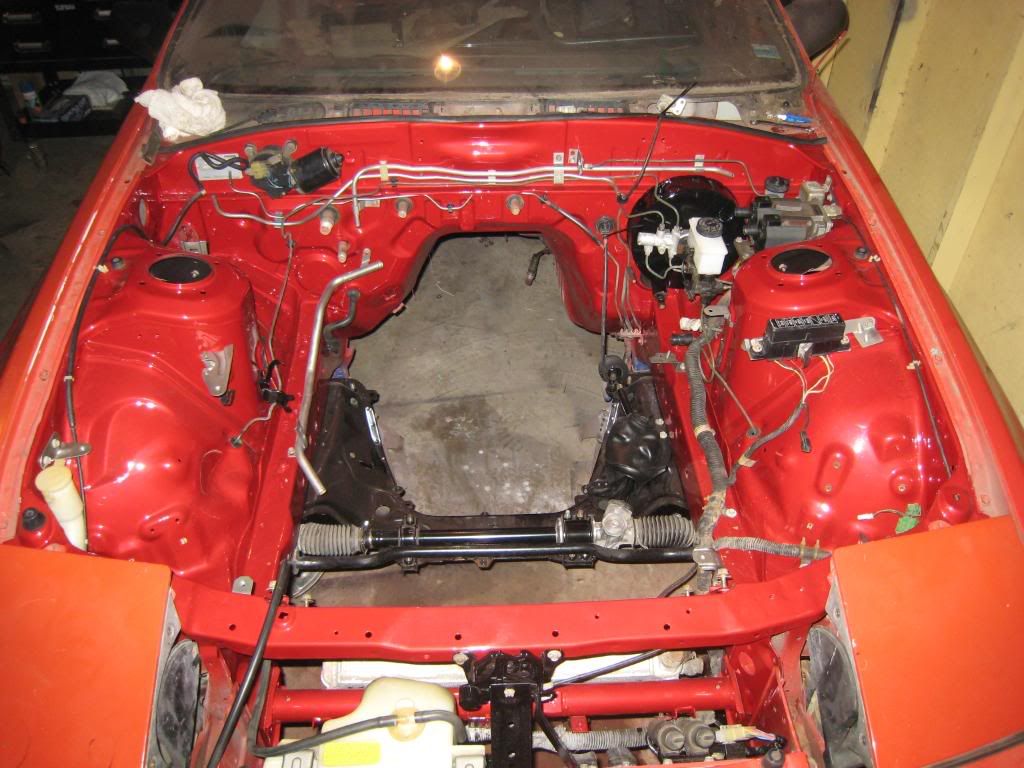
Is going into this pristine environment.
It's amazing how crazy some people are. I wish I could build my motor and paint the exterior now. But there is only so much money in the world, and even less in my bank account. I still have to figure out if I am going to make a new transmission cross member using the automatic mounts, or if I'm going to drill out the mounts from the cancer patient and weld them into the "new" body.
I also conquered the rear swing arm bushings. No thanks to you guys.
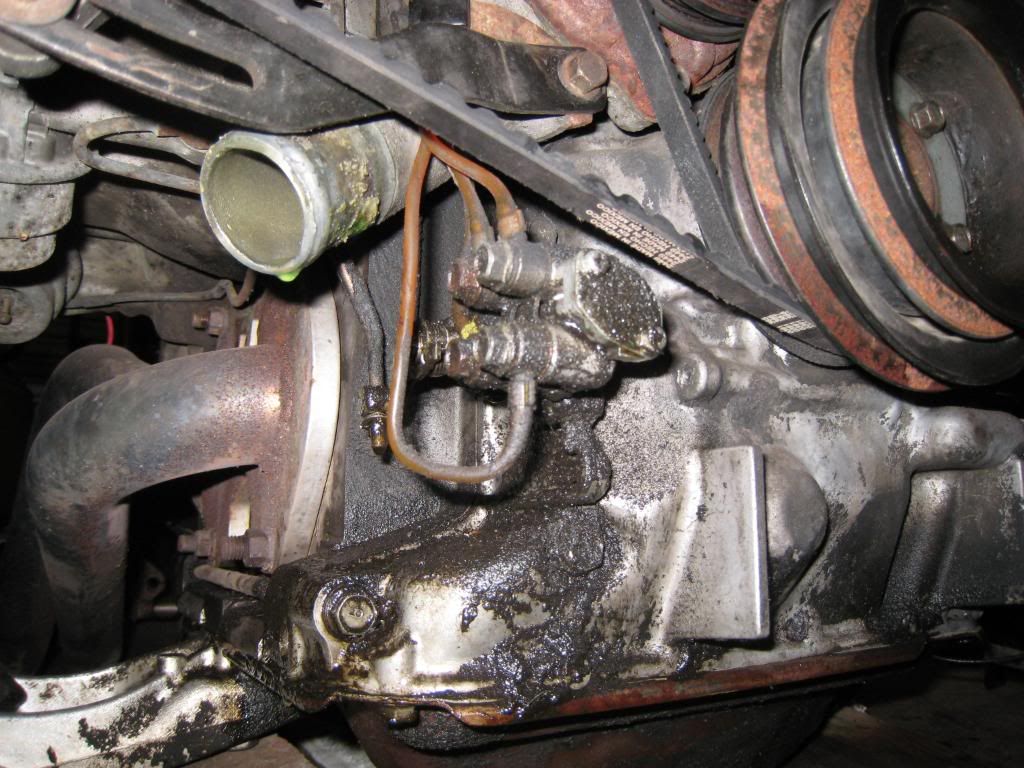
Which is more likely to leak, the front cover or the OMP? There is oil in that area and I would like to fix it before I install the motor.
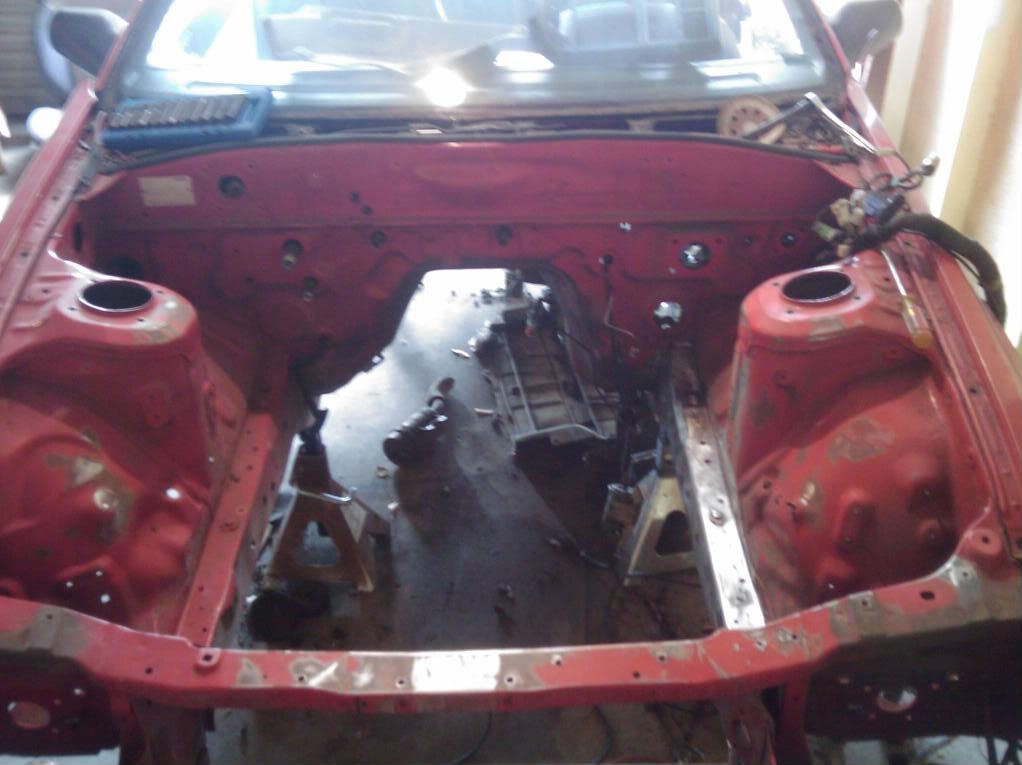
The pictures really don't do the engine bay any justice. Everything was either painted or scrubbed with solvent or soap. Nearly everything in there looks better than new. Under side of the car too.
I think I will be able to finish on time. There is still lots to do, but most things are going smoothly. It's 5:45 am now. I just got home and showered, but i am thinking of going back to the shop and just staying up all day. I could get a lot done, and I would hopefully get back on a semi-normal sleep schedule.
Now, this dirty, old, greasy, 177,000 mile motor...
Is going into this pristine environment.
It's amazing how crazy some people are. I wish I could build my motor and paint the exterior now. But there is only so much money in the world, and even less in my bank account. I still have to figure out if I am going to make a new transmission cross member using the automatic mounts, or if I'm going to drill out the mounts from the cancer patient and weld them into the "new" body.
I also conquered the rear swing arm bushings. No thanks to you guys.
Which is more likely to leak, the front cover or the OMP? There is oil in that area and I would like to fix it before I install the motor.
The pictures really don't do the engine bay any justice. Everything was either painted or scrubbed with solvent or soap. Nearly everything in there looks better than new. Under side of the car too.
I think I will be able to finish on time. There is still lots to do, but most things are going smoothly. It's 5:45 am now. I just got home and showered, but i am thinking of going back to the shop and just staying up all day. I could get a lot done, and I would hopefully get back on a semi-normal sleep schedule.
11-12-09, 05:49 AM
#47
Thanks man.
guess what I did today...
I also removed all the hard vac lines under the UIM. Then replaced all hoses with new. I was going to install this S5 UIM, but it wouldn't fit without modification. So I didn't in the interest of time.
I also used the ancient Japanese method to wrap every inch of wire in front of the fire wall. Body and motor. FYI it takes a tad over three rolls of electric tape.
There were some minor injuries dispite my best efforts. I had taped that styrofoam sheet, the kind used for packing, all over the firewall and sides of the bay. Then, over that I cut 7" strips of cardboard and taped over that. I had to take it off of the cross member when we got close.


The one on the red I think I'm going to leave alone. I might take a hobby paint brush just to cover the primer. No one will ever see it when everything is back in. the cross member though, I think I'm going to mask around it and spray a coat or two. It's past the primer and will rust.
A couple of questions. This shot of the differential shows how I installed it. I think I got it reversed. I looked in both manuals and could not find a diagram that showed the order. Can you guys help? I put the disk thing on bottom because there were marks on the mount that matched the little rubber nubs. but they don't touch the mount, so I don't know how those marks are there.

Then there is the motor mount. I though that there was only one of these little cups under the mount. I only have two total after taking apart two cars. My question is, should I install this cup under the engine mount on the drivers side? I installed one on the passenger side.

things are moving along. I think I might actually make my deadline. Tomorrow I'm going to fashion some temporary trans mounts. Not to drive, just to hold the tail in place. I think I'm going to take it to a fabricator a buddy knows really well. I really hope my shock boots come tomorrow so i can finish installing the suspension. They were supposed to be here today... err, yesterday.
these working until 5AM nights are messing with me. Oh well, still having fun.
guess what I did today...
I also removed all the hard vac lines under the UIM. Then replaced all hoses with new. I was going to install this S5 UIM, but it wouldn't fit without modification. So I didn't in the interest of time.
I also used the ancient Japanese method to wrap every inch of wire in front of the fire wall. Body and motor. FYI it takes a tad over three rolls of electric tape.
There were some minor injuries dispite my best efforts. I had taped that styrofoam sheet, the kind used for packing, all over the firewall and sides of the bay. Then, over that I cut 7" strips of cardboard and taped over that. I had to take it off of the cross member when we got close.
The one on the red I think I'm going to leave alone. I might take a hobby paint brush just to cover the primer. No one will ever see it when everything is back in. the cross member though, I think I'm going to mask around it and spray a coat or two. It's past the primer and will rust.
A couple of questions. This shot of the differential shows how I installed it. I think I got it reversed. I looked in both manuals and could not find a diagram that showed the order. Can you guys help? I put the disk thing on bottom because there were marks on the mount that matched the little rubber nubs. but they don't touch the mount, so I don't know how those marks are there.
Then there is the motor mount. I though that there was only one of these little cups under the mount. I only have two total after taking apart two cars. My question is, should I install this cup under the engine mount on the drivers side? I installed one on the passenger side.
things are moving along. I think I might actually make my deadline. Tomorrow I'm going to fashion some temporary trans mounts. Not to drive, just to hold the tail in place. I think I'm going to take it to a fabricator a buddy knows really well. I really hope my shock boots come tomorrow so i can finish installing the suspension. They were supposed to be here today... err, yesterday.
these working until 5AM nights are messing with me. Oh well, still having fun.
11-30-09, 12:57 AM
#48
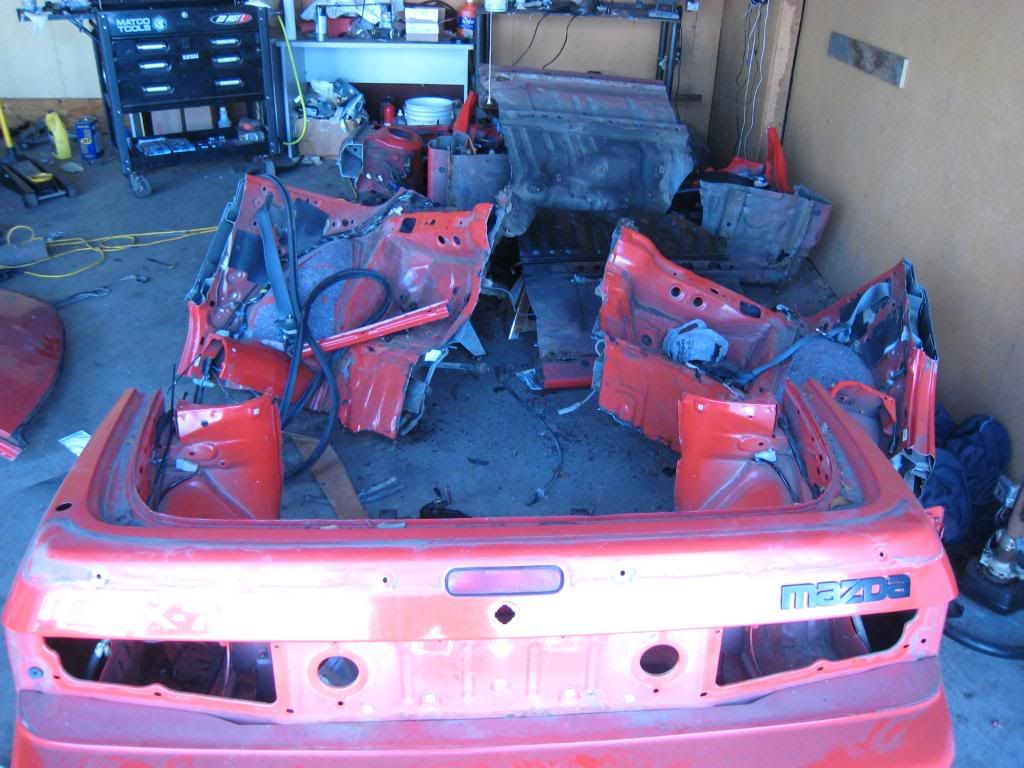
Well, I got pissed off and my anger got the better of me. I gave up in a fit of rage and look what i did.
Hah! you should have seen the look on your face!
No I didn't cutup all my work. and yes, I did finish on time. however the hectic deadline, work, and holidays prevented me from snapping picks and making one final entry.
I had moved out of my shop the day before the deadline to cost me an additional two hundred bones. I pulled a few 14 and 18 hours shifts to get it done. My wife offered to help. Being unskilled I had her polish my brake calipers and then thought it would be a good idea to make her feel useful by helping install the radiator. I handed her the ratchet and she let the handle swing around and smack the fresh paint on the fender. at least the MAF hides it. She felt badly and I did too. but when i heard that handle hit, I just froze for a moment, then had to tell her it was alright and walk out side for a moment.
Back on topic...
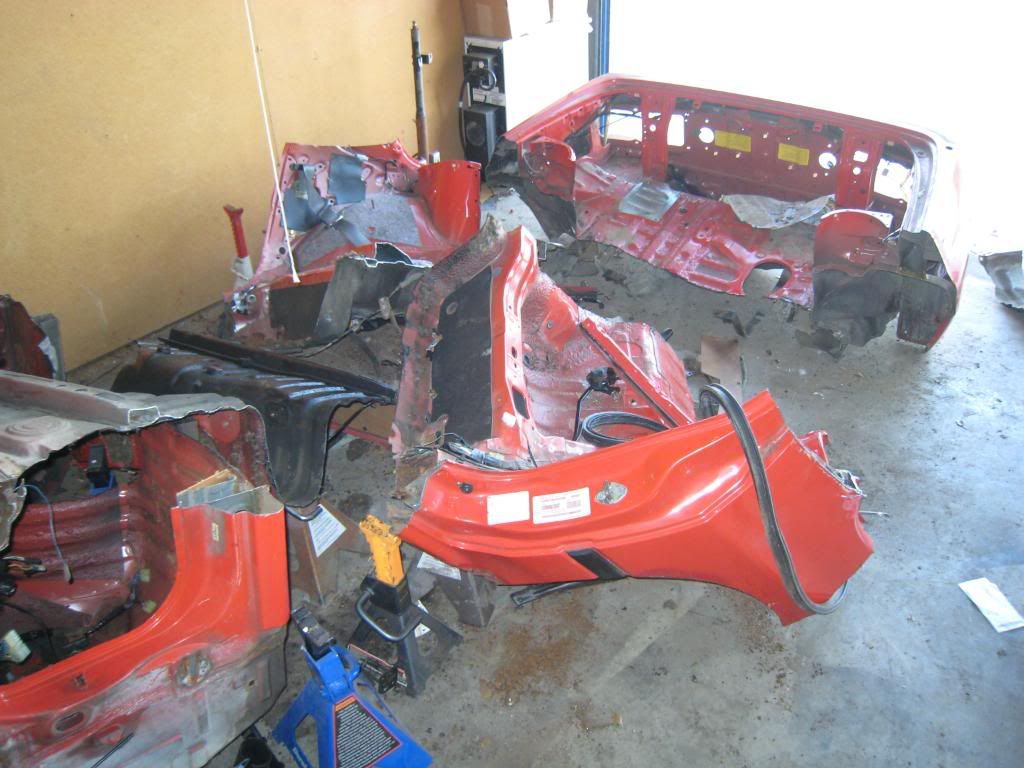
Cutting up the old car was fun. although more work than I thought it was going to be. My hands and fore arms were sore the next day. I just used a saws-all with a blade said to be used by fire and rescue. I believe it. I probably could have done the whole thing with one blade, but I did use the second to make cutting faster.
I had no major issues getting everything hooked up and running. I had trouble locating replacements for a couple special threaded nuts and other fasteners though.
I flushed the brake lines and used DOT 5 fluid. nothing fabulous to report on the fluid. the brakes feel as secure as they did in the cancer patient. I think they feel slightly firmer, but that is probably due to the stainless flex lines. as always I used Mobile 2 for every lubricant.
the day after it was on the ground and running. I took it to an alignment shop. He wouldn't do it because the rear camber is non adjustable as well as a few other things. I had to leave town for work by 11:30 so I decided not to leave it with him. but I turned my shocks myself and using the print out he gave me I made some adjustments to the front and rear toe. I didn't over do it and still need an alignment, but it's close enough that I don't have to worry while I wait for part from mazdatrix. i will be installing the rear toe eliminators too.
I love the suspension. at first I had it set way too firm. drove a 110 miles with the fronts on 3 and the rears on 6. filling up to go the 110 miles home, I turned them down to 1 in front and 2 in the back. for driving on the interstate and Memphis roads i really like the setup. I have not yet taken the car though any really twisty roads. I have a problem filling my gas tank. the pump immediately shuts off like the tank is full. I have fiddled and fudged to try and fix it. I will drop the tank and start over when the rain stops.
I have not yet installed the rest of the interior or passenger seat. I want to install some Dynamat and I have re-envisioned the stereo. I kept the rear hatch of the old car from the shock towers back. I'm going to build stealth fiberglass and wood encloses for a one 10" sub and an amp rack that will be stealth and hopefully very light. I liked the setup had, but this will be better. I will install the other seat so i can take my wife for a drive.
I also learned why my dash rattled so badly in the old car. every one of the mounts under the windshield had cracked and broken. so when i take out the windshield from "the new car" I will reinforce these points with fiberglass.
I also have a bolt in roll bar and 4 point belts. I think I'm going to install this too before I re-install the interior. but I'm going to weld it in.
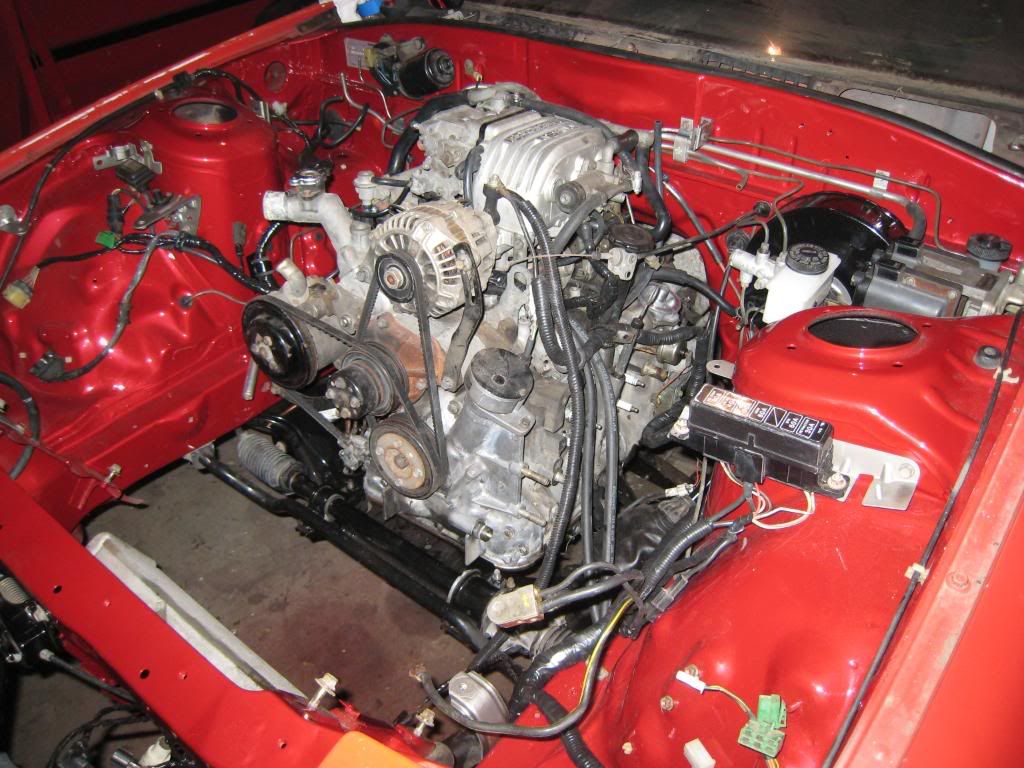
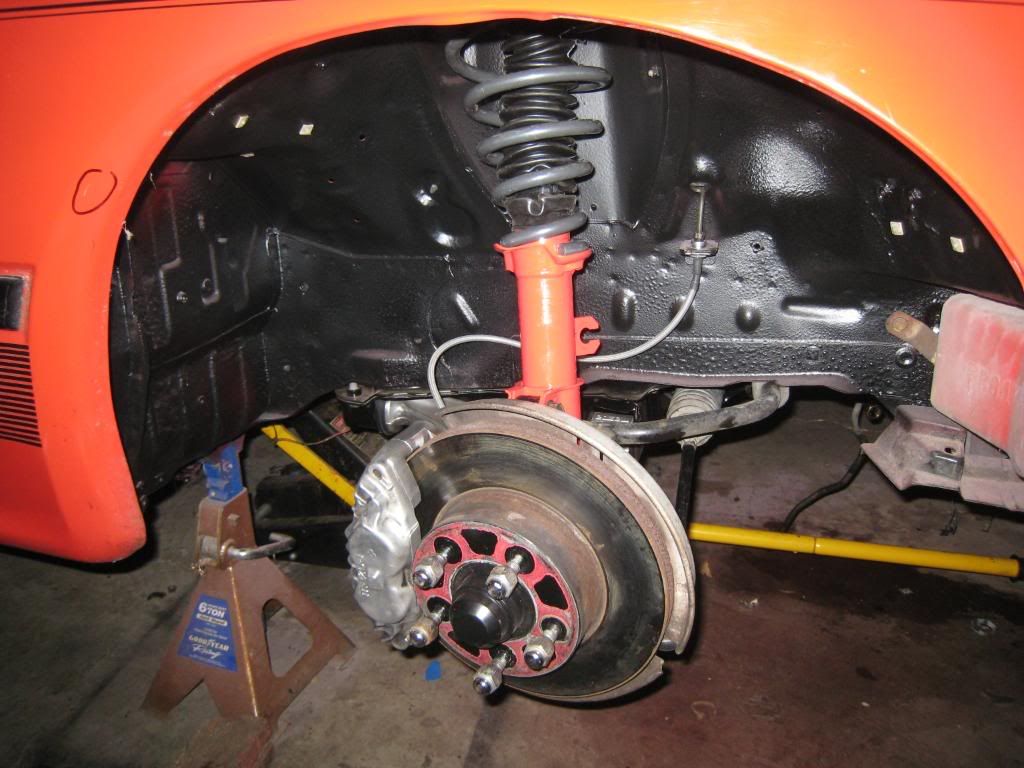
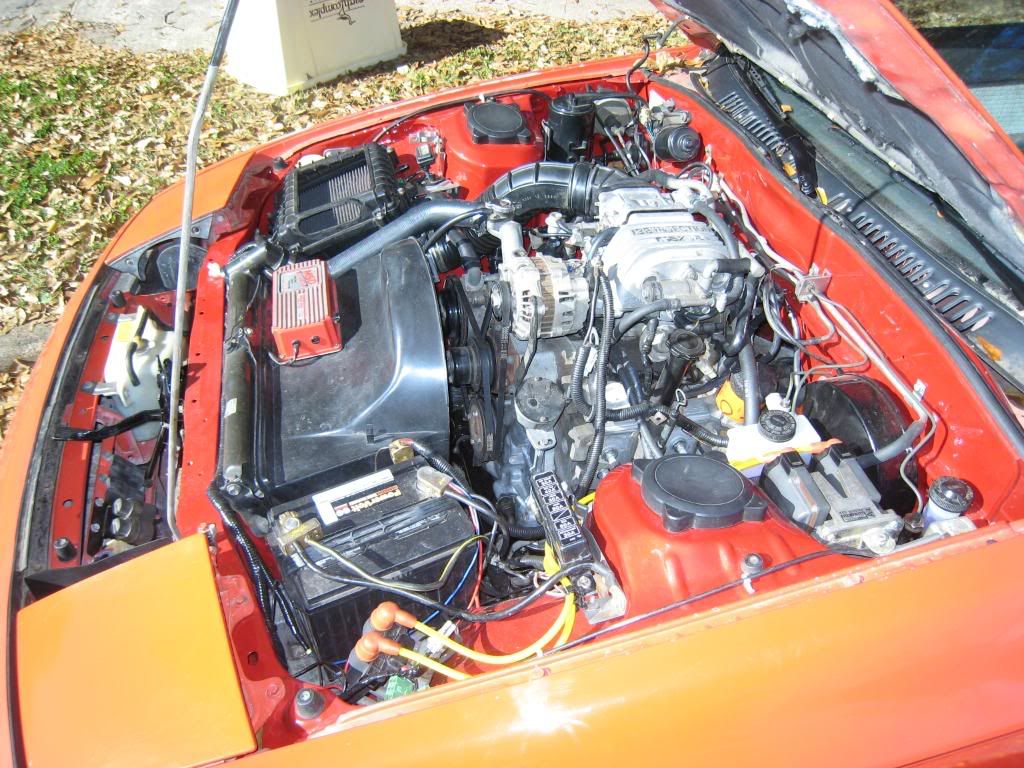
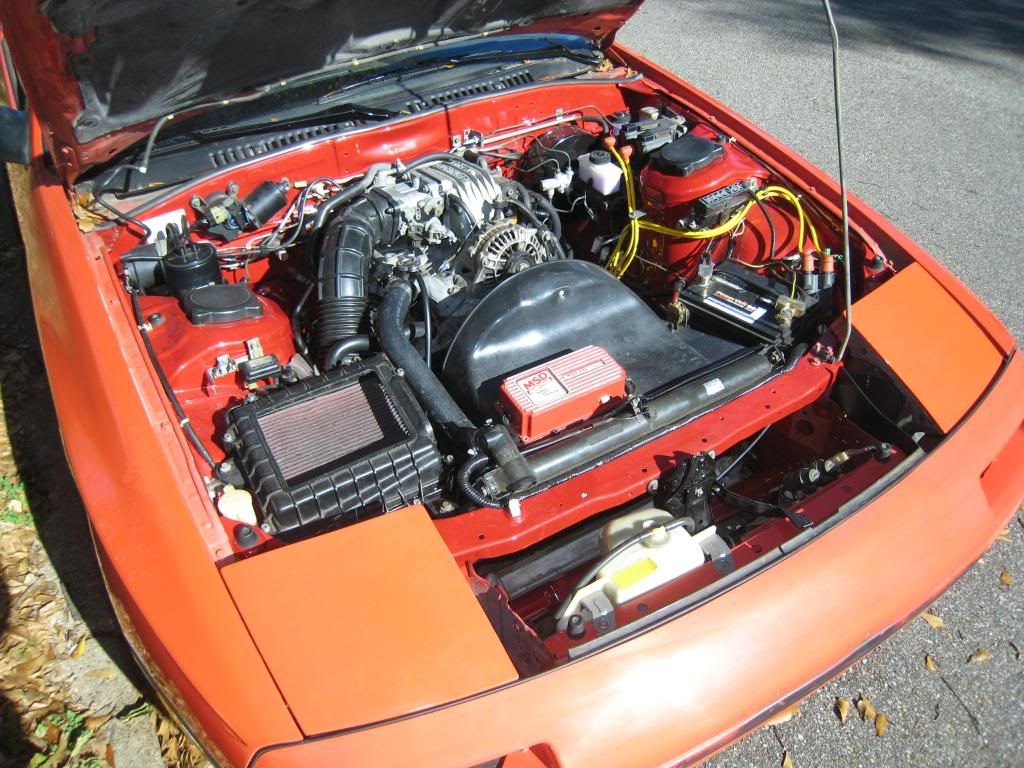
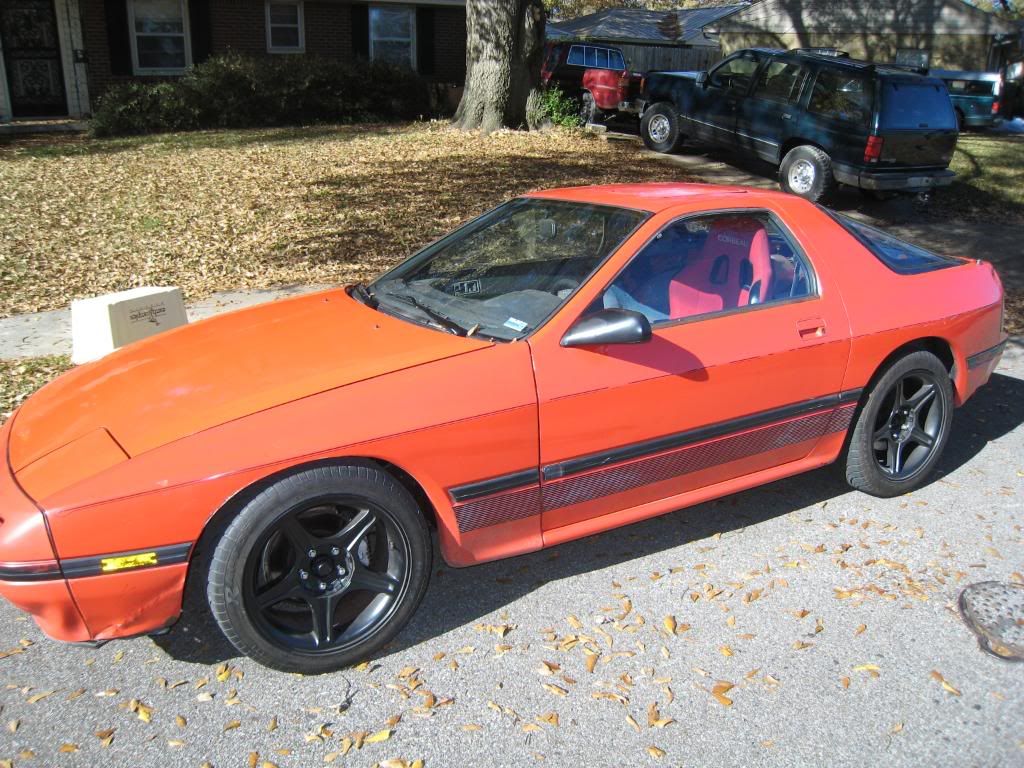
In the "Mission Accomplished" pics below, I snapped them quickly Turkey Day morning before we left (in another car) for family dinner. but that is an electric fan in the OE fan shroud. I found that I had better cooling when I mounted it this way from previous 7s. I also have a cone air filter, but I have a cold air box in mind. The car doesn't sit as low as i thought it would. I don't know what I expected from an .8" drop, but I really like the way it is. I love how the tires fill the fender. I did have to roll the lip of the fender because the tires were hitting it.
The car feels so much better. planted on the road. it really gives you a feeling of confidence that the car will do what you ask it to. more mods will come of course, and i will show you my progress on the exterior paint and what ever else.
Hah! you should have seen the look on your face!
No I didn't cutup all my work. and yes, I did finish on time. however the hectic deadline, work, and holidays prevented me from snapping picks and making one final entry.
I had moved out of my shop the day before the deadline to cost me an additional two hundred bones. I pulled a few 14 and 18 hours shifts to get it done. My wife offered to help. Being unskilled I had her polish my brake calipers and then thought it would be a good idea to make her feel useful by helping install the radiator. I handed her the ratchet and she let the handle swing around and smack the fresh paint on the fender. at least the MAF hides it. She felt badly and I did too. but when i heard that handle hit, I just froze for a moment, then had to tell her it was alright and walk out side for a moment.
Back on topic...
Cutting up the old car was fun. although more work than I thought it was going to be. My hands and fore arms were sore the next day. I just used a saws-all with a blade said to be used by fire and rescue. I believe it. I probably could have done the whole thing with one blade, but I did use the second to make cutting faster.
I had no major issues getting everything hooked up and running. I had trouble locating replacements for a couple special threaded nuts and other fasteners though.
I flushed the brake lines and used DOT 5 fluid. nothing fabulous to report on the fluid. the brakes feel as secure as they did in the cancer patient. I think they feel slightly firmer, but that is probably due to the stainless flex lines. as always I used Mobile 2 for every lubricant.
the day after it was on the ground and running. I took it to an alignment shop. He wouldn't do it because the rear camber is non adjustable as well as a few other things. I had to leave town for work by 11:30 so I decided not to leave it with him. but I turned my shocks myself and using the print out he gave me I made some adjustments to the front and rear toe. I didn't over do it and still need an alignment, but it's close enough that I don't have to worry while I wait for part from mazdatrix. i will be installing the rear toe eliminators too.
I love the suspension. at first I had it set way too firm. drove a 110 miles with the fronts on 3 and the rears on 6. filling up to go the 110 miles home, I turned them down to 1 in front and 2 in the back. for driving on the interstate and Memphis roads i really like the setup. I have not yet taken the car though any really twisty roads. I have a problem filling my gas tank. the pump immediately shuts off like the tank is full. I have fiddled and fudged to try and fix it. I will drop the tank and start over when the rain stops.
I have not yet installed the rest of the interior or passenger seat. I want to install some Dynamat and I have re-envisioned the stereo. I kept the rear hatch of the old car from the shock towers back. I'm going to build stealth fiberglass and wood encloses for a one 10" sub and an amp rack that will be stealth and hopefully very light. I liked the setup had, but this will be better. I will install the other seat so i can take my wife for a drive.
I also learned why my dash rattled so badly in the old car. every one of the mounts under the windshield had cracked and broken. so when i take out the windshield from "the new car" I will reinforce these points with fiberglass.
I also have a bolt in roll bar and 4 point belts. I think I'm going to install this too before I re-install the interior. but I'm going to weld it in.
In the "Mission Accomplished" pics below, I snapped them quickly Turkey Day morning before we left (in another car) for family dinner. but that is an electric fan in the OE fan shroud. I found that I had better cooling when I mounted it this way from previous 7s. I also have a cone air filter, but I have a cold air box in mind. The car doesn't sit as low as i thought it would. I don't know what I expected from an .8" drop, but I really like the way it is. I love how the tires fill the fender. I did have to roll the lip of the fender because the tires were hitting it.
The car feels so much better. planted on the road. it really gives you a feeling of confidence that the car will do what you ask it to. more mods will come of course, and i will show you my progress on the exterior paint and what ever else.
11-30-09, 10:18 PM
#49
zoom zoom go boom
I noticed your running your msd box in the exact same spot I am...copycat. lol j/k
But no seriously though it came out good. What was that leak from btw? Was it the omp?
Oh, and did the door handles get missed by the sawzall? Looks like you had fun with that part.
But no seriously though it came out good. What was that leak from btw? Was it the omp?
Oh, and did the door handles get missed by the sawzall? Looks like you had fun with that part.