NA eFan Install
#1
NA eFan Install
Today I finally completed the third part of this summer's engine bay upgrade- installing the efan.
Previously I fabbed up an ambient air intake, deleted the power steering and AC and relocated the battery.
I don't want to get into the debate about clutch v. electric fan, I probably would have stayed with the stock setup had my fan clutch not started to fail but I must admit that the aesthetics of the electric fan were always appealing to me and sooner or later I would have swapped one in anyway.
Now seemed like a good time as the weather is still nice and I hate working in the freezing cold.
Everyone always raves about the efficacy of the Ford Taurus fan, especially the two speed version, so that's what I set out to find.
Unfortunately, there is not a single car in my favorite junkyard with a radiator in place...I assume they are all pulled for the scrap value- and the guys who pull them are not gentle.
Anything that's in the way gets ripped out- literally.
Thus, finding a fan that hasn't been mangled is very difficult.
In fact, finding a fan that's still in the original car ain't common either..they lay strewn about and it's impossible to tell from whence they came.
The only clue as to origin is the layout of the yard itself- cars are more or less organized by manufacturer and because the Taurus was so popular (although only God knows why...), there is a large contingent of them all in the same place.
Every time I visit the yard I cruise this section and today I finally scored what I think is the fabled fan...
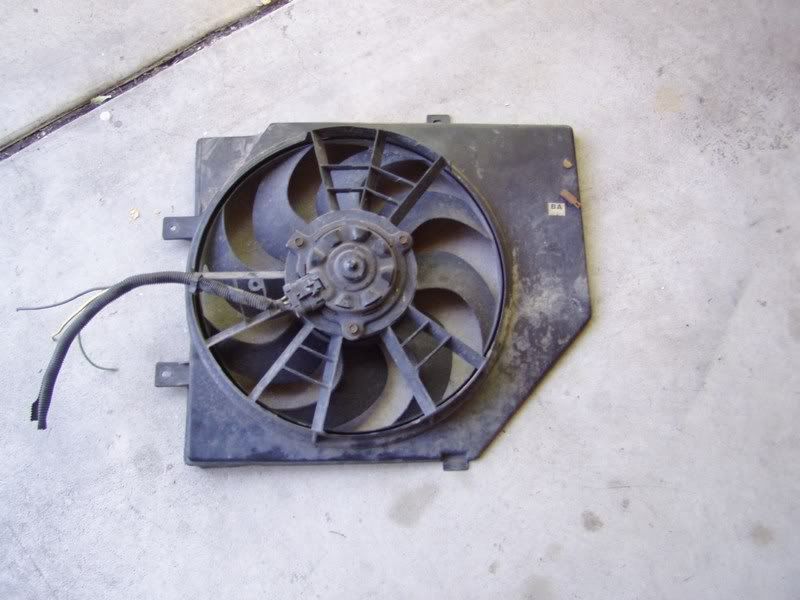
If it isn't a Taurus fan, at least the shroud was undamaged, it is a two speed motor and it's the perfect size so I snagged it for the princely sum of $10.
So, that's one part of the puzzle in place.
Now for the hard part...how to trigger the fan?
I really wanted a sensor that was actually in contact with the coolant but NA's do not have a readily accessible place to put one...or do they?
Well in fact, yes, they do- but first, the sensor itself...

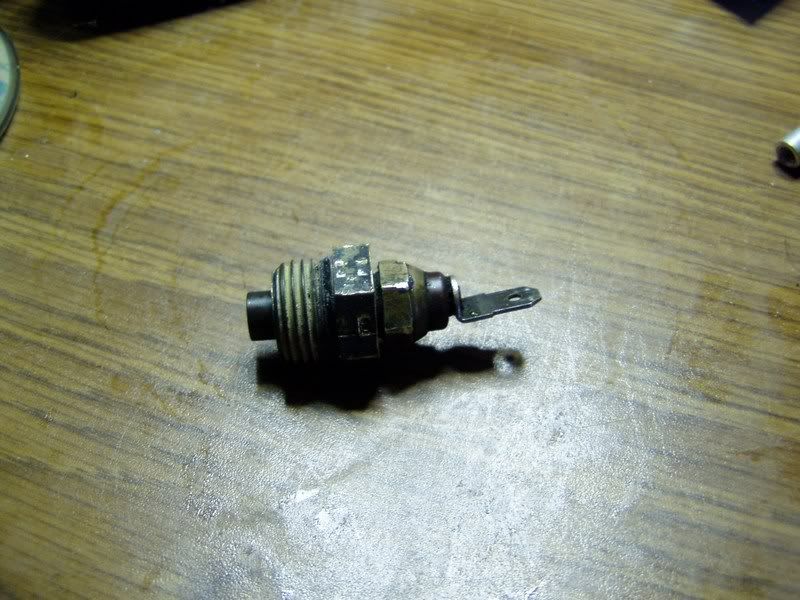
This little honey is a stock Mazda accessory fan trigger, commonly used on AC equipped cars and installed (on Turbo models) in the thermostat housing/upper rad hose fitting...which naturally, will not interchange with a NA unit.
Why this is, I have no idea- it seems contrary and wasteful but there you have it.
So, where to put it?
Looking at some irons at my mechanic's shop I spied a threaded fitting hidden underneath the AC/PS bracket, almost obscured by the oil cooler hose.
It's a 8mm blind plug and looked very close in size to the trigger pictured above.
I could find no mention of it's use anywhere but Mike said that he'd heard it was for a block heater and an inspection of the iron shows that it does indeed open into a coolant passage before the thermostat and would be perfect...if the sensor fits.
Glory be!
It threaded right in.

This will only work if you've deleted the AC/PS, BTW.
So now the fan is in place and the trigger/sensor is positioned- all that's left is to wire her up.
Naturally, there will be a relay (fused) and trigger power (which is ignition controlled- the fan does not run with the car off) came from the green test connector by the front coils, but what to do about the two speeds...I only have one sensor?
After mulling my options I decided to simply install a ON-OFF-ON toggle switch.
This switch is interposed between the Load power from the relay and the fan itself.
Basically, it just connects either the low or the high speed lead to the fan depending on toggle position.
I'm calling it Winter/Summer and we'll see how that works out...

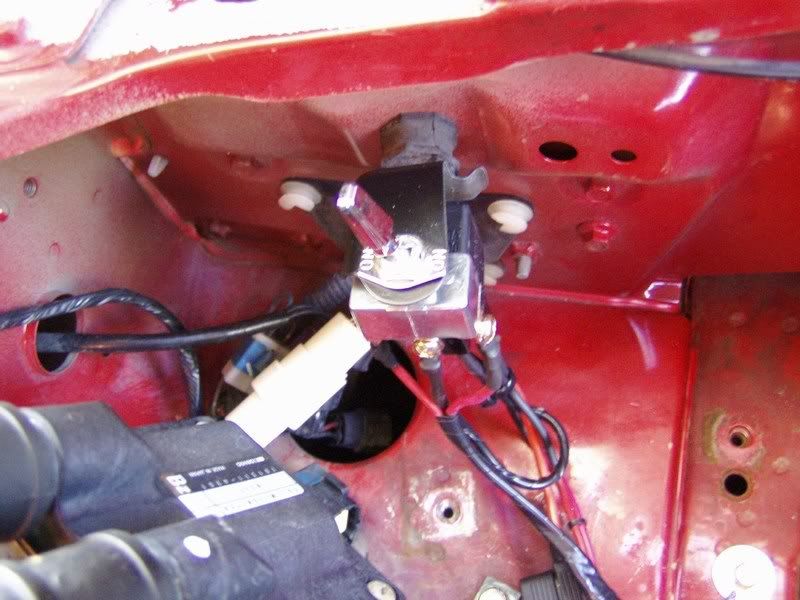
The theory is that during colder months the lower speed should suffice and then the high speed can be engaged as needed during warmer times.
That's the theory...
Installing the fan was cake...a bit of bracketry and on she went...
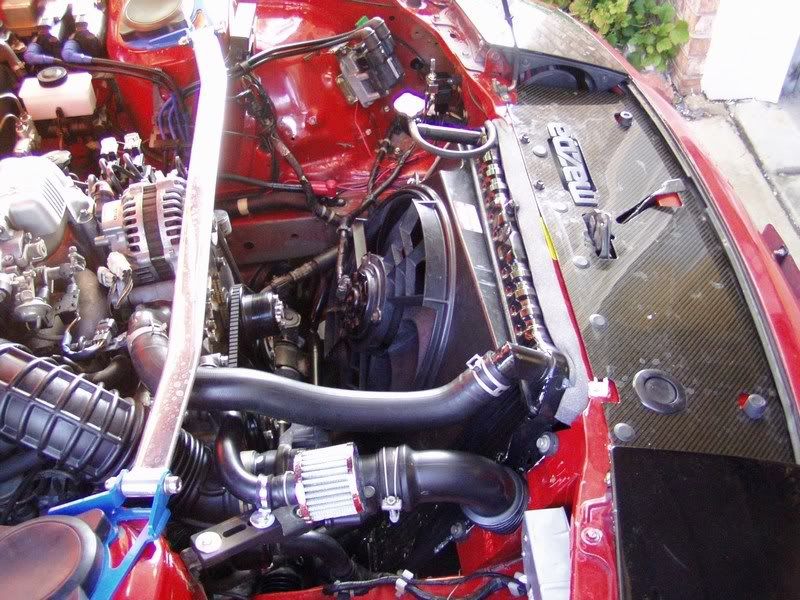
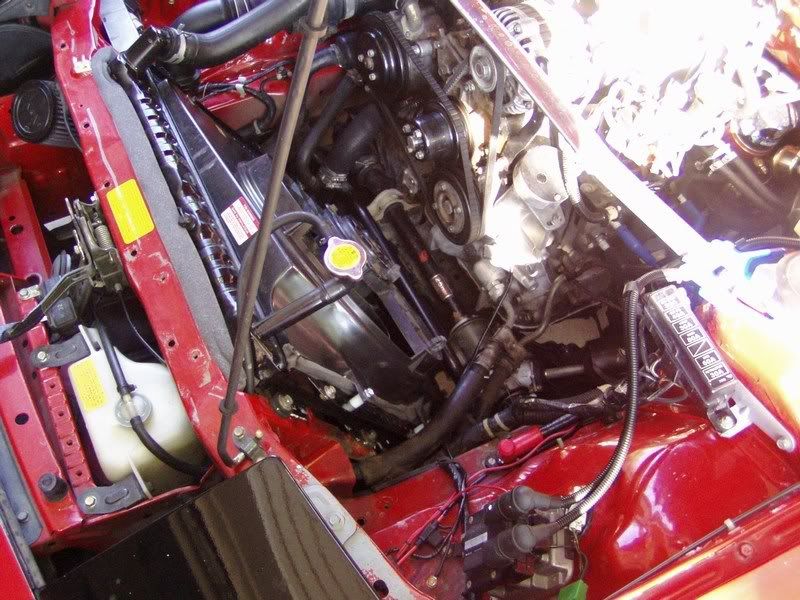
And there you have it.
*a note about the sensor...
These ND sensors are all over many Japanese cars- you needn't look at just Turbo Mazdas.
The one I ended up using actually came off a Toyota.
It seems that the trigger temp is different- depending on usage- but the sensors are all physically identical and so, they'll interchange.
I tried to find info using the markings on the sensors themselves (I pulled several), but nothing came up so I resorted to simply installing them one at a time and seeing when they came on.
Crude, but effective.
The one I'm now using comes on at @195°- which is too early.
The Mazda part comes on at 210° which would be about perfect, I think...now to find one (the one pictured- from a real RX Turbo- was a dud...did not trigger the fan...sigh).
Previously I fabbed up an ambient air intake, deleted the power steering and AC and relocated the battery.
I don't want to get into the debate about clutch v. electric fan, I probably would have stayed with the stock setup had my fan clutch not started to fail but I must admit that the aesthetics of the electric fan were always appealing to me and sooner or later I would have swapped one in anyway.
Now seemed like a good time as the weather is still nice and I hate working in the freezing cold.
Everyone always raves about the efficacy of the Ford Taurus fan, especially the two speed version, so that's what I set out to find.
Unfortunately, there is not a single car in my favorite junkyard with a radiator in place...I assume they are all pulled for the scrap value- and the guys who pull them are not gentle.
Anything that's in the way gets ripped out- literally.
Thus, finding a fan that hasn't been mangled is very difficult.
In fact, finding a fan that's still in the original car ain't common either..they lay strewn about and it's impossible to tell from whence they came.
The only clue as to origin is the layout of the yard itself- cars are more or less organized by manufacturer and because the Taurus was so popular (although only God knows why...), there is a large contingent of them all in the same place.
Every time I visit the yard I cruise this section and today I finally scored what I think is the fabled fan...

If it isn't a Taurus fan, at least the shroud was undamaged, it is a two speed motor and it's the perfect size so I snagged it for the princely sum of $10.
So, that's one part of the puzzle in place.
Now for the hard part...how to trigger the fan?
I really wanted a sensor that was actually in contact with the coolant but NA's do not have a readily accessible place to put one...or do they?
Well in fact, yes, they do- but first, the sensor itself...

This little honey is a stock Mazda accessory fan trigger, commonly used on AC equipped cars and installed (on Turbo models) in the thermostat housing/upper rad hose fitting...which naturally, will not interchange with a NA unit.
Why this is, I have no idea- it seems contrary and wasteful but there you have it.
So, where to put it?
Looking at some irons at my mechanic's shop I spied a threaded fitting hidden underneath the AC/PS bracket, almost obscured by the oil cooler hose.
It's a 8mm blind plug and looked very close in size to the trigger pictured above.
I could find no mention of it's use anywhere but Mike said that he'd heard it was for a block heater and an inspection of the iron shows that it does indeed open into a coolant passage before the thermostat and would be perfect...if the sensor fits.
Glory be!
It threaded right in.

This will only work if you've deleted the AC/PS, BTW.
So now the fan is in place and the trigger/sensor is positioned- all that's left is to wire her up.
Naturally, there will be a relay (fused) and trigger power (which is ignition controlled- the fan does not run with the car off) came from the green test connector by the front coils, but what to do about the two speeds...I only have one sensor?
After mulling my options I decided to simply install a ON-OFF-ON toggle switch.
This switch is interposed between the Load power from the relay and the fan itself.
Basically, it just connects either the low or the high speed lead to the fan depending on toggle position.
I'm calling it Winter/Summer and we'll see how that works out...


The theory is that during colder months the lower speed should suffice and then the high speed can be engaged as needed during warmer times.
That's the theory...
Installing the fan was cake...a bit of bracketry and on she went...


And there you have it.
*a note about the sensor...
These ND sensors are all over many Japanese cars- you needn't look at just Turbo Mazdas.
The one I ended up using actually came off a Toyota.
It seems that the trigger temp is different- depending on usage- but the sensors are all physically identical and so, they'll interchange.
I tried to find info using the markings on the sensors themselves (I pulled several), but nothing came up so I resorted to simply installing them one at a time and seeing when they came on.
Crude, but effective.
The one I'm now using comes on at @195°- which is too early.
The Mazda part comes on at 210° which would be about perfect, I think...now to find one (the one pictured- from a real RX Turbo- was a dud...did not trigger the fan...sigh).
#2
Nice write up Clokker! I'm always glad when members put up pictures of their project. I too plan on deleting the a/c and p/s and installing an electic fan. I actually already have a taurus shroud with a 16" perma-cool fan all ready to drop in. My original plan was to run it off the ignition switch, but that would mean it would run all the time. Since I live in AZ, I figured that wouldn't be too much of a problem considering it's HOT here all the time. After reading your thread, I'm thinking I'll give this a shot. Now, to try and find a sensor...
#3
Lives on the Forum
iTrader: (7)
Joined: Dec 2003
Posts: 6,598
Likes: 9
From: Temple, Texas (Central)
Excellent writeup, especially since I am looking at doing this in the very near future (sick of failing fan clutches.) I will probably wire it up differently. I'd like to rig up something with TTL logic to account for the a/c being on, but its probably more trouble that its worth.
I did find one problem, though: I think you want the fan coming on MUCH sooner than 210, even sooner than 195, probably in the neighbor hood of 180-185. Remember, the stock accessory fan is in ADDITION to the stock cluched fan, so it only needs to come on when the stock fan is overwhelmed. Waiting until 210 for it to kick on means that the engine will get to 210+, which seems like a bad idea to me.
One more thing, do you have an exact model for the car that sensor came from?
#4
Sideways, I see your point but...
Having the fan kick in earlier then it does now would seem to lead to a battle between the fan and the thermostat.
*BTW, my entire cooling system is new- pump, rad, thermostat, hoses and cap*
If the thermostat opens at 180° and the fan kicks at 185° then the thermostat will start to close, the fan goes off, thermostat reopens...etc., etc.
Besides, the sensors don't close at the same temps they open.
This one seems to close at @185°.
RotaryResurrection has been running the Mazda sensor (opens at 210°, close @190°) and seems quite pleased.
I'll be playing with different sensors (it takes but a minute to swap and you only lose about a pint or so of coolant) and see what happens.
I believe the sensor came from a late 80's Corolla but I could be wrong...I looked at over a hundred cars that day and was only focusing on the thermostat housings (that's where everyone puts 'em).
#6
I would be scared to put the sensor on the cold side of the cooling system. That sensor is usually located at the top of the thermostat housing on the HOT side of the cooling system. You just installed it on the COLD side so now the hot side will be MUCH hotter then before.
You don't unless you are running a colder thermostat. The stock thermostat opens at around 180*F. Having the fan turn on at 200-210*F is perfectly safe. Otherwise your fan will be running ALL the time even while driving since the temp will never get below 180-185.
This is one of the CONs about an electric fan. Unless you have a PWM controller, then fan should only come on at around 195-210 on the HOT side.
Looks good though.
even sooner than 195, probably in the neighbor hood of 180-185.
so it only needs to come on when the stock fan is overwhelmed. Waiting until 210 for it to kick on means that the engine will get to 210+, which seems like a bad idea to me.
Looks good though.
#7
I would be scared to put the sensor on the cold side of the cooling system. That sensor is usually located at the top of the thermostat housing on the HOT side of the cooling system. You just installed it on the COLD side so now the hot side will be MUCH hotter then before.
I don't think that could be construed as the "cold side" of the system at all.
Trending Topics
#8
That side is the return side since its returning from the radiator. Its already been cooled which is why I call it the cold side.
This link has a diagram in it
http://howto.globalvicinity.com/gv_w...=192&co=1&vi=1
The bottom of the block and toward the exhaust ports is where the hot side is.
This link has a diagram in it
http://howto.globalvicinity.com/gv_w...=192&co=1&vi=1
The bottom of the block and toward the exhaust ports is where the hot side is.
#9
To me, it sure looks like it's located in the return to the thermostat, not the outflow from the rad.
But really, does it matter?
I have an aftermarket temp gauge with the sensor screwed into the stock location and it shows the fan kicking in at @190-195°, so it's not like the coolant is getting overly hot before the fan starts anyway.
Admittedly, I have very little time on this install as yet, so longer term data is not available.
I am actively searching for another thermostat cover/radiator hose fitting- definitely metal instead of the S5's plastic- to adapt to the engine.
If successful, I'll be able to run a second fan trigger and water temp sensor in that location (which you prefer) and see what happens.
The obstacle here is the hose size...1 1/2" ID hose is pretty uncommon these days, so properly oriented and sized parts are not easy to find.
I'll get it eventually...
#10
#11
Yes, I know but it's just a copy of the stocker done in metal.
It's lacking the bungs for any sensors and still positions the hose outlet such that the Mazda (i.e.- expensive) upper hose is needed.
My hope is to not only be able to fit sensors but reposition the outlet so a straight hose can be used.
It's lacking the bungs for any sensors and still positions the hose outlet such that the Mazda (i.e.- expensive) upper hose is needed.
My hope is to not only be able to fit sensors but reposition the outlet so a straight hose can be used.
#12
#13
#15
But really, does it matter?

#18
So, your point is well taken but has been rendered moot by a fortuitous discovery at the junkyard today.
I managed to score the thermostat cover* I'd dreamed of- low profile, all metal, already drilled/tapped for a fan trigger AND a water temp sensor (now I can run both the stock and aftermarket gauge...it is somewhat disconcerting to see the stock gauge not moving at all).
All I need to do is fab up an adaptor plate to mount it...need some 1/2" aluminum plate and a bit of hardware.
Once installed I'll need to rewire the setup anyway and I'll make you proud and move the switch(es)** indoors.
Here's the part...

I partially installed a water temp sensor just to confirm fitment and you can see the bung for the switch sensor at the top.
* The part is from a '92 Mitsubishi Galant and is only marginally smaller (exactly 1/8") in diameter than the stocker- hopefully a non-issue...we'll see.
**Considering adding a second switch so I can change-on the fly, as it were- from high to low fan speed and from upper to lower trigger sensor. Or, I could add a second relay and use both triggers- one for each speed. Not sure how the wiring for this might work though.
This all may be stupid overkill, I'll see how it goes after the parts are installed and I've run her in all possible configurations.
#23
Silly, isn't it?
Originally Posted by GarageAlchemist
cut your own and make one with the correct bungs on it.
Which is what I'm doing.
If all goes well, should be done by tomorrow night.
#24
I forget he needed a S5 one. That T-stat housing pictured threw me off. Sorry
I have seen adaptors that fit in the coolent hoses at summitracing for thermosensors/switches.
You could also use a Simple Voltage Switch and use the stock thermosensor to get the temperature.
Click here for more info on wiring the electric fan.
I have seen adaptors that fit in the coolent hoses at summitracing for thermosensors/switches.
You could also use a Simple Voltage Switch and use the stock thermosensor to get the temperature.
Click here for more info on wiring the electric fan.
#25
OK folks, more progress- of a sort.
The new thermostat housing is installed and along with it the trigger switch has been relocated.
First though I decided that it was silly to have multiple thermoswitches installed which left me with a hole to fill.
Rather than reinstall the blind plug I took one of my bad thermoswitches, chucked it up in the lathe and drilled/tapped it for 1/8 NPT.
Then I installed the original gauge cluster's temp sender...so now I have two functioning water temp gauges.
Then I started on the adaptor needed to mount the new housing.
I had a sheet of 1/4" aluminum and decided to try using it.
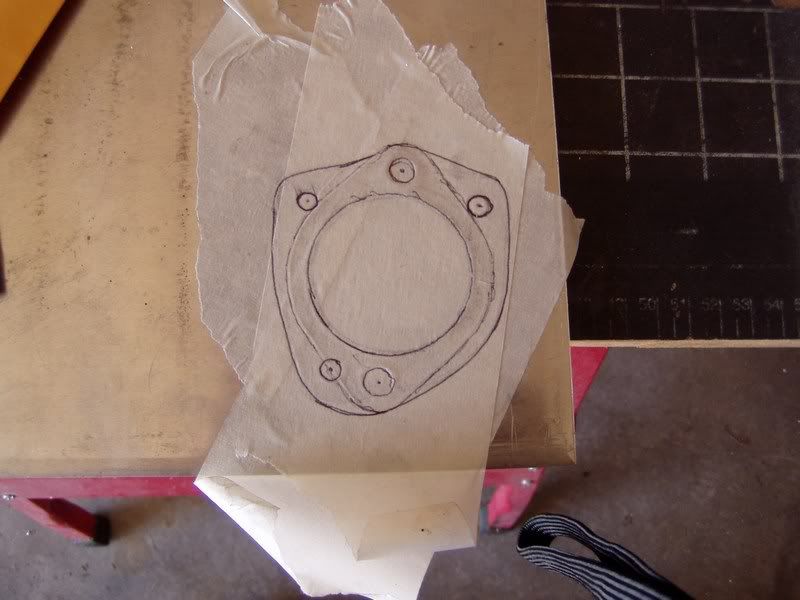
First I made templates of both the original and the new housing using masking tape.
I laid the stocker's template onto the ally and then overlaid that with the new housing's template, keeping the alignment of the new one facing the proper direction.
That gives us this...
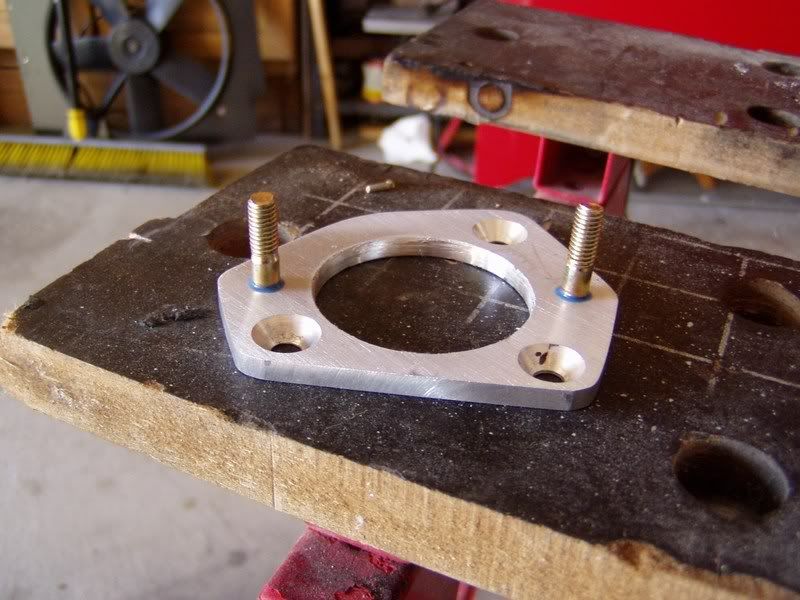
Then I drilled/tapped and countersunk as appropriate...

The center hole was cut using an adjustable hole saw on a drill press.
Then I cut it out (jigsaw) and gave the edges a quick pass on a belt sander.
Now we have this...
And the unit installed...


For the nonce I'm using the stock upper hose which was cut down but the hunt begins for a better fitting (and with any luck, one with two different diameter ends...) hose.
NAPA will prolly be my first stop for this.
Now, how did it work.
Well, fine actually, BUT- there is absolutely NO DIFFERENCE in fan actuation between this trigger location and my original spot in the lower front iron.
It still kicks the fan at EXACTLY the same indicated temp so, RotaMan, I am now absolutely certain that the spot I chose at the beginning of this thread is perfectly suitable and in no way "on the cold side" of the system.
In fact, this sensor location suffers from the same objection people raise when someone wants to install a temp gauge sensor in this same spot...what happens if the thermostat fails to open?
In my case, the fan will never turn on.
Honestly though, I'm not really too concerned with that ATM, and will leave things as they are for a while and see how it goes.
After all this work the only benefit I see from relocating the sensor is that I now have all my gauges functional again and the somewhat worrisome plastic S5 housing is gone.
All in all, given what I know now, I would have left as is but knowledge ain't free and I guess it was worth confirming.
I think I'm finished now...
The new thermostat housing is installed and along with it the trigger switch has been relocated.
First though I decided that it was silly to have multiple thermoswitches installed which left me with a hole to fill.
Rather than reinstall the blind plug I took one of my bad thermoswitches, chucked it up in the lathe and drilled/tapped it for 1/8 NPT.
Then I installed the original gauge cluster's temp sender...so now I have two functioning water temp gauges.

Then I started on the adaptor needed to mount the new housing.
I had a sheet of 1/4" aluminum and decided to try using it.
First I made templates of both the original and the new housing using masking tape.
I laid the stocker's template onto the ally and then overlaid that with the new housing's template, keeping the alignment of the new one facing the proper direction.
That gives us this...

Then I drilled/tapped and countersunk as appropriate...

The center hole was cut using an adjustable hole saw on a drill press.
Then I cut it out (jigsaw) and gave the edges a quick pass on a belt sander.
Now we have this...

And the unit installed...


For the nonce I'm using the stock upper hose which was cut down but the hunt begins for a better fitting (and with any luck, one with two different diameter ends...) hose.
NAPA will prolly be my first stop for this.
Now, how did it work.
Well, fine actually, BUT- there is absolutely NO DIFFERENCE in fan actuation between this trigger location and my original spot in the lower front iron.
It still kicks the fan at EXACTLY the same indicated temp so, RotaMan, I am now absolutely certain that the spot I chose at the beginning of this thread is perfectly suitable and in no way "on the cold side" of the system.
In fact, this sensor location suffers from the same objection people raise when someone wants to install a temp gauge sensor in this same spot...what happens if the thermostat fails to open?
In my case, the fan will never turn on.
Honestly though, I'm not really too concerned with that ATM, and will leave things as they are for a while and see how it goes.
After all this work the only benefit I see from relocating the sensor is that I now have all my gauges functional again and the somewhat worrisome plastic S5 housing is gone.
All in all, given what I know now, I would have left as is but knowledge ain't free and I guess it was worth confirming.
I think I'm finished now...


