
My build up thread!
 07-18-07, 03:19 PM
#76
Winter sucks
Join Date: Jan 2004
Location: Newberg, Oregon
Posts: 3,083
Likes: 0
Received 0 Likes
on
0 Posts
the hood latch is stock. i kept all that the same.parts i just cant use a prop rod. i found on another forum where they used hood stuts. im going to go that route.
and i got ALL NAPA paint. the future father in-law owns ours in town so i got hooked up with a great price.
and i got ALL NAPA paint. the future father in-law owns ours in town so i got hooked up with a great price.
Deltron 2000: Black + White
Napa CrossFire: Black + White
PPG Omni : Black + Blue <-- WTF?!
It came out super blue-ish once sprayed. I went and got a quart of Napa and sprayed over it.

 07-18-07, 06:37 PM
#77
Full Member
Join Date: Jul 2007
Location: NW PA
Posts: 67
Likes: 0
Received 0 Likes
on
0 Posts
 It's nice to have connections isn't it.
 07-18-07, 06:59 PM
#78
Super Raterhater
iTrader: (6)
Join Date: Dec 2001
Location: NY, MA, MI, OR, TX, and now LA or AZ!
Posts: 10,630
Likes: 0
Received 3 Likes
on
3 Posts
I checked out that all-metal you were talking about. It looks like a pretty sweet filler. I'm going to have to give it a shot if I can find it around here.
It looks like the stuff this guy put on my '69 GTO back in the 80's when my dad owned it. He was having problems with the decklid bubbling on the rear pass side corner.This guy ground all the bondo out of it and laid this metal filler in there. I didn't even know it was there till I stripped the lid to redo it. Never bubbled again after he put it on there.What does this stuff look like cured? That stuff was like a dark gray. Looked just like metal. It was pretty sweet.
Geno
Sounds exactly like it.
07-18-07, 07:03 PM
#79
tom port.. AKA streetport
Thread Starter
iTrader: (6)
Join Date: Jan 2005
Location: ludlow, pa
Posts: 4,659
Likes: 0
Received 0 Likes
on
0 Posts
So what'd he soak ya for it?
1 gallon black paint + reducer
clear
$ 300 for it all
of course black paint is cheap

Last edited by 88rxn/a; 07-18-07 at 07:13 PM.
07-18-07, 07:46 PM
#80
Full Member
Join Date: Jul 2007
Location: NW PA
Posts: 67
Likes: 0
Received 0 Likes
on
0 Posts

Mine looks different for some reason though.
 Does to me anyway what do you think?

Last edited by gmag69; 07-18-07 at 07:53 PM.
 07-19-07, 08:19 PM
#82
tom port.. AKA streetport
Thread Starter
iTrader: (6)
Join Date: Jan 2005
Location: ludlow, pa
Posts: 4,659
Likes: 0
Received 0 Likes
on
0 Posts
that does look a little darker??
well yesterday i painted the underneath of the hood. today i removed the driverside door and painted the inside of that. i didnt take any pics becuase it got dark out. i will tommorow though!!
well yesterday i painted the underneath of the hood. today i removed the driverside door and painted the inside of that. i didnt take any pics becuase it got dark out. i will tommorow though!!


 Anything new happening? Get the doors done? Pics!We Want Pics!
 07-24-07, 09:07 AM
#85
Senior Member
iTrader: (2)

Join Date: Oct 2001
Location: Baltimore
Posts: 678
Likes: 0
Received 0 Likes
on
0 Posts
Are you running a sacrificial anode in your cooling system?
This is one of the problems of running an "isolated" pipe in place of your radiator hose.
Since the pipe is not electrically connected to the rest of the chassis, it tends to eat itself quicker than the rest of the car - it's called galvanic corrosion, and the pipe eats itself from the inside out.
-Ted
07-27-07, 08:18 PM
#86
tom port.. AKA streetport
Thread Starter
iTrader: (6)
Join Date: Jan 2005
Location: ludlow, pa
Posts: 4,659
Likes: 0
Received 0 Likes
on
0 Posts
well i know it has been a while since i let you all know whats going on. i wanted to wait for my GOOD cam to get back before i took pics. today i hopefully finished up that QP. ill tell ya what, for the pepole that work at body shops...PROPS to ya!! its a son of a bitch to get flat and even!!! i bought the tiger hair and used the bondo as thin as i could. i fairly sure its not gonna crack. it was called CUZ form NAPA.
i did happen to get a decent pic of how far i got that dent out.

this was before i started bondo or any work like this. this was after i pulled on it with the nails welded to it.
after countless hours of "feeling" for humps, highs and lows sanding, sanding and more sanding...i think i got this QP about straightened out!!! i wont really know till tommorow when the sun lite hits it i guess.
heres what it looks like now...i primered it so that the bondo wont soak up any water.

you can see at the very bottom of the fender there is some leftover bondo. this is gone now as i took the pic and foound it and sanded it out. its FAR form perfect and the center could have been brought down more near the door but you know what....IM TIRED OF SANDING ON THIS SPOT!!! hahahahah as long as i cant see HUGE high and low spots...its DONE!!!
BTW: notice that BIG OL turbo in the background!!
i did happen to get a decent pic of how far i got that dent out.
this was before i started bondo or any work like this. this was after i pulled on it with the nails welded to it.
after countless hours of "feeling" for humps, highs and lows sanding, sanding and more sanding...i think i got this QP about straightened out!!! i wont really know till tommorow when the sun lite hits it i guess.
heres what it looks like now...i primered it so that the bondo wont soak up any water.
you can see at the very bottom of the fender there is some leftover bondo. this is gone now as i took the pic and foound it and sanded it out. its FAR form perfect and the center could have been brought down more near the door but you know what....IM TIRED OF SANDING ON THIS SPOT!!! hahahahah as long as i cant see HUGE high and low spots...its DONE!!!
BTW: notice that BIG OL turbo in the background!!
08-02-07, 11:43 PM
#89
tom port.. AKA streetport
Thread Starter
iTrader: (6)
Join Date: Jan 2005
Location: ludlow, pa
Posts: 4,659
Likes: 0
Received 0 Likes
on
0 Posts
well hopefully tommorow the car will be primered. i been finding little dents and fixing them to keep the paint flat.
i did get some pics from my engine builder though!
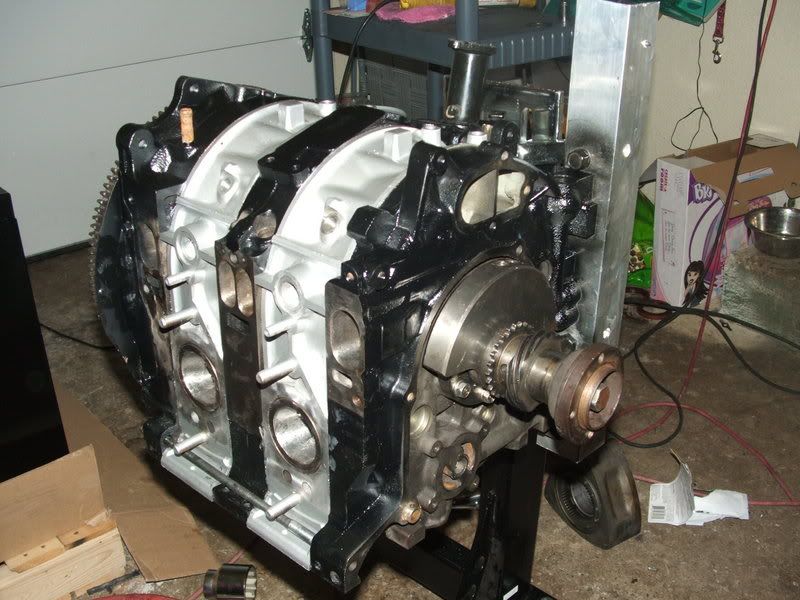
i have more pics of the motor, ill upload tommorow.
sunday morning we meet so i can pic the motor up.
i did get some pics from my engine builder though!
i have more pics of the motor, ill upload tommorow.
sunday morning we meet so i can pic the motor up.
08-03-07, 12:53 PM
#92
tom port.. AKA streetport
Thread Starter
iTrader: (6)
Join Date: Jan 2005
Location: ludlow, pa
Posts: 4,659
Likes: 0
Received 0 Likes
on
0 Posts
thanks so much for the compliments guys! i cant take all the credit myself though. gmag69 helped and another friend helped on the QP.
but anyways, today i got the first coat of primer laid. come to find out i didnt get that QP as smooth as i would have liked. i have spot putty i think im going to go back in and use. theres a few more spots that may need it also.
heres a pic of it primered. this is 2 thin coats just so i could find the remaing dents and scrathes. after they are filled ill apply more primer. plus i didnt like having that bondo exposed for to long. this will ensure its sealed up and last because im not sure how much longer this build is going to take.
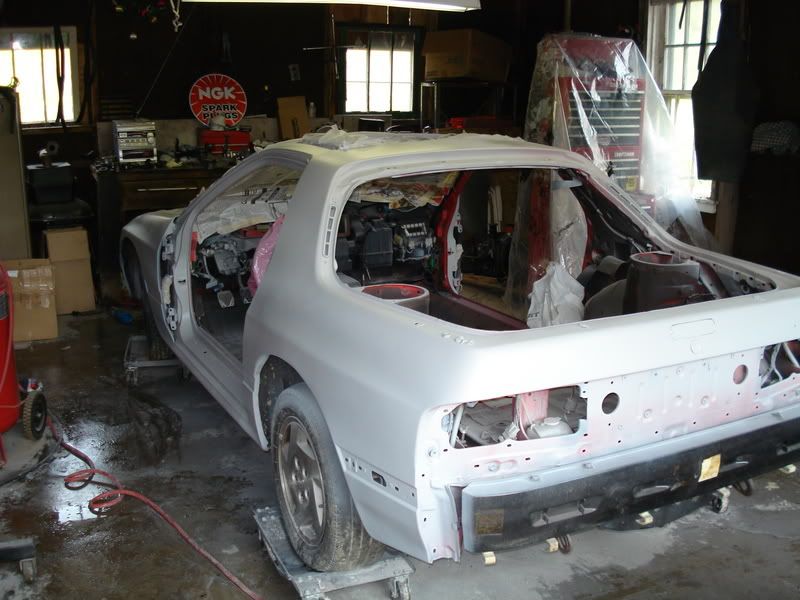
BTW, thats water on the floor to keep the dust down.
but anyways, today i got the first coat of primer laid. come to find out i didnt get that QP as smooth as i would have liked. i have spot putty i think im going to go back in and use. theres a few more spots that may need it also.
heres a pic of it primered. this is 2 thin coats just so i could find the remaing dents and scrathes. after they are filled ill apply more primer. plus i didnt like having that bondo exposed for to long. this will ensure its sealed up and last because im not sure how much longer this build is going to take.
BTW, thats water on the floor to keep the dust down.
08-03-07, 02:32 PM
#94
Full Member
Join Date: Jul 2007
Location: NW PA
Posts: 67
Likes: 0
Received 0 Likes
on
0 Posts
 Looking good man. Thanks for the props. I'm glad I could help ya out. I wanna see it in paint
  08-03-07, 07:12 PM
#96
tom port.. AKA streetport
Thread Starter
iTrader: (6)
Join Date: Jan 2005
Location: ludlow, pa
Posts: 4,659
Likes: 0
Received 0 Likes
on
0 Posts
and i contacted that company for that downpipe and have yet to get a email back from them?? im gonna try again tonite. i hope i can get a hold of them. i really like there DP!!
Looking good man. Thanks for the props. I'm glad I could help ya out. I wanna see it in paint
You need to toss something over the rims to keep off the over spray as you might want to use those or sell them one day.


 08-06-07, 11:07 PM
#100
tom port.. AKA streetport
Thread Starter
iTrader: (6)
Join Date: Jan 2005
Location: ludlow, pa
Posts: 4,659
Likes: 0
Received 0 Likes
on
0 Posts
hahaha, yeah i promise ill load them up tommorow. i got all the spots i didnt like fixed and sanded the primer down for another coat. tommorow monring i should have the final primer coat layed.