The Holy Grail
#1
The Holy Grail
This mod has a rather convoluted genesis, partially driven by need, partly by "Can I do it?".
All told, it took nearly a year to formulate and two days to execute.
It all started with gauges...
Like many S5 owners, one of my first additions to the car was a real water temp gauge. Searching our classifieds I found a set of new SPI units (water and oil temp & oil pressure) for a good price and proceeded to mount them in one of the standard locations- the center console where the radio used to be.
Well, the SPI gauges were junk- the lighting was pathetic- and I replaced the water temp and oil pressure with VDO units...much nicer (I've since acquired a VDO oil pressure gauge as well).
So superficially all was well.
It looked like this...

As I lived with this setup however, the gnawing realization grew that the gauges were just not very visible in this location unless I made an effort to look down.
I also realized that some prime visual real estate was occupied by the warning light/clock cluster and I don't know about you but I'd rather see my water temp instead of the time.
So what's the dilemma?
Ditch the idiot lights and put the gauges up there.
Oh no, way too easy.
I decided that if I was going to do this, the cluster had to be relocated to the console.
Which meant that the wiring for the cluster had to be extended and I wasn't about to hack up the harness to do it (not to mention, without removing the dash this would be very difficult).
What I needed was an extender cable- one that would plug into the stock dash harness and then the relocated cluster.
Finding the connectors with enough wiring on them was going to be difficult.
I had no idea how difficult.
The guys at my shop (Precision Imports in Denver) had a junk harness and I cut off the stock connector, put it in my "junkyard toolbox" and began the search.
Let me tell you, 17 wire connectors with the correct configuration just don't grow on trees...in fact, I came to believe they didn't exist.
Months passed and I would occasionally see the connector in the bottom of the box and make a halfhearted effort to find one, but essentially, I had given up hope.
I moved on to other projects.
Over these same months I kept seeing complaints on the forum about the RX's lack of cupholders.
It's never been a big deal for me but it seemed likely that the junkyard (or, as I like to call it, "The Field of Dreams") held a solution.
I added this to my list of things to look for as I wandered the yard.
Turns out, lots of cars have them but they're either inextricably integrated into the dash or butt ugly.
Then I discovered Subarus.
Early to mid-nineties Subarus have them on many models...the same unit, very discrete and best of all, standalone (removable and not built in with something else).
Looks like this...
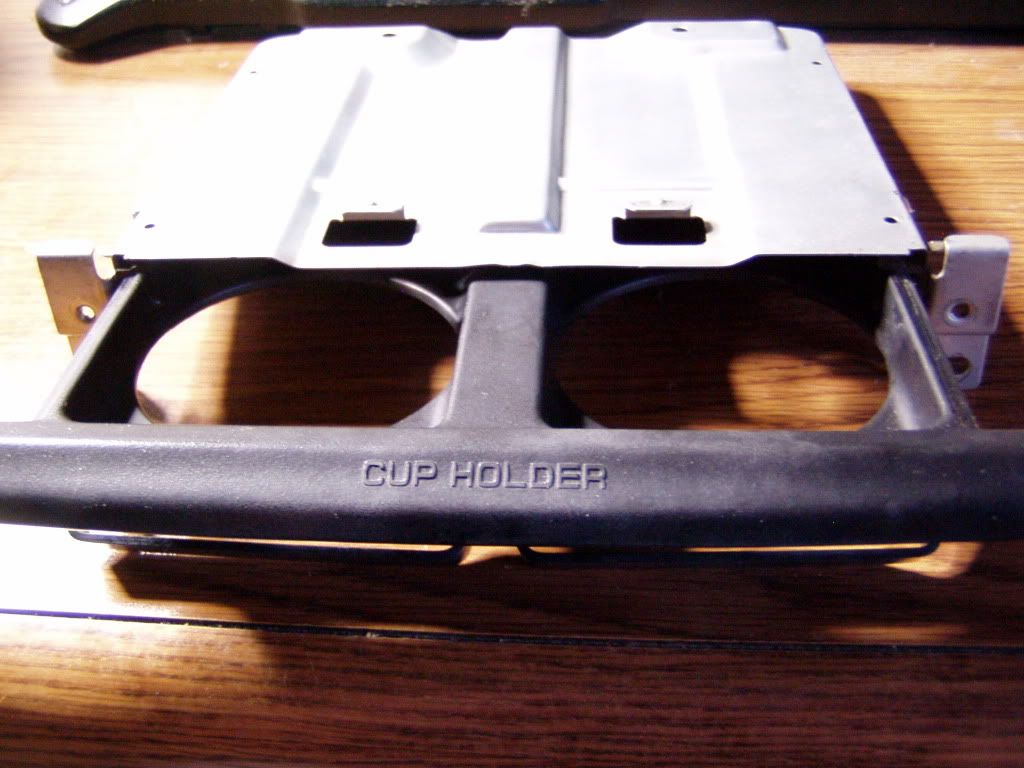
Very interesting.
As I searched for one in good condition, I also started to notice that some of the base models (those without super duper stereos) also had a useful looking double DIN assembly with a built in cubby that had a flip up door.
This guy...
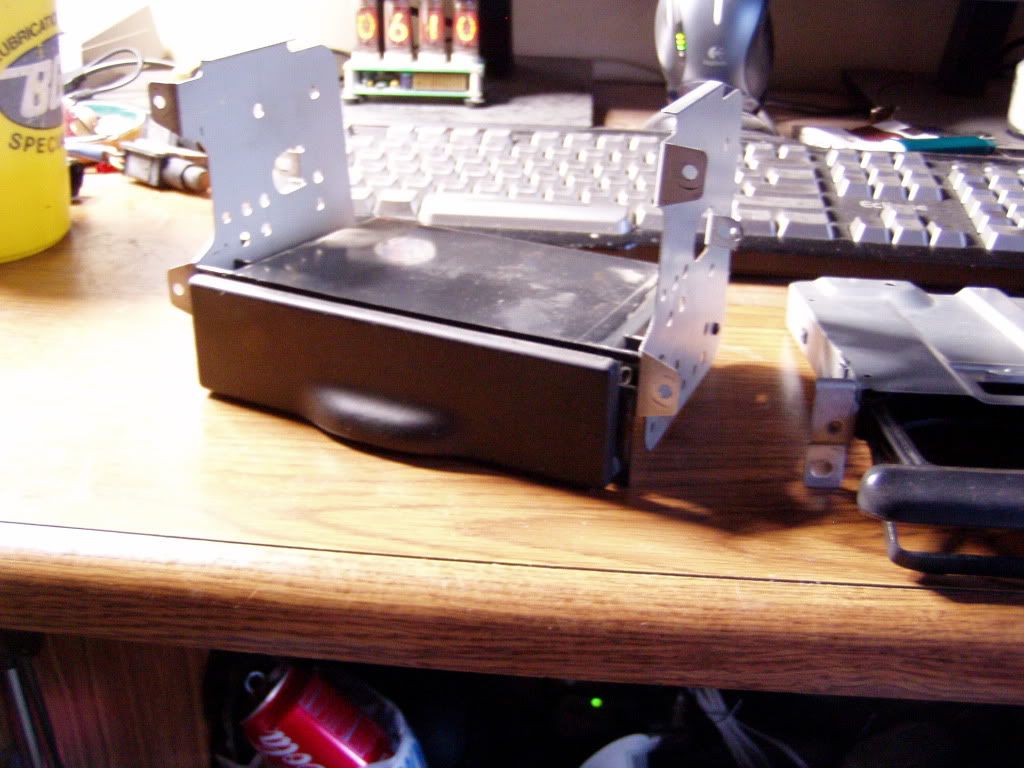

Hmmm...even more interesting.
Then came the moment of revelation.
One of the cars I was examining had the steering column trim removed and just by chance I noticed a familiar looking connector leading up to the turn signal assembly...could it be?
Oh baby, YES!
My Mazda idiot light connector plugged right in!
Here it was, finally...a male and female connector that would work and had a substantial amount of free wire to be useful.
Only one problem...Subaru doesn't populate all the slots in the connector- they only use twelve of the seventeen available slots, so I was going to have to find another one to depin and add the missing wires.
Naturally, Subaru- just like every other manufacturer- arbitrarily changes things every year and only very specific models use this particular connector.
I finally found another '93 Legacy (and, oddly enough, TWO '89 XT's but good luck finding one of them!) and harvested their harnesses.
Here's the Subie wiring in it's natural state...

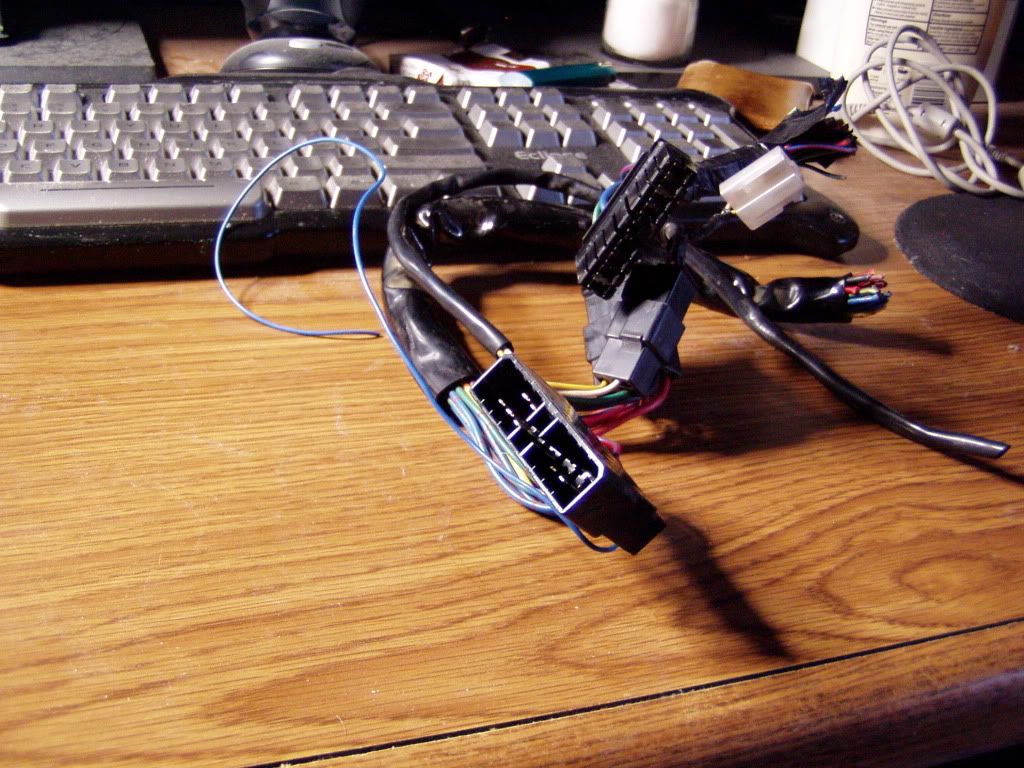
So, I walked out of the yard with the Subaru wiring, cupholder and DIN/cubby assembly.
Total cost...$5, plus tax.
First thing to do was create the harness extender...the whole project depended on this being feasible.
Here it is...
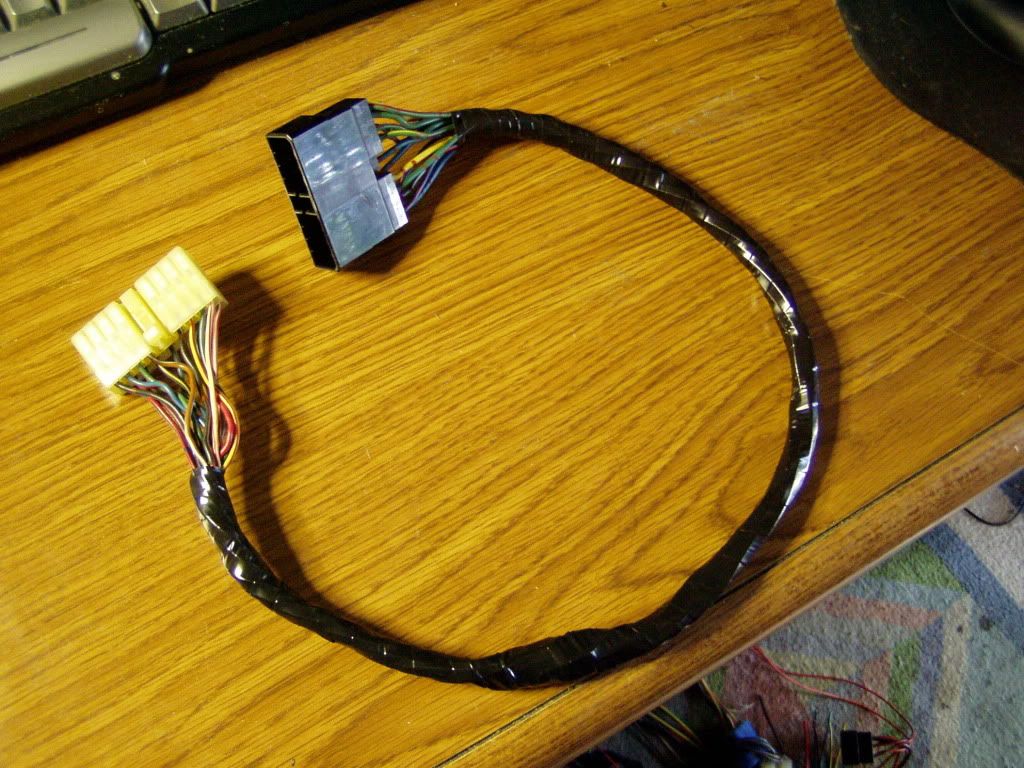
(I used the Mazda end piece (white) which saved me having to add wires on that end before splicing together. This was just a timesaver...the Subaru end will work also but you'll have to add the extra five wires to it).
This cable ended up 24" long.
Next I had to route the extender down to the center console.
This required disassembling half the damn dash...defroster bezel, warning light cluster (obviously), glove box and lower passenger dash panel, plus removing two heater vent hoses...all this just to get to the stock cluster connector and pull it down.
Probably very easy to do with the dash out of the car but not so simple in situ.
Finally done, I was happy to see that the 24" length was going to be perfect...enough slack to plug in the relocated cluster before reinstalling the center console bezel.
And it worked!
YAY!

Part Two- Building the new center panel, to follow.
All told, it took nearly a year to formulate and two days to execute.
It all started with gauges...
Like many S5 owners, one of my first additions to the car was a real water temp gauge. Searching our classifieds I found a set of new SPI units (water and oil temp & oil pressure) for a good price and proceeded to mount them in one of the standard locations- the center console where the radio used to be.
Well, the SPI gauges were junk- the lighting was pathetic- and I replaced the water temp and oil pressure with VDO units...much nicer (I've since acquired a VDO oil pressure gauge as well).
So superficially all was well.
It looked like this...

As I lived with this setup however, the gnawing realization grew that the gauges were just not very visible in this location unless I made an effort to look down.
I also realized that some prime visual real estate was occupied by the warning light/clock cluster and I don't know about you but I'd rather see my water temp instead of the time.
So what's the dilemma?
Ditch the idiot lights and put the gauges up there.
Oh no, way too easy.
I decided that if I was going to do this, the cluster had to be relocated to the console.
Which meant that the wiring for the cluster had to be extended and I wasn't about to hack up the harness to do it (not to mention, without removing the dash this would be very difficult).
What I needed was an extender cable- one that would plug into the stock dash harness and then the relocated cluster.
Finding the connectors with enough wiring on them was going to be difficult.
I had no idea how difficult.
The guys at my shop (Precision Imports in Denver) had a junk harness and I cut off the stock connector, put it in my "junkyard toolbox" and began the search.
Let me tell you, 17 wire connectors with the correct configuration just don't grow on trees...in fact, I came to believe they didn't exist.
Months passed and I would occasionally see the connector in the bottom of the box and make a halfhearted effort to find one, but essentially, I had given up hope.
I moved on to other projects.
Over these same months I kept seeing complaints on the forum about the RX's lack of cupholders.
It's never been a big deal for me but it seemed likely that the junkyard (or, as I like to call it, "The Field of Dreams") held a solution.
I added this to my list of things to look for as I wandered the yard.
Turns out, lots of cars have them but they're either inextricably integrated into the dash or butt ugly.
Then I discovered Subarus.
Early to mid-nineties Subarus have them on many models...the same unit, very discrete and best of all, standalone (removable and not built in with something else).
Looks like this...

Very interesting.
As I searched for one in good condition, I also started to notice that some of the base models (those without super duper stereos) also had a useful looking double DIN assembly with a built in cubby that had a flip up door.
This guy...


Hmmm...even more interesting.
Then came the moment of revelation.
One of the cars I was examining had the steering column trim removed and just by chance I noticed a familiar looking connector leading up to the turn signal assembly...could it be?
Oh baby, YES!
My Mazda idiot light connector plugged right in!
Here it was, finally...a male and female connector that would work and had a substantial amount of free wire to be useful.
Only one problem...Subaru doesn't populate all the slots in the connector- they only use twelve of the seventeen available slots, so I was going to have to find another one to depin and add the missing wires.
Naturally, Subaru- just like every other manufacturer- arbitrarily changes things every year and only very specific models use this particular connector.
I finally found another '93 Legacy (and, oddly enough, TWO '89 XT's but good luck finding one of them!) and harvested their harnesses.
Here's the Subie wiring in it's natural state...


So, I walked out of the yard with the Subaru wiring, cupholder and DIN/cubby assembly.
Total cost...$5, plus tax.
First thing to do was create the harness extender...the whole project depended on this being feasible.
Here it is...

(I used the Mazda end piece (white) which saved me having to add wires on that end before splicing together. This was just a timesaver...the Subaru end will work also but you'll have to add the extra five wires to it).
This cable ended up 24" long.
Next I had to route the extender down to the center console.
This required disassembling half the damn dash...defroster bezel, warning light cluster (obviously), glove box and lower passenger dash panel, plus removing two heater vent hoses...all this just to get to the stock cluster connector and pull it down.
Probably very easy to do with the dash out of the car but not so simple in situ.
Finally done, I was happy to see that the 24" length was going to be perfect...enough slack to plug in the relocated cluster before reinstalling the center console bezel.
And it worked!
YAY!

Part Two- Building the new center panel, to follow.
#5
Geez Aaron, major bonus points for spotting that little gem.
About five years ago, on one of the PC forums I frequent ([H]ard, IIRC) this guy -from Newfoundland, no less- posted that he had come into a pallet of Russian submarine spares, among which was a quantity of Nixie tubes.
He solicited suggestions about what to do with them.
Being heavily involved in clocks at the time, I suggested a timepiece and he thought that was a capitol idea.
Months went by as he designed and built the circuitry and prototype, I followed closely and when he offered some for sale, I jumped.
The initial run of twenty vanished fast and he was going to produce more but then he suddenly disappeared and I never heard of him again.
I love that thing.
I'll trade you Tina for it.
#6
Digi7ech did something similar, but he just re-pinned the harness. I would think re-pinning the harness one wire at a time would be a little less painstaking than tearing apart Subies?
He also made a new clear cover for the idiot cluster so it's flush.
LINK HERE
I will say clokker, I am stoked to see what you do with the cup holder. I just added that to my junkyard list! Thanks
He also made a new clear cover for the idiot cluster so it's flush.
LINK HERE
I will say clokker, I am stoked to see what you do with the cup holder. I just added that to my junkyard list! Thanks

#7
Very sweet idea. Now you just need one of these http://www.shop.retro-spec.net/produ...1&productId=69
Trending Topics
#10
Engine, Not Motor
iTrader: (1)
Joined: Feb 2001
Posts: 29,793
Likes: 119
From: London, Ontario, Canada
Geez Aaron, major bonus points for spotting that little gem.
About five years ago, on one of the PC forums I frequent ([H]ard, IIRC) this guy -from Newfoundland, no less- posted that he had come into a pallet of Russian submarine spares, among which was a quantity of Nixie tubes.
He solicited suggestions about what to do with them.
Being heavily involved in clocks at the time, I suggested a timepiece and he thought that was a capitol idea.
Months went by as he designed and built the circuitry and prototype, I followed closely and when he offered some for sale, I jumped.
The initial run of twenty vanished fast and he was going to produce more but then he suddenly disappeared and I never heard of him again.
I love that thing.
I'll trade you Tina for it.
I'll trade you Tina for it.
http://store.tubeclock.com/index.php...xie-clock-kits
Reasonable price too. I'll be ordering early next week.
#11
Very sweet idea. Now you just need one of these http://www.shop.retro-spec.net/produ...1&productId=69
In addition, keeping and relocating the cluster added a degree of difficulty that made it interesting.
It is funny how paths cross. I read about this guy on the EV list years ago. I never did get a chance to buy one of his. Since then I have made a bunch of clocks, based mostly on the LM8560 clock-on-a-chip-chip (the datasheet is still on my desktop). In my shop hangs one I made using about 90 LEDs that I am just finishing TIG-welding up a nice copper case for.
.
.
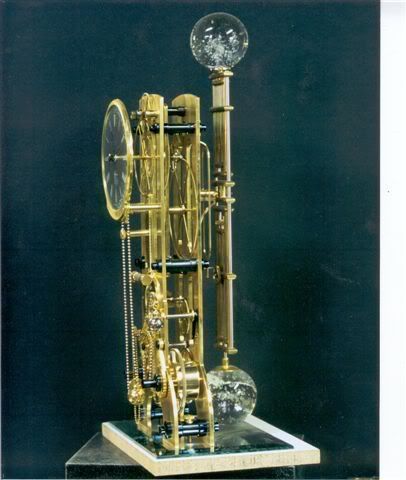
All the scratch-built clocks I made were strictly traditional.
Like this one...
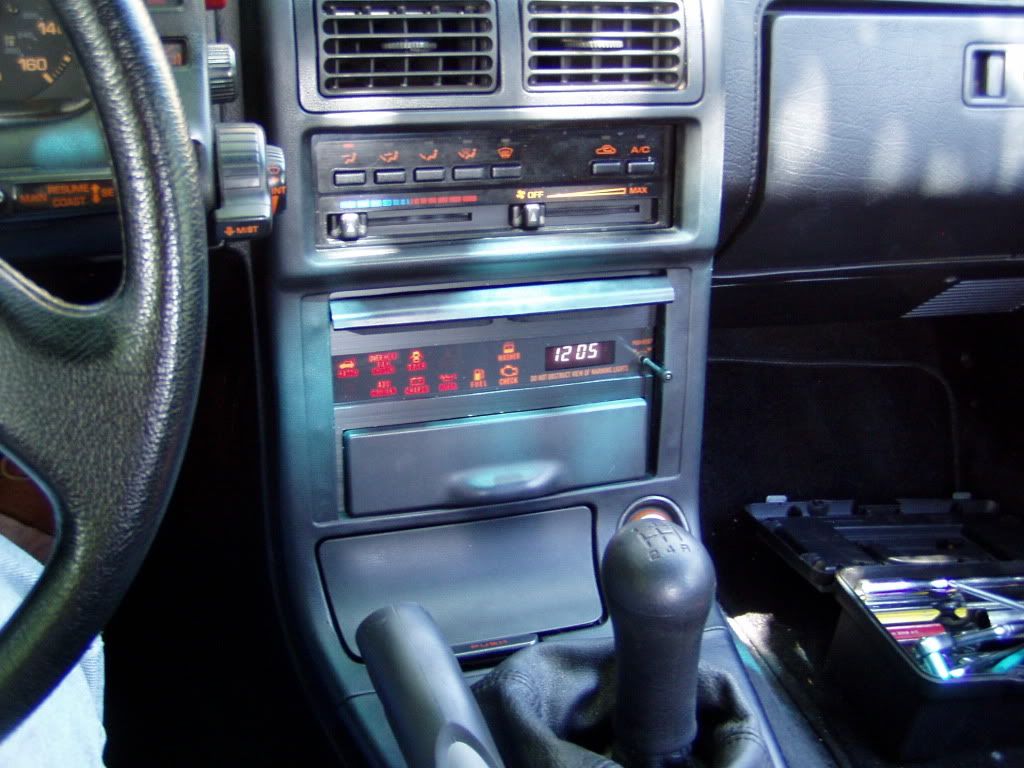
Anyway, the console is installed and there are enough things wrong with it that I'm considering it to be a prototype for the finished thing.
Improving this will be simple since all the thought/engineering has already been done.
It's not too bad for a first effort.
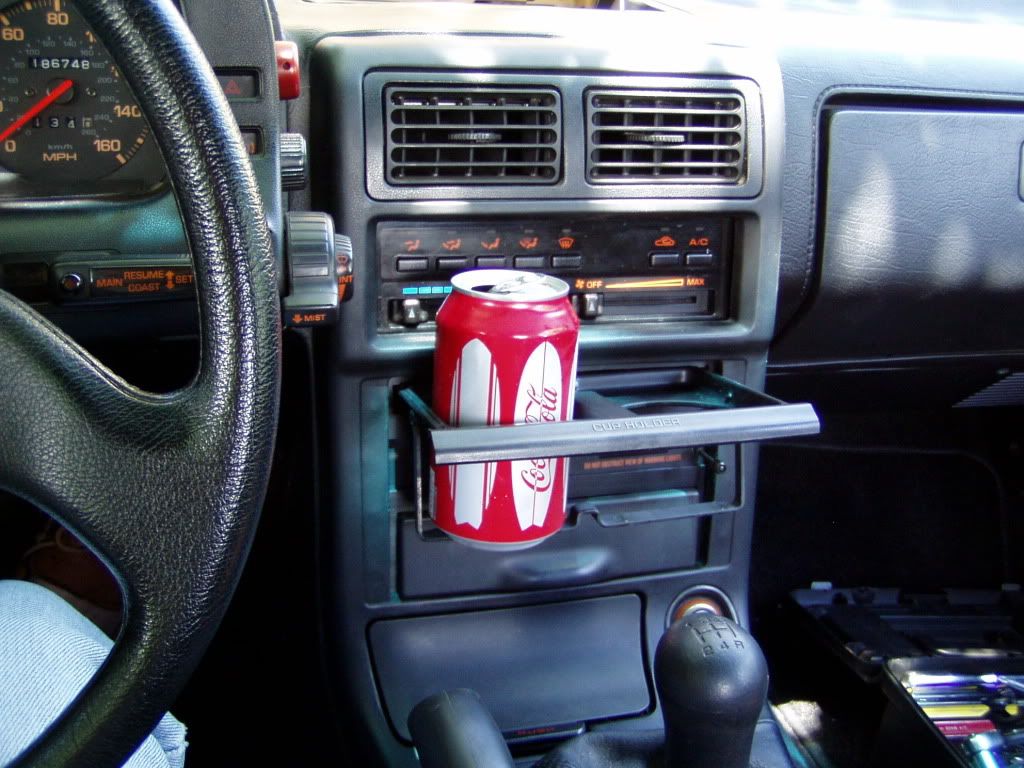
Naturally, I had to test the cupholder...
And an overview...
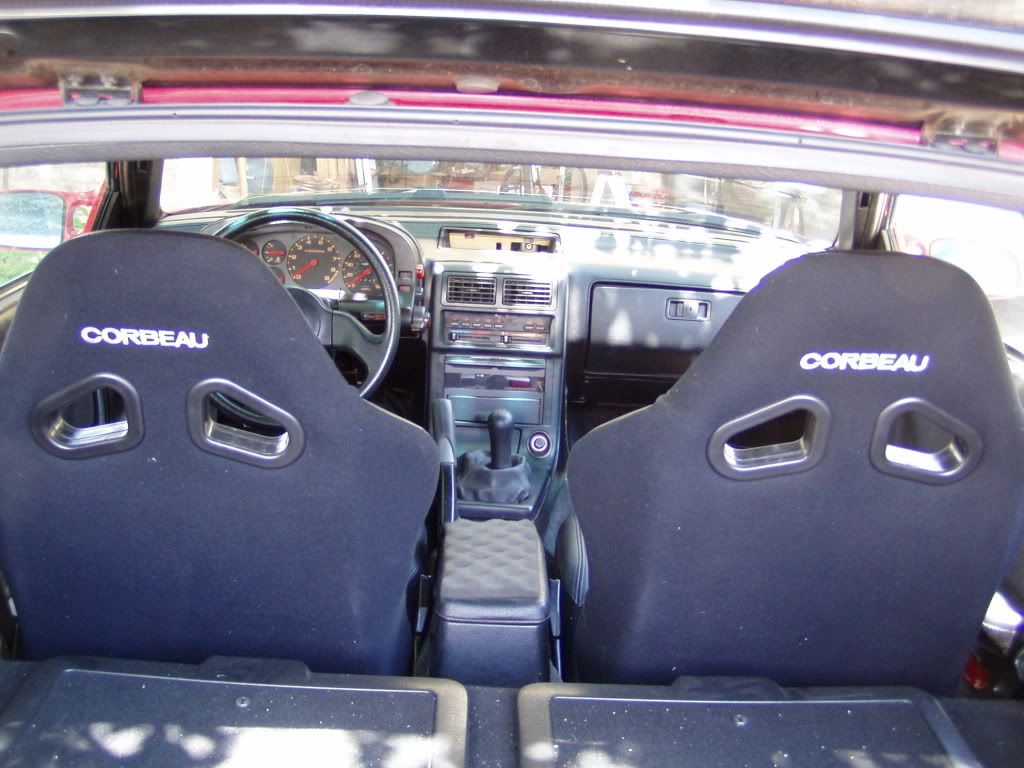
I think it integrates pretty well into the interior...it's not obviously homemade and color and patina of the Subie parts matches up closely with the Mazda parts.
I'm going to drive her as is for a few days while I ponder the changes for the next (hopefully, final) version.
#12
um......... do you plan on putting a head unit cause it looks like your trying to go for a tacory appearance. but this is pretty awesome for the cup holders. I'll look into doing that in the near future for my car. Thanks for the write up
#14
If however I change my mind, you can be sure that I'm not going to put it in the console where every Tom, Dick and Crack Addict can see it.
#15
so no radio? oops, too late.
I love the cup holders!!
Here is how I mounted the lambda gauge


I'll be doing a v2 shortly so you cant see the wires. I am also going to try to eliminate the accidental bulge in the dash.
I love the cup holders!!
Here is how I mounted the lambda gauge


I'll be doing a v2 shortly so you cant see the wires. I am also going to try to eliminate the accidental bulge in the dash.
#16
I see. its just you go through all that work and still no radio. If you want to conseal it, I was thinking the glove box would be a nice little spot so that crackhead cant see it lol. but i reall like what you did, especially the cup holders!
#19
Wow lots of good stuff in this thread.
stylEmon - what did you use for a gauge? I plan on doing the same but am still hunting for a small form factor digital voltmeter that is configurable.
stylEmon - what did you use for a gauge? I plan on doing the same but am still hunting for a small form factor digital voltmeter that is configurable.
#21
that looks absolutely amazing!
at one point i thought of making something like this. a small aluminum DIN sized plate, some LEDS and some creative wiring. i may still decide to make this, things are still up in the air.
at one point i thought of making something like this. a small aluminum DIN sized plate, some LEDS and some creative wiring. i may still decide to make this, things are still up in the air.
#24
It wasn't till I installed and put in a drink that the obstruction became obvious.
A real "Doh!" moment.


