HELP!! head unit install...
 10-17-03, 05:07 PM
#1
pistons=teh suck
Thread Starter
Join Date: May 2003
Location: NJ
Posts: 933
Likes: 0
Received 0 Likes
on
0 Posts
HELP!! head unit install...
i got a new alpine head unit today. first of all i have no experience what so ever with this. i got the old one out (wasnt the stock one), and almost all the wires were connected to each other by just twisting them together, no connectors or anything. the harness that came with the alpine has many, but still has some bare wires. the ground has a connector on the end to screw it on, but the black wire (which i assume is the ground) is just bare like the others. do i need to go out and buy connectors to put on the existing wires so it will fit? can anyone pleeeasse help me or give me some direction (*cough*icemark*cough*)?
 10-17-03, 05:14 PM
#2

What year is the RX7? Also what apline unit did get? I actually just installed mine, and I was lucky that I could use the ez harness. But I am going to swap it out for a Pioneer, so I will try and take pics of it to help...It might take me a few days though...
10-17-03, 05:40 PM
#3
Former Moderator. RIP Icemark.
Yes if the old plugs are not there you will need crimp connectors and a crimper (get a real crimper, don't micky mouse the crimps with vice grips or the like).
here's the radio wires again...
LTBlue/Red= 12v+
LtBlue/White= +Accessory
LtBlue/Yellow= - power ant trigger (not positive like all aftermarket radios- you must use a relay to invert the signal)
Red/Black= + Lumination
White=Factory Amp Turn on
Ground to the body, use the 10mm bolt behind the center console front drivers access panel. Do not use the Red/Black as ground it will damage the interior light circuit and dimmer in the car
Front Speakers (maximum of a 15 watt peak from the radio):
LtGreen/Red= Left
LtGreen/Black= Left
LtGreen= Right
LtGreen/Yellow=Right
Rear Speakers (if applicable, if you have the amplified rear speakers again the Maximum of 15 watts peak is all the stock speaker amp input can handle):
Brown= Left rear
Brown/White= Left Rear
LtBlue= Right Rear
LtBlue/Orange=Right Rear
So your Alpine's red wire will go to blue/white of the car
Your alpine's yellow wire will go to the Blue/red of the car.
The blue antenna wire of the alpine will go to the 85 lead of the extra relay for the power antenna.
The blue/white of the alpine will go to the white of the car.
The black of the alpine will go the ground bolt as mentioned above.
and then hook up your speaker wires as needed.
Last edited by Icemark; 10-17-03 at 05:47 PM.
10-17-03, 05:42 PM
#4
I'm a boost creep...
Join Date: Jan 2002
Location: Auckland, New Zealand
Posts: 15,608
Likes: 0
Received 8 Likes
on
8 Posts
Wiring head units is easy. You get a wiring diagram for your car (they're in the FSM), figure out which wire is which from the colour codes, do the same for the wires on the head unit (read the instructions), match them up and connect them together.
If the factory plugs are still there you can crimp male spade connectors onto the head unit's wires and plug them straight in. Since in your case the plugs have been cut off, connect the wires together with bullet connectors so you can unplug them later if you need to.
Most FC's had amps for the speakers, and these need to be bypassed when running new head units. If you can't figure out how to bypass the amps from the wiring diagrams then just run new speaker wires straight from the head unit.
The only complication is the antenna, which needs a switched ground to go up, whereas most head units provide switched power. Wire a relay into the antenna wire like this:
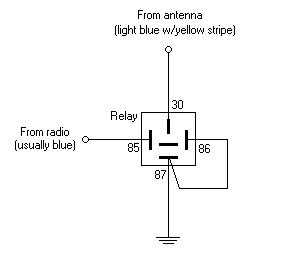
Hope that helps.
If the factory plugs are still there you can crimp male spade connectors onto the head unit's wires and plug them straight in. Since in your case the plugs have been cut off, connect the wires together with bullet connectors so you can unplug them later if you need to.
Most FC's had amps for the speakers, and these need to be bypassed when running new head units. If you can't figure out how to bypass the amps from the wiring diagrams then just run new speaker wires straight from the head unit.
The only complication is the antenna, which needs a switched ground to go up, whereas most head units provide switched power. Wire a relay into the antenna wire like this:
Hope that helps.
10-17-03, 05:58 PM
#5
putting it down daily
I would like to figure out how to hook my antenna up so that it works as it is supposed to- although I had a stereo shop hook it up, they hooked the antenna up so that anytime the ignition was in the ACC or ON position, the antenna is up. Works ok for now, but I would like the antenna to go down when I am using CD only or when the power to the radio is off.
10-17-03, 06:09 PM
#6
Rotary Enthusiast
Join Date: Dec 2001
Location: not in winterpeg anymore
Posts: 1,350
Likes: 0
Received 0 Likes
on
0 Posts
hook up a basic 2 prong toggle switch for the antenna, that just interupt a ground signal.
As for the deck, I always prefer wiring direct to the batterry for the yellow wire from the head unit(the alpines yellow wire). the black to a good ground and the red to the light blue/white, you can use a male spade for that red wire and just plug it into the stock connector on the light blue/white wire.
If you want your deck to sound good at all, I would recommend upgrading the speakers and rewiring them straight from the deck. Less resistance equals better sound(to a point of diminishing returns).
10-17-03, 07:37 PM
#7
pistons=teh suck
Thread Starter
Join Date: May 2003
Location: NJ
Posts: 933
Likes: 0
Received 0 Likes
on
0 Posts
i got 4 4" infinity speakers too, but the tweeter sticks out too much to fit under the dash, and 4 is the wrong size for the back, and i cant find 5" ones anywhere. so yeah, this has become quite frustrating. im thinking about just getting someone to install it for me. will they install it for me even if i didnt buy the stuff from them?
Trending Topics
10-17-03, 07:51 PM
#9
I'm a boost creep...
Join Date: Jan 2002
Location: Auckland, New Zealand
Posts: 15,608
Likes: 0
Received 8 Likes
on
8 Posts
Originally posted by introVert
I would like to figure out how to hook my antenna up so that it works as it is supposed to...
I would like to figure out how to hook my antenna up so that it works as it is supposed to...
10-18-03, 08:21 AM
#12
Rotary Enthusiast
Join Date: Dec 2001
Location: not in winterpeg anymore
Posts: 1,350
Likes: 0
Received 0 Likes
on
0 Posts
put 6.5 rounds in the back. Crutchfeild sells adapter plates or you can make your own out of mdf board. I made my own door panels so that i could fit my MB Quart 6.5 component set in there. Just ,ake new inserts for the door panel. Will probably require some metal cutting on the door though and some good sound deadening material.I have pics up here just search for them. My panels are made of sheet metal.
10-18-03, 10:20 AM
#13
Engine, Not Motor
iTrader: (1)
Join Date: Feb 2001
Location: London, Ontario, Canada
Posts: 29,789
Likes: 0
Received 110 Likes
on
93 Posts
Just a word on crimping: unless you were properly trained in quality crimping, and have an expensive high quality crimp tool, you should solder and use heat shrink instead. It is very easy to make a bad crimp, yet exceedingly difficult to make a good one (especially with the quality of hardware most people buy). What's worse it that most people are electrically ignorant, so they don't know any better. Save yourself some trouble and solder.
10-18-03, 11:21 AM
#14
pistons=teh suck
Thread Starter
Join Date: May 2003
Location: NJ
Posts: 933
Likes: 0
Received 0 Likes
on
0 Posts
what if i dont know how to solder.....
all signs are pointing toward an installer . the wires werent crimped before and it worked fine. one was just wrapped around the other.
all signs are pointing toward an installer . the wires werent crimped before and it worked fine. one was just wrapped around the other.
10-18-03, 03:20 PM
#16
I'm a boost creep...
Join Date: Jan 2002
Location: Auckland, New Zealand
Posts: 15,608
Likes: 0
Received 8 Likes
on
8 Posts
Originally posted by Aaron Cake
Just a word on crimping: unless you were properly trained in quality crimping, and have an expensive high quality crimp tool, you should solder and use heat shrink instead.
Just a word on crimping: unless you were properly trained in quality crimping, and have an expensive high quality crimp tool, you should solder and use heat shrink instead.
 I have no training other than my own experience, and have never paid more than NZ$15 for a crimper. I can't remember ever having a connection fail.
Like anything else, there's a proper technique you should use to get a good connection, but IMO it's easier to stuff up a solder joint if you don't know what you're doing. Soldering is best, but crimping is nearly as good and less hassle, especially for non-critical stuff like stereo's.
10-19-03, 10:42 AM
#18
Rotary Enthusiast
Join Date: Dec 2001
Location: not in winterpeg anymore
Posts: 1,350
Likes: 0
Received 0 Likes
on
0 Posts
An electrician showed me his wiring trick(and he has his journeymans papers so he knows what he is doing)
take the 2 wires that you want to connect to each other. Strip about 1/2 inch off each wire. now, on each wire seperate the threads so that the wire has a "y" end on it(like splitinto 2)now do the same to the other wire. So with the 2 wires you have 4 ends, take one end from each and wrap them around each other, now do the same for the other side. So you went from 4 down to 2, now wrap those 2 into 1. Tape it up real tight. This will not fail, if done properly you can tug on it as hard as you can and it won't come apart. It will not fail, garunteed.
take the 2 wires that you want to connect to each other. Strip about 1/2 inch off each wire. now, on each wire seperate the threads so that the wire has a "y" end on it(like splitinto 2)now do the same to the other wire. So with the 2 wires you have 4 ends, take one end from each and wrap them around each other, now do the same for the other side. So you went from 4 down to 2, now wrap those 2 into 1. Tape it up real tight. This will not fail, if done properly you can tug on it as hard as you can and it won't come apart. It will not fail, garunteed.
10-19-03, 11:04 AM
#19
Former Moderator. RIP Icemark.
Originally posted by wpgrexx
An electrician showed me his wiring trick(and he has his journeymans papers so he knows what he is doing)
take the 2 wires that you want to connect to each other. Strip about 1/2 inch off each wire. now, on each wire seperate the threads so that the wire has a "y" end on it(like splitinto 2)now do the same to the other wire. So with the 2 wires you have 4 ends, take one end from each and wrap them around each other, now do the same for the other side. So you went from 4 down to 2, now wrap those 2 into 1. Tape it up real tight. This will not fail, if done properly you can tug on it as hard as you can and it won't come apart. It will not fail, garunteed.
10-19-03, 12:30 PM
#20
Rotary Enthusiast
Join Date: Dec 2001
Location: not in winterpeg anymore
Posts: 1,350
Likes: 0
Received 0 Likes
on
0 Posts
I have never had a problem with electrical tape. If you want to take a long time to do a job that I can do way faster and just as strong, do it your way. It seems no one is open to any suggestions on this forum anymore.
10-19-03, 01:24 PM
#21
Former Moderator. RIP Icemark.
Originally posted by wpgrexx
I have never had a problem with electrical tape. If you want to take a long time to do a job that I can do way faster and just as strong, do it your way. It seems no one is open to any suggestions on this forum anymore.
I have never had a problem with electrical tape. If you want to take a long time to do a job that I can do way faster and just as strong, do it your way. It seems no one is open to any suggestions on this forum anymore.
But using tape on bare wires in a car is a bad practice and will result in the joint failing after a couple of years.
That might not mean anything to you. But as someone that has seen the long term effects, I would never do it. Have you seen what an electrical connection looks like after 2 years with black generic electrical tape on it??? The adhesive has oosed between all the strands and the copper has discolored to green. Bad news for conductivity.
If you want to do your electricans wrap, or even the solder method, then cover the wire with heat shrink tubing. Don't use electrical tape (unless you are using 3M 1700 or 3M super 33 tape- both designed to work in that application) on bare metal or wires in the car.
The average Home depot special tape that most people use is one of te worst things you can use, and you would be better off using band aids.
10-19-03, 02:42 PM
#22
Rotary Enthusiast
Join Date: Dec 2001
Location: not in winterpeg anymore
Posts: 1,350
Likes: 0
Received 0 Likes
on
0 Posts
I have used it on things under hoods and they have lasted for many more than 2 years. But it is a good heads up.
although the connections do get gummed up from the glue, the connections are still nice and flow good conductivity. I see what you are saying, don't just wrap 2 wires together and tape it. The tape I am using as a exterior protectant, not a joint.
although the connections do get gummed up from the glue, the connections are still nice and flow good conductivity. I see what you are saying, don't just wrap 2 wires together and tape it. The tape I am using as a exterior protectant, not a joint.
10-20-03, 02:09 AM
#23
I'm a boost creep...
Join Date: Jan 2002
Location: Auckland, New Zealand
Posts: 15,608
Likes: 0
Received 8 Likes
on
8 Posts
Originally posted by wpgrexx
It seems no one is open to any suggestions on this forum anymore.
It seems no one is open to any suggestions on this forum anymore.
Last edited by NZConvertible; 10-20-03 at 02:11 AM.
10-20-03, 08:01 AM
#24
Seduced by the DARK SIDE
Join Date: Apr 2001
Location: Orange Park FL (near Jax)
Posts: 7,323
Likes: 0
Received 2 Likes
on
2 Posts
I just wired up my 91.
It was all straight forward except the little stock door woofer amp.
The head unit to door woofer amp switch wire is brown/red.
The wiring diagram implies it�s a ground, but actually it�s a + feed.
(The red stripe was the clue.)
It was all straight forward except the little stock door woofer amp.
The head unit to door woofer amp switch wire is brown/red.
The wiring diagram implies it�s a ground, but actually it�s a + feed.
(The red stripe was the clue.)
10-20-03, 08:35 AM
#25
Senior Member

Join Date: Sep 2003
Location: Syracuse, New York
Posts: 488
Likes: 0
Received 0 Likes
on
0 Posts
Originally posted by Aaron Cake
Just a word on crimping: unless you were properly trained in quality crimping, and have an expensive high quality crimp tool, you should solder and use heat shrink instead. It is very easy to make a bad crimp, yet exceedingly difficult to make a good one (especially with the quality of hardware most people buy). What's worse it that most people are electrically ignorant, so they don't know any better. Save yourself some trouble and solder.
Just a word on crimping: unless you were properly trained in quality crimping, and have an expensive high quality crimp tool, you should solder and use heat shrink instead. It is very easy to make a bad crimp, yet exceedingly difficult to make a good one (especially with the quality of hardware most people buy). What's worse it that most people are electrically ignorant, so they don't know any better. Save yourself some trouble and solder.
"A simple rule governs soldering, if you think you can't, you can't."
If I thought someone could barely use a crimper, there's no way I would hand them a soldering iron. They could use the wrong solder, heat things up too much, stick it in their eye, not heat things up enough, etc. Heck, when I was in school, most of the EE"s couldn't even solder worth a crap.
I would just advocate them buying a decent crimper. Autozone has a decent ratcheting crimper for $20.