Doorhandle Treachery
 01-15-10, 12:00 PM
#1
Doorhandle Treachery
After three years and 45k miles, something finally broke on my S5.
Not that my car is magic or anything- I've spent uncounted hours proactively maintaining/upgrading systems before
they bit my *** and comparatively speaking I've been extraordinarily lucky.
Furthermore, the part that broke is not a "maintainence" item, not a part you can preventively replace...it's something that's good right up till the moment it breaks
and then one deals.
So, the other night I reach for my doorhandle and nothing happens.
Bloody hell.
I've read of the proclivity for handle breakage and even considered robbing a junkyard donor for a spare (not the easiest part to nab since the junkers have no battery
and few have window switches) but it was never a pressing concern and I naively decided to wait till I found a proper
Blaze Red replacement.
This complacency and pickiness evaporated when access to the car became so awkward.
I was fortunate enough to find a replacement pretty quickly but it's black and as crappy as my car's exterior appearance is, at least it's all the same color.
So I've decided to attempt a repair of the broken piece, comforted by the knowledge that there's a backup in place.
Ever the optimist, I hoped that the problem was just a loose activating rod, even though I'm familiar with how they are
retained and couldn't imagine how one could pop free on it's own.
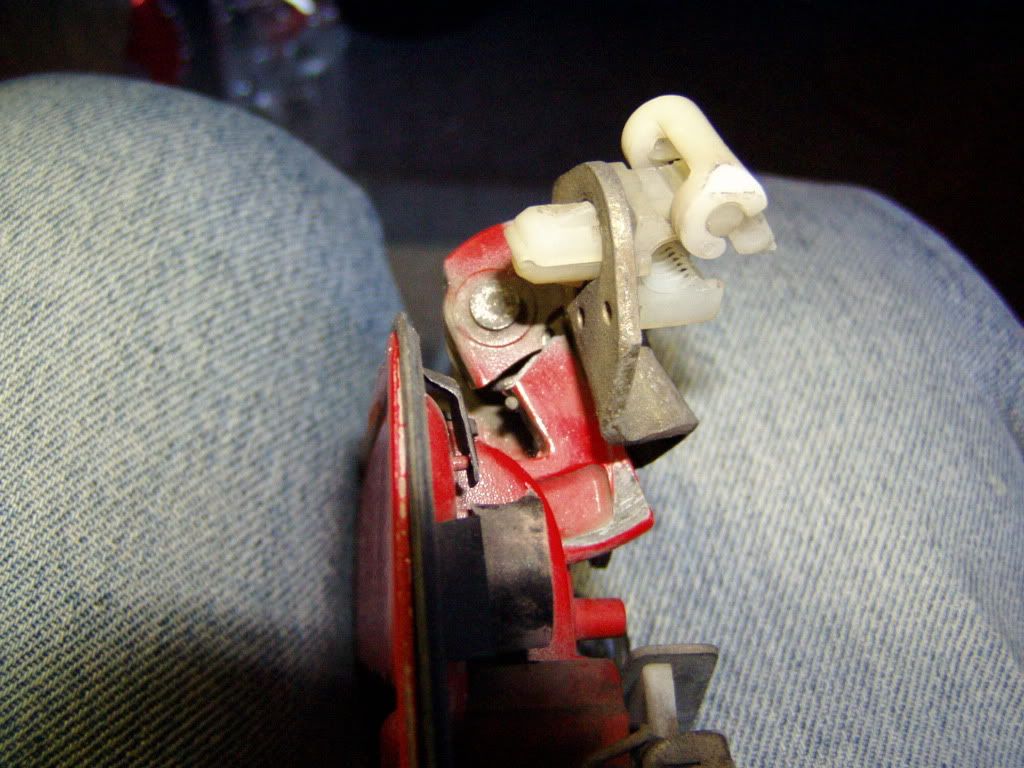
Removing the door panel and quickly inspecting the handle proved that the simple fix wasn't going to work, so the assembly was removed.
Once exposed it was obvious what had happened and also pretty obvious why.
Even allowing for what appears to be a clear design flaw, I can't really complain...it's a nearly twenty year old part
and it takes a lot of abuse...who is gentle with their doorhandle?
Anyway, new part on the way and a few days to kill, I examined the piece and did a forum search to see what others had done in this situation.
Things looked grim.
Since the broken arm is potmetal, welding didn't seem to be an option.
JB Weld didn't seem to work, the only semi-successful option seemed to be J-Rat's "safety wire fix".
I actually have safety wire pliers (years working on motorcycle roadracers) and I'm not afraid to use 'em
but- not to impugn Rat's integrity or results- just couldn't see how this repair could work.
To clarify...I believe the people who say it does but it's so counterintuitive that I couldn't make myself try it.
I felt I'd always be wary and overly ginger with the repaired doorhandle, certain that the safety wire would break at any moment.
I wanted to go back to being blissfully unconcerned whether my door would open or not, so a more involved fix was necessary.
This my attempt.
Certainly, much more elaborate than drilling two holes and looping some wire but potentially just as strong as the part was originally
and good for several more years of operation.
"Potentially" being the operative word here but there's only one way to find out.
Here is the problem...
Here was my first take on the "scab plate" I thought would fix things...
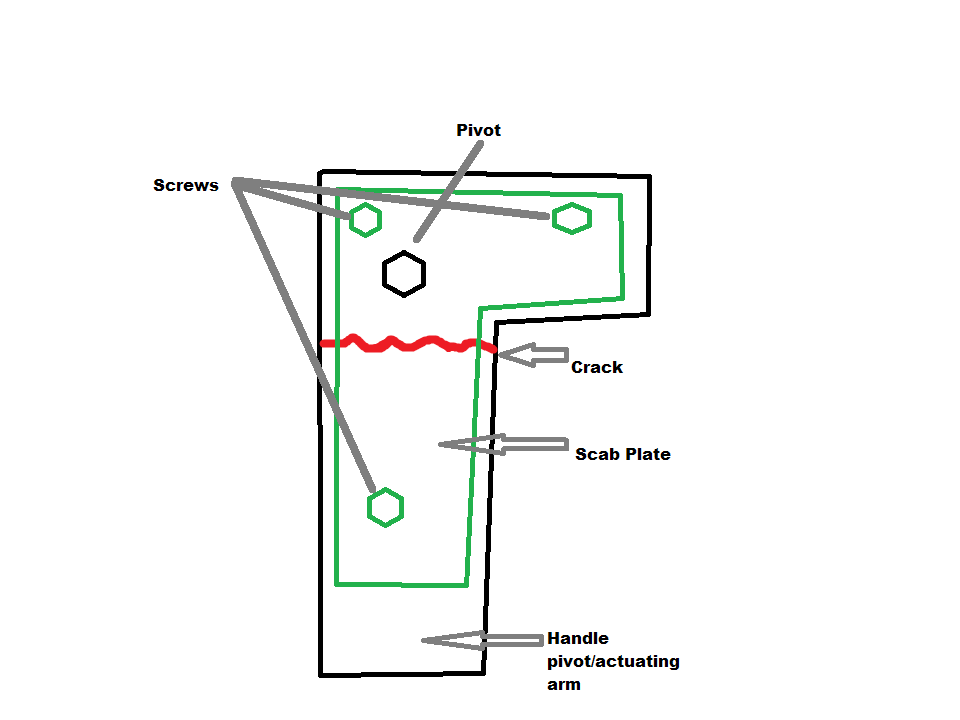
And this is a rough dimensional drawing after I had the handle in hand and could measure it.
Below the drawing is the rough cut piece I ended up with...
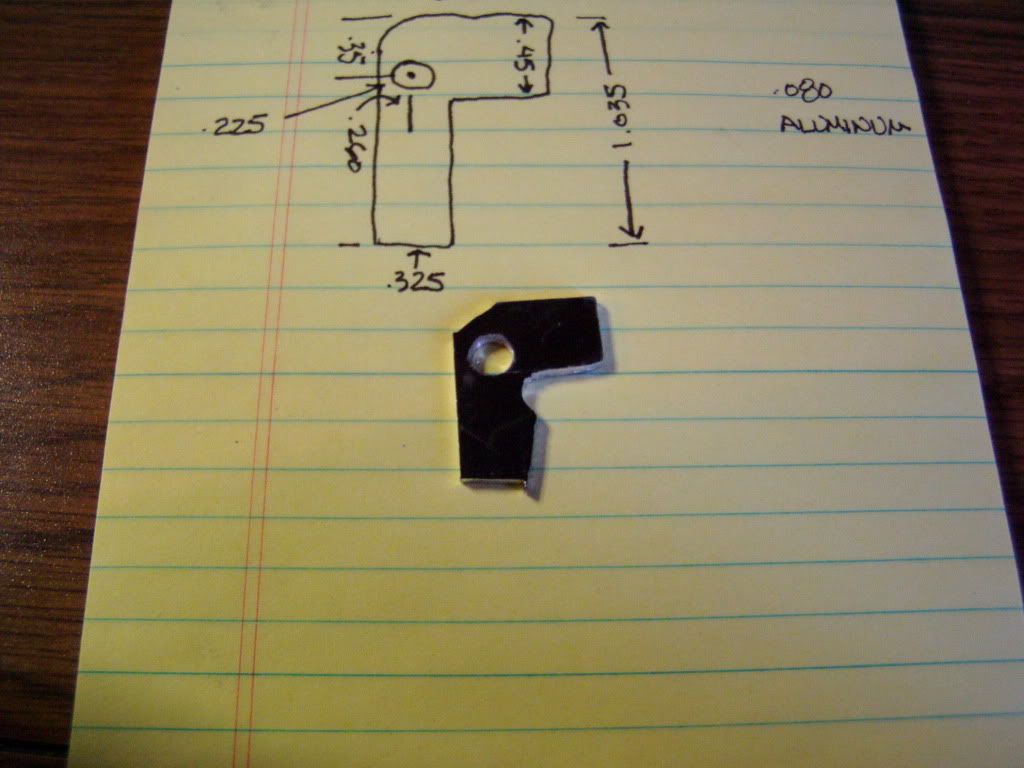
The scab plate was cut from some .080 aluminum plate I had (a Lian-li PC case sidepanel, in fact).
I used two part epoxy in the crack itself and then again on the back of the scab and used rubber bands to hold everything in position while the curing took place.
There was no expectation that the epoxy would actually fix things, it was only intended to hold the two pieces in alignment while I drilled and tapped for the screws that I hope will make this work.
Half an hour later I drilled and tapped the assembly for 2-56 screws.
You'll note that I only ended up with two instead of the planned three screws...room was at a premium and I counted myself very lucky to have drilled the two holes without breaking the small drillbit.
After the screws were installed I discovered a flaw in my planning...the bottom of the scab had to be angle cut to allow the arm to retract properly.
Not a big deal, although it was a bit awkward to cut.
Finally, the finished repair...
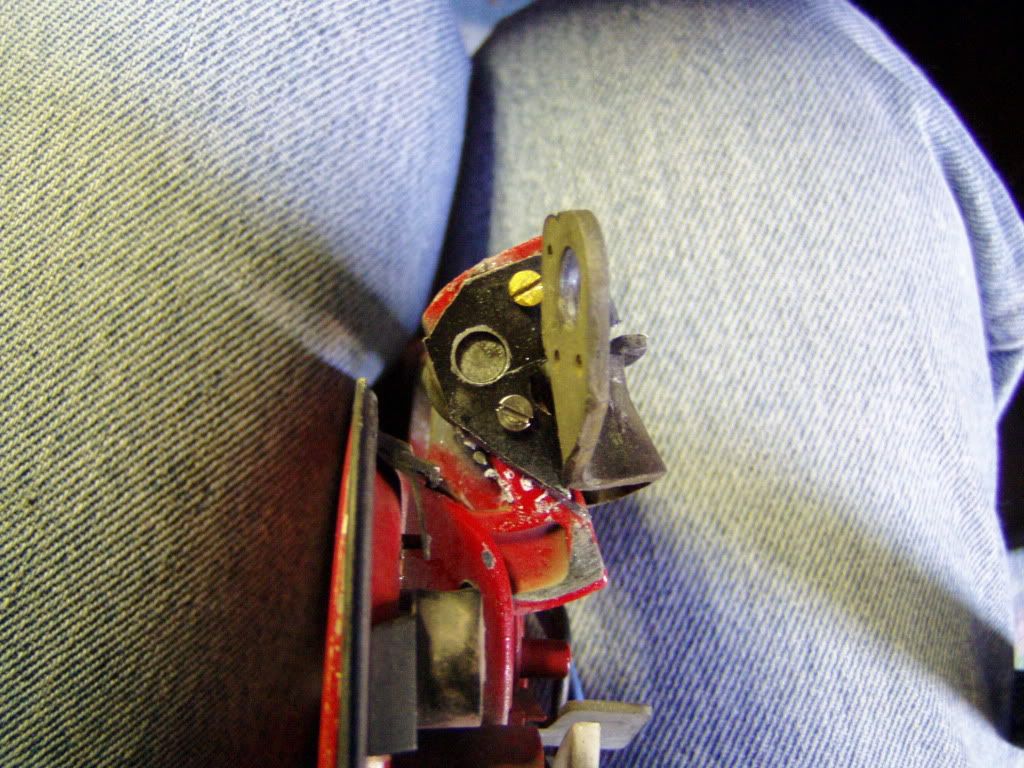
T'aint that pretty and the craftsmanship is nothing to write home about but it does seem to work...at least the arm pushes the necessary amount on the pivot bar to open the door and I can see no evidence of the arm separating at the break.
Now to reinstall and see how long the repair holds.
I'll be carrying the replacement in my bin just in case but I'm cautiously optimistic that the fix will last.
This was not a very difficult repair...total time was less than two hours (including epoxy cure time) and it didn't require any exotic tools/techniques, so I'm offering it as a possible alternative to other methods.
It's certainly possible that this failure could strike anyone at any time, so having some options is always good.
Not that my car is magic or anything- I've spent uncounted hours proactively maintaining/upgrading systems before
they bit my *** and comparatively speaking I've been extraordinarily lucky.
Furthermore, the part that broke is not a "maintainence" item, not a part you can preventively replace...it's something that's good right up till the moment it breaks
and then one deals.
So, the other night I reach for my doorhandle and nothing happens.
Bloody hell.
I've read of the proclivity for handle breakage and even considered robbing a junkyard donor for a spare (not the easiest part to nab since the junkers have no battery
and few have window switches) but it was never a pressing concern and I naively decided to wait till I found a proper
Blaze Red replacement.
This complacency and pickiness evaporated when access to the car became so awkward.
I was fortunate enough to find a replacement pretty quickly but it's black and as crappy as my car's exterior appearance is, at least it's all the same color.
So I've decided to attempt a repair of the broken piece, comforted by the knowledge that there's a backup in place.
Ever the optimist, I hoped that the problem was just a loose activating rod, even though I'm familiar with how they are
retained and couldn't imagine how one could pop free on it's own.
Removing the door panel and quickly inspecting the handle proved that the simple fix wasn't going to work, so the assembly was removed.
Once exposed it was obvious what had happened and also pretty obvious why.
Even allowing for what appears to be a clear design flaw, I can't really complain...it's a nearly twenty year old part
and it takes a lot of abuse...who is gentle with their doorhandle?
Anyway, new part on the way and a few days to kill, I examined the piece and did a forum search to see what others had done in this situation.
Things looked grim.
Since the broken arm is potmetal, welding didn't seem to be an option.
JB Weld didn't seem to work, the only semi-successful option seemed to be J-Rat's "safety wire fix".
I actually have safety wire pliers (years working on motorcycle roadracers) and I'm not afraid to use 'em
but- not to impugn Rat's integrity or results- just couldn't see how this repair could work.
To clarify...I believe the people who say it does but it's so counterintuitive that I couldn't make myself try it.
I felt I'd always be wary and overly ginger with the repaired doorhandle, certain that the safety wire would break at any moment.
I wanted to go back to being blissfully unconcerned whether my door would open or not, so a more involved fix was necessary.
This my attempt.
Certainly, much more elaborate than drilling two holes and looping some wire but potentially just as strong as the part was originally
and good for several more years of operation.
"Potentially" being the operative word here but there's only one way to find out.
Here is the problem...
Here was my first take on the "scab plate" I thought would fix things...
And this is a rough dimensional drawing after I had the handle in hand and could measure it.
Below the drawing is the rough cut piece I ended up with...
The scab plate was cut from some .080 aluminum plate I had (a Lian-li PC case sidepanel, in fact).
I used two part epoxy in the crack itself and then again on the back of the scab and used rubber bands to hold everything in position while the curing took place.
There was no expectation that the epoxy would actually fix things, it was only intended to hold the two pieces in alignment while I drilled and tapped for the screws that I hope will make this work.
Half an hour later I drilled and tapped the assembly for 2-56 screws.
You'll note that I only ended up with two instead of the planned three screws...room was at a premium and I counted myself very lucky to have drilled the two holes without breaking the small drillbit.
After the screws were installed I discovered a flaw in my planning...the bottom of the scab had to be angle cut to allow the arm to retract properly.
Not a big deal, although it was a bit awkward to cut.
Finally, the finished repair...
T'aint that pretty and the craftsmanship is nothing to write home about but it does seem to work...at least the arm pushes the necessary amount on the pivot bar to open the door and I can see no evidence of the arm separating at the break.
Now to reinstall and see how long the repair holds.
I'll be carrying the replacement in my bin just in case but I'm cautiously optimistic that the fix will last.
This was not a very difficult repair...total time was less than two hours (including epoxy cure time) and it didn't require any exotic tools/techniques, so I'm offering it as a possible alternative to other methods.
It's certainly possible that this failure could strike anyone at any time, so having some options is always good.
 01-15-10, 12:08 PM
#2
Now With 10th AE Fun!
iTrader: (1)
Join Date: Jun 2005
Location: CA
Posts: 1,869
Likes: 0
Received 0 Likes
on
0 Posts
Definitely a more rugged approach. I recently had to do the J-Rat method and it has been working great for about a month. I personally don't really like to over engineer something, but that seems to be your thing. More power to you. I hope it holds up as it is a bitch to get that handle out.
01-15-10, 12:56 PM
#6
Very nice, i've fixed a few when they break at the other common spot.. were the spring pivot place is.. but i've always concidered these break "unfixxable" i think i might try a buncha like this! i've got access to at least 20 broken ones
Trending Topics
 01-15-10, 05:31 PM
#10
Clokker, there is also a Dupli-color rattlecan spray that is a very good match for Blaze Red. I looked through my paint collection just now and I'm pretty sure it was this one: "Super Red II 88-01560." When my door handle broke, I got one off a gold S4 and painted it myself, followed with some Dupli-Color clear. It turned out well and was pretty indistinguishable from my factory paint which was still in good shape.
That said, kudos on the ingenuity of your repair. Hope it works out.
That said, kudos on the ingenuity of your repair. Hope it works out.
01-16-10, 03:23 PM
#11
My driver side handle recently broke, although I'm not surprised since its not actually attached to the door ever since the mounting nuts broke when this bitch hit me in an explorer....
I recently grabbed a blue 'sport' door and pristine white vert door handle (for my black car). This seems like a lot of work, especially if you have to go back in and repair it again since door handle removal is rather tedious. But thanks for providing us w/ another alternative if we can't source (or afford) a new handle!
I recently grabbed a blue 'sport' door and pristine white vert door handle (for my black car). This seems like a lot of work, especially if you have to go back in and repair it again since door handle removal is rather tedious. But thanks for providing us w/ another alternative if we can't source (or afford) a new handle!
