
10-9 second build with Boost Innovations
 03-26-07, 08:38 AM
#1
Senior Member
Thread Starter
10-9 second build with Boost Innovations
Hey guys, Ill start a thread so people can follow because i have had alot of questions concerning alot of things. I am working with a new shop named Boost Innovations out of Fargo ND. They are very capable and most of all they want to make the customer happy. They are a great bunch of guys
Website should be about done boostinnovations.com
Ill keep posting pics and information as i go along, but ill might aswell start now
The hope here is for a 600hp 13b rew powered FC via a garrett GT42 that will run 10's all day and possibly touch 9's..... and yet be a daily driven street car
Here is a quick list of things that are done or will be
Complete wire tuck + all OEM wire mess delete
Coils in car
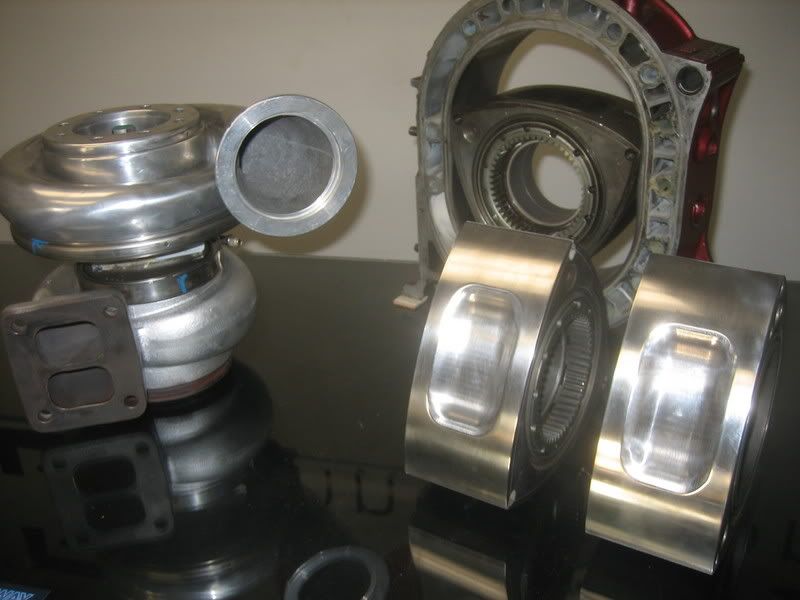
13b rew build and install
custom radiator setup
Boost Innovation's SS tubular turbo manifold + dual tial 38's and 4" full exhaust
custom Aluminium oil pan
custom intake manifold
granny 3 link 8.8 rearend install
all stock gauges + switches gone.... autometer in place
plus a whole bunch more stuff
Ill cover and post pics of all this and we proceed...
Ill start off with a little turbo fun
Started off a new virgin Garrett GT4202.....102mm compressor not the 94mm
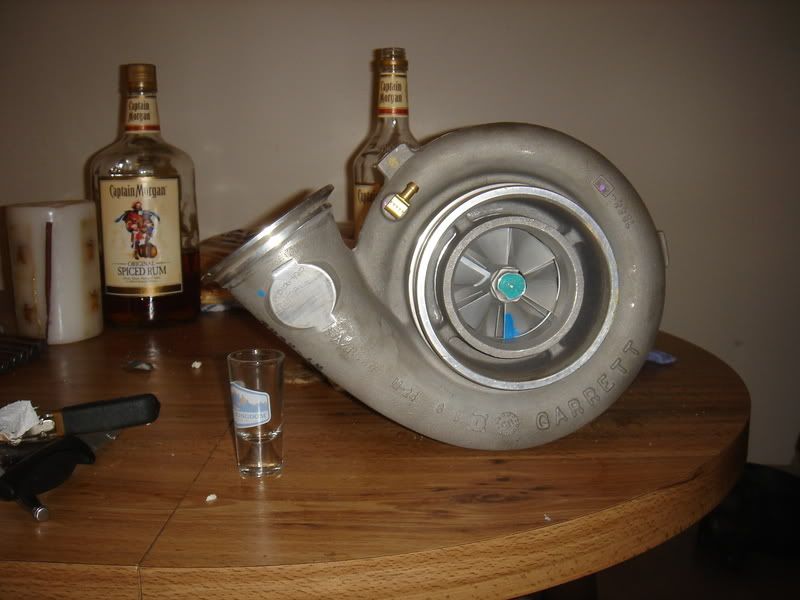
and happens when i have too much time.... the other turbo is my old PT67, not a tiny turbo either
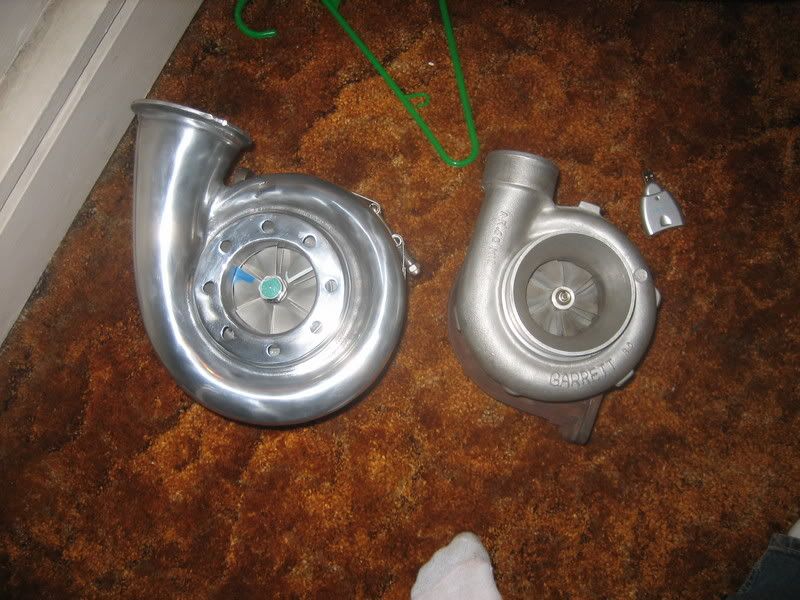
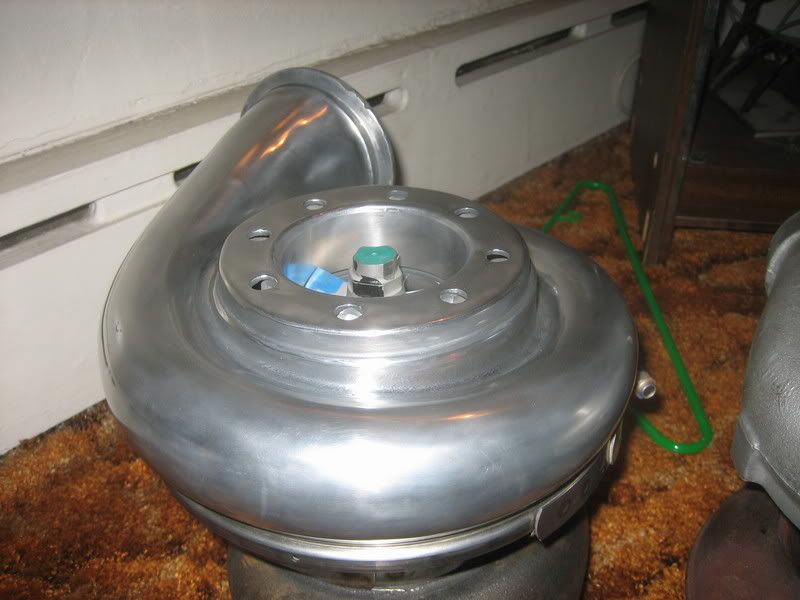
I cut all the ugly tabs and markings off and polished the compressor cover, also cut the snout down flush with the inner intake, welded in a ring and and drilled some holes. I should have not drilled holes and deleted the anti-surge, but i want to hear it first i think ..... there is just enough to clamp a filter but watch your fingers
I will post a bunch more pics tonight when i get them uploaded, oh and we are going with the 13b rew because i cracked the rear iron on my s5 high compression motor that i built.
If you guys have any idea's or opinions please let me know, cuz i know there are a bunch of well thinking 7 brains out there
Website should be about done boostinnovations.com
Ill keep posting pics and information as i go along, but ill might aswell start now
The hope here is for a 600hp 13b rew powered FC via a garrett GT42 that will run 10's all day and possibly touch 9's..... and yet be a daily driven street car
Here is a quick list of things that are done or will be
Complete wire tuck + all OEM wire mess delete
Coils in car
13b rew build and install
custom radiator setup
Boost Innovation's SS tubular turbo manifold + dual tial 38's and 4" full exhaust
custom Aluminium oil pan
custom intake manifold
granny 3 link 8.8 rearend install
all stock gauges + switches gone.... autometer in place
plus a whole bunch more stuff
Ill cover and post pics of all this and we proceed...
Ill start off with a little turbo fun
Started off a new virgin Garrett GT4202.....102mm compressor not the 94mm
and happens when i have too much time.... the other turbo is my old PT67, not a tiny turbo either
I cut all the ugly tabs and markings off and polished the compressor cover, also cut the snout down flush with the inner intake, welded in a ring and and drilled some holes. I should have not drilled holes and deleted the anti-surge, but i want to hear it first i think ..... there is just enough to clamp a filter but watch your fingers
I will post a bunch more pics tonight when i get them uploaded, oh and we are going with the 13b rew because i cracked the rear iron on my s5 high compression motor that i built.
If you guys have any idea's or opinions please let me know, cuz i know there are a bunch of well thinking 7 brains out there
Last edited by zbrown; 03-26-07 at 08:45 AM.
 03-26-07, 09:14 AM
#4

what gears are you going to run with that 8.8? Also what can you get a granny 8.8 for? A buddy of mine just got a chasis engineering ford 9" in for his first gen. he will be getting 6.00gears for it. Anyways looks like this will be a fun project
 03-26-07, 02:13 PM
#7
What's the point??
iTrader: (6)
Join Date: Oct 2005
Location: Omaha, NE
Posts: 995
Likes: 0
Received 0 Likes
on
0 Posts
Am I correct in assuming that you are going to use AI in order to reach this goal?
Good luck, I definitely think you would be one of the ones that could do it, especially judging by previous projects.
Good luck, I definitely think you would be one of the ones that could do it, especially judging by previous projects.
Trending Topics
03-26-07, 09:40 PM
#8
Senior Member
Thread Starter
Originally Posted by hondahater
what gears are you going to run with that 8.8? Also what can you get a granny 8.8 for? A buddy of mine just got a chasis engineering ford 9" in for his first gen. he will be getting 6.00gears for it. Anyways looks like this will be a fun project
Well guys I am going with the 8.8 because i only have a NA lsd in back right now....
 but what the hey it got me into the 11's on slicks with a 1.60 60ft and didnt break so i cant complain.
I I know the TII rear is strong, i beleive it is around an 8" gear right? But will it be dependable? with supporting equipment like axles, lsd and pinion snubber and strong mounts?
Also i feel the i'd lose some considerable weight with the swap.... it seems to me the removal of the whole subframe and the install of a solid axle there would be a significant weight drop, is this true?? I think the 9" is alot heavier too isnt it?
I want stay around a 4.00 gear in back i think, i like my gearing as it sits..... shorter gears and 1rst gear is pointless, and id be in the sweet spot of 4th finishing crossing the line at about what mph i need. I want this to be a street car and not buzzing at 5k down the interstate all day.
Any opinons on this, give me some advice, i like hearing different thoughts.
I plan to see where the NA lsd breaks..... but if you guys think a TII rear will cut it then maybe just stick with that???
thanks guys
03-26-07, 09:58 PM
#9
Senior Member
Thread Starter
alright got some pics loaded. I guess we'll start with some shiny stuff
Here are the polished 9.7:1 rotors i did that are going in the engine + the turbo
and the exhaust flanges showed up
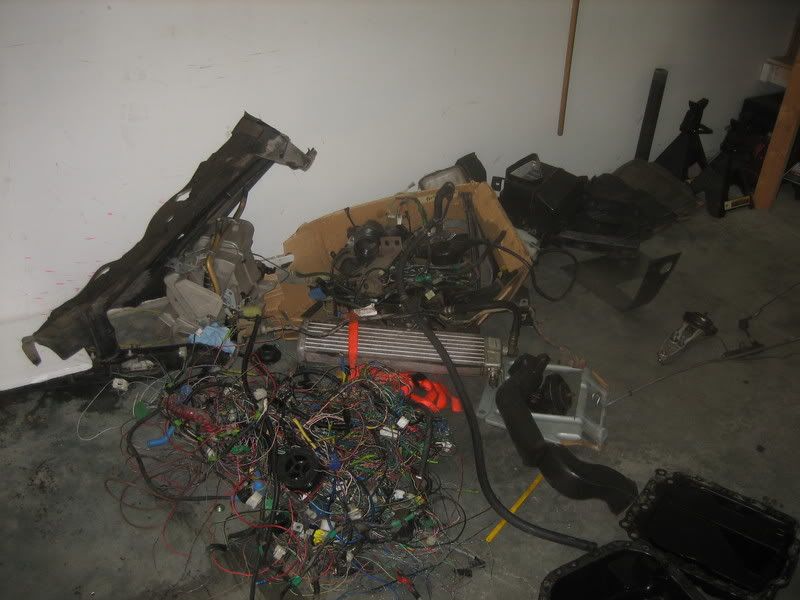
Here is the pile-o-**** that came off the car so far.... note the wiring..... that is everything from the stock harness from the seats forward
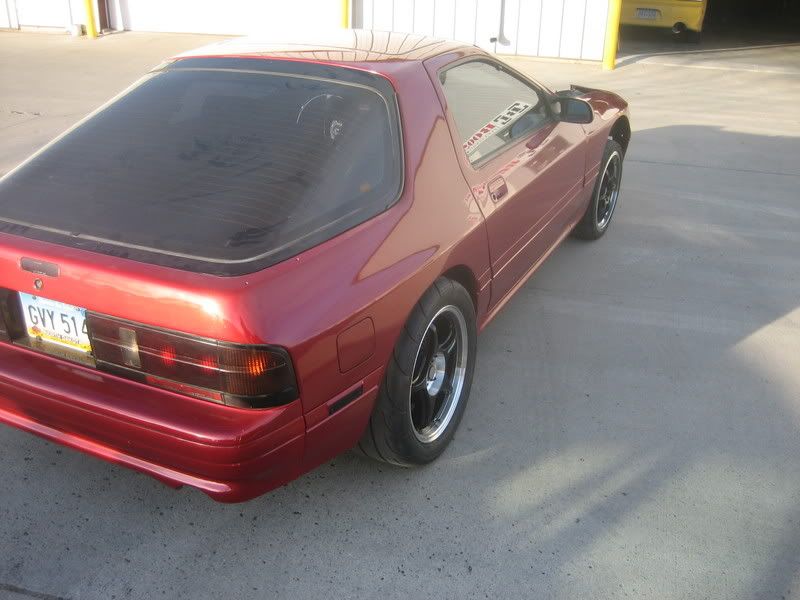
Well here is a shot of the new wheel combos for the street. They are 5Zigen's with Mickey Thompson drag radials 275, should hook on the street. Have a set of 10.5 full slicks for the track
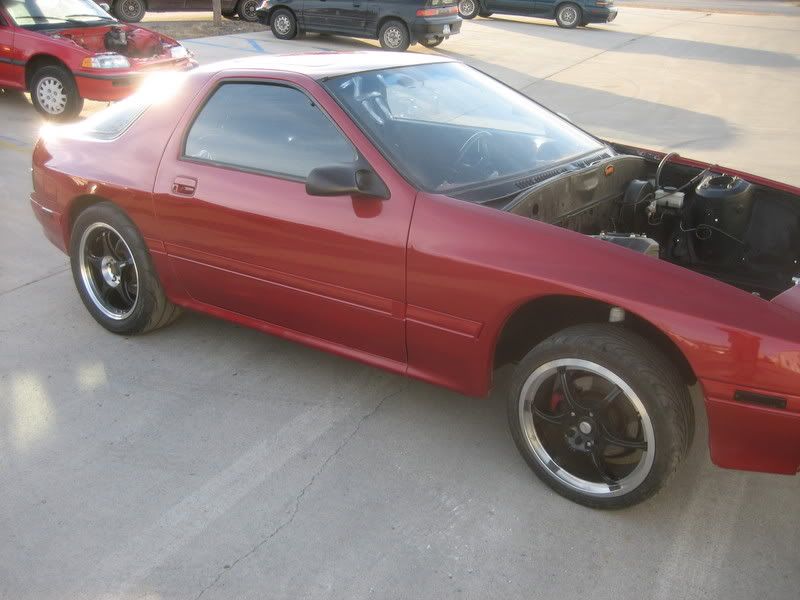
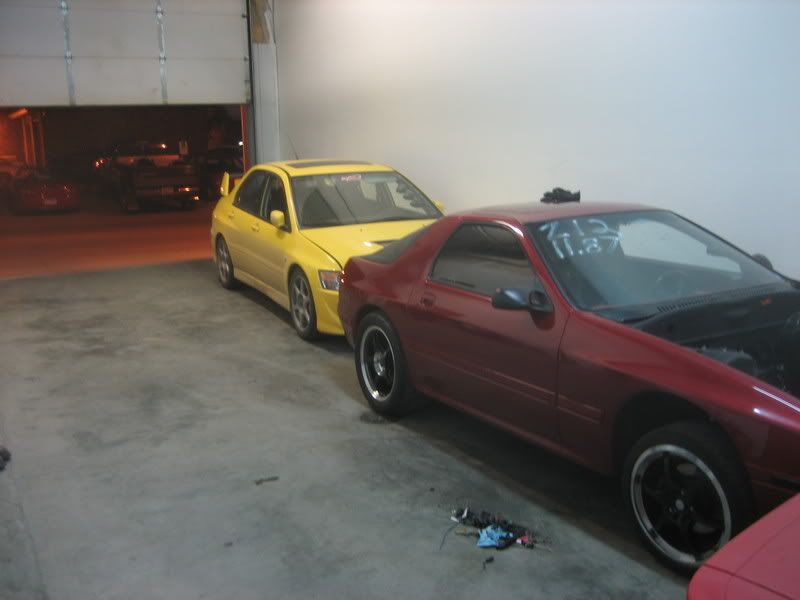
gotta love the take off position with the engine out.... base 11 second evo in the one pic aswell
Here are the polished 9.7:1 rotors i did that are going in the engine + the turbo
and the exhaust flanges showed up
Here is the pile-o-**** that came off the car so far.... note the wiring..... that is everything from the stock harness from the seats forward
Well here is a shot of the new wheel combos for the street. They are 5Zigen's with Mickey Thompson drag radials 275, should hook on the street. Have a set of 10.5 full slicks for the track
gotta love the take off position with the engine out.... base 11 second evo in the one pic aswell
03-26-07, 10:32 PM
#10
Senior Member
Thread Starter
Here are some of the engine bay
Note the following
cross memeber for 13rew install
complete wire tuck
coils in car
radiator setup
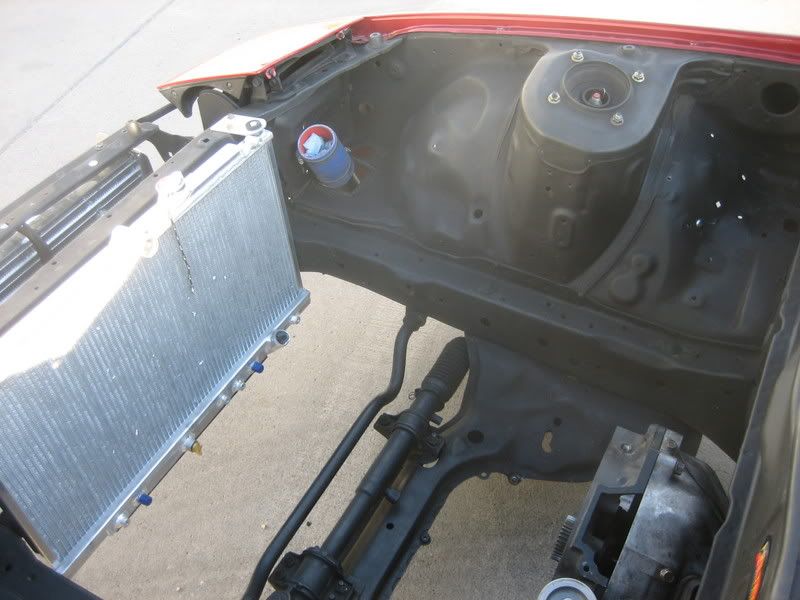
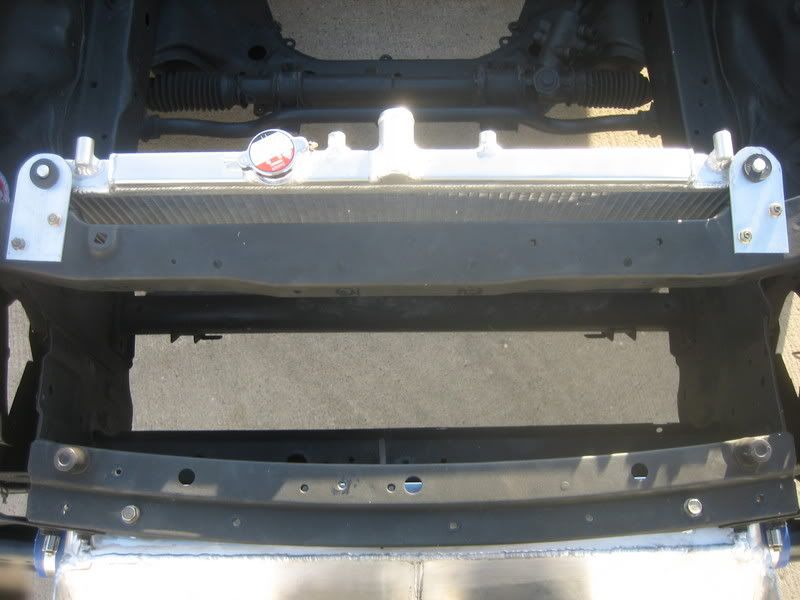
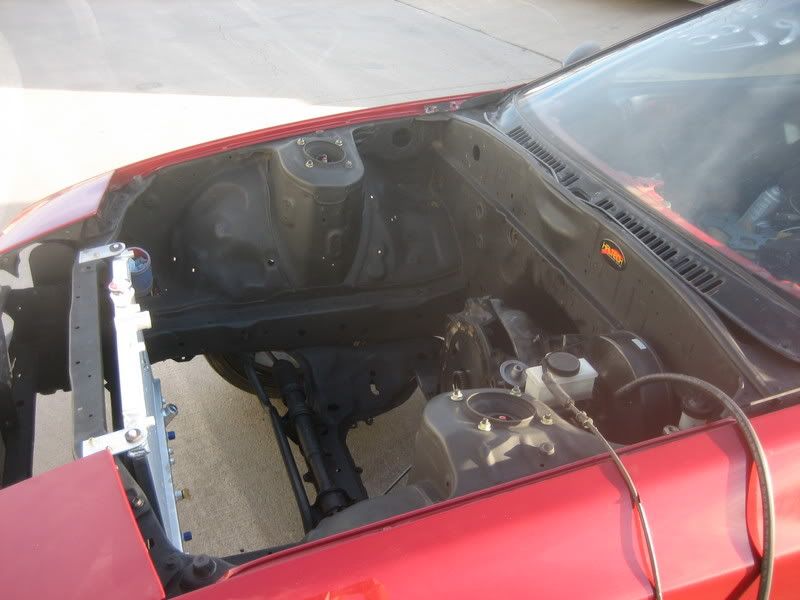
the radiator is for an Integra... it is such a perfect fit.
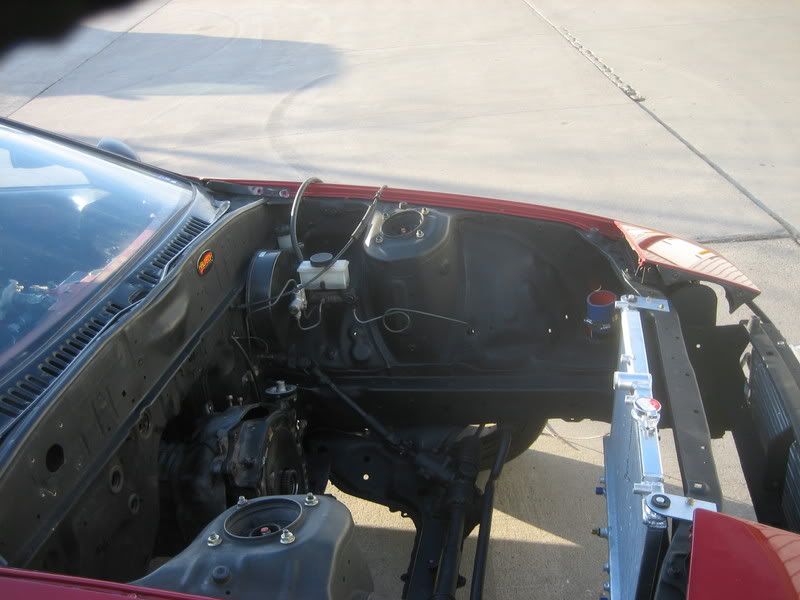
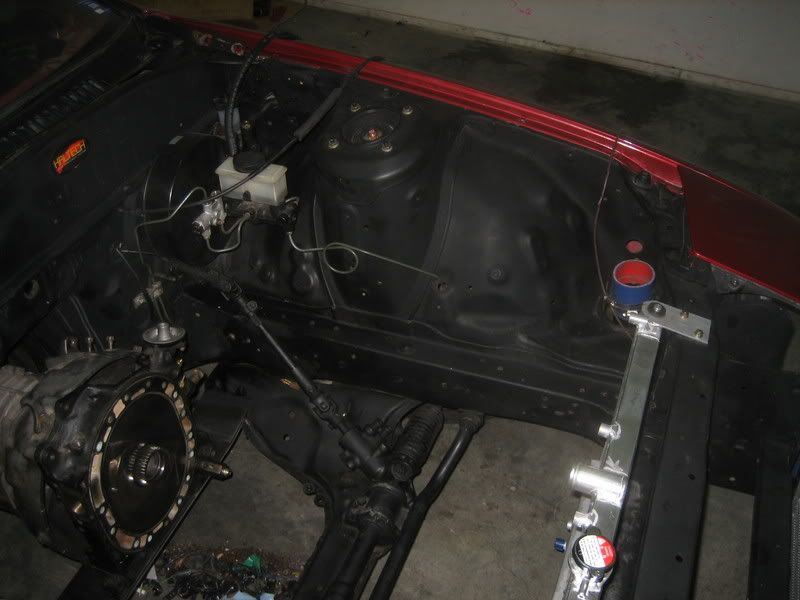
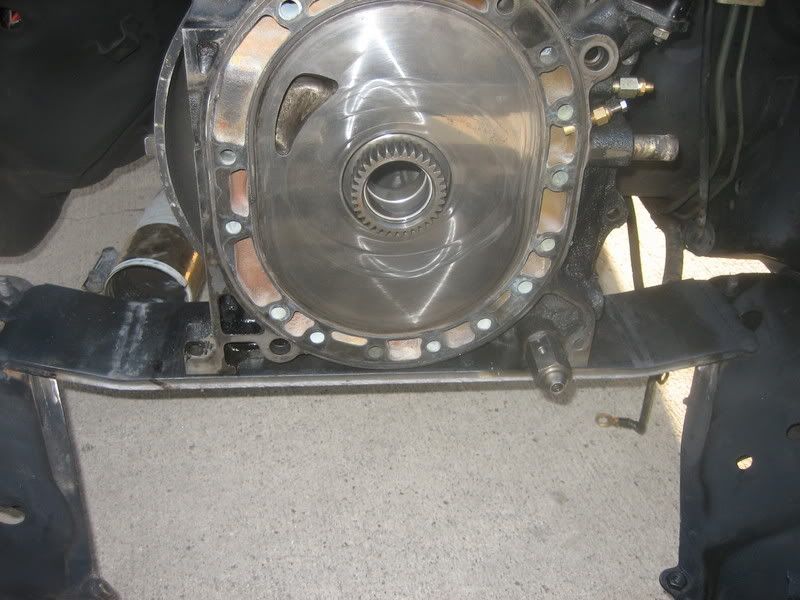
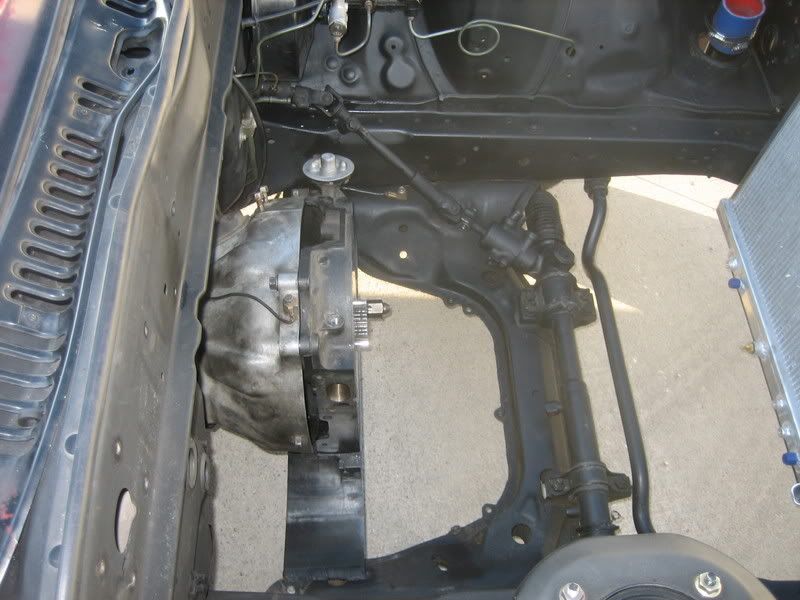
in the next pics you can see the cross memeber i did. 1/2 cold rolled steel that bent in a press to fit perfectly. I am going to lay a strip of urethane down between the cross member and engine for mounting.
another thing that happend that i didnt design for, is that the tranny will just sit on the cross memeber aswell. no need to pull the tranny for engine extraction, and very easy engine installs. somthing that actually worked with bonus as well
OH yeah and since the fc engine sits at a stupid *** angle and not in the middle of the car, this one will sit square with the car and in the middle, **** like that bothers me for some reason
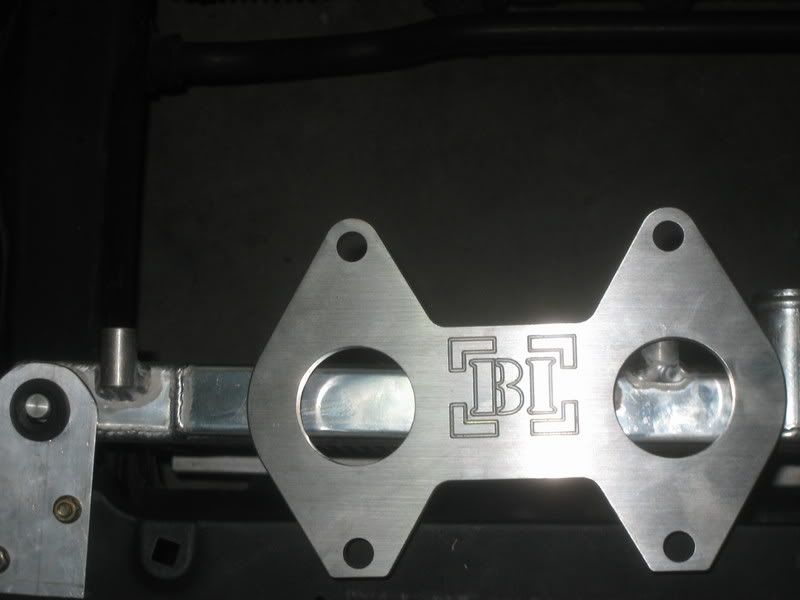
check out my sweet port job on the old s5 plate.... gayass cracked dowel casting if you can see too
Here are some of the IC setup. I will prolly place some black expanded metal over the front.... how would that look??? give me some advice on that
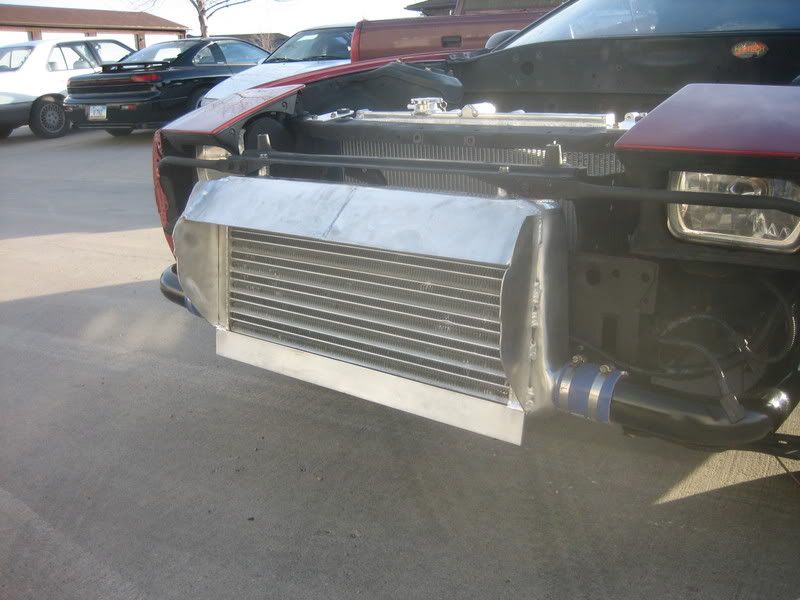
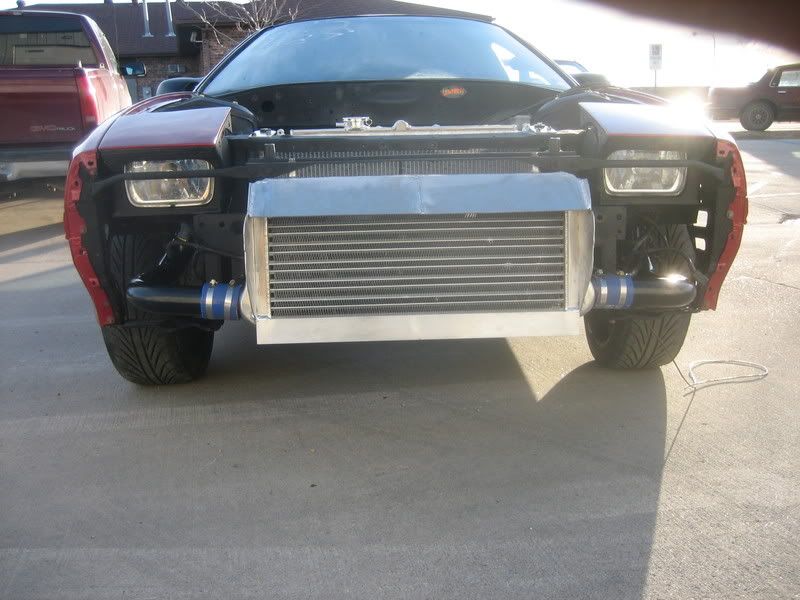
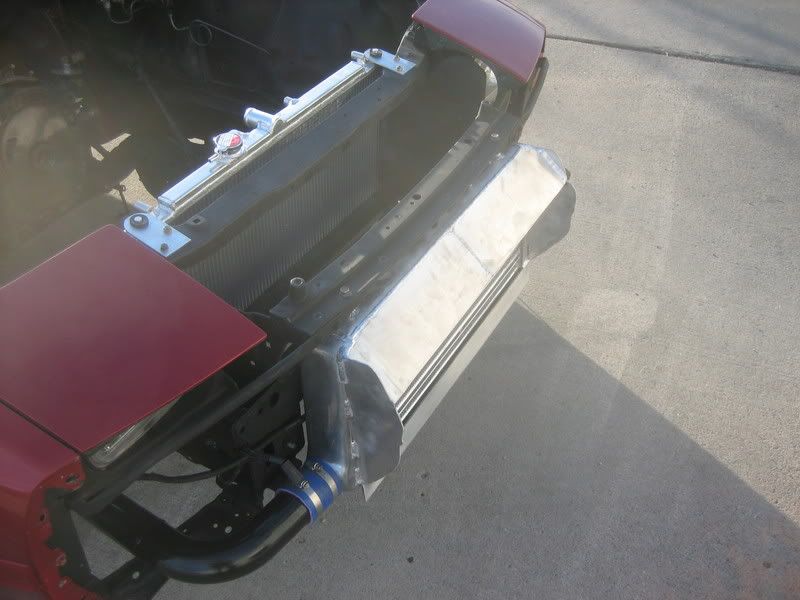
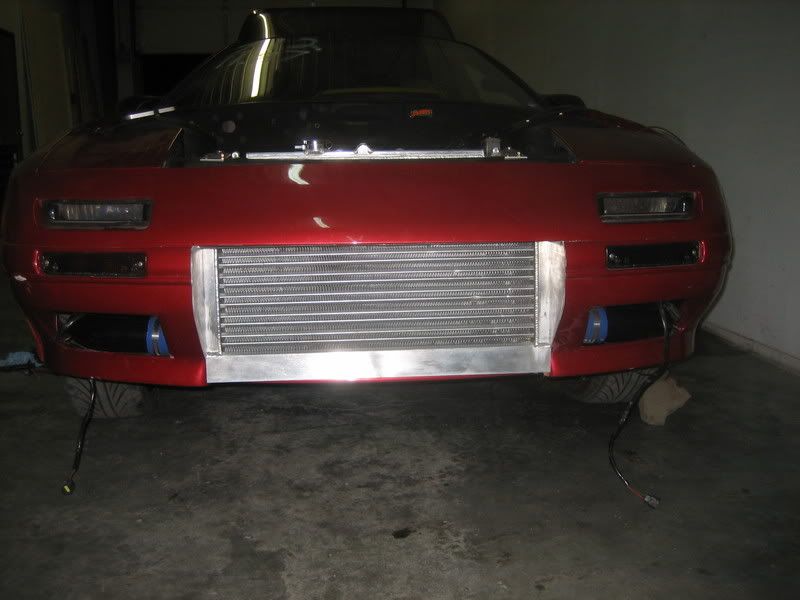
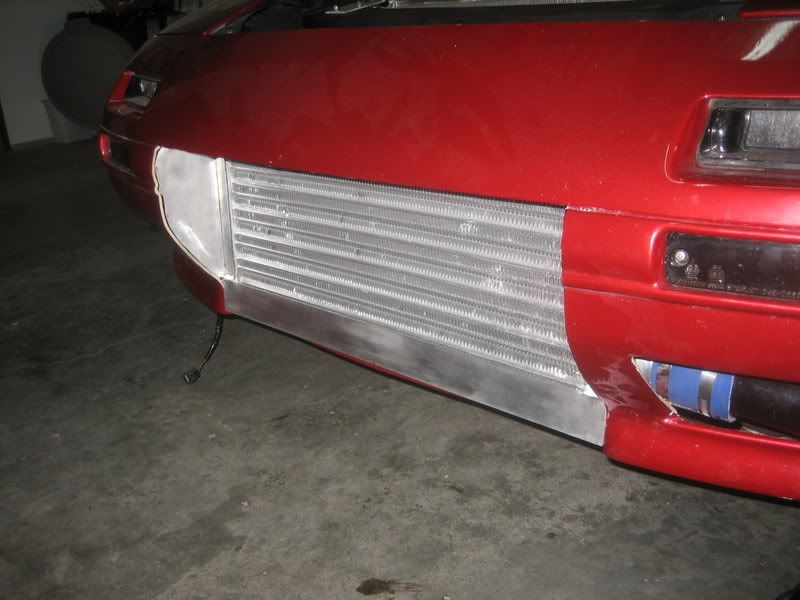
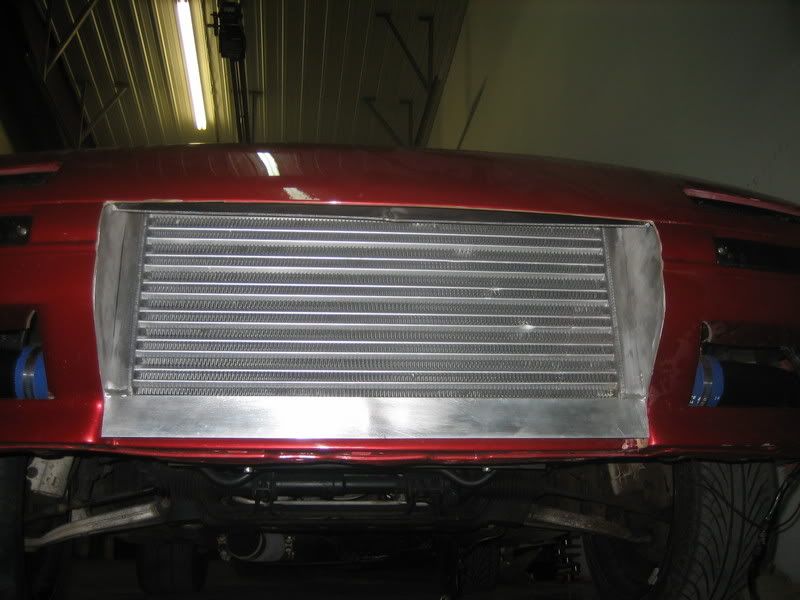
I still need some black trim to go anound the edges of the bumper where i cut it out.... so black expanded mesh or no?
Note the following
cross memeber for 13rew install
complete wire tuck
coils in car
radiator setup
the radiator is for an Integra... it is such a perfect fit.
in the next pics you can see the cross memeber i did. 1/2 cold rolled steel that bent in a press to fit perfectly. I am going to lay a strip of urethane down between the cross member and engine for mounting.
another thing that happend that i didnt design for, is that the tranny will just sit on the cross memeber aswell. no need to pull the tranny for engine extraction, and very easy engine installs. somthing that actually worked with bonus as well
OH yeah and since the fc engine sits at a stupid *** angle and not in the middle of the car, this one will sit square with the car and in the middle, **** like that bothers me for some reason
check out my sweet port job on the old s5 plate
.... gayass cracked dowel casting if you can see tooHere are some of the IC setup. I will prolly place some black expanded metal over the front.... how would that look??? give me some advice on that
I still need some black trim to go anound the edges of the bumper where i cut it out.... so black expanded mesh or no?
03-26-07, 10:53 PM
#11
is it just the pics or does that radiator look smaller than the stock one? Not sure if I would trust a radiator made for a 4 banger to cool the likes of a rotary producing enough hp to get me down the 1/4 in 8 or 9 seconds. Just my thoughts. Anyways nice job on the ic ducting! and the rotors look bling bling!
03-26-07, 10:54 PM
#12
Senior Member
Thread Starter
and to finish the night here are some of the interior
dont worry the dash and everything will be back in there
also i can reach all the fuses and everything with the dash on, youd be amazed how much room is back in there with the heater/ac stuff out
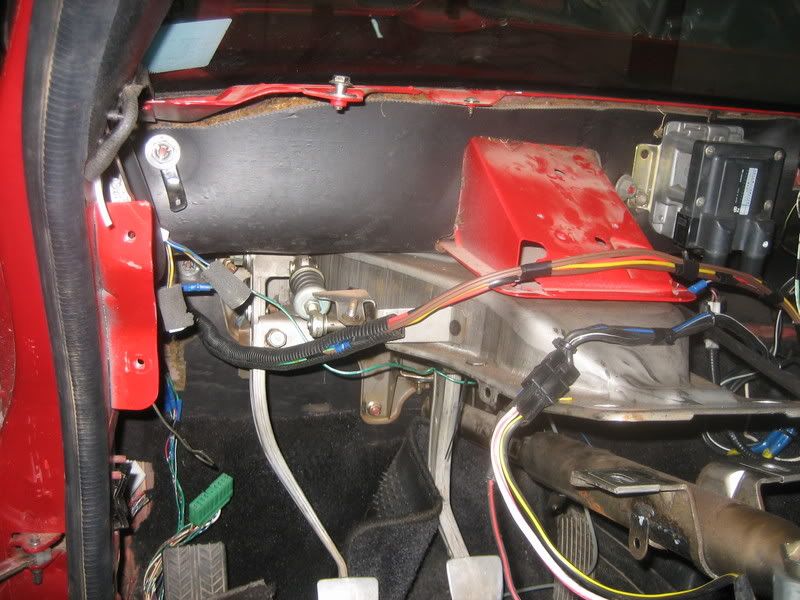
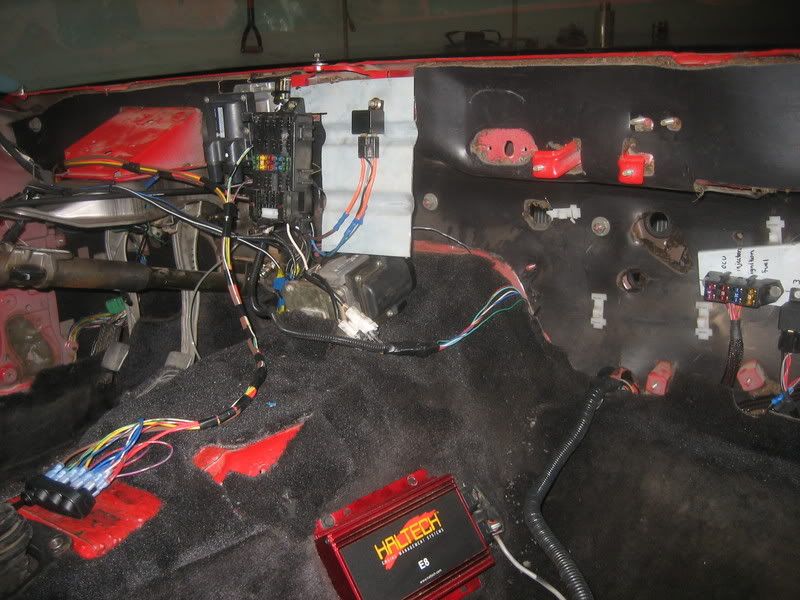
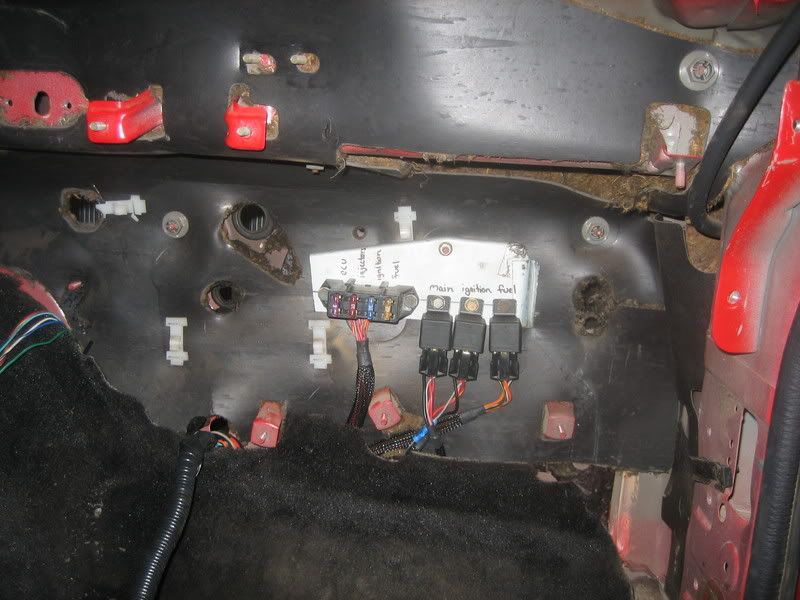
uhi have toggles running everything, i did the harness from scratch. turned out very nice and clean + everything workes
can see the coils there
the spark plug wires will come out he driver side heater core hole and the haltech engine harness through the passenger side one
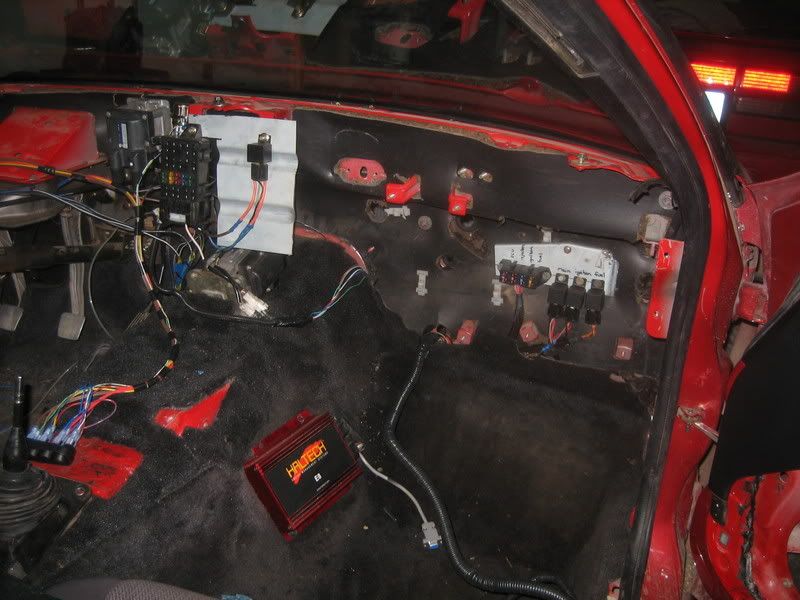
more when i get the engine back from paint do the build
and if some are wondering the engine bay was painted with a PPG epoxy primer....it is thick and very very durable. i have had brake fluid sit on it with nothing to show for it
give some advice if you have it
thanks
dont worry the dash and everything will be back in there
also i can reach all the fuses and everything with the dash on, youd be amazed how much room is back in there with the heater/ac stuff out
uhi have toggles running everything, i did the harness from scratch. turned out very nice and clean + everything workes
can see the coils there
the spark plug wires will come out he driver side heater core hole and the haltech engine harness through the passenger side one
more when i get the engine back from paint do the build
and if some are wondering the engine bay was painted with a PPG epoxy primer....it is thick and very very durable. i have had brake fluid sit on it with nothing to show for it
give some advice if you have it
thanks
Last edited by zbrown; 03-26-07 at 11:01 PM.
03-26-07, 11:09 PM
#13
Senior Member
Thread Starter
Originally Posted by hondahater
is it just the pics or does that radiator look smaller than the stock one? Not sure if I would trust a radiator made for a 4 banger to cool the likes of a rotary producing enough hp to get me down the 1/4 in 8 or 9 seconds. Just my thoughts. Anyways nice job on the ic ducting! and the rotors look bling bling!
but i measured and it holds a pinch more water than a stock rad...even with its small tanks. if i have heating problems i ll switch to a thicker core.
but when i was running on 400 wheel on the pt67 my temps usually sat around 190-200 but when i did the new intercooler setup (minus the ducting) temps sat around 160-170 all the time on the stock radiator and the fan never ran unless it sat still. I was very suprised by the huge diffence the large inlet and lack of bumper did for cooling
i think this rad should cool up to par becasue of the large amount of extra air flow from the very large entrance.... plus the ducting
maybe im wrong but i hope it works..... most hondas use half size rads, and the full size rads stock are 5/8 of an ich thick
03-26-07, 11:19 PM
#15
Banned. I got OWNED!!!
Originally Posted by zbrown
yeah the core itself is thinner,
but i measured and it holds a pinch more water than a stock rad...even with its small tanks. if i have heating problems i ll switch to a thicker core.
but when i was running on 400 wheel on the pt67 my temps usually sat around 190-200 but when i did the new intercooler setup (minus the ducting) temps sat around 160-170 all the time on the stock radiator and the fan never ran unless it sat still. I was very suprised by the huge diffence the large inlet and lack of bumper did for cooling
i think this rad should cool up to par becasue of the large amount of extra air flow from the very large entrance.... plus the ducting
maybe im wrong but i hope it works..... most hondas use half size rads, and the full size rads stock are 5/8 of an ich thick
 03-27-07, 08:07 PM
#19
Senior Member
Thread Starter
Originally Posted by NZ_87_TURBO
are you planning on running a dry sump setup?
......going to make a deep sump oil pan out of aluminum. I have to because i am using the s5 front cover still. and the pan should turn out perty damn niceanybody have any idea what the weight of stock subfram + diff vs an 8.8 solid axe would be ??
as for J-rat..... more power to the FC guys
03-28-07, 03:14 PM
#21
What's the point??
iTrader: (6)
Join Date: Oct 2005
Location: Omaha, NE
Posts: 995
Likes: 0
Received 0 Likes
on
0 Posts
Originally Posted by yusoslo
waiting for more pics!
also coil relocation pics would be sweet!
also coil relocation pics would be sweet!
Here:
03-28-07, 04:13 PM
#22

Damn.. Nice work! I was planning on doing a similar setup with my old GXL that I had gutted out. I took out every single wire in the car. Then when trying to wire everything back up, I figured I was waaaay in over my head. Now I understand a lot more about whats involved witha project such as this. So I may give it another try in a year or so. Right now my goal is to get my vert into 11s. Very hard I know, But im working on it. If I cant, ill buy a coupe and throw my setup in there. 
Nice work though man. looks really clean
Nice work though man. looks really clean
03-28-07, 07:08 PM
#23
Senior Member
Thread Starter
here is a pic of the coils you can see clearly..... this was before i decided to rip out the stock massive harness. so that is why it is still there.
i was gonna just strip down the stock harness..... till i got into it and said **** it and just started from scratch... turned out nice thouh
should have the engine peices back from paint by fri or sat. then i can port and have it together by hopefully sunday. Prolly start on my oil pan tommorrow.

i was gonna just strip down the stock harness..... till i got into it and said **** it and just started from scratch... turned out nice thouh
should have the engine peices back from paint by fri or sat. then i can port and have it together by hopefully sunday. Prolly start on my oil pan tommorrow.
03-29-07, 07:41 AM
#25
I have injector envy!
Looks great. I just need to extend some wires so I can get my coils there I am thinking of mounting mine on the drivers side so I can access them easily. I also like how you have the blue and black colors so you know whats what in the engine bay.
Did you used custome cut to length wires? I am also worried about finding a good ground for these coils under the dash... I guess I could mount them and then run a ground wire to one of the bolts where I mount.
Did you used custome cut to length wires? I am also worried about finding a good ground for these coils under the dash... I guess I could mount them and then run a ground wire to one of the bolts where I mount.