
Project: "He doesn't know how to EFI..."
 10-12-09, 09:40 AM
#26
The Doctor
Thread Starter
iTrader: (1)
Join Date: Apr 2008
Location: Cedar Rapids, IA
Posts: 1,185
Likes: 0
Received 0 Likes
on
0 Posts
So I just found out some stuff looking at the parts I have to work with.
The harness I have is a USDM S4 NA. I also have a JDM S5 T2 harness. Would I be better off just extending the wires on that? It would probably help on the wire tuck if I had some extra cable to work with anyway.
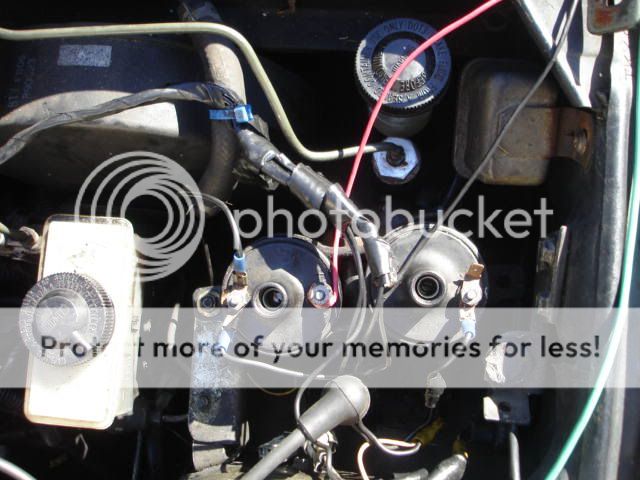
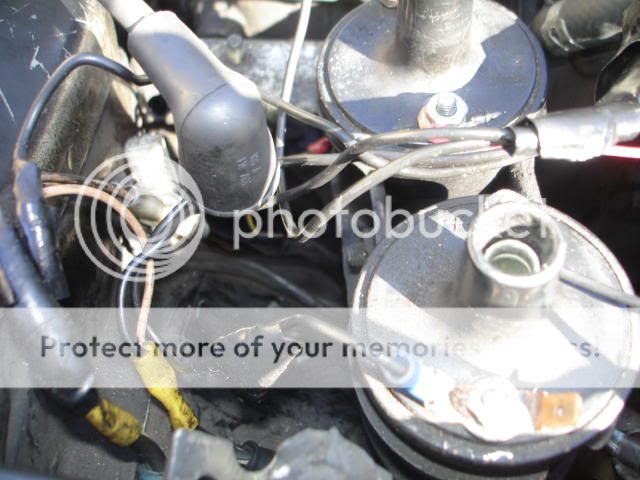
And I also found I have another situation. The drivers side body harness is completely FUBAR~! It's all hacked up (was when I bought the car). What part of the harness do the stock coils hook into? Isn't their suppose to be a main relay up in that corner of the engine bay next to the brake booster? That would be the square box in the top right, right?
This is the old ignition setup (for carb, it came this way)
The harness I have is a USDM S4 NA. I also have a JDM S5 T2 harness. Would I be better off just extending the wires on that? It would probably help on the wire tuck if I had some extra cable to work with anyway.
And I also found I have another situation. The drivers side body harness is completely FUBAR~! It's all hacked up (was when I bought the car). What part of the harness do the stock coils hook into? Isn't their suppose to be a main relay up in that corner of the engine bay next to the brake booster? That would be the square box in the top right, right?
This is the old ignition setup (for carb, it came this way)
 10-19-09, 02:23 PM
#27
The Doctor
Thread Starter
iTrader: (1)
Join Date: Apr 2008
Location: Cedar Rapids, IA
Posts: 1,185
Likes: 0
Received 0 Likes
on
0 Posts
So I've been trying to get all the specs together for assembly of the new motor. Theirs the basics in the Haynes, but some builders don't go by those specs and have recommended their own. Right now I have:
Apex seal length - .0015in
End play - .0025in
Side - corner seal - .003in (NO MORE THAN THIS)
I've tried the search function to find others that builders have recommended over the manual but this forum is so cluttered with crap, the search function is useless. Are their any other important ones that are going to be different from what the manual says?
I've begun ordering the soft seals as well as some of the hard seals. All items in color are from mazdatrix (with part number listed).
Current budget list:
Item Qty Part number Price
Gasket Set 1 10-S600-N370 $218.70
Inner Rotor O-ring 4 11-3410-0820 $38.40
Outer Rotor O-ring 4 11-3430-1202 $74.00
SideSeal Spring 12 11-C170-N-326 $19.08
Corner Seal Plugs 12 11-C22A-N326 $22.56
Corner Seal Springs 12 11-C240-NF01 $32.04
RR Main Oil seal 1 10-556A-1668 $9.32
FT Main Oil Seal 1 10-6050-0820 $4.33
Apex Seal 6 11-C00C-N351 $381.78
SIDE SEAL 12 11-C110-N3Y1 $147.72
RA Race Apex Seal Springs $80.50
Manifolds, Ecu, Harness's, and Turbo - $0
Walbro 255 with ~100 miles - $40
Dremel & Accesories: $50
Himni Solid Mounts: $70
This brings the current total to: $1038.43 or with Florida 7% tax, $1111.12
This price includes a FULL shortblock overhaul (except for rotors, housings, and irons) for those who don't know the internals. This setup is for ***ALL OEM*** internals except for aftermarket apex seal springs.
 10-19-09, 02:47 PM
#31
Junior Member

Join Date: Sep 2009
Location: san antonio
Posts: 48
Likes: 0
Received 0 Likes
on
0 Posts
this is something i plan on doing with my 91 vert going turbo good luck i will be checkin this thread alot
Last edited by MikeTZ; 10-19-09 at 02:47 PM. Reason: spelling error
10-19-09, 02:49 PM
#32
The Doctor
Thread Starter
iTrader: (1)
Join Date: Apr 2008
Location: Cedar Rapids, IA
Posts: 1,185
Likes: 0
Received 0 Likes
on
0 Posts
Yeah, just something metal in there. No JB Weld or stick weld here. Again, I'm trying to cut as few corners as possible with this build. It's my first (personal) turbo car and I'd like it to be a good experience, not constantly have problems with it to the point where I sell it (what usually happens to most people).
10-19-09, 03:57 PM
#33
The Doctor
Thread Starter
iTrader: (1)
Join Date: Apr 2008
Location: Cedar Rapids, IA
Posts: 1,185
Likes: 0
Received 0 Likes
on
0 Posts
I can't edit my old post so I'm going to have to double post, sorry.
I stated in my first post, I was going to use the RA super seals and reusable soft seals. I decided to go with oem soft seals and apex seals since I did some asking around and people have had good experiences with the reusable seals, but they only had them in the car for a year and would rebuild, not actually run the seals till they break. And after asking around, the stock seals should be able to hold without a problem.
And I heard some horror stories about aftermarket 1 pieces eating up housings if they werent carbon seals. Sorry, I dont have a extra 1300$ to shell out just on apex seals. Same with this, stock seals should be fine. I'm not trying to break 9's with this car, just have something quick.
10-19-09, 04:38 PM
#35
The Doctor
Thread Starter
iTrader: (1)
Join Date: Apr 2008
Location: Cedar Rapids, IA
Posts: 1,185
Likes: 0
Received 0 Likes
on
0 Posts
It seems the main problem people are having with them is that they leak a little bit by the exhaust, allowing exhaust into the system and small amounts of coolant out.
10-19-09, 05:00 PM
#37
The Doctor
Thread Starter
iTrader: (1)
Join Date: Apr 2008
Location: Cedar Rapids, IA
Posts: 1,185
Likes: 0
Received 0 Likes
on
0 Posts
I'm one of those "drive it to break it" kinda people.
10-19-09, 06:41 PM
#39
The Doctor
Thread Starter
iTrader: (1)
Join Date: Apr 2008
Location: Cedar Rapids, IA
Posts: 1,185
Likes: 0
Received 0 Likes
on
0 Posts
Why have a sports car if your not going to drive it like one.
Haven't you ever seen Ferris Buellers Day Off?
<object width="560" height="340"><param name="movie" value="http://www.youtube.com/v/_S7AyiVfNdA&hl=en&fs=1&"></param><param name="allowFullScreen" value="true"></param><param name="allowscriptaccess" value="always"></param><embed src="http://www.youtube.com/v/_S7AyiVfNdA&hl=en&fs=1&" type="application/x-shockwave-flash" allowscriptaccess="always" allowfullscreen="true" width="560" height="340"></embed></object>
Nah. Nothing like that. It was hard enough to break the mounts though.
 10-22-09, 03:07 PM
#41
The Doctor
Thread Starter
iTrader: (1)
Join Date: Apr 2008
Location: Cedar Rapids, IA
Posts: 1,185
Likes: 0
Received 0 Likes
on
0 Posts
Yep. I'm trying to go pick up the motor some time this week so I can crack it open. Looking forward to posting a lot of pics so their arent all these kids always asking "what does it take to rebuild a motor?".
11-06-09, 01:22 PM
#42
The Doctor
Thread Starter
iTrader: (1)
Join Date: Apr 2008
Location: Cedar Rapids, IA
Posts: 1,185
Likes: 0
Received 0 Likes
on
0 Posts
So it's time for a little update.
I've been busy lately with some personal stuff so I haven't had a LOT of time to work on this, but I did get a few things done.
Again, I cant explain how long it has actually taken me to sand/smooth/polish some of this stuff. I have a new earned respect for people who have polished their manifolds. Especially by hand.
I was able to go pick up the motors so I can finally start that part of the build. However, I do need a 54mm socket as it seems my mechanic put the flywheel back on the motor before I picked it up (guess he wasn't too happy at me for something at the time).
If anyone on here has one in the Orlando area, I'll give them a couple double cheeseburgers to let me borrow it for about a hour or two.
Without further ado, pictures!
Throttle body (still a work in progress)
<img src="http://img.photobucket.com/albums/v112/Xenium911/DSCN0001.jpg" width="736" height="552">
<img src="http://img.photobucket.com/albums/v112/Xenium911/DSCN0005.jpg" width="795.5" height="596.5">
Began work on the LIM
<img src="http://img.photobucket.com/albums/v112/Xenium911/DSCN0007.jpg" width="784" height="588">
The N/A block (2nd and 3rd pic are the front rotor, rear just has some carbon build-up)
<img src="http://img.photobucket.com/albums/v112/Xenium911/DSCN0008.jpg" width="841" height="631">
<img src="http://img.photobucket.com/albums/v112/Xenium911/DSCN0015.jpg" width="740" height="555">
<img src="http://img.photobucket.com/albums/v112/Xenium911/DSCN0024.jpg" width="731" height="548.5">
Like I said, I don't have a whole lot of time to work on this, so it isn't going very fast, but it'll be done eventually.
More to come when I get that socket and can open the motor.
01-16-10, 06:08 AM
#44
The Doctor
Thread Starter
iTrader: (1)
Join Date: Apr 2008
Location: Cedar Rapids, IA
Posts: 1,185
Likes: 0
Received 0 Likes
on
0 Posts
Not anymore. A lot of stuff has come up between when I started the project and I just don't have the $$ to do it right now. I hope to be able to build one right later, but it's going to have to be honda status for a little while.
01-20-10, 02:59 AM
#45
Hell yeah.
I'm trying to grow out of it but i can't see it happening. I know breaking ****=spending money i usually dont have but it's FUN!!!!
I'm liking your build so far. I tried to find a pic of a keg i saw yesterday that was straight fire. Had polished housings (they looked chrome, no ****) and fire engine red irons. I came.
Oh, and i totally feel you trying to undo the half-assed **** previous owners do to these cars. My harness isn't THAT bad but i did find SILICONE on my injector nozzles. That's right. They put the injectors into the manifold/keg using silicone. ALL 4 of the injector clips were broken as well. I said to my brother "I'm going to choke the daylights out of that kid if i ever see him again." There's alot of split/exposed wire all over the place i have to heat shrink/solder new wire in as well. Not looking foward to that.
01-20-10, 06:01 PM
#46
Senior Member
Join Date: Mar 2002
Location: Logan Utah
Posts: 409
Likes: 0
Received 0 Likes
on
0 Posts
I'm going to kindly disagree about the inability of the 3076r (30R) turbo to reach 400hp on a rotary. Just ask Andy McKee, one of the national champs for sm2 (now ssm) in autox who is making just over 400hp at ~18psi.
You'll need a little more pressure to do it, but it definitely will to it. Plus you will have some freaking fast spoolage. Don't worry, it will be a very capable turbo. Basically like a td06-20g but with slightly better compressor flow dynamics.
You'll need a little more pressure to do it, but it definitely will to it. Plus you will have some freaking fast spoolage. Don't worry, it will be a very capable turbo. Basically like a td06-20g but with slightly better compressor flow dynamics.
 01-20-10, 10:19 PM
#48
The Doctor
Thread Starter
iTrader: (1)
Join Date: Apr 2008
Location: Cedar Rapids, IA
Posts: 1,185
Likes: 0
Received 0 Likes
on
0 Posts
Unfortunately, I'm stopping this project for the time being. Some recent things have come up and the car is up for sale. I'm going to start another one when I can afford it and do it right.
Until then, I have to put put around in a Honda and keep myself out of trouble.
Until then, I have to put put around in a Honda and keep myself out of trouble.
01-21-10, 12:57 AM
#50
Also doesn't look worth the gains to thin the **** out that much. Sure, you could knife it out a little bit but that intake "porting" or whatever you want to call it is way overdone.
If you can do that job with a "CUT OFF WHEEL" i'll paypal you $100.
DIE GRINDER
FLAP WHEEL
Seriously, at that point i'd be seeking out an alternative throttle body.
The lower butterfly area looks as though it's been filled with jb weld.
You could probably bend the areas between the upper and lower butterflies with your fingers.