why rear wheel well rust?
 07-01-08, 02:20 AM
#1
Senior Member
Thread Starter

why rear wheel well rust?
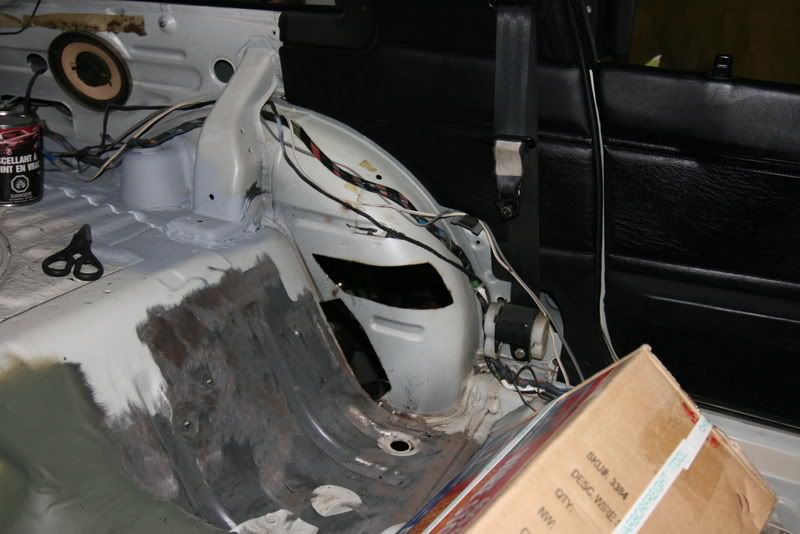
despite under coating upon undercoating every year, my rx-7 has the classical rear wheel rust.
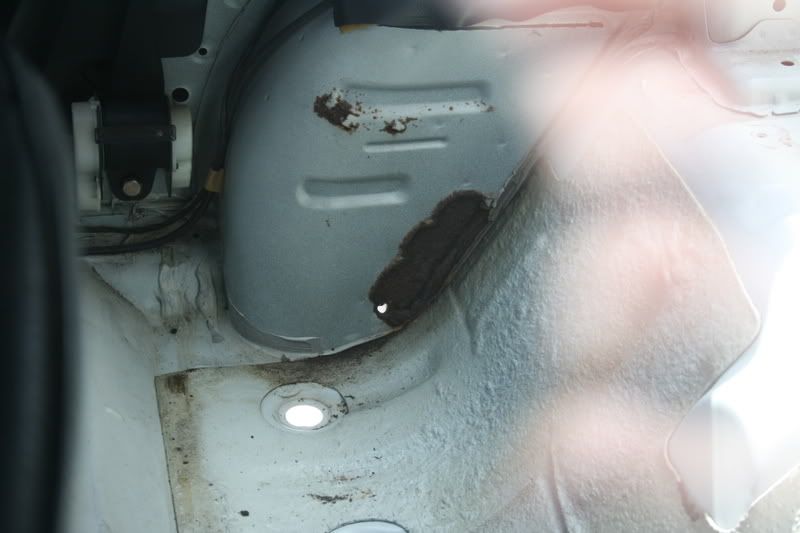
The top area that is rusted through on my car, well the water seaped inbetween two horizontal pieces of metal.
Why did the area that isn't rusted through rust? Where is the damn water coming from???!!!
And I chipped away all the loose rust down to intact metal, can i just use pore15, and then bondo it?
 07-01-08, 03:45 AM
#2
I hate drum brakes
Join Date: Oct 2006
Location: West Palm Beach, Florida
Posts: 638
Likes: 0
Received 0 Likes
on
0 Posts
Hey... Wait a second, that's a picture from my car 
The water gets in between there from condensation, and driving in the rain.
Here is my car now, and this is what you need to do to fix the problem.
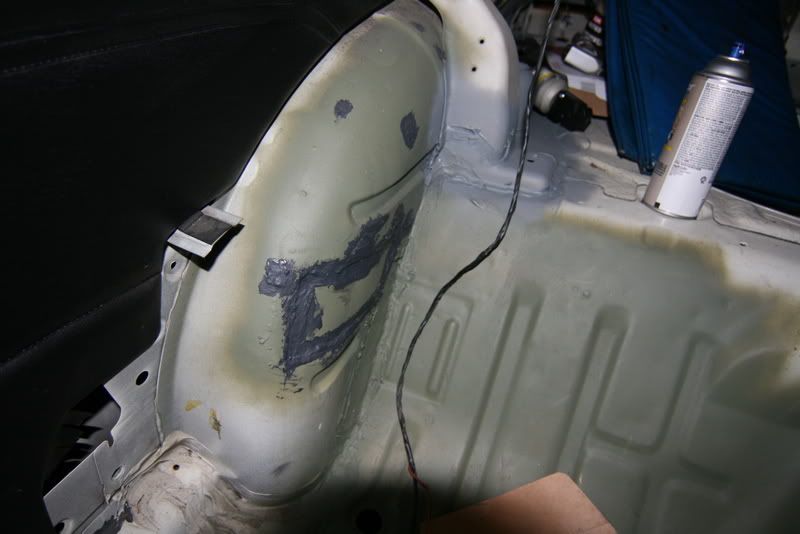
The full version:
That bondo looking crap is actually seam sealer. The lack of seam sealer where it's needed lets water in so it can rust.
The water gets in between there from condensation, and driving in the rain.
Here is my car now, and this is what you need to do to fix the problem.
The full version:
That bondo looking crap is actually seam sealer. The lack of seam sealer where it's needed lets water in so it can rust.
07-01-08, 08:03 AM
#3
Senior Member
Thread Starter
Box, yes that is your car. I'm too cheap to buy a digital camera. How did you get the sheet metal to fit so nice?
Is are the black areas in the first picture rust inhibitor (por 15)?
Buying a home welder, now that would really endear me to the apartment manager!!!
Is are the black areas in the first picture rust inhibitor (por 15)?
Buying a home welder, now that would really endear me to the apartment manager!!!
07-01-08, 08:38 AM
#4

i think it was trochoid that did a write up on this as well. he pointed out the problem areas and showed how to seal them correctly. though BoxMan's explanation is very good, you may also want to consider looking into trochoid's thread to get even more info on the wheel well resto.
07-01-08, 10:48 AM
#5
I hate drum brakes
Join Date: Oct 2006
Location: West Palm Beach, Florida
Posts: 638
Likes: 0
Received 0 Likes
on
0 Posts
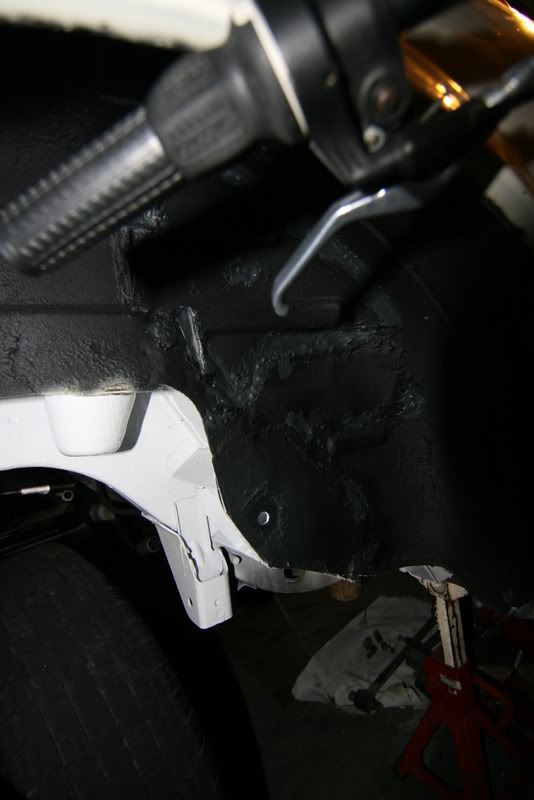
I formed the sheet metal to the proper shape by using a hammer (cheap ball peen set from harbor freight), an anvil (big heavy vice), and lots of patience.
The black area in the first pic is just shadows, those are really holes where I cut away rusted metal. I'm not using any por-15 on the fenders, except for where there's a little orange on the survace of the stock heavy gauge parts that I'm re-using, other than that, I'm cutting away all the rusted sheet metal and replacing it with non corroded metal. The drivers side is getting the same treatment as the passenger side, but it's a few steps behind the others as you can see in the pictures.
Hopefully Trochoid can add his $.02, because he has a really good build thread that inspired me and gave me lots of ideas.
07-01-08, 06:08 PM
#6
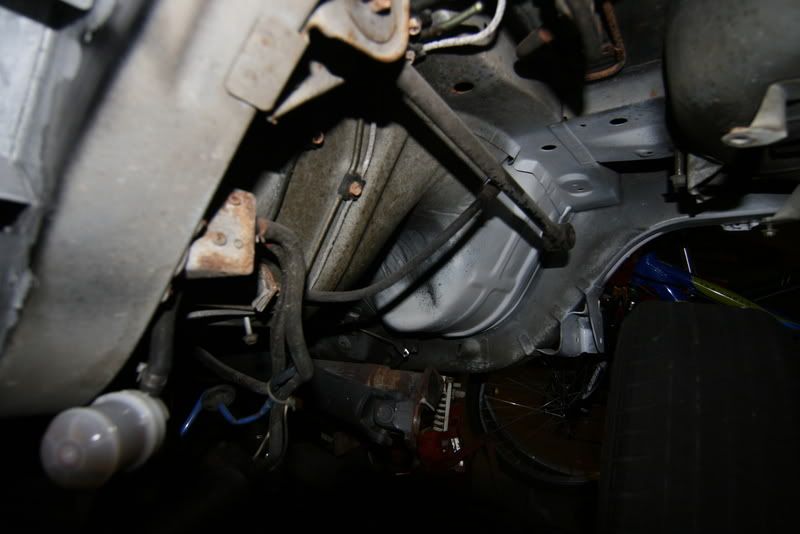
The lower part of the wheel well rusts because that's where the mount for the link arm is. The reinforcing bracket is poorly sealed where it's spot welded to the body. This allows water to migrate behind it and begin the rust process. Since there is some metal flexure at this point and the seam sealer dries out over time, rust is inevitable. The rust at the upper part of the wheel well is caused by the failure of Mazda to seal the extra reinforcing patch on the inside of the wheel well.
To truely repair and prevent future rust, both of these patches should be removed, all rust treated, then the patches can be replaced, sealed with seam sealer followed by a generous undercoat. Personally, I prefer using the Dupli-Color Truck Bed Liner. The other undercoatings are generally bitumen based and over time the VOCs evaporate out, leading to cracking where water can migrate in an begin the rust process again. The truck bed liner is a plastic/urethane base and not subject to the same shrinkage.
To truely repair and prevent future rust, both of these patches should be removed, all rust treated, then the patches can be replaced, sealed with seam sealer followed by a generous undercoat. Personally, I prefer using the Dupli-Color Truck Bed Liner. The other undercoatings are generally bitumen based and over time the VOCs evaporate out, leading to cracking where water can migrate in an begin the rust process again. The truck bed liner is a plastic/urethane base and not subject to the same shrinkage.
07-01-08, 06:24 PM
#7
Senior Member
Thread Starter
if only I sealed this 18 years ago when I 1st got the car, if only mazda did things right 25 years ago!! all this time, I've been putting the undercoating in the wrong place!!!
Great item for a group buy, pre fabbed sheet metal to fix this.
So much is rusted, now I'm worried about the structural integrity.
Great item for a group buy, pre fabbed sheet metal to fix this.
So much is rusted, now I'm worried about the structural integrity.
Trending Topics
07-01-08, 06:36 PM
#8
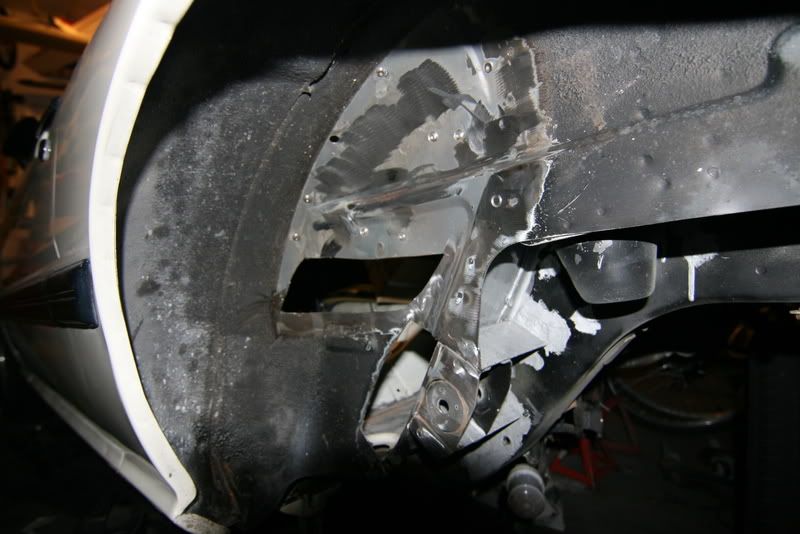
Excellent pic. It shows the the link arm plate I was refering to and if one looks closely, the seam for the other patch can be seen above it. It's those joints that need to be sealed with an automotive grade seam sealer, after proper rust prevention methods are performed. After that, Hit it with truck bed liner.
Also note in the larger patch that there are 3 holes punched that were never sealed from the factory. Those 3 holes are a major point of entry for moisture and must be sealed off.
Also note in the larger patch that there are 3 holes punched that were never sealed from the factory. Those 3 holes are a major point of entry for moisture and must be sealed off.
07-01-08, 10:23 PM
#9
Senior Member
Thread Starter
can I use sheet metal screws instead of spot welds or pop ribbits?
And it mazda used spot welds, then those pieces of metal are not load bearing.
And to think about all the damn lectures I had to go to about Japanese Quality, and how Dr Taguchi considerred it a sin against society to for industrial design to produce waste.
And it mazda used spot welds, then those pieces of metal are not load bearing.
And to think about all the damn lectures I had to go to about Japanese Quality, and how Dr Taguchi considerred it a sin against society to for industrial design to produce waste.
07-01-08, 11:30 PM
#10
To replace the patches, definitely not. The lower link bracket must be welded in due to the stresses involved. The larger wheel well patch could be pop riveted, but I'd use fiberglass resin/epoxy to secure it. The rivets would simply draw the patch down tight and hold it in place until the resin sets.
07-05-08, 06:56 AM
#11
Senior Member
Thread Starter
so where can I get the sheet metal?
There are all kinds, grades (galvanized, high carbon steel, stainless, and aluminum). Galvanized gives off poisonous gas when welded.
How about a frying pan, cast iron?
There are all kinds, grades (galvanized, high carbon steel, stainless, and aluminum). Galvanized gives off poisonous gas when welded.
How about a frying pan, cast iron?
07-05-08, 07:48 AM
#12
20-22 gauge mild steel is fine for the larger curved patch, but to do it properly you need a forming hammer, sand bag and an English wheel. If I could get enough orders for both right and left hand sides, I'd happily spend the nearly 1k needed for an english wheel and planishing hammer.
For the link bracket, 3/32-1/8" mild steel is fine. The rolled edge on the oem piece is for added strength. If one can't duplicate that, stepping up the thickness by 1/16" will make up for that.
Gavlanized steel is only toxic when welded or flame cut. Wearing a vapor respirator will mitigate the hazard. But then one loses the corrosion protection on the edges that are cut or welded. All parts should be coated with a weld through primer, prior to install, a couple coats of epoxy prior to seam sealing, then topcoated with chassis black, truck bed liner or undercoating as a final step.
07-07-08, 04:17 PM
#13
Senior Member
Thread Starter
got 1/8 th inch mild steel sheet metal from a muffler shop for $10. The OEM body metal is 1/32 and the reinforcing plate is 1/16 inches, so I think I replace both with the steel plate as shown. And drill a hole only large enough for the bolt.
Drilling out the welds was surprisingly easy, and hammer and wood chisel easily cut through the body metal.
Drilling out the welds was surprisingly easy, and hammer and wood chisel easily cut through the body metal.
Last edited by speedracer_not; 07-07-08 at 04:22 PM.
07-08-08, 11:56 AM
#14
Full Member

Join Date: Jan 2008
Location: England
Posts: 67
Likes: 0
Received 0 Likes
on
0 Posts
Watching this closely guys as my '85 UK car is just starting out cracking across the bottom reinforcing plates. How urgent do you think a repair is, since as said, it's just a flexing type of crack at the minute?
07-08-08, 01:46 PM
#15
Senior Member
Thread Starter
it all depends on the amount of rust that you >>>cannot see<<< right now.
You need to worry about the rust behind the backing plate that supports the bolt hole.
In my car's case, the rust area around the bolt hole (bushing) is only cosmetic yet the body sheet metal was rusted through.
At the top of the wheel well, I chipped a little (less than a sq cm) rust bubble, and it got bigger and bigger and bigger (like 10 inches, and rusted clear though in some areas).
07-09-08, 06:59 AM
#17
Full Member
Join Date: Jan 2008
Location: England
Posts: 67
Likes: 0
Received 0 Likes
on
0 Posts
it all depends on the amount of rust that you >>>cannot see<<< right now.
You need to worry about the rust behind the backing plate that supports the bolt hole.
In my car's case, the rust area around the bolt hole (bushing) is only cosmetic yet the body sheet metal was rusted through.
At the top of the wheel well, I chipped a little (less than a sq cm) rust bubble, and it got bigger and bigger and bigger (like 10 inches, and rusted clear though in some areas).
You need to worry about the rust behind the backing plate that supports the bolt hole.
In my car's case, the rust area around the bolt hole (bushing) is only cosmetic yet the body sheet metal was rusted through.
At the top of the wheel well, I chipped a little (less than a sq cm) rust bubble, and it got bigger and bigger and bigger (like 10 inches, and rusted clear though in some areas).
There's nothing apparent at the moment except for a flex crack on each side but I suppose that behind that will be all sorts of rust.
My welding skills are long gone, but I've started to talk to a resto specialist about 50 miles from me in York. I think he started on stagecoaches!
I shall strip out the interior and free off the tie rods for him (refitting the tie rods straight away to keep it mobile).
07-09-08, 04:15 PM
#18
Senior Member
Thread Starter
ukcoder,
this project at first seems allot harder than it is. The 1/8 inch mild steel plate was surprising easy to drill a hole through, and bend slightly. Drilling out the welds were nothing but elbow grease and a power drill. The a hammer and wood chisel cut the body sheet metal easier than a frozen pizza.
also, maybe I'm missing something, but why did mazda design that backing plate's hole so big. i think it would be better it the bolt went through the backing plate's hole. Maybe it has something to do with collision crush zones??

Thread
Thread Starter
Forum
Replies
Last Post