Weekend well spent!!! rust repair
 11-19-06, 08:56 PM
#1
Weekend well spent!!! rust repair
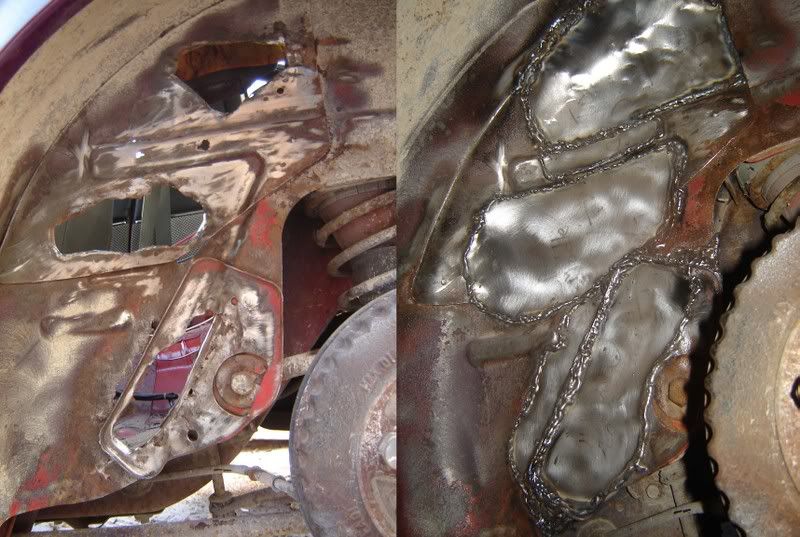
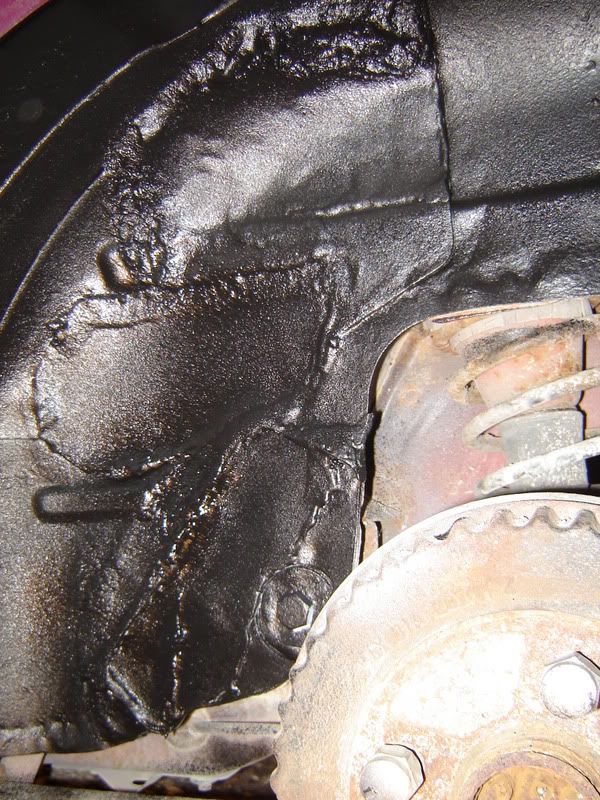
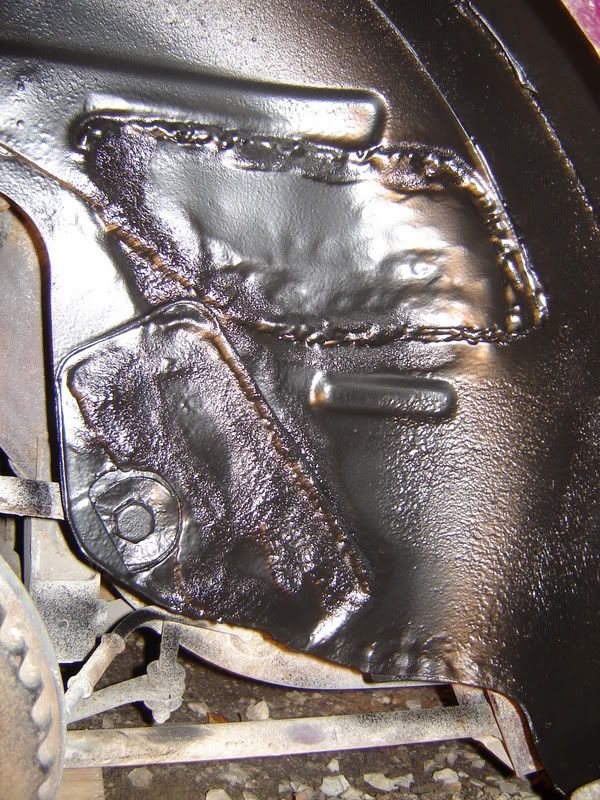
Well, I got into the new project car finally this weekend and found that it had a bit more rust than I had thought. No problem, I started goin on it and its already lookin not too bad. I still have the inside to do up but its a start.
Thought Id throw up a few pictures for you guys to see, hope the welds dont hurt too much to look at...It was my first time welding on a car, and it took a while to get used to LOL.
A bit of grinding and prep/paint will help a lot, but this is all I could get done this weekend. Will post more pictures next week, and since I have everything documented so well, if anyone thinks I should do a writeup, that could follow as well.
Cheers!
 11-19-06, 09:53 PM
#2
400WHP or bust
iTrader: (7)
Join Date: Oct 2003
Location: Walkerton, Ontario Canada
Posts: 4,048
Likes: 0
Received 0 Likes
on
0 Posts
Turn the wire speed down on the welder, and bump the heat up a bit. Doesn't look like it's sheilded with gas either, Flux-Cored wire?
Little bit of grinding and it will look good, good work.
Little bit of grinding and it will look good, good work.
11-19-06, 10:04 PM
#3
I was using argon/co2 and .025 solid mild steel wire.
The bottom pictures were done first. I had the gas a little too low, and was holding the gun a little too far away, thats why it looks a bit oxidized.
I think Ive got the hang of it now, I am just out of practise!!
Im using the recomended heat/feed settings that came with the welder, so I think I should be good as far as that. Just need some more practise.
 11-19-06, 10:08 PM
#5
400WHP or bust
iTrader: (7)
Join Date: Oct 2003
Location: Walkerton, Ontario Canada
Posts: 4,048
Likes: 0
Received 0 Likes
on
0 Posts
The heat and feed settings are all feel and sound set ups, once you get the steady crack for lack of a better term you know it's set right, and .025" seems kind small, I use .035" all the time good penitration on the welds, and more filler is applied.
11-20-06, 09:17 AM
#7
G0D OF DEATH
iTrader: (9)
Join Date: May 2006
Location: Illinois
Posts: 1,051
Likes: 0
Received 0 Likes
on
0 Posts
fantastic pictures , i am doing the same thing to my rx7 . yeah by the time you grind the welds down and get the under coating back on there nobody will be able to tell it has had anything done to it .
Trending Topics
 11-20-06, 04:48 PM
#11
400WHP or bust
iTrader: (7)
Join Date: Oct 2003
Location: Walkerton, Ontario Canada
Posts: 4,048
Likes: 0
Received 0 Likes
on
0 Posts
Well even if he moved slower and pushed the wire into the weld puddle it would have done a better job, but this should work.
Set up in mig welding is the one of most important things, and those specs in the welding book are likely for the flat position, not the vertical.
Set up in mig welding is the one of most important things, and those specs in the welding book are likely for the flat position, not the vertical.
11-20-06, 06:12 PM
#12
K thanks a lot for everyones input!! This was my first time using the new machine, so Im sure I need to get used to the settings, as well as work on the welds.
Keep in mind I really piled up the welds, I probably made at least 2 passes on each filler piece, so that definately contributes to the sketchy look of the welds.
The metal I used was 17 Guage (I was told) but I seem to think its in the 18-20g region. Seemed fine for smaller jobs like this, and bodywork, but if I was going to be doing anything to the frame, or suspension mounts, etc. I would definately go a little thicker.
I plan to wire wheel the whole outter part of the wheel well, then either hit it with some POR-15 or just a good primer, and top it off with truck bedliner.
Im working on the inside at the moment, but once thats done Ill look more at the coating options.
After that, theres just a bit of cancer left on the rockers to take care of. I think once its all done Ill throw up a bunch of pictures of the progress and get a better writeup going. This one is just to keep the motivation up on the project!!
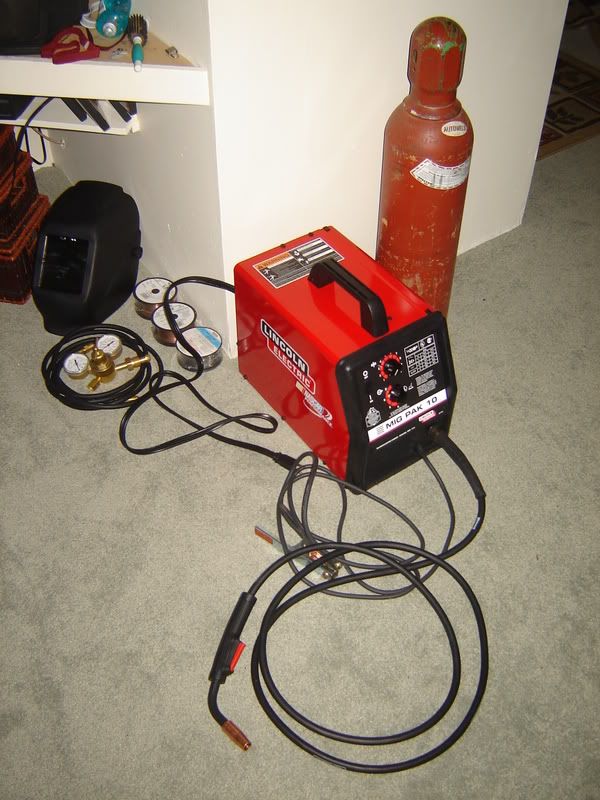
I have one question about the welding end though, I feel like my argon/co2 is disappearing quite quickly. I am running the small tanks that they will sell you (one size below the Q) and I went from somewhere in the 1400 psi region down too about 400 psi and I havent even gone through a 2lb spool of .025 wire yet. I know it doesnt last forever, and a thicker mig wire would help, but does this sound right?
I am running about 25 CFH on the regulator, that is about right isnt it???
Here is the setup for anyone that is wondering. I have a Q tank as well so there is no downtime, but with the tank pictured what sorta gas life should I see?
Keep in mind I really piled up the welds, I probably made at least 2 passes on each filler piece, so that definately contributes to the sketchy look of the welds.
The metal I used was 17 Guage (I was told) but I seem to think its in the 18-20g region. Seemed fine for smaller jobs like this, and bodywork, but if I was going to be doing anything to the frame, or suspension mounts, etc. I would definately go a little thicker.
I plan to wire wheel the whole outter part of the wheel well, then either hit it with some POR-15 or just a good primer, and top it off with truck bedliner.
Im working on the inside at the moment, but once thats done Ill look more at the coating options.
After that, theres just a bit of cancer left on the rockers to take care of. I think once its all done Ill throw up a bunch of pictures of the progress and get a better writeup going. This one is just to keep the motivation up on the project!!
I have one question about the welding end though, I feel like my argon/co2 is disappearing quite quickly. I am running the small tanks that they will sell you (one size below the Q) and I went from somewhere in the 1400 psi region down too about 400 psi and I havent even gone through a 2lb spool of .025 wire yet. I know it doesnt last forever, and a thicker mig wire would help, but does this sound right?
I am running about 25 CFH on the regulator, that is about right isnt it???
Here is the setup for anyone that is wondering. I have a Q tank as well so there is no downtime, but with the tank pictured what sorta gas life should I see?
11-20-06, 06:20 PM
#13
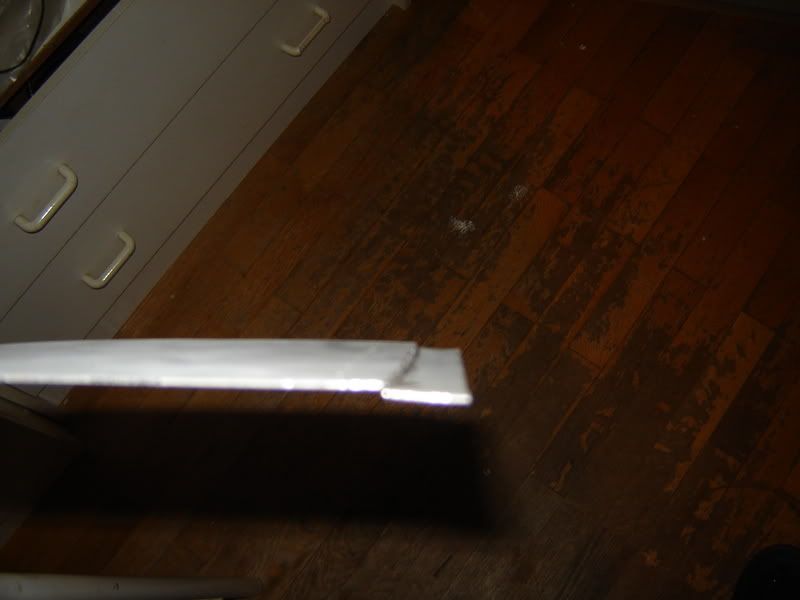
Haha, I was really not looking forward to scraping out the sound deadening/insulation material inside the car having read all the posts that say dry ice is the only way to go.
Well, I must say Im glad to be canadian because I decided one cool morning.. it was about -8 celcius (a mild fall day for us winnipeggers) that I was gonna go at the insulation crap.
5 minutes of chiseling later, and I had everything I needed out of the way. Could'nt have been any easier, and I was glad because I have no time to track down dry ice (with being at work all day...).
Just wanted to let the canucks know that were so cool we dont even need dry ice haha, just wait till the fall, winter, or spring to do it haha! amazing! lol
11-20-06, 06:31 PM
#14
400WHP or bust
iTrader: (7)
Join Date: Oct 2003
Location: Walkerton, Ontario Canada
Posts: 4,048
Likes: 0
Received 0 Likes
on
0 Posts
Yeah I stripped my whole car of the sound deadning in less then 45minutes, it was -12 but it worked awesome.
I usually run about 15CFH on my regulator, I have the Millermatic 135. I tried the Lincoln, but didn't like it too much, I don't know why either. I also use the Q tank, of Straight argon, the bimix, and the trimix seem to work better for SS.
I usually run about 15CFH on my regulator, I have the Millermatic 135. I tried the Lincoln, but didn't like it too much, I don't know why either. I also use the Q tank, of Straight argon, the bimix, and the trimix seem to work better for SS.
11-20-06, 06:33 PM
#15
I know this is my third post in a row (edit: nismo convert broke it up  haha) , but I just wanted to throw up one more picture.
These are prety much most of the tools to do a decent job on bodywork, so for the newbies who want to get into it (lol, like me) this is what I would recomend to have.
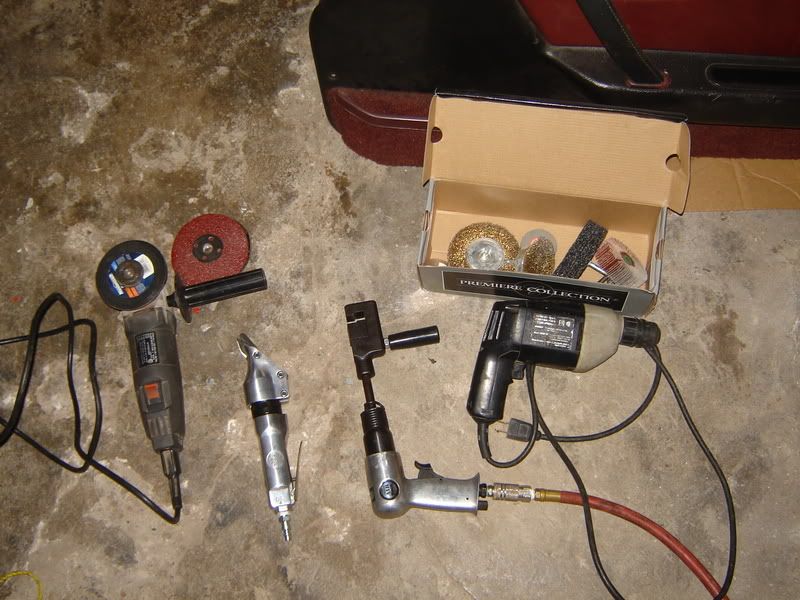
Id say at the bare minimum you are going to want a grinder with abrasive and cutoff discs, an air shear, panel crimper, and drill w/ a few wire wheels, flapwheels, and my personal fave the 3M synthetic wheel thingies. If you dont have an air compressor, then thats first on the list.
For those of you who dont know what a panel crimper is, Its a wonderfull tool for bodywork where the appearance is important. I havent gotten to the rockers yet, but I know this tool will be a nice trick to have up the sleeve.
All you do is run it along the edge of the hole your planning to fill, and voilla!!
you have a nice indent that the filler piece will drop right into. Not only will it help you hold the materials together, its really nice not to have to butt weld visible panels if you are new to welding.
Thats all for now...Ill be back soon!!!!!!!
haha) , but I just wanted to throw up one more picture.These are prety much most of the tools to do a decent job on bodywork, so for the newbies who want to get into it (lol, like me) this is what I would recomend to have.
Id say at the bare minimum you are going to want a grinder with abrasive and cutoff discs, an air shear, panel crimper, and drill w/ a few wire wheels, flapwheels, and my personal fave the 3M synthetic wheel thingies. If you dont have an air compressor, then thats first on the list.
For those of you who dont know what a panel crimper is, Its a wonderfull tool for bodywork where the appearance is important. I havent gotten to the rockers yet, but I know this tool will be a nice trick to have up the sleeve.
All you do is run it along the edge of the hole your planning to fill, and voilla!!
you have a nice indent that the filler piece will drop right into. Not only will it help you hold the materials together, its really nice not to have to butt weld visible panels if you are new to welding.
Thats all for now...Ill be back soon!!!!!!!
11-20-06, 06:44 PM
#16
Originally Posted by Nismo Convert86
Yeah I stripped my whole car of the sound deadning in less then 45minutes, it was -12 but it worked awesome.
I usually run about 15CFH on my regulator, I have the Millermatic 135. I tried the Lincoln, but didn't like it too much, I don't know why either. I also use the Q tank, of Straight argon, the bimix, and the trimix seem to work better for SS.
I usually run about 15CFH on my regulator, I have the Millermatic 135. I tried the Lincoln, but didn't like it too much, I don't know why either. I also use the Q tank, of Straight argon, the bimix, and the trimix seem to work better for SS.
I have definately heard good things about miller welders, but the cost was really what made me stick to the lincoln. All the welding elements sure add up quick, and I just couldnt bring myself to throw anymore money down at this point. I think once I get used to it itll do just fine, especially with the amount of the red box welders you see out there, they cant be useless.
If theres a next time, Ill go for the bluebox haha!
Thanks alot man, I really appreciate the constructive criticism! Its always nice to hear that people think it looks good, but if theres a way to do it better, Im all ears and thats why I posted my pictures here.
cheers!
11-20-06, 06:50 PM
#17
400WHP or bust
iTrader: (7)
Join Date: Oct 2003
Location: Walkerton, Ontario Canada
Posts: 4,048
Likes: 0
Received 0 Likes
on
0 Posts
The tip should be about 1/4"-1/2" away from the workpiece at a 15-20 degree angle, www.millerwelds.com has a very informative videos, and write ups, they even have a forum to ask questions.
 11-20-06, 08:42 PM
#19
Originally Posted by wankel commando
what did you use for the wheel well brackets...these need to be pretty strong...
If the wheel well bracket is something else, please explain what/where it is. Im sorta confused as to what your talking about.
11-22-06, 08:11 PM
#20
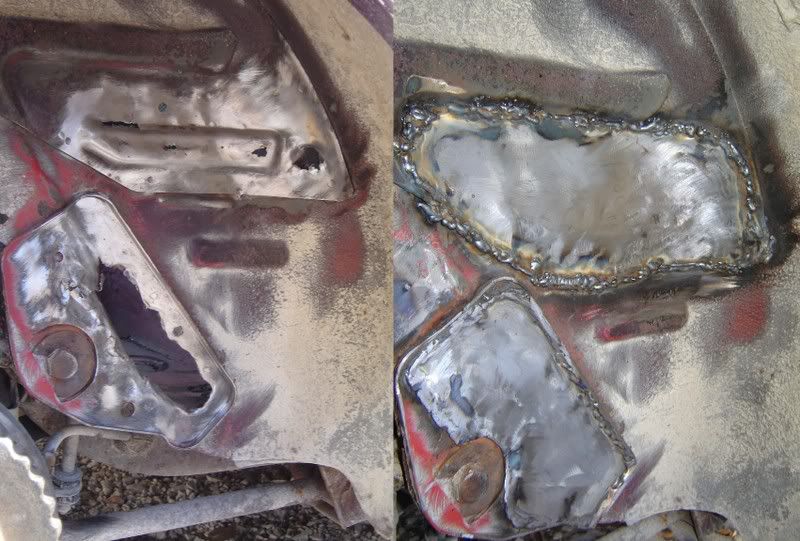
Well, I prepped it all with my wire wheel, primed and finished it off with a coating of truck bedliner! The outter wheel wells are dooone!!!!!!
Im fairly happy with the results (considering it was my first automotive welding project, and on a new machine!).
Here are some pictures:
I think I did a decent job, Im just a little worried as to what the mechanic will say when I take it in for a safety. I used quite a bit of bedliner, so in some spots it might be a little thick and rubbery feeling. I think I should be good to go, but I dont want the mechanic to think I filled in any holes, or poor welds (which I sorta did haha) and question it or anything.
Do you guys think Ill be allright???
Anyways, I guess now I just gotta finish the inside of wheel wells up, and the rocker panels and then mechanically speaking Grimace will be in good shape!
11-22-06, 08:39 PM
#21
Wankel Me This!!
Nice job. but you are lucky you only had small holes. I had really big ones I had some in my floor and one on the floor in the drivers side front. I will post pics of the job me and my dad did like what you did there,
11-22-06, 08:45 PM
#22
Haha and before any of you guys criticize the oh-so nice overspray, I just wanted to pipe in that soon my beautiful sandblasted and refinished LSD rear end is going to get slapped in there.. When I pop it in, Ill go back and finish up the bedliner undercoat job lol.


