
Undercarriage Restoration
 05-30-12, 09:17 PM
#1
Senior Member
Thread Starter
iTrader: (1)
Join Date: May 2006
Location: State College, PA
Posts: 459
Likes: 0
Received 0 Likes
on
0 Posts
Undercarriage Restoration
Well, you know how it goes..."Replacing shocks" turns into "complete suspension overhaul" (respeed coilovers,camber plates, illuminas, sway bar) turns into "undercarriage restoration, diff. rebuild, powdercoating of: rear axle housing, brake backing plates, fuel pump guard, skid plate, strut tubes,etc"...Been waiting for a day off of work of low humidity to sand blast and prime the underneath. Plan on using canned self-etching primer...What about on top of that? Canned rubberized undercoating? ALso, what about my rusty exhaust heat-sheilding...Can I sandblast and paint that? What kind of temps do the heat shield above the muffler and connecting pipe see?
Also, I had "bin rot" taken care of in the past, but the new metal is on the inside, and there's still a shitty, rusty outer layer of metal on the bottom...It looks like the longer trailing links mount only to the rusty bottm layer(See TlinkRot pic), but new metal is above...What should I do about that?
Also, I had "bin rot" taken care of in the past, but the new metal is on the inside, and there's still a shitty, rusty outer layer of metal on the bottom...It looks like the longer trailing links mount only to the rusty bottm layer(See TlinkRot pic), but new metal is above...What should I do about that?

 06-05-12, 01:30 PM
#4
Senior Member
Thread Starter
iTrader: (1)
Join Date: May 2006
Location: State College, PA
Posts: 459
Likes: 0
Received 0 Likes
on
0 Posts
Well, you know how it goes..."Replacing shocks" turns into "complete suspension overhaul" (respeed coilovers,camber plates, illuminas, sway bar) turns into "undercarriage restoration, diff. rebuild, powdercoating of: rear axle housing, brake backing plates, fuel pump guard, skid plate, strut tubes,etc"...Been waiting for a day off of work of low humidity to sand blast and prime the underneath. Plan on using canned self-etching primer...What about on top of that? Canned rubberized undercoating? ALso, what about my rusty exhaust heat-sheilding...Can I sandblast and paint that? What kind of temps do the heat shield above the muffler and connecting pipe see?
Also, I had "bin rot" taken care of in the past, but the new metal is on the inside, and there's still a shitty, rusty outer layer of metal on the bottom...It looks like the longer trailing links mount only to the rusty bottm layer(See TlinkRot pic), but new metal is above...What should I do about that?
Also, I had "bin rot" taken care of in the past, but the new metal is on the inside, and there's still a shitty, rusty outer layer of metal on the bottom...It looks like the longer trailing links mount only to the rusty bottm layer(See TlinkRot pic), but new metal is above...What should I do about that?
06-05-12, 02:09 PM
#5
The area around that lower control arm mount will need to be cut out and new metal welded in, I had the same rust as you on both my cars. Not overly difficult to fix.
The exhaust heat shield I would just find another one to replace it, as for that rust near the spring perch etc, sandblast it and seal it up with por 15, or rust bullet or one of those type products. Make sure you get some good undercoating on top of it, I've been using 3m in a spray can and it has held up well.
I've been meaning to pick up Eastwoods undercoating gun, but haven't done so yet.
The rust on your car isn't too bad, definitely take care of it now though and it'll last for years.
06-05-12, 04:21 PM
#6
Senior Member
Thread Starter
iTrader: (1)
Join Date: May 2006
Location: State College, PA
Posts: 459
Likes: 0
Received 0 Likes
on
0 Posts
As far as the link mount...There is all new metal above visible from the inside of the car, but the crappy bottom layer was left alone. I don't see how to remove the old crap in the bottom without cutting into the good stuff DIRECTLY above it.
I have another exhaust hear sheild from a parts car, it is solid but very rusty. What temps do these rear sheilds see, what could I paint it with if it survives blasting?
You would use the por15 as a primer/paint after blasting? Not self-etching primer or something else? I've asked around shops and whatnot about the por15, nobody I talked to had anything nice to say about it...
06-06-12, 01:23 AM
#7
don't use the canned rubberized undercoating. Once it starts drying up a little and cracking, it will trap moisture behind it...
I've used por-15 and the slightly cheaper Eastwood Rust Encapsulator (basically same as por-15) with great results in the past. Just for fun I used the eastwood stuff on a rusty wheelbarrow wheel and left it outside for a few years. Rust didn't creep back under where the stuff was foam-brushed on.
I've used por-15 and the slightly cheaper Eastwood Rust Encapsulator (basically same as por-15) with great results in the past. Just for fun I used the eastwood stuff on a rusty wheelbarrow wheel and left it outside for a few years. Rust didn't creep back under where the stuff was foam-brushed on.
Trending Topics
06-06-12, 09:25 AM
#8
I've had pretty good luck with por15 over the years. I typically will topcoat it with something to give it a little extra protection. As long as you sandblasted all of the rust off though a good self etching primer will be fine too. Por15 gets a bad rap because people think they can just pile it on anything and make it last. It's good if used correctly
I agree that many of the spray can undercoatings will shrink/crack and then trap moisture, but the 3m stuff seems to work very well. I used it on my restoration in 2006 and it has help up very well in that time.
As for the lower control arm mount, you'll probably end up cutting into your new metal above the rusted stuff, hard to avoid. Honestly though if new metal was put more or less directly on rusted metal it too is now going to be rusted. Might be a good excuse to just redo the whole thing again...
06-06-12, 11:16 AM
#9
Senior Member
Thread Starter
iTrader: (1)
Join Date: May 2006
Location: State College, PA
Posts: 459
Likes: 0
Received 0 Likes
on
0 Posts
I've had pretty good luck with por15 over the years. I typically will topcoat it with something to give it a little extra protection. As long as you sandblasted all of the rust off though a good self etching primer will be fine too. Por15 gets a bad rap because people think they can just pile it on anything and make it last. It's good if used correctly
I agree that many of the spray can undercoatings will shrink/crack and then trap moisture, but the 3m stuff seems to work very well. I used it on my restoration in 2006 and it has help up very well in that time.
As for the lower control arm mount, you'll probably end up cutting into your new metal above the rusted stuff, hard to avoid. Honestly though if new metal was put more or less directly on rusted metal it too is now going to be rusted. Might be a good excuse to just redo the whole thing again...
I agree that many of the spray can undercoatings will shrink/crack and then trap moisture, but the 3m stuff seems to work very well. I used it on my restoration in 2006 and it has help up very well in that time.
As for the lower control arm mount, you'll probably end up cutting into your new metal above the rusted stuff, hard to avoid. Honestly though if new metal was put more or less directly on rusted metal it too is now going to be rusted. Might be a good excuse to just redo the whole thing again...
Re-doing the whole thing is NOT an option...I can't get anyone anywhere to do ANY work...11 months now I've been trying to rebuild my diff. and reassemble my rear axle. I'm getting no help here or anywhere. I paid more for the welding fix of the bin rot than I paid for the car in the first place. It's done very nicely from the inside, but I had no idea the old crap layer was left underneath until ~4 years later when I dropped the rear and tank...
06-06-12, 11:48 AM
#10
Sorry you're having a problem getting help, but I've already given some advice about the rust near the spring perch, that can simply be sandblasted and sealed. If you can get a few pics of what the metal work looks like on the inside of the car maybe we can get a better idea of what you're up against. That area has 2 layers of steel as well as the crossmember/brace section that the bin frame bolts to if i remember correctly. I'm curious to see how they even went about welding anything in if there was only rusted metal to weld to...
POR 15 - You can paint it directly over surface rust and it'll do a decent job of sealing it, assuming you've cleaned it properly and there isn't any loose rust or scale. I've seen guys try to basically glue rotten rust scale back together with it lol. Not surprising it gets a bad name when used like that.
POR 15 - You can paint it directly over surface rust and it'll do a decent job of sealing it, assuming you've cleaned it properly and there isn't any loose rust or scale. I've seen guys try to basically glue rotten rust scale back together with it lol. Not surprising it gets a bad name when used like that.
06-06-12, 03:28 PM
#11
Senior Member
Thread Starter
iTrader: (1)
Join Date: May 2006
Location: State College, PA
Posts: 459
Likes: 0
Received 0 Likes
on
0 Posts
Thanks for the help...I'll have to take picturesof the inside this weekend if I can get back to where the car is(it's about an hour away from where I live). I can't find pics I've allready taken. The guy basically had to remake some of the wheel wells from scratch and put some in the floor also, but I will get pics to better explain what I mean. Thanks again.
06-11-12, 09:59 PM
#13
Senior Member
Thread Starter
iTrader: (1)
Join Date: May 2006
Location: State College, PA
Posts: 459
Likes: 0
Received 0 Likes
on
0 Posts
Well, rented a big air compressor today, it holds at 110 psi...Wanted to sandblast the underneath finally, but water kept coming out of the end...It was supposed to be 40% relative humidity, but might've been around 70. How do you avoid this using an air compressor? Here are some before and after pics. After blasting, I sprayed with acetone, then brushed on Purple Power's rust inibitor...It converts and dries grey.
Also, can your remove the rubber top spring perch for the rear? DO you remove this when installing Re-speed coilovers, or do they sit on the rubber?
Also, can your remove the rubber top spring perch for the rear? DO you remove this when installing Re-speed coilovers, or do they sit on the rubber?
06-12-12, 05:38 AM
#14
Wow that looks really good!! I use an inline dryer/filter when I'm blasting or painting. There doesn't have to be much humidity in the air for it to condense in your air line...
Not sure about the spring perch/rubber thing but keep up the good work!!
Not sure about the spring perch/rubber thing but keep up the good work!!
06-12-12, 08:28 AM
#15
I haven't installed re-speed "coil overs" in the rear, but I would assume that the stock rubber isolator would be removed.
Nice work with the sandblasting, I always love the look of sandblasted clean metal
Like he said above, it doesn't take much for moisture to build up in the line, especially if the compressor is running for a while, it gets hot and causes even more condensation. It sucks, but it's kinda par for the course...
As for your earlier pics of that patch, the work inside the car looks pretty solid. Why they didn't remove the rusted outside metal is beyond me and it's going to be kinda a pain to fix properly. I hate suggesting a halfassed solution, but if you're unable to cut that section out and patch it properly you could at least sandblast it and seal it up really good with por15 or something similar. That would keep it together for a while (probably a few years before rust starts creeping out again) and maybe at that point you could have the time and money to fix it properly... Just a thought
06-12-12, 11:28 AM
#16
Senior Member
Thread Starter
iTrader: (1)
Join Date: May 2006
Location: State College, PA
Posts: 459
Likes: 0
Received 0 Likes
on
0 Posts
Thanks for the replies...Jeremy- what kind/type/size of dryer and filter will get me clean air? I also tried my father's much smaller craftsman compressor running the line through a water trap, it was also like a water gun, though...What about other options? bottled nitrogen? N2 is nice and clean and dry, how long could I sandblast with a bottle regulated to ~100psi?
82- I think I'm ok with blasting the crap out of everything, getting the rust inhibitor inbetween the layers, and finally sealilng with primer and then undercoating. I did manage to seperate a small section of the old crap and get a look "inside/inbetween" and it(bottom of the new metal on top) didn't look rusty, it was kinda blackened and glazed looking. It's been years, but I think I initially used some permatex rust inhibitor and sprayed it all around in there when I first got the car back after welding.
82- I think I'm ok with blasting the crap out of everything, getting the rust inhibitor inbetween the layers, and finally sealilng with primer and then undercoating. I did manage to seperate a small section of the old crap and get a look "inside/inbetween" and it(bottom of the new metal on top) didn't look rusty, it was kinda blackened and glazed looking. It's been years, but I think I initially used some permatex rust inhibitor and sprayed it all around in there when I first got the car back after welding.
06-12-12, 11:36 AM
#17

One way to try to limit the amount of condensation is to have at least 30 feet or so of pipe on the compressor that has a down leg that can be drained off. It takes about 30 feet of pipe for the air to get cool enough to form water again and drip in to the down leg. I did this on my 80- gallon compression in my barn with copper and shark bit connectors. Shark bit connectors allow you to put copper together without have to solder the pipe. Also make sure you drain the water from the bottom of the compressor every do often. I also use a filter/regulator.

06-12-12, 06:58 PM
#18
Senior Member
Thread Starter
iTrader: (1)
Join Date: May 2006
Location: State College, PA
Posts: 459
Likes: 0
Received 0 Likes
on
0 Posts
Thanks for the excellent suggestion. What diameter pipe did you use? Should there be at least 30 ft. of pipe before the down leg, then? Do you have an estimate of cost of your setup? Sounds like alot of time/money for me to use it once...I just want to get the damn thing blasted so I can her back together and driving. She hasn't been started in about 9 months, and I'm getting nervous!
06-12-12, 09:40 PM
#19
Thanks for the excellent suggestion. What diameter pipe did you use? Should there be at least 30 ft. of pipe before the down leg, then? Do you have an estimate of cost of your setup? Sounds like alot of time/money for me to use it once...I just want to get the damn thing blasted so I can her back together and driving. She hasn't been started in about 9 months, and I'm getting nervous!
I used 3/4" copper. I'm not suggesting you use copper - it's way to expensive. Black gas pipe would work fine and is MUCH cheaper. Just don't use PVC. It does nasty stuff when it splits at high pressure. You might also get away with just using one of the water traps/regulators and an extra length of air hose.
06-13-12, 10:18 AM
#20
Senior Member
Thread Starter
iTrader: (1)
Join Date: May 2006
Location: State College, PA
Posts: 459
Likes: 0
Received 0 Likes
on
0 Posts
The only time I tried it with a water trap, the trap was inline only about 3-4 feet from the compressor itself. So, it needs to be far away inline from the compressor to be effective? Like right before the sandblaster handle? Thanks again...Any comments on bottled N2? TOo cold? Not enough in a tank?
06-13-12, 11:39 AM
#21
Those after pictures are great.
Those after pictures are great. I do have a question though. In this picture:
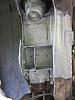
It looks like the patch they put in isn't welded all the way around, it looks like the sealer is the only thing on the right side. Does it look welded on the other side?
That's a clean looking SE, it'll be nice once it's back on the road.
It looks like the patch they put in isn't welded all the way around, it looks like the sealer is the only thing on the right side. Does it look welded on the other side?
That's a clean looking SE, it'll be nice once it's back on the road.
06-13-12, 11:57 AM
#22
Senior Member
Thread Starter
iTrader: (1)
Join Date: May 2006
Location: State College, PA
Posts: 459
Likes: 0
Received 0 Likes
on
0 Posts
Those after pictures are great. I do have a question though. In this picture:
It looks like the patch they put in isn't welded all the way around, it looks like the sealer is the only thing on the right side. Does it look welded on the other side?
That's a clean looking SE, it'll be nice once it's back on the road.
It looks like the patch they put in isn't welded all the way around, it looks like the sealer is the only thing on the right side. Does it look welded on the other side?
That's a clean looking SE, it'll be nice once it's back on the road.
06-13-12, 12:35 PM
#23
The only time I tried it with a water trap, the trap was inline only about 3-4 feet from the compressor itself. So, it needs to be far away inline from the compressor to be effective? Like right before the sandblaster handle? Thanks again...Any comments on bottled N2? TOo cold? Not enough in a tank?
06-13-12, 03:18 PM
#24
Full Member
iTrader: (6)
Join Date: May 2003
Location: Saint Louis, MO
Posts: 222
Likes: 0
Received 0 Likes
on
0 Posts
N2 is nitrogen... how are you planning on hooking up an air line to the regulator on the N2 tank? I would think that it would be much cheaper (safer) to put in a water trap as suggested then try and rig up a N2 system. You can get the traps at Harbor Freight or some place like that cheap enough...
06-13-12, 08:00 PM
#25
Senior Member
Thread Starter
iTrader: (1)
Join Date: May 2006
Location: State College, PA
Posts: 459
Likes: 0
Received 0 Likes
on
0 Posts
Yes, the trap would be the best way to go...Get it built and in place, then go rent the compressor again. Problem is, I have to drive ~60 miles to get to where my car is at to work on it only once or twice a week on weekends if I don't have work. AND if the weather cooperates. AND if my father is home and I can borrow his truck to tow the compressor. I guess I was looking for a cheaper, quicker fix to allow me to get it done sat. if the weather was good. Guess I'll bite the bullet and gather supplies after work tomorrow and try to build it this weekend, then rent the compressor the following weekend. Thanks for the helpfull replies.