A Tale of Two Motors, with gearhead-42
 06-28-07, 01:52 PM
#26
An update.
I got the intake ports all smoothed up nice. It didn't take long but my back still didn't appreciate it. lol

Check out the step wear in the reflection. They're supposed to be parallel lines.

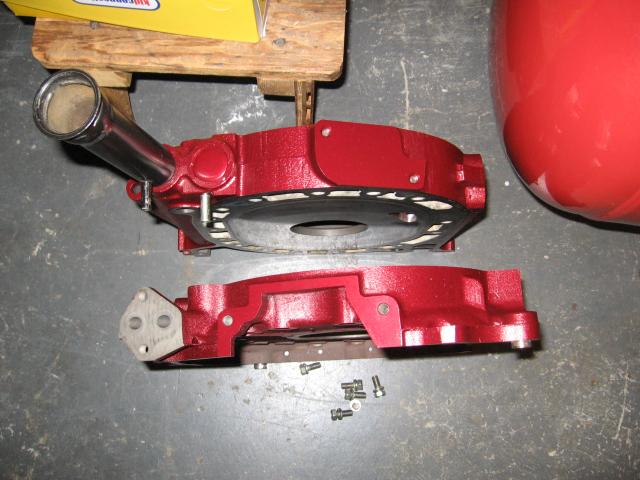
Here's a nice looking shot showing all three plates.

The intermediate plate is more worn. Still within spec though. I measured about .003. Spec calls for no greater than .0039 but my .004 feeler guage was too thick, and the .002 was to thin. I looked high and low for a replacement but no luck within my price range. If I wanted to spend money, I'd have gone with a 1950 or larger ACVW.
I got the intake ports all smoothed up nice. It didn't take long but my back still didn't appreciate it. lol
Check out the step wear in the reflection. They're supposed to be parallel lines.
Here's a nice looking shot showing all three plates.
The intermediate plate is more worn. Still within spec though. I measured about .003. Spec calls for no greater than .0039 but my .004 feeler guage was too thick, and the .002 was to thin. I looked high and low for a replacement but no luck within my price range. If I wanted to spend money, I'd have gone with a 1950 or larger ACVW.
 06-28-07, 02:22 PM
#27
Ok, here's a closeup of the step wear on the intermediate plate. Would you use it? I know it's not ideal, but still appearantly in spec. The tail end of spec.

Each engine I've built recently has had at least one thing that wasn't ideal about it. There is only so much you can do with used parts. They're for my own personal use though, so it's fine. I know what's in them, and kept careful notes. I would insist on tighter specs on a customer's engine, of course.
Speaking of tighter specs, I hand-fitted a set of new side seals yesterday. Got them down to between zero clearance and .002 (that's pretty tight!). I'll have to watch it on the warm ups to keep from screaming the engine before it's ready since the seals will heat up more quickly than the rotors causing binding in the slots. This should make tons of low end power if done right.
Was it worth it even though the side plates are a bit worn? Yes because I can always perform a quickie rebuild in the future to swap out the worn plate(s). Whose to say that it will even be necessary? It might perform far beyond my expectations as is, and I've got to tell you I'm expecting quite a lot out of this engine. It will be compared to the engine I built for the RX-4 with all new seals and GSL-SE rotating assembly. It had surprising loads of low end torque even with a streetport. It went into a heavy car (RX-4 wagon) with a rear diff ratio of 3.636, as will this engine (into my Cosmo for break-in). The main difference here is my ports are stock, so the low end should be even better. Also my side seal fitting technique has actually improved since I did the RX-4 engine. Oh, I also have a GSL-SE flywheel for this engine, to match the GSL-SE flywheel on the RX-4's engine, which further levels the playing field.
06-29-07, 03:14 AM
#28
Hmm, it appears that picture above still isn't working. It was my second attempt. Looks like the forum doesn't like such a tall picture. Oh well.
And now for another update.
Rotors with tight side seals. Notice I didn't bother cleaning them? What's the point when they're just gonna get dirty in the first few minutes of run time anyway? They're clean enough to handle, and that's good enough.

Painted the side plates.

I think the engine turned out nicely. The flash messed with what you see but it does look stunning in real life.

This closeup of the exhaust port shows the alternating color scheme a little more accurately.

And now for another update.
Rotors with tight side seals. Notice I didn't bother cleaning them? What's the point when they're just gonna get dirty in the first few minutes of run time anyway? They're clean enough to handle, and that's good enough.
Painted the side plates.
I think the engine turned out nicely. The flash messed with what you see but it does look stunning in real life.
This closeup of the exhaust port shows the alternating color scheme a little more accurately.
06-29-07, 12:24 PM
#31
Latin270, it will have to be soon because the 1st gen is losing its 12A soon. Then later in August I'll fire up the red truck (with the engine featured in the awesome '74 engine thread). In the mean time, this engine will be broken in in my Cosmo because I'd rather run it in something where I know the cooling system is adequate. Then it will go into this.

Now the color scheme makes sense. I wonder what colors gearhead-42 is painting his engine?
I'd prefer not to fight a fresh rebuild in an air cooled to water cooled conversion. Why not take advantage of the Cosmo? Its engine leaks oil out of the rear seal (discovered after removing the automatic a few days ago) so it's the perfect excuse to swap it out. Plus I'll get to see how well stock ports work compared to '74 spec in the truck and MG. Then build a really nice engine for the Cosmo when this one is ready to go in the baja.
trochoid, I looked high and low for a maroon type color that would match. I think I got it pretty close. The silver parts (doors) weren't super glossy and neither is the aluminum engine paint, which matches really well. The maroon color is a semi-clear metallic, which actually worked out better than expected because it looks darker on dark surfaces like iron, but lighter on surfaces like aluminum or with primer or cadmium/chrome plating. I've got to tell you if the irons weren't kind of a dark grey, this paint wouldn't have matched so well.
I'm not sure what colors or types of paint the PO used, but the roof looks to have been done with a standard HVLP auto paint and the fenders were done with a rattle can. He must have been good at painting because the end result, although weathered a bit and no longer glossy, is still holding up. The roof is still glossy so it's kind of interesting. He did a good job color matching, and I hope I did it justice. It should be a nice looking engine coversion when done.
Interestingly enough, that 4th pic turned out badly. The flash reflecting off the rotor housings lowered the levels everywhere else in the picture so I had to raise the gamma and then correct it by adjusting the contrast in paint shop pro. The end result looks fairly close, but I still think it looks better in person. The intake ports pictured above also lost some of their luster, as they always do with this camera.
The paint is Dupli•Color Truck, Van and SUV paint. T199 Cherry Red (M) CC
Then later in August I'll fire up the red truck (with the engine featured in the awesome '74 engine thread). In the mean time, this engine will be broken in in my Cosmo because I'd rather run it in something where I know the cooling system is adequate. Then it will go into this. Now the color scheme makes sense. I wonder what colors gearhead-42 is painting his engine?
I'd prefer not to fight a fresh rebuild in an air cooled to water cooled conversion. Why not take advantage of the Cosmo? Its engine leaks oil out of the rear seal (discovered after removing the automatic a few days ago) so it's the perfect excuse to swap it out. Plus I'll get to see how well stock ports work compared to '74 spec in the truck and MG. Then build a really nice engine for the Cosmo when this one is ready to go in the baja.
trochoid, I looked high and low for a maroon type color that would match. I think I got it pretty close. The silver parts (doors) weren't super glossy and neither is the aluminum engine paint, which matches really well. The maroon color is a semi-clear metallic, which actually worked out better than expected because it looks darker on dark surfaces like iron, but lighter on surfaces like aluminum or with primer or cadmium/chrome plating. I've got to tell you if the irons weren't kind of a dark grey, this paint wouldn't have matched so well.
I'm not sure what colors or types of paint the PO used, but the roof looks to have been done with a standard HVLP auto paint and the fenders were done with a rattle can. He must have been good at painting because the end result, although weathered a bit and no longer glossy, is still holding up. The roof is still glossy so it's kind of interesting. He did a good job color matching, and I hope I did it justice. It should be a nice looking engine coversion when done.
Interestingly enough, that 4th pic turned out badly. The flash reflecting off the rotor housings lowered the levels everywhere else in the picture so I had to raise the gamma and then correct it by adjusting the contrast in paint shop pro. The end result looks fairly close, but I still think it looks better in person. The intake ports pictured above also lost some of their luster, as they always do with this camera.
The paint is Dupli•Color Truck, Van and SUV paint. T199 Cherry Red (M) CC
06-30-07, 11:51 PM
#33
I need a new user title

Join Date: Oct 2005
Location: Yaizu, Japan
Posts: 2,646
Likes: 0
Received 0 Likes
on
0 Posts
No problem.
That engine looks very nice in person and matches the Baja well. It's kind of metallic-looking and has a nice texture to it. It'll look even better once it's actually in the car.
That engine looks very nice in person and matches the Baja well. It's kind of metallic-looking and has a nice texture to it. It'll look even better once it's actually in the car.
07-08-07, 12:36 AM
#35
I stripped the necessary parts off the Cosmo engine to get the new one up and running in the Cosmo. Man does it get ugly toward the front. At least the flywheel looks nice. lol

13B Automobiles mazDa

Which motor mounts should I use?

13B Automobiles mazDa
Which motor mounts should I use?
