1st Generation Specific (1979-1985) 1979-1985 Discussion including performance modifications and technical support sections

Stripped Nikki's

Thread Tools
 
Search this Thread
 
Old 02-23-10, 05:28 PM
  #1  
searching...

Thread Starter
iTrader: (8)
 
Jibaro 12A's Avatar
 
Join Date: Dec 2009
Location: Chicago
Posts: 1,022
Likes: 0
Received 1 Like on 1 Post
Stripped Nikki's

Alrght guys, Im on my 5th Nikki Rebuild and Im loving it. I have followed all of my instructions as per Sterling's website and Glazedhams instructions in the archives. My question is besides dipping the carb in carb cleaner, what other methods do you guys use to clean them up? Also, I would like to see pics on how you set up your mechanical secondaries and emmisions block-off's. Or any tricks that you guys use. Pics would be nice. Thanks
Old 02-23-10, 05:37 PM
  #2  
weak minds wear the crown

iTrader: (2)
 
blackdeath647's Avatar
 
Join Date: Oct 2006
Location: Hudson, NC
Posts: 2,105
Likes: 0
Received 1 Like on 1 Post
i'm sorry i have no answer for you, but i would like to know if you have the links to the instructions?, i've been looking for something similar and couldn't find anything, i rebuild my carb with my uncle's help but it's been a good 4 years since that happened and i can't remember exactly how we did it.
Old 02-23-10, 06:00 PM
  #3  
Censored

iTrader: (14)
 
ray green's Avatar
 
Join Date: Jul 2002
Location: Georgia
Posts: 11,381
Received 182 Likes on 141 Posts
Courtesy of DD:


Mine worked better before she was stripped, so I dressed her back up.
Old 02-23-10, 06:36 PM
  #4  
Lives on the Forum

 
Kentetsu's Avatar
 
Join Date: Jun 2004
Location: Grand Rapids Michigan
Posts: 11,359
Received 14 Likes on 11 Posts
Oh mylanta! I don't even know what to say! I almost feel bad because I think that looks so good. lol. Nice work Ray.
Old 02-23-10, 06:45 PM
  #5  
searching...

Thread Starter
iTrader: (8)
 
Jibaro 12A's Avatar
 
Join Date: Dec 2009
Location: Chicago
Posts: 1,022
Likes: 0
Received 1 Like on 1 Post
Originally Posted by blackdeath647
i'm sorry i have no answer for you, but i would like to know if you have the links to the instructions?, i've been looking for something similar and couldn't find anything, i rebuild my carb with my uncle's help but it's been a good 4 years since that happened and i can't remember exactly how we did it.
sterlingmetalworks.com this site is freaking amazing. Read it from beggining to end he provides alot of info. Also if you go to page 3 in the archives Glazedham42 has a great write up on rebuilding the carb without all of the emmisions junk.
Old 02-23-10, 06:50 PM
  #6  
searching...

Thread Starter
iTrader: (8)
 
Jibaro 12A's Avatar
 
Join Date: Dec 2009
Location: Chicago
Posts: 1,022
Likes: 0
Received 1 Like on 1 Post
ray green awesome work! How do you go about getting it so clean? I also have a concern. I was cleaning a carb last night with a Q-tip, in 2 of the orifices i stuck the Q-tip I heard a pop and when I tried to extract the Q-tip there was a bit of resistance. Im at work so I dont have any pics but Im hoping I didnt ruin this bad boy. Could anyone think of what I might have done improperly? Once I get home I will identify the orifices and list them. Thanks Again.
Old 02-23-10, 06:56 PM
  #7  
Dreamin of drivin my 7!
iTrader: (18)
 
installer67's Avatar
 
Join Date: Feb 2009
Location: Seabeck, Washington
Posts: 1,073
Likes: 0
Received 1 Like on 1 Post
Stripping a Nikki tutorial in PDF

First, I gotta say thanks again to Vipernicus42 for taking the time to actually do this in thwe first place. It has been invaluable to me! Here is a link to a tutoeial he wrote some time ago. It is easy to follow, has pics of every step, and is so easy a caveman could do it! Anyone stripping a Nikki should have this.
http://www.leethaxorz.com/Reference/...pingDraft1.pdf
Hope this helps, and hope someone pins this link to the archives! So everyone can use it.
Old 02-23-10, 07:49 PM
  #8  
weak minds wear the crown

iTrader: (2)
 
blackdeath647's Avatar
 
Join Date: Oct 2006
Location: Hudson, NC
Posts: 2,105
Likes: 0
Received 1 Like on 1 Post
Originally Posted by Jibaro 12A
sterlingmetalworks.com this site is freaking amazing. Read it from beggining to end he provides alot of info. Also if you go to page 3 in the archives Glazedham42 has a great write up on rebuilding the carb without all of the emmisions junk.
thanks man, i had skipped right over Glazedham's write up. i had read the sterling page, but pictures always work better with me.
Old 02-24-10, 06:38 AM
  #9  
Censored

iTrader: (14)
 
ray green's Avatar
 
Join Date: Jul 2002
Location: Georgia
Posts: 11,381
Received 182 Likes on 141 Posts
I should have been more clear, that's Diving Driver's carb, not mine!

It's the best looking rebuild I know off.
Old 02-24-10, 09:45 AM
  #10  
1st-Class Engine Janitor

iTrader: (15)
 
DivinDriver's Avatar
 
Join Date: Jun 2008
Location: Chino Hills, CA
Posts: 8,376
Received 26 Likes on 24 Posts
Training the preying mantis to eat carb dirt was the hard part.

Question for the class: can anyone point out the "assembly error" in the 2nd pic? Something's not where it should be!
Old 02-24-10, 12:36 PM
  #11  
Moderator

iTrader: (2)
 
rxtasy3's Avatar
 
Join Date: Jun 2002
Location: Spartanburg, SC
Posts: 9,358
Likes: 0
Received 264 Likes on 245 Posts
^yeah it has an arrow pointing to it.
Old 02-24-10, 12:50 PM
  #12  
Lives on the Forum

 
Kentetsu's Avatar
 
Join Date: Jun 2004
Location: Grand Rapids Michigan
Posts: 11,359
Received 14 Likes on 11 Posts
Just remember that there is still a huge difference between a stripped Nikki, and a Sterling Nikki.
Old 02-24-10, 02:54 PM
  #13  
Senior Member

 
clubber's Avatar
 
Join Date: Apr 2004
Location: South Jordan UT
Posts: 453
Likes: 0
Received 0 Likes on 0 Posts
Originally Posted by Kentetsu
Just remember that there is still a huge difference between a stripped Nikki, and a Sterling Nikki.
I wouldn't know. 5 months and still waiting for my sterling. I wish He'd get back to his carb business.
Old 02-24-10, 04:56 PM
  #14  
1st-Class Engine Janitor

iTrader: (15)
 
DivinDriver's Avatar
 
Join Date: Jun 2008
Location: Chino Hills, CA
Posts: 8,376
Received 26 Likes on 24 Posts
Originally Posted by rxtasy3
^yeah it has an arrow pointing to it.

BZZZZT!

Nope, that part is right where it belongs. That second solenoid on the right side of the carb indicates that it has vacuum power valves, which were used only on a few variations of the Nikki. Other versions just have a flat land there with no hole in it.

Anyone else want to play?
Old 02-24-10, 06:11 PM
  #15  
Moderator

iTrader: (2)
 
rxtasy3's Avatar
 
Join Date: Jun 2002
Location: Spartanburg, SC
Posts: 9,358
Likes: 0
Received 264 Likes on 245 Posts
aahhhhh. all the nikkis i've delt with didn't have that solenoid on them.
Old 02-24-10, 07:59 PM
  #16  
1st-Class Engine Janitor

iTrader: (15)
 
DivinDriver's Avatar
 
Join Date: Jun 2008
Location: Chino Hills, CA
Posts: 8,376
Received 26 Likes on 24 Posts
Only shows up on the 1980's, and on the 79's except for the non-California Manual Trans versions. Goes along with several other internal parts differences.
Old 02-27-10, 11:04 AM
  #17  
Rotary Enthusiast

iTrader: (17)
 
Stevan's Avatar
 
Join Date: Sep 2003
Location: Jax, FL.
Posts: 1,041
Likes: 0
Received 1 Like on 1 Post
I've got 2 Nikki's torn down right now, about to build one.
I was wondering about the emergency return spring. In a thread in the archives by Jeff20b, he has removed it, IIRC, Sterling retains it on his builds. Anyone experience problems running without it?
Here is the thread, https://www.rx7club.com/1st-gen-archive-71/intake-nikki-mani-670456/
In the pic, the red arrow points to where it would be, the blue one points to a good view of his AP lever mod.
Attached Thumbnails Stripped Nikki's-nikki.jpg  
Old 02-27-10, 01:41 PM
  #18  
Lapping = Fapping

iTrader: (13)
 
Jeff20B's Avatar
 
Join Date: Aug 2001
Location: Near Seattle
Posts: 15,725
Received 83 Likes on 76 Posts
Sterling figured out a neat trick where he drills a hole in the upper hardware near the choke connector and routes the emergency return spring rod through it to act as a throttle return spring. This eliminated the entire bracket and stock throttle return spring from the area of the carb indicated by your red arrow. The short story here is that it allows you to take off the carb top with nothing more than a screw driver and a 14mm wrench. It eliminates the need for a needle nose plier to take the stock throttle return spring off. Plus it further simplifies the carb for your convenience.

I attempted this mod once but had to move on so I never figured out what all is needed to employ an emergency return spring as a throttle return spring and make it work. When I asked Sterling if he'd be willing to give me some pointers, he flatly refused. I guess there are some secrets the master needs to keep?
Old 02-27-10, 03:29 PM
  #19  
Rotary Enthusiast

iTrader: (17)
 
Stevan's Avatar
 
Join Date: Sep 2003
Location: Jax, FL.
Posts: 1,041
Likes: 0
Received 1 Like on 1 Post
Very interesting, heading to garage now.
Old 02-27-10, 04:16 PM
  #20  
Lapping = Fapping

iTrader: (13)
 
Jeff20B's Avatar
 
Join Date: Aug 2001
Location: Near Seattle
Posts: 15,725
Received 83 Likes on 76 Posts
I found some pictures on my hd that sort of show the return spring mod.
Attached Thumbnails Stripped Nikki's-carbcompare2.jpg   Stripped Nikki's-currentstatus1.jpg   Stripped Nikki's-dsc00229.jpg   Stripped Nikki's-dsc00267.jpg   Stripped Nikki's-dsc00268.jpg  

Old 02-27-10, 04:20 PM
  #21  
Lapping = Fapping

iTrader: (13)
 
Jeff20B's Avatar
 
Join Date: Aug 2001
Location: Near Seattle
Posts: 15,725
Received 83 Likes on 76 Posts
And here is a very clear picture of the mod. Sterling indicated it is an early carb.
Attached Thumbnails Stripped Nikki's-index.jpg  
Old 02-28-10, 01:07 AM
  #22  
Rotary Enthusiast

iTrader: (17)
 
Stevan's Avatar
 
Join Date: Sep 2003
Location: Jax, FL.
Posts: 1,041
Likes: 0
Received 1 Like on 1 Post
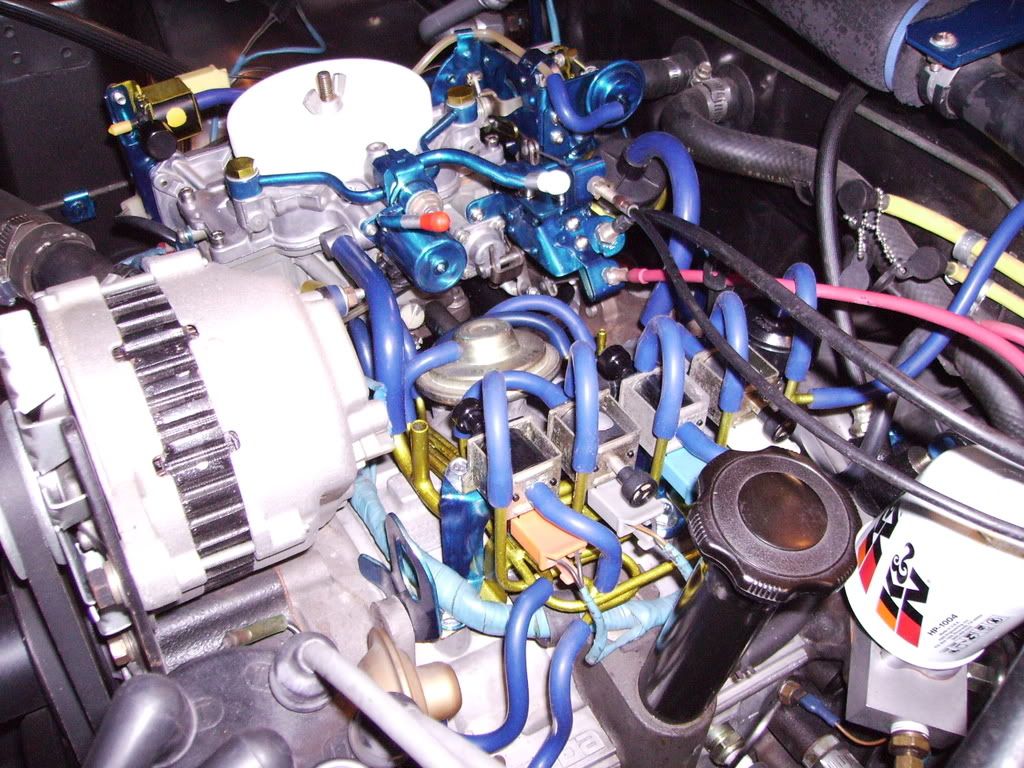
Thanks Jeff, after tearing parts off a 3rd carb, I figured something like that. The last pic you posted looks like there's a custom connection on the shaft to enable the spring to be closer to vertical, and eliminate an extension of the throttle bracket, or use of a modified main spring bracket. Here is a photo of the bracket removed, and the spring/connection reversed so it's closer to the carb body.
Attached Thumbnails Stripped Nikki's-2010-02-27-22.48.00.jpg  
Old 02-28-10, 01:22 AM
  #23  
Rotary Enthusiast

iTrader: (17)
 
Stevan's Avatar
 
Join Date: Sep 2003
Location: Jax, FL.
Posts: 1,041
Likes: 0
Received 1 Like on 1 Post
Pretty simple, yet ingenious.<Had trouble spelling that.
I was thinking of modifying the brackets, but fabbing a new linkage on the shaft is cleaner.
Old 02-28-10, 08:31 PM
  #24  
Senior Member
 
Oneiros's Avatar
 
Join Date: Nov 2009
Location: Australia
Posts: 346
Likes: 0
Received 1 Like on 1 Post
I've been pretty ruthless with mine, removing as much as possible, still got a few more things to do to clean it up as well.. Included a close up of the mech secondaries mod, the linkage arm I used is from the diaphragm box -> secondary tab. It gets them open at around 1/4 throttle and goes hard.
Attached Thumbnails Stripped Nikki's-img_0170.jpg   Stripped Nikki's-img_0172.jpg   Stripped Nikki's-img_0174.jpg   Stripped Nikki's-img_0175.jpg  
Old 02-28-10, 08:35 PM
  #25  
searching...

Thread Starter
iTrader: (8)
 
Jibaro 12A's Avatar
 
Join Date: Dec 2009
Location: Chicago
Posts: 1,022
Likes: 0
Received 1 Like on 1 Post
Thanks for the pics guys! I will be posting up pics of mine this upcoming week, once I get my hands back on my digi.


Quick Reply: Stripped Nikki's


All times are GMT -5. The time now is 03:36 PM.