
Storage Bin Rust Repair Issues
 03-19-16 | 06:18 PM
#1

Thread Starter
Full Member
Joined: Feb 2014
Posts: 137
Likes: 1
From: Minnesota
Storage Bin Rust Repair Issues
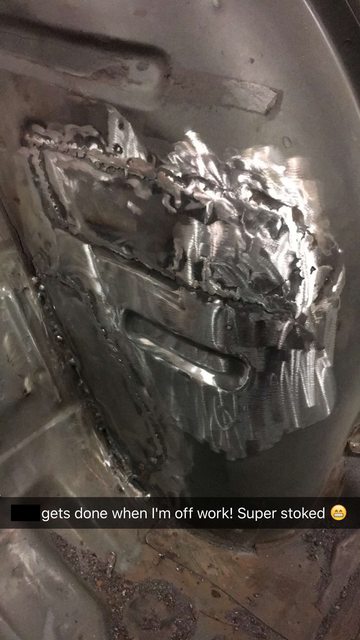
For those of you who are quite knowledgeable on first gens you're aware the storage bins generally have terrible rust issues, which also butts up real close to the trailing arm mount. My car wasn't too bad but I'm having some issues repairing it.
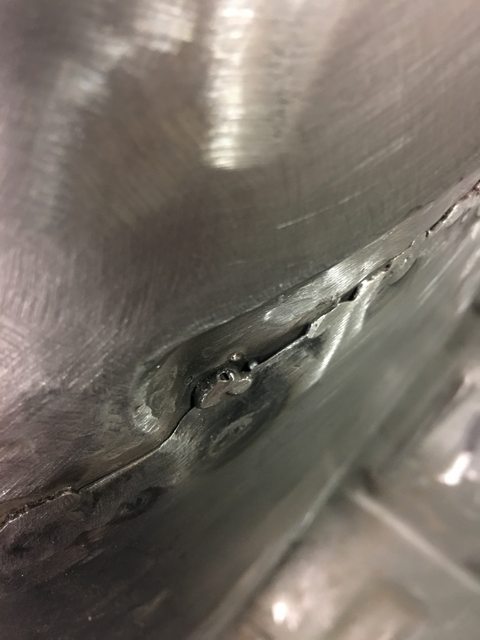
I opted for 16ga mild steel, got the rust all cut out and ready for repair. I chose to butt weld the new patches in as opposed to flanging the panel and plug welding them in. my patches weren't the best, the fitment could've been much better so some decent size gaps were filled. The welds are ugly, but they held. Long story short, I got the patches in and ground down. I tried to gently shape the panel to OEM appearance and some decent cracking had appeared in a few locations. I had attempted to weld the crack shut but it just blew right through. The last thing I need to do is fill more holes in, and exacerbate the issue.
How would you all suggest repairing this? cutting the steel out and replacing it with a larger patch panel? Lastly, how can I avoid this when doing the other side... Build a better fitting patch and go slower with the welding? It doesn't need to look perfect but I'm looking for a strong repair that isn't going to crack the minute I drive the car for the first time.
 03-21-16 | 06:24 PM
#3
Thread Starter
Full Member
Joined: Feb 2014
Posts: 137
Likes: 1
From: Minnesota
I might be able to help you a little but but I'm getting to the point where It might be beyond me. The other side of my car went perfectly fine, I just welded in 16 gauge patches today with no issues. The side of the car I'm having issues with is a much bigger patch though, which may be a factor.
03-22-16 | 07:41 AM
#5

Full Member
Joined: Jul 2008
Posts: 151
Likes: 8
From: Savannah
I'm about to do the same as well in my hatch area. The only thing I can think of is did you potentially overheat the metal by continuing with longer welds or did you stick to repeated smaller tac welds?
03-22-16 | 01:01 PM
#6
03-23-16 | 08:06 PM
#7
Thread Starter
Full Member
Joined: Feb 2014
Posts: 137
Likes: 1
From: Minnesota
Kind of sort of, not really? I have before pictures on the incomplete side, after pictures on the complete-ish side.

I still need to build new reinforcement plates for the trailing arm... I removed mine because there was a decent amount of rust behind them.
Trending Topics
03-25-16 | 07:33 AM
#8
I'm sure you've probably already seen all the videos and stuff online about how to weld, but on page 13 of my build thread I had a lot of great help from board members here. There's some really good references and links to videos on that page.
I started by trying to butt weld the joints, but with the metal only 1 mm thick, I found I constantly blew holes in the metal. I had the greatest success with flanging the patch piece and overlapping about 1/8 of an inch at the suggestion of 82Transam. Most of the overlap metal became the seam and doesn't look pretty, but I'm confident I had good penetration and the weld is strong.
I started by trying to butt weld the joints, but with the metal only 1 mm thick, I found I constantly blew holes in the metal. I had the greatest success with flanging the patch piece and overlapping about 1/8 of an inch at the suggestion of 82Transam. Most of the overlap metal became the seam and doesn't look pretty, but I'm confident I had good penetration and the weld is strong.
03-25-16 | 11:25 AM
#9
I thought i heard someone say my name  With metal this thin you don't really want to run a bead at all, it's a series of tacks basically. Maybe you can get away with like half an inch bead, but anything more and you'll get it too hot and blow through. At least that's always been my experience.
Also, like Woodmv said, in a case like this where it's just gotta be a sound repair, but not "visual" (like a quarter panel replacement or something) giving yourself a small overlap makes your life much easier. As you've found out, tight panel fitment is crucial in order to do a proper butt joint. Here's an example of what I'm up to right now, doing quarters on my 85 (using fenders as the donor panels!) just to give you an idea of what a butt joint should kinda look like. Again though, for the wheel wells and other structural work I leave myself some wiggle room with an overlap, getting the fitment needed for a butt joint like this pic takes forever lol I slowly went back and continued doing tack welds until it was a continuous seam, jump around a lot to avoid warping. Same applies to the wheel well, although not quite as critical since again, it's not a visual part...

With metal this thin you don't really want to run a bead at all, it's a series of tacks basically. Maybe you can get away with like half an inch bead, but anything more and you'll get it too hot and blow through. At least that's always been my experience.Also, like Woodmv said, in a case like this where it's just gotta be a sound repair, but not "visual" (like a quarter panel replacement or something) giving yourself a small overlap makes your life much easier. As you've found out, tight panel fitment is crucial in order to do a proper butt joint. Here's an example of what I'm up to right now, doing quarters on my 85 (using fenders as the donor panels!) just to give you an idea of what a butt joint should kinda look like. Again though, for the wheel wells and other structural work I leave myself some wiggle room with an overlap, getting the fitment needed for a butt joint like this pic takes forever lol I slowly went back and continued doing tack welds until it was a continuous seam, jump around a lot to avoid warping. Same applies to the wheel well, although not quite as critical since again, it's not a visual part...
03-26-16 | 08:55 AM
#11
The reference standard here folks for properly welding a visible seam - haven't seen anything better than 82Transam's work! Nice job on the quarter panel BTW!
I got creative with a pair of pliers, a hammer, and the edge of my workbench; however, the flanging pliers would be a great investment.
I got creative with a pair of pliers, a hammer, and the edge of my workbench; however, the flanging pliers would be a great investment.
04-02-16 | 01:37 AM
#12
Thread Starter
Full Member
Joined: Feb 2014
Posts: 137
Likes: 1
From: Minnesota
The reference standard here folks for properly welding a visible seam - haven't seen anything better than 82Transam's work! Nice job on the quarter panel BTW!
I got creative with a pair of pliers, a hammer, and the edge of my workbench; however, the flanging pliers would be a great investment.
I got creative with a pair of pliers, a hammer, and the edge of my workbench; however, the flanging pliers would be a great investment.

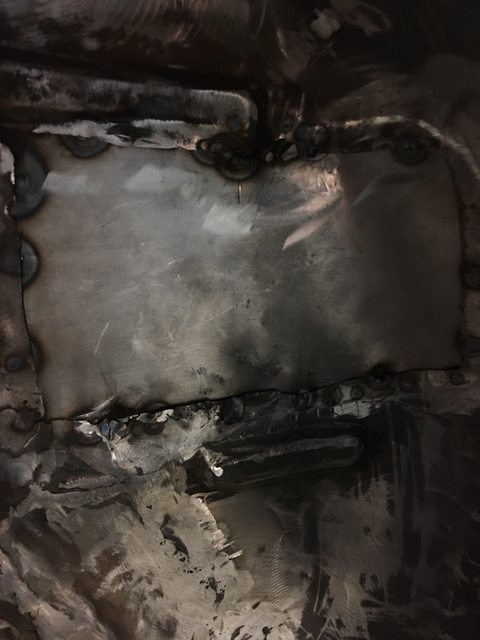
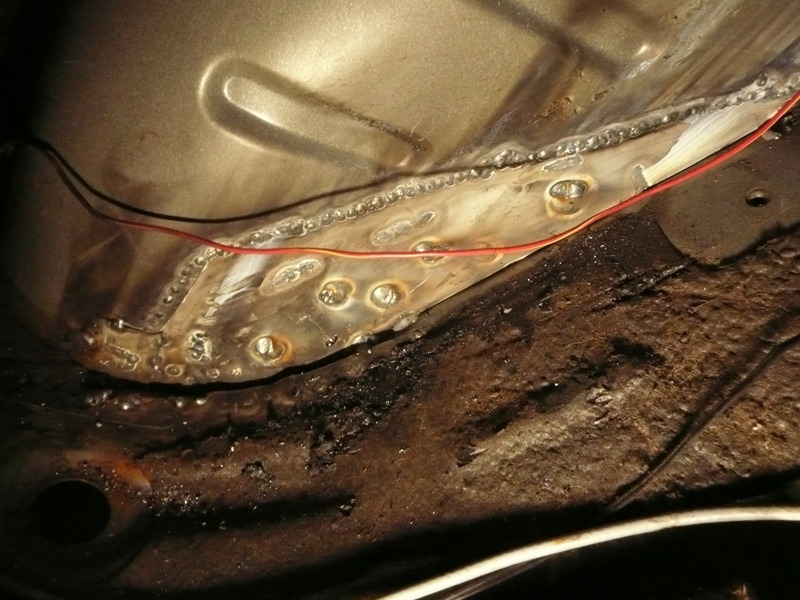
It's most definitely not pretty, it was incredibly troublesome... Especially due to the fact I didn't realize you need to scrape away the weld thru primer at each plug, to ensure penetration. this also means that I can't weld from the backside to add any more welds... Nor can I add more welds at the perimeter because there is no penetration. I'm worried about the strength of this patch, considering I did not go overboard with plugs.
The second picture of the three shows poor fitment in the patch due to the contours of the body... sealing this may be an issue. How do I go about sealing the panels? Primer, Seam Sealer, Topcoat in that order?
04-02-16 | 05:37 PM
#13
It's most definitely not pretty, it was incredibly troublesome... Especially due to the fact I didn't realize you need to scrape away the weld thru primer at each plug, to ensure penetration. this also means that I can't weld from the backside to add any more welds... Nor can I add more welds at the perimeter because there is no penetration. I'm worried about the strength of this patch, considering I did not go overboard with plugs.
The second picture of the three shows poor fitment in the patch due to the contours of the body... sealing this may be an issue. How do I go about sealing the panels? Primer, Seam Sealer, Topcoat in that order?
The second picture of the three shows poor fitment in the patch due to the contours of the body... sealing this may be an issue. How do I go about sealing the panels? Primer, Seam Sealer, Topcoat in that order?
That's not bad at all!
You can finish welding those seams. The weld thru primer has a high copper content so that it facilitates welding, and is meant to prevent the rust in the seam, but when you finish the welds you can spray them with primer.
Once I formed the patch correctly I'd use sheet metal screws to hold it in place then tacked it in place and removed the screws. After that I would completely weld the seam using 1/2" to 3/4" stitches around the perimeter of the patch, jumping from one tack to the next (or skipping a tack if they were close together) to prevent warping. After grinding the welds down a bit I would use a light from beneath to see if I had any pin holes and then weld them up until I had a seam.
Once the weld was done and cleaned up I'd shoot some primer on it (or POR-15 if I had it laying around) from both sides, then use seam sealer and a topcoat. It shouldn't rust after that.
04-05-16 | 01:53 PM
#14
Senior Member
Joined: Aug 2008
Posts: 493
Likes: 0
From: Belgium (2800)
I'm having the same problem. My fix is a 5mm plate  see https://www.rx7club.com/build-thread...-982573/page3/
see https://www.rx7club.com/build-thread...-982573/page3/
 04-09-16 | 03:56 PM
#17
Full Member
Joined: Jul 2008
Posts: 151
Likes: 8
From: Savannah
Dude I think you're good to go with that! I feel like yours look a lot better than mine (which I believe I posted pics of in "purchasing an Sa tomorrow".
My welds definitely got better as I went but on the same token, my first pass was a lot of popcorn welds that I sanded down and then through more popcorn at lol. Basically little to no penetration. I kept trying to break the panel free though and it seemed to hold strong. So though it may not have looked the best and sure as heck wasn't the strongest I did feel confident that it wasnt going anywhere.
I proceeded to POR-15 and seam seal (that seam sealer is a PITA to work with. I threw a bead down then smoothed, or attempted to smooth, it out with my finger.... that stuff is thick, simultaneously dries when smoothed out because it obviously gets thinner and does not wipe off areas you dont want it.
All I can say is, I'm not happy with the results but I felt the more I worked the area, the worse I would make it. I know its strong enough to hold and maybe one day I will attempt to redo it or meet someone that can help do it better. All we can do is try and learn from our attempts then repeat.
Good luck! I think it looks pretty good!
04-11-16 | 12:44 AM
#18
Thread Starter
Full Member
Joined: Feb 2014
Posts: 137
Likes: 1
From: Minnesota
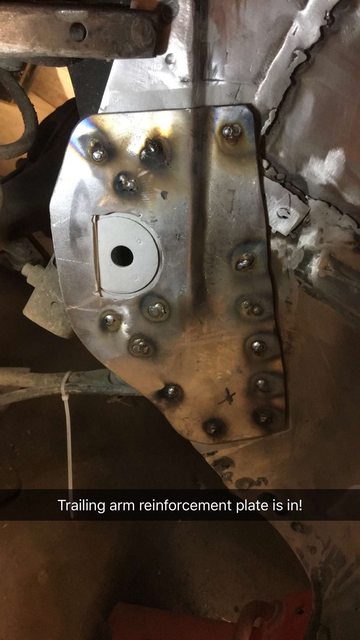
Thank you! Here's an update! I built new trailing arm reinforcement plates out of 16 gauge steel. I'm not sure if 16 gauge will be strong enough steel to replace the old plate or not as I couldn't get an accurate thickness measurement due to rust, so I opted to just use what I had lying around. It'll be interesting to see how well they hold up, considering these are just plates without any major bends in it unlike the factory stamped plate. As of right now they're just plug welded in... I may throw a couple of short beads around the edges.


 06-20-16 | 03:25 PM
#21
Thread Starter
Full Member
Joined: Feb 2014
Posts: 137
Likes: 1
From: Minnesota

Thread
Thread Starter
Forum
Replies
Last Post
jbherri2
1st Generation Specific (1979-1985)
10
03-08-16 08:52 PM
visatrade
2nd Generation Specific (1986-1992)
5
02-29-16 12:01 PM