
Steering Shaft - in/out slide?
 03-31-09, 12:22 PM
#1
Steering Shaft - in/out slide?
85' GS
Thanks guys for you earlier help with this issue.
but as a follow up I've got another concern.
Previously i removed my steering wheel for the combo switch replacement. Even with a puller, that was an ordeal. I probably had to use some quick strikes with a hammer to convince the wheel to come off.
But after getting the assemble back together, the steering shaft now slides in and out about 3/4 of an inch. This doesn't effect my usual driving, but with the column in the 'out' position, the combo switch won't auto-disengage the turn signals, nor will the horn work since the contracts aren't, well 'in contact.' Normally I don't find this sliding an issue. But I'm worried about when I'll be out a track day.
While removing the steering wheel, did i break/dislodge anything?
 03-31-09, 01:50 PM
#2
Full Member

Join Date: May 2008
Location: Winnipeg, MB
Posts: 52
Likes: 0
Received 0 Likes
on
0 Posts
The plastic pin that joins both part of the shafts (and is supposed to snap in an accident, allowing the shafts to "collapse") likely broke.
There's a wire soldered to each piece of the shaft (I'm guessing so there's a good ground connection), and right now when you push it in, what's stopping it from sliding in further is probably the piece of solder/wire.
Wait for a few more responses (in case it's something else I'm not thinking of), but the best way to get at it to replace it is to take the steering box out, drill out the rest of the old pin on each shaft, then put them together and get a new plastic screw in there. You could of course tack weld the pieces together (or use another permanent solution), but in a serious enough accident your ribs might be sorry when they collapse instead of the shaft.
All that said, I tend to think a lot of people probably drive with a collapsed shaft without realizing it.
03-31-09, 02:31 PM
#3
Plastic pin. Remove it and replace with a plastic screw from hardware store. It's a safety item so in an accident the steering column will collapse and absorb energy instead of you impaling on the steering wheel. Easier way is to just run a steel screw thru it.
03-31-09, 02:55 PM
#4
There's actually two pins, made of nylon, but otherwise, yep.
Per the FSM, collapse of the column is supposed to be adequate reason to replace the entire steering gear assembly... probably because of the liability of replacing the factory-installed pins in the field, should something go wrong.
The real thing that's going to make you unhappy, is that you're going to have to remove your steering wheel, combo switch, ignition lock, and probably the entire steering gear, in order to get to the pins in order to replace them. They are under the outside sleeve that covers the actual shaft. Unless you find a way to cut the sleeve off (which would probably make it real hard to seal up your cabin again.)
I have a naked steering gear on my workbench right now, that I just bought for a replacement: I'll post up some detail pix tongiht so you can see where you're trying to get to.
You might be able to finesse it somehow.
03-31-09, 08:27 PM
#5
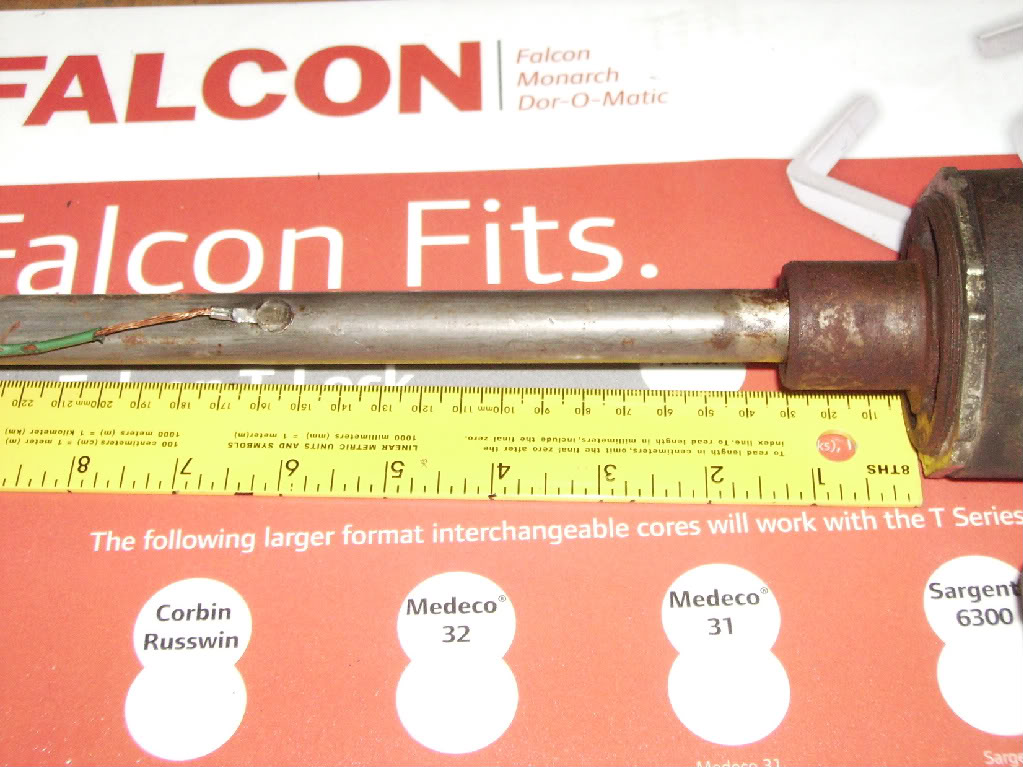
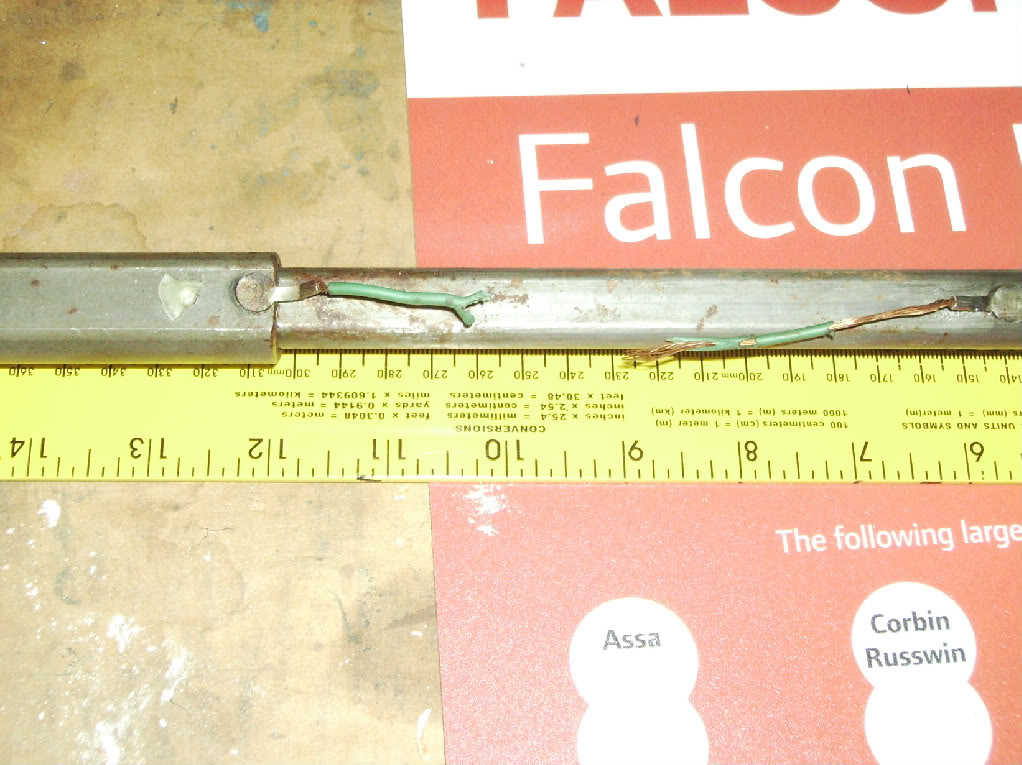
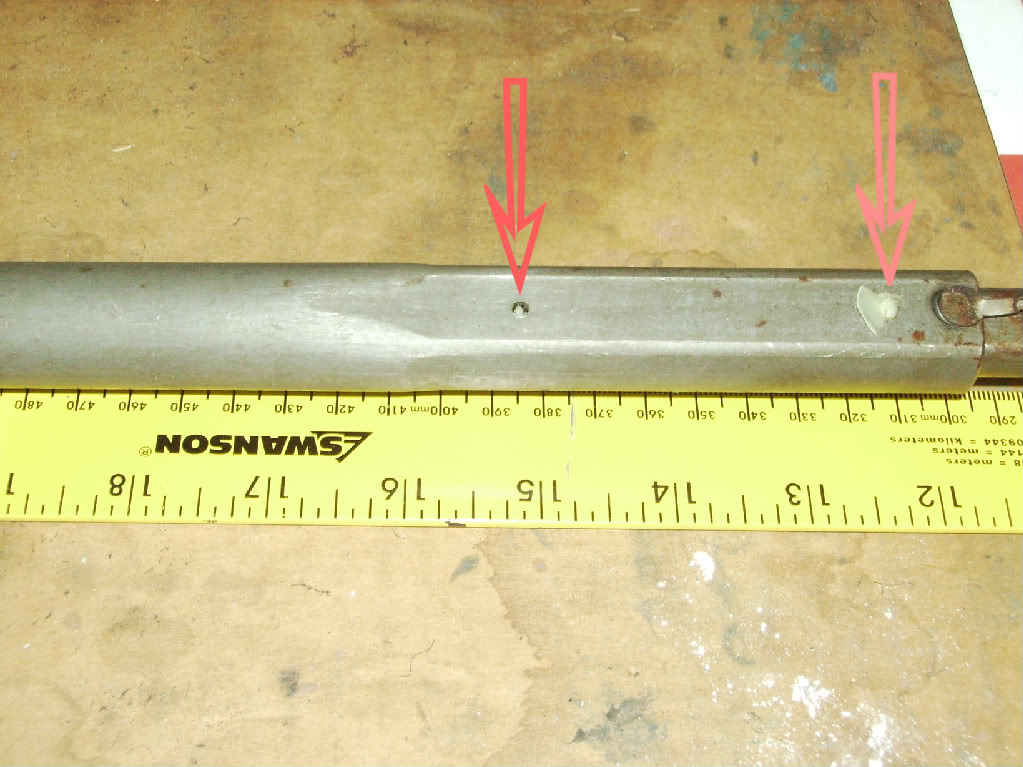
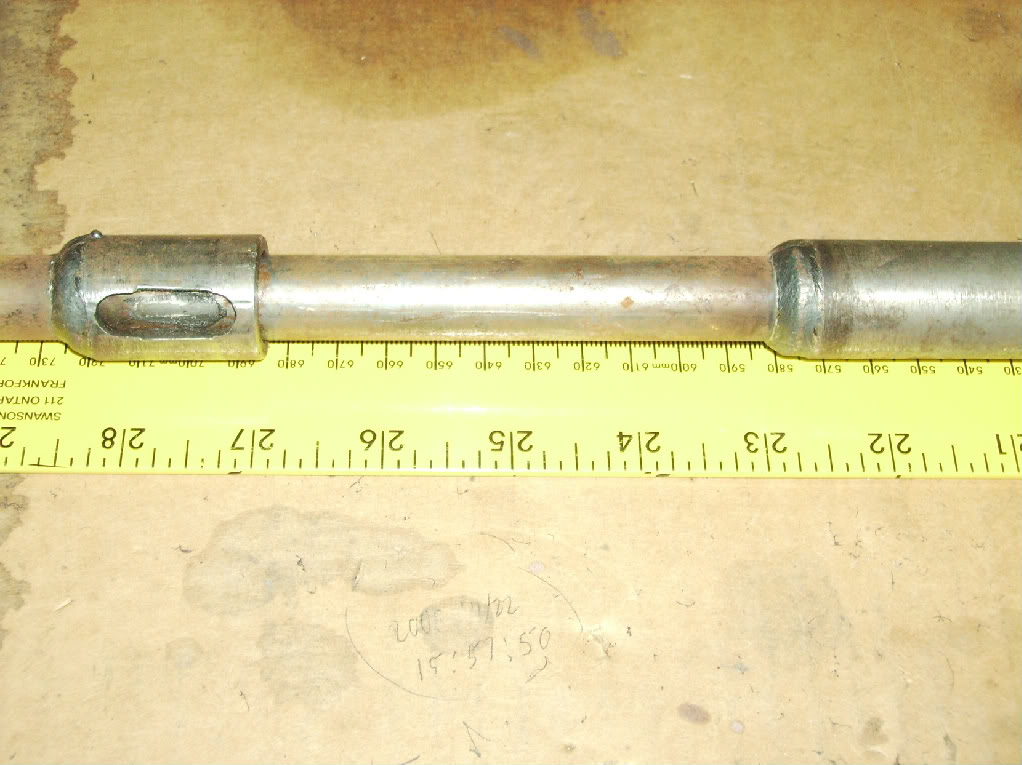
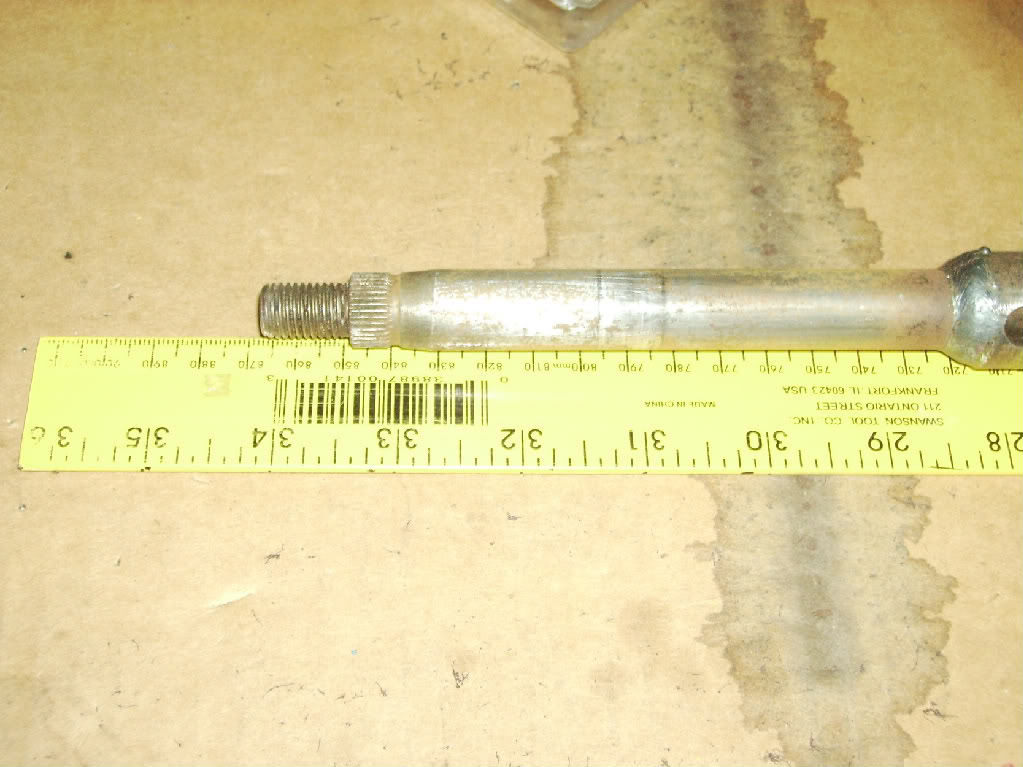
This is the best pic I've got; I remembered on the way home that my camera is with my wife, and she's out of the country just now.
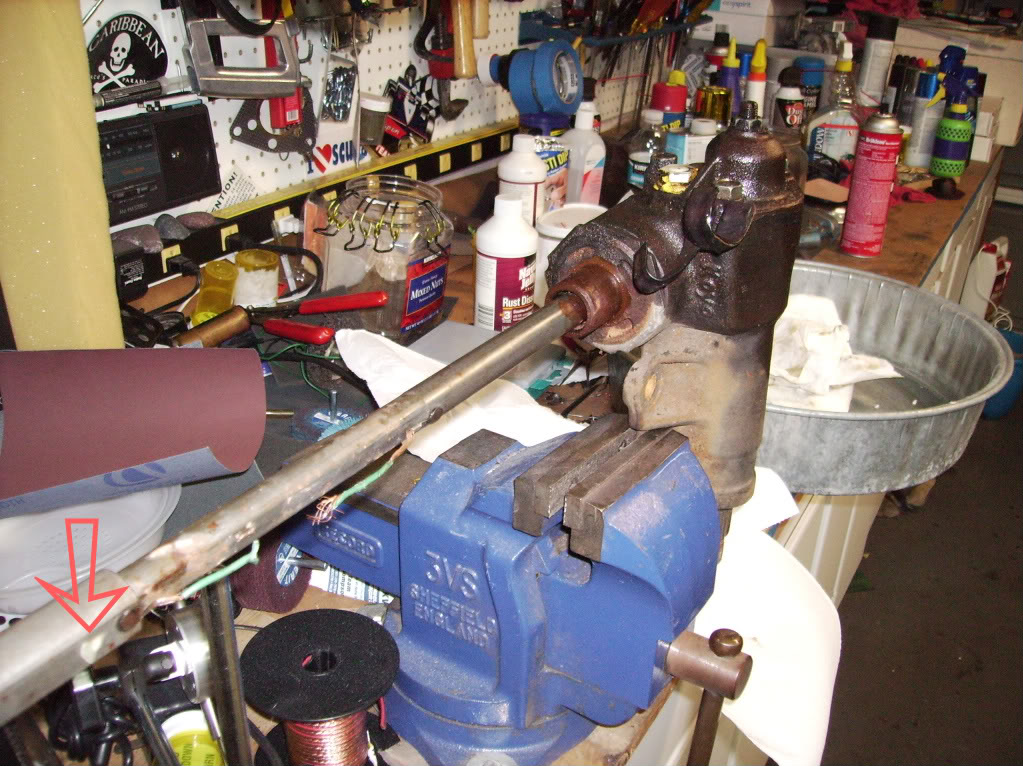
You can see ground wire (busted on this unit) and you can see the bottom of the two nylon pins (arrow)... the head of it's a bit busted up. there are two of them, spaced about 2 3/4" apart, and the bottom one is about 11 1/2" up from the bottom of the shaft.
You can see ground wire (busted on this unit) and you can see the bottom of the two nylon pins (arrow)... the head of it's a bit busted up. there are two of them, spaced about 2 3/4" apart, and the bottom one is about 11 1/2" up from the bottom of the shaft.
Trending Topics
 04-21-09, 05:46 PM
#9
Full Member
Join Date: May 2008
Location: Winnipeg, MB
Posts: 52
Likes: 0
Received 0 Likes
on
0 Posts
The shaft is basically 2 pieces. If you're looking to repair it, you probably could do it from inside the car, but I don't think most people would. You'd basically have to disconnect everything from the inside and pull out the sleeve. From the engine bay, you'd probably have to disconnect the steering box so that you can move the shaft down to get access to it (which would make the box go up). Then you'd probably have enough room to drill/rescrew/re-attach both pieces of the shaft.
Really by that time you'll have so much disconnected that you may as well just take out the box, since you'll just have the battery and the hood in the way at that point (unless you have A/C also). The shaft simply comes with it through the engine bay. It's not overly fun getting it out, but once out you'll have much more room to work.
Resist the urge to just disconnect everything from inside and simply pull down on the shaft. If the box is still attached in the engine bay, the shaft will flex a *bit* but it'll probably be tough on any bearings inside the box, and if you manage to bend the shaft, the car will pull to the side pretty hard when you drive (it'll feel/act like a very very bad alignment) - ask me how I know.
05-01-09, 10:01 AM
#10
Junior Member
iTrader: (2)
Join Date: May 2007
Location: Edmonton AB
Posts: 39
Likes: 0
Received 0 Likes
on
0 Posts
What about using an angle grinder to cut a "window" in the steering shaft sleeve from under the dash, to gain access to the adjoinment? Could somebody measure the distance from the end of the steering shaft to where the nylon pins should be? My '83 GSL is going to become a race car so I'm not too concerned about the aesthetics.
05-01-09, 03:11 PM
#11
What about using an angle grinder to cut a "window" in the steering shaft sleeve from under the dash, to gain access to the adjoinment? Could somebody measure the distance from the end of the steering shaft to where the nylon pins should be? My '83 GSL is going to become a race car so I'm not too concerned about the aesthetics.
From my prev. post:
"there are two of them, spaced about 2 3/4" apart, and the bottom one is about 11 1/2" up from the bottom of the shaft."
I suppose you could just bang the hell out of the upper end of the shaft with a mallet and block of wood, to shear the pins. You'd still end up busting the ground wire.
05-02-09, 08:07 PM
#12
Junior Member
iTrader: (2)
Join Date: May 2007
Location: Edmonton AB
Posts: 39
Likes: 0
Received 0 Likes
on
0 Posts
DivinDriver; This is 11 1/2" from the steering wheel end of the shaft, or from the steering box?
What I have pictured in my mind is that with a measurement from the steering wheel end I could locate, and cut a hole about 3" long in the sleeve, (long enough to view both pins) and then with this access from under the dash I would drill out the old damaged pins and reinstall some new ones. (maybe pop rivets??) I would be quite content to seal the hole in the sleeve with muffler tape or similar. I don't see a need to remove or disconnect the steering shaft at all, (or break the ground wire) ...but am I missing something?
What I have pictured in my mind is that with a measurement from the steering wheel end I could locate, and cut a hole about 3" long in the sleeve, (long enough to view both pins) and then with this access from under the dash I would drill out the old damaged pins and reinstall some new ones. (maybe pop rivets??) I would be quite content to seal the hole in the sleeve with muffler tape or similar. I don't see a need to remove or disconnect the steering shaft at all, (or break the ground wire) ...but am I missing something?
 05-03-09, 03:49 AM
#14
i was lead to believe there was a metal clip that does the same job and was suppose to colapse in a accident, mine has done this and i was going to drill a couple of holes and place a ali rivet in there that way it should still colapse and be strong enough to hold it in normal driving + you don't need to remove anything
saw the write up on here some where
https://www.rx7club.com/forum/showth...ighlight=rivet
saw the write up on here some where
https://www.rx7club.com/forum/showth...ighlight=rivet
05-03-09, 11:12 AM
#15
Junior Member
iTrader: (2)
Join Date: May 2007
Location: Edmonton AB
Posts: 39
Likes: 0
Received 0 Likes
on
0 Posts
Right!
DirectFreak;
"The best suggestion that I've heard came from Dave Barniger at KD Rotary, and it can be done with the column and steering gear in place: turn the steering wheel so that the wheels are straight ahead and position the wheel so that you have the desired clearance between the wheel and the plastic steering column covers. From the floorboard, measure 7.5" up the column, and then drill a 1/2" hole into the bottom of the steel column jacket. Then, through that hole, drill a quarter or eighth inch hole through the collapsible shaft. Install a quarter or eighth inch ALUMINUM pop rivet into the hole and you're done!"
05-03-09, 01:34 PM
#16
That's a method of replacing the nylon pins, once they've sheared.
Not sure if I'm 100% behind the assumption that an aluminum pop rivet (which will likely still have the steel expansion pin inside it) will shear as easily in an accident as two nylon pins will.
Collapsable steering columns saved a lot of lives over the old method, before airbags made them unnecessary.
Probably would work mechanically fine. But from a safety standpoint, very iffy.
02-08-10, 12:28 PM
#17
Full Member

Join Date: Nov 2008
Location: London England
Posts: 56
Likes: 0
Received 0 Likes
on
0 Posts
Fix steering in -out play
Following on from Divindriver's pics,I repaired my steering and wanted to add my 5 cents.
Under a sleeve column the collapsible steering shaft consists of two pieces which slide together.To hold them in place there are four pins/glue
The male section has two grooves 2mm deep and are spaced apart.
The female section has four holes thru which these pins go to sit in the grooves.
To repair the shaft I used 7mm aluminium pop rivets and a manual rivet gun.
I had taken the complete steering box out to do the repair which means taking off the bonnet and is a fiddly job to get box out .With hindsight I think that this repair can be done inside the car by sliding off the outer column to expose the inner shafts -should be much easier.
I'm attaching a drawing with dimensions of whats in the male /female connection.
02-08-10, 06:15 PM
#18
add to cart
Join Date: Jun 2002
Location: Saskatoon, SK & Montreal, PQ
Posts: 4,180
Likes: 0
Received 0 Likes
on
0 Posts
They're still used. If you get into a collision that mashes the front of your car past the front wheels, the engine (in front engine designs) is designed to drop under the vehicle and the steering column collapses. Otherwise, airbag or not, the engine and steering column would be pushed into the passenger compartment.
08-11-19, 10:09 AM
#19
Full Member

I know this is a 10 yr old post but drilling a 1/2 inch hole in the sleeve and installing a 1/8 inch aluminum rivet directly into the shaft while the shaft is still in the car works great, (of course you gotta work upside down). Thank you for posting it.
Last edited by Lews83GS; 08-11-19 at 10:13 AM. Reason: clarification
The following users liked this post:
mikey D (10-05-19)
The following users liked this post:
mikey D (10-05-19)
04-14-20, 05:11 AM
#21
Junior Member

Join Date: Mar 2014
Location: NZ
Posts: 6
Likes: 0
Received 0 Likes
on
0 Posts
hi, I need to do the same repair and keen to avoid removing the steering column. How has your repair performed? do you recall if you used the exact measurement of 7.5inches off the floor as in the original post? And did you just use one rivet? thanks!