Rebuilt carburetor and having more problems!
 06-04-11, 07:00 PM
#1
Senior Member
Thread Starter

Okay I just had a thread about a hesitation when I am hitting the gas during idle. I have found it out was the accelerator pump and the carburetor needed to be rebuilt. Which I am sure some of you already know. I spent about 7 hours working on this carburetor and putting it all together and I thought I got it all worked out. I put it on the car and the first time I started the car it revved to 5k and when I shut it off gas was leaking out of the accelerator pump. I realized the screws wasn't on there as tight as I thought. So I put it all back together put it back on there and tried it again. The car now idles at around 800 to 900 rpm and sounds better than it did. Now the hesitation I was experiencing before is far worse. I can barely get on the gas and the car will go up to about 2000 rpm then it will want to die. Or if I just get on the gas from idle it will bog down until it dies. This time it isn't just hesitating a little bit. So is anyone able to tell me what I might of done wrong before I throw this carburetor out and save up for a Holley?
I actually found a edelbrock carburetor on jcwhitney for $277 part number is 12109G and a Holley street avenger carburetor part number 15608G for $320. I am wondering if either of these will increase horsepower and well the most important question, will this even fit on the car? I don't exactly have an extra $600 laying around just to get racingbeat's Holley, so I have to try and find something at least a little cheaper if I am able to.
I actually found a edelbrock carburetor on jcwhitney for $277 part number is 12109G and a Holley street avenger carburetor part number 15608G for $320. I am wondering if either of these will increase horsepower and well the most important question, will this even fit on the car? I don't exactly have an extra $600 laying around just to get racingbeat's Holley, so I have to try and find something at least a little cheaper if I am able to.
Last edited by mar3; 06-11-11 at 08:54 PM. Reason: Merged back-to-back posts...
 06-04-11, 09:21 PM
#2
u would really need to change to the intake RB sells to use the holley or edelbrock. i have seen tho where an aluminum spacer the holley will bolt to was welded to the stock intake. either way neither of those carbs will just bolt to the stock intake. i don't know how it would work out with just any off the shelf holley, i just know how one from RB does. they have their own things they do so they work on a rotary, but an off the shelf one can be made to work with some patience and an assortment of jets. there's a few on here that have used edelbrock as well. i just hate for u to spend all that money on a holley and it still be a headache trying to get it to work right.
06-05-11, 01:56 AM
#3
If you missed tightening the screws on the accelerator pump, you may have missed something else, something myself and everyone else here has never done 
The stock carb is easier to tune and get right than an off the shelf generic carb.
The more times you take it apart and reassemble, the more familiar/better and faster you get at it. Take it apart again, look at the diagram in the FSM and in the rebuild kit before you put each part in to make sure you're not missing any thing. Little things can vanish easily while you're handling them. The diagrams show which parts get a gasket, or sealing washer.
06-05-11, 08:20 AM
#4

bahlorm, I realize you are very frustrated with this car, I have read some of your other posts.
But blaming the Nikki and treating the good folks on this column as if they are here for one thing, to solve all your problems, is not going to help.
Ignorance x frustration x lack of respect = failure every time.
There's nothing about your Nikki a good attitude adjustment, a little education and lot's of patience won't fix. Many, if not most of us are driving around on Nikki carbs that we rebuilt and we are doing just fine, thank you.
But not many of us got it completely right the first time. Dropped *****, reversed gaskets, extra parts at the end of the job and a Nikki that's just not acting right is pretty much par for the course for most rookies doing their first Nikki rebuild. The problem usually reveals itself when you pull the carb and take it apart. After all, now you know what to look for.
And if in fact you did get it right the first time, that's no guarantee your new carb is going to make your car run like new. You still have a whole bunch of critical connections and adjustments that need to be done right before you can move on to the next step, whether that's simply driving the car or doing a full restoration.
So I understand your frustration, believe me, I've been there plenty of times. But that frustration, together with a lack of respect and appreciation for your equipment and, it seems to me, for the people who could actually help you figure this thing out, are the main things standing between you and success right now.
When I started out with my first FB and Nikki, almost ten years ago now, I knew next to nothing about rotaries and only a bit more a bout four barrel carbs. (small engine carbs and SU's yes, but nothing nearly as complicated as a Nikki).
I made just about every rookie mistake in the book, most of which you will find recorded here on this forum. And the feedback I have harvested from wise and even some unwise rotor heads has been impressive and invaluable.
Most importantly, I have always been very grateful for that help and advice and I let the rotary gurus here at RX-7 club know it every time I post a problem, both at the beginning and at the end.
10 years and 300,000 miles later I know just about everything there is to know about my 12A's, my Nikki's and everything else that makes my 84/85 GSLs run reliably and strong. In fact, just like a bunch of guys who will read this post, I would venture a guess that I could have your car running fine in an hour or two simply by applying a systematic approach, the proper diagnostics and a little patience.
But you don't seem to be listening very well. You don't seem to learn from the generous and helpful responses that have already been offered. Worst of all, appreciation and respect for your equipment and the good advice you have already received seems to be absent.
But we are a patient bunch, so let's try again.
Michael has no problem with aftermarket carbs, I believe he has a Holley on the ported Old School 13B that powers his FB. But he also has the knowledge base to maintain either a Nikki or a Holley and when he says Nikki's are easier and way less expensive, believe him.
And Stevan is spot on, you need to learn everything about any carb if you really want it to realize it's full potential. A good deal of this will be trial and error and that takes time and patience. Heed their advice, at this stage you are much better off mastering the Nikki.
Also, get in the habit of posting very specific, detailed and carefully thought out questions. Post lot's of pictures so we can actually see what you're talking about. A carefully constructed dialogue will be helpful to all of us, rookies and experts alike, who love our cars and want to realize their full potential.
And the answers that discussion generates will surely fix your problems.
Hope this helps!
Ray
06-05-11, 10:12 AM
#5
I'm sure everyone would agree that rebuilding a Nikki takes ALOT if patience and attention to dissassembly / re-assembly detail; really obsessive attention to details using the Nikki rebuild FSM. I rebuilt mine on a white table cloth, using ziplock baggies with individual FSM page copies that highlighted each piece location per step. I think I ended up with 20 baggies; each containing the carb pieces per step with a page of the service manual's exploded view of the the Nikki. (I didn't lose those tiny two-sized ***** that are often stuck, unnoticed, then later fall out as you are cleaning!)
I was obssessive on the details, but was successful on the rebuild, as I can get it to idle at 800 rpms! (I didn't screw with making rats nest mods, though, as that seems to be a constant problem on the forums over the years.)
If ya can't get it right, I'd go with the Racing Beat product, as they certainly know their stuff!
06-05-11, 11:36 AM
#6
meh.
iTrader: (2)
Join Date: Aug 2009
Location: fwb, fl
Posts: 459
Likes: 0
Received 0 Likes
on
0 Posts
after i rebuilt my nikki the mesh screens in the fuel rails completely dissentigrated as soon as i fired it up. float bowls were full of crap, all my jets were clogged again.
good times.
good times.
06-05-11, 11:48 AM
#7
This forum is one of the most helpful forums...ever.
The information on here is just flat out ridiculous. Ive never belonged to a forum that has as many helpful threads, posts, and more importantly, members.
I'm no rotary genius by any means, and I search this forum daily I think with questions. I pulled my engine nearly two years ago because I was going to paint the engine compartment. 2 weeks later, I had it painted and the engine back in.
Fast forward almost 2 years and another rx7 that stole most of my attention, I still dont have the car idling correctly which is why you'll see a post from me very soon with detailed explanations of what I have done and checked. I will be posting pictures of everything I have tried and done.
These cars are a pain, yes. Especially while learning how they work. You just have to look at a few things; the things that keep me interested in the RX7's.
1. The respect you get from all ages. I get props from people ages 10-75+
2. How many other people drive things with a rotary that can actually explain to people how it works? YOU will be able to, because of the issues youre currently having.
3. The rx7 community is great.
4. Above all, the knowledge you'll have from doing this.
Stick with it man. You'll be fine. Patience is key.
Trending Topics
06-05-11, 01:14 PM
#8
Bahlorm, something obvious to check: Did you put the accel pump diaphragm in backwards? The piston should face outward so that it contacts the lever. When you've been working on the thing for hours, you get tired and stuff like that seems to magically happen.
06-05-11, 01:48 PM
#10
Lizard, I might be able to help with the air horn threads, pm me a pic of the part, I'll send it along if I have it.
Those mesh little barrel screens in the fuel horn are truly hard to come by, however.
I'm two screens short of a Nikki rebuild right now. Makes me wish I still had those good ones I mangled on the first Nikki rebuild.
Anybody got a source?
Those mesh little barrel screens in the fuel horn are truly hard to come by, however.
I'm two screens short of a Nikki rebuild right now. Makes me wish I still had those good ones I mangled on the first Nikki rebuild.
Anybody got a source?
06-05-11, 03:01 PM
#11
I can't find a 10Mx1.0 tap anywhere. None of the metric sets have them and I haven't seen a standard equivalent. I have a 1.25 that will do more harm than good. I might try to use an M6x1.0 to thread one side and see if I can get the bolt to work it's way in. If not, I'll have to order a tap.
I have a spare air horn lying around, but I've done some extensive modification to the one I've stripped so I'd rather not have to throw away countless hours of work and then put in more hours of work modding the spare one unless I absolutely have to. That airhorn is also missing the banjo bolts and screens.
As for the screen, I have a set in the carb that is on the car (the carb I'm building is an extra for race applications.) Using them would break my golden rule for this project - Don't borrow any parts from the good running carb! But I'd rather borrow a screen than run without one.
Ray, the thread is in the air horn itself. I'll PM you a pic.
06-05-11, 04:04 PM
#12
Senior Member
Thread Starter
Actually Lizard that might be what might of happened. I planned to take it off and fiddle with it here in a few. I remember making the piston pointing towards the spring. I was also wondering about the little *****. I only found out where 1 of them go to and it had another little piece inside the same spot. I am not completely sure which order it goes in. I think I put the ball inside there then the little piece, if anyone has any idea as to what I may be talking about lol.
 06-05-11, 06:27 PM
#15
Senior Member
Thread Starter
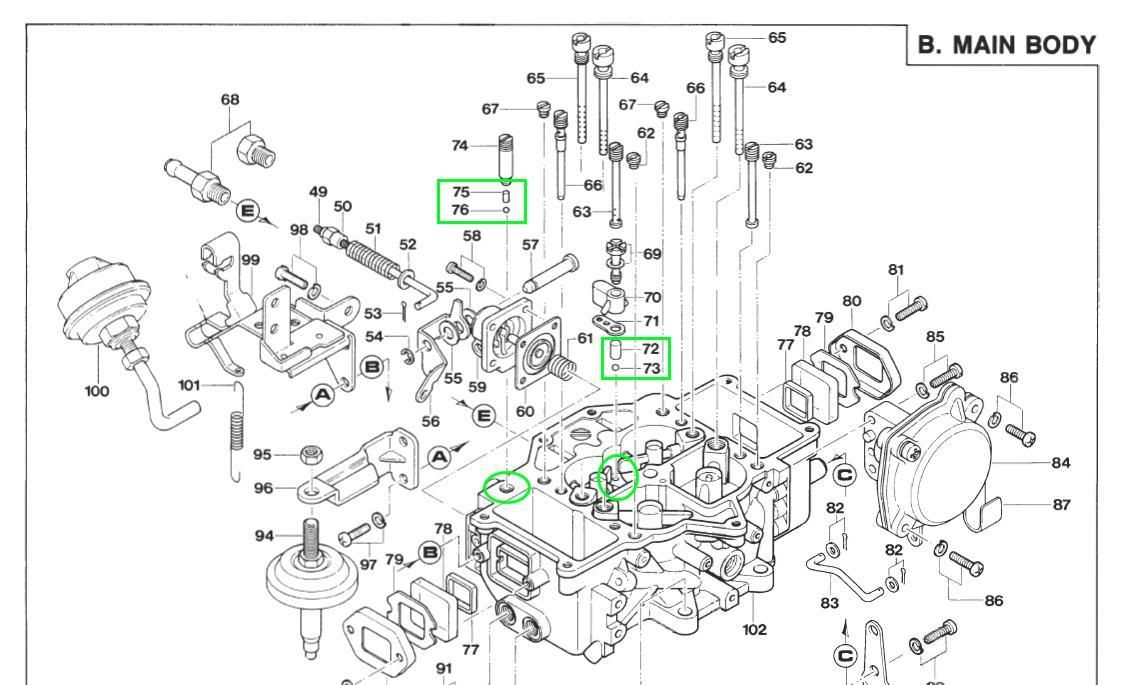
Ahh I did not replace the one numbered 75 and 76. I do have excellent news though, the accelerator pump was backwards and I turned it around, the car was idling crazy low, around maybe 100 rpm. I got it on video here
http://www.youtube.com/watch?v=3eIt2Zxc9C4
After a few minutes of thinking and fiddling I started messing with the fuel and air mixture screw. Then after turning it for about 30 seconds straight I started to finally notice a difference and then the car went up to about 500 rpm and the idle has smoothed quite a bit. I also got on the gas and there is no hesitation. So with a little bit of tuning I am thinking that this car will be fixed, well at least that will be fixed lol. Thanks to everyone that has helped me through this, without any knowledge I gained from here then I would not know where to start!
06-05-11, 08:17 PM
#16
Glad you got it working! Sterling has an excellent write-up on idle tuning on his site here: http://www.sterlingmetalworks.com/tuning_the_nikki.htm
Hopefully you can get it running well and then dive into the fun part: tuning at WOT
Hopefully you can get it running well and then dive into the fun part: tuning at WOT
06-05-11, 08:44 PM
#17
Senior Member
Thread Starter
Okay, I take the good running part back lol. The car just must like my GF, when she came home it idled good and revved just fine. I went to go out and tune it and it started running like it did in the video. I did what it told me to do to tune the carburetor and it made no difference other than either it would kill it or it would run like it was. Also now it will die giving it any gas at all. I even decided to be curious and spray started fluid in it while it was running to see if it would do anything. And it would instantly kill the car. So it seems any excess gas makes the car not want to run. I don't know if the accelerator pump could cause this, or if maybe there is something going on with the jets? I put them on there fairly tight, could they be too tight or mixed up in some way if that is possible? There was 1 jet I was curious about. It is kind of a long jet around the edge of the carburetor and it sticks out while all the others are flat, and it was the only 1 that looked that way, but it looks like it fits with the air horn on and over it. Also had a open spot next to that jet that looks as another was supposed to go there, but I put all the jets in a bucket to soak in carburetor cleaner and no one touched it until after I started putting the jets back in.
Actually instead of trying to explain it, I just remembered I have a picture of it here
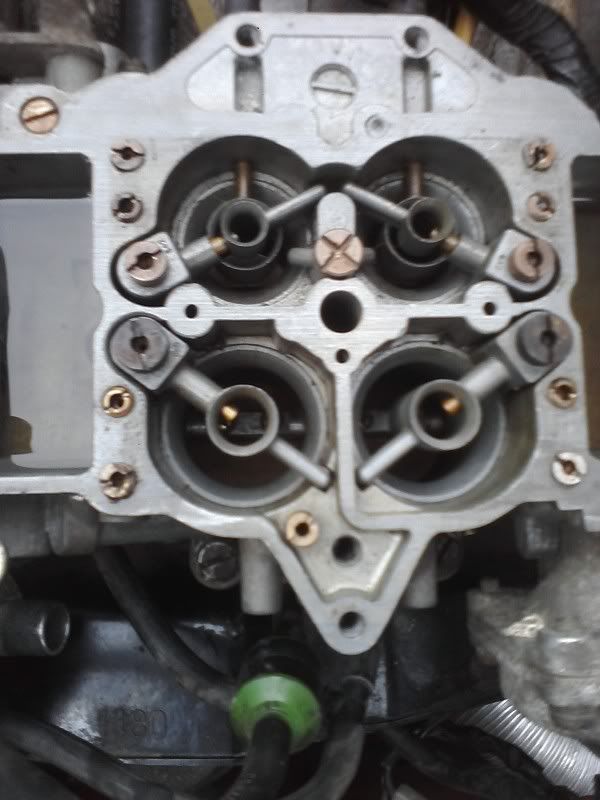
Actually instead of trying to explain it, I just remembered I have a picture of it here
06-06-11, 10:01 AM
#20
Senior Member
Thread Starter
UPDATE!!!! I have no idea as to why I decided to randomly want to say update but here it goes. I was missing that plug and I found it on the floor. I put it in and tried to start it. After about 10 minutes of cranking it over and starting fluid it finally started. I had it running at around 2500 rpm trying to get it to warm up while white smoke was pouring out of it, so I guess it ended up flooding. After it got warm the idle was around 2000 which I thought the linkage was probably too tight, and it was. I took the linkage off and instantly the car died, and again it required more starting fluid to get it going along with lots more white smoke. Then it died again and I ran out of fluid to start it lol. Is it possible to put that plug in backwards or something? This car is running extremely rich even after it is warmed up, the smoke stops unless I hit the gas then smoke pours out of it again. The float level is actually in the center so surprisingly that is not the problem. Other than that though the car isn't dying when on the throttle and it isn't doing what it was doing, so that problem is fixed. Now it is doing the opposite lol.
I do have to say though with all the help and how many times I have taken this thing apart and since I am doing many mistakes at once, I am actually learning a hell of a lot more than I thought I would from these carburetors lol. After all this I would hope that the next rebuild would go much more smoothly.
Uhoh reading on the diagram from foxed.ca the plug is actually something that screws in. I thought it was a little black piece. So maybe I put in the wrong thing. Even though it fit perfectly in there lol. But it looks like this plug is almost like a really short jet looking thing. If that is the case then I am missing this piece.
Last edited by mar3; 06-11-11 at 08:57 PM. Reason: Merged back-to-back posts...
06-06-11, 10:51 AM
#21
You will soon become a Nikki Master bahlorm, there aren't many things more satisfying than rebuilding a Nikki and getting it perfectly tuned. Every morning at the end of my 50 mile 40 minute cruise down interstate 85 at 70+ mph I pull up to the stop light at the end of the exit ramp and the Nikki idles down to a sharp 600 rpm, then takes off at the green without skipping a beat. Took me years to get that just right.
Anyway the piece you need is a slotted brass screw, you can see the top of it in this picture. If you can't find one pm me your mailing address, I should have a spare and I'll send it along.
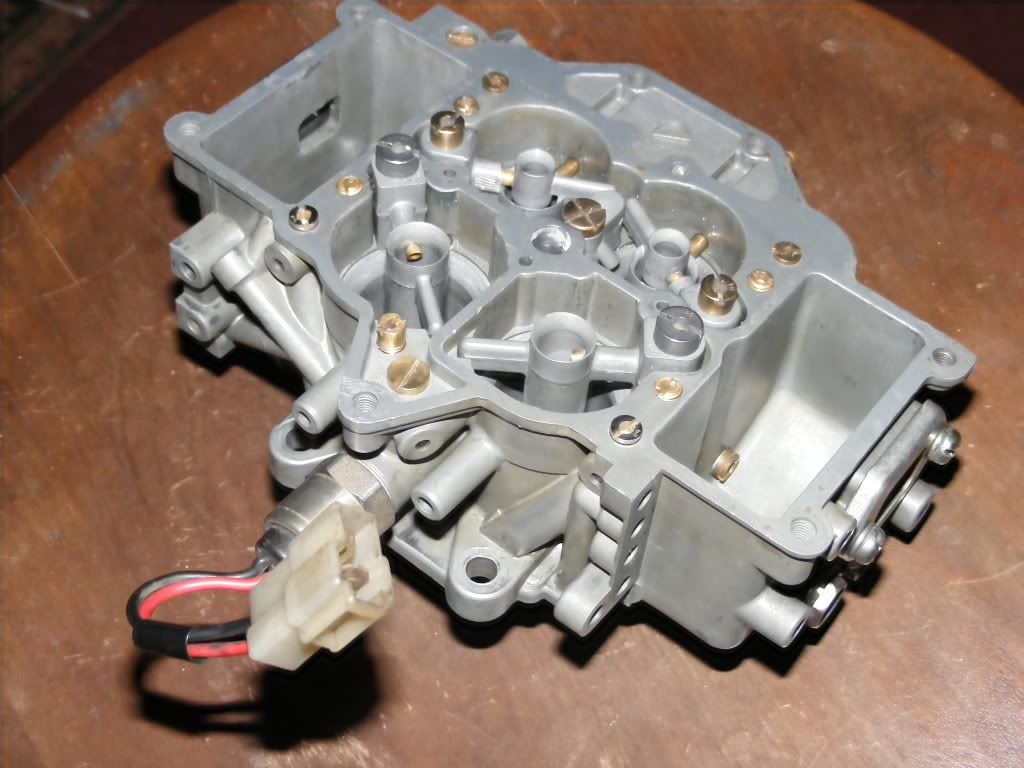
And in the middle of this photo, it's a short stubby thing
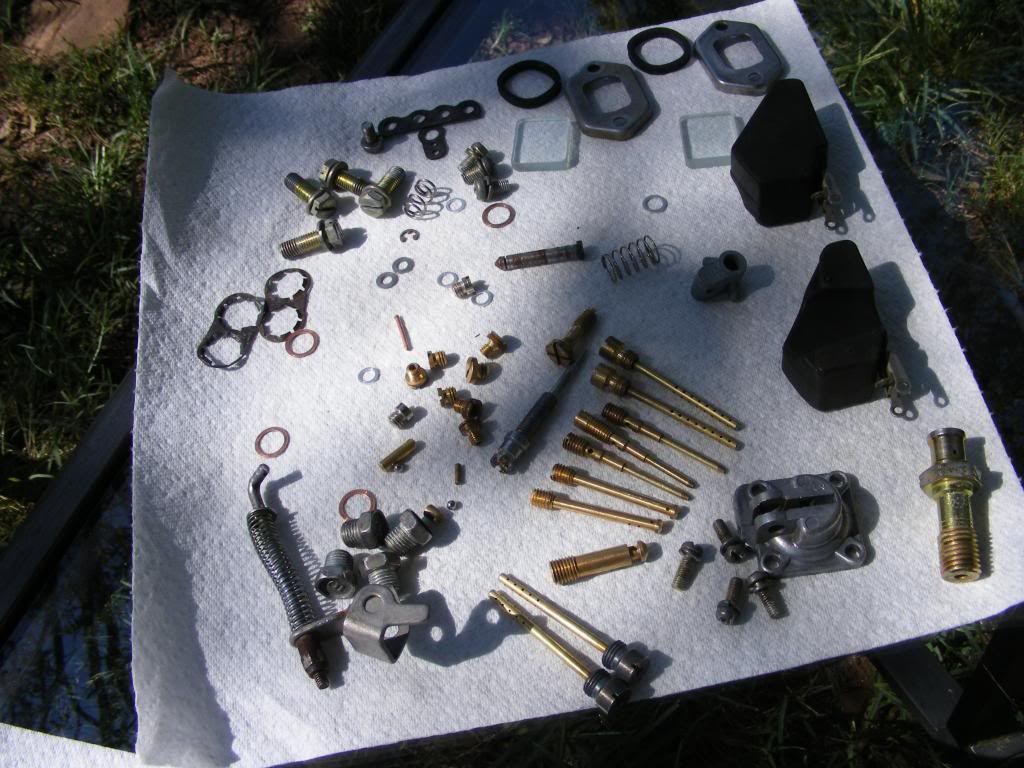
Anyway the piece you need is a slotted brass screw, you can see the top of it in this picture. If you can't find one pm me your mailing address, I should have a spare and I'll send it along.
And in the middle of this photo, it's a short stubby thing
06-06-11, 03:44 PM
#23
Senior Member
Thread Starter
Yeah my ignition should be in good shape. unless my plugs are fouled out already from gas and i do seem to be missing that piece ray so if you want i will pm it to you as soon as i get home. by the time my phone would load another page my break would be over lol.
06-06-11, 05:07 PM
#24
OK bahlorm, I checked my nikki parts and after awhile found that little brass plug. That thing and them little aluminum crush washer are small, I can see how it could get misplaced.
I'll send it out when I get your snail mail address, but do me a favor in the mean time and perform that test Mark (Kentetsu) suggested for your leading ignition.
I just listened to your little video (with the sound on this time) and I totally agree with Mark, you don't have any leading ignition.
I'll send it out when I get your snail mail address, but do me a favor in the mean time and perform that test Mark (Kentetsu) suggested for your leading ignition.
I just listened to your little video (with the sound on this time) and I totally agree with Mark, you don't have any leading ignition.
06-06-11, 07:52 PM
#25
Senior Member
Thread Starter
Okay, I definitely will. There is a chance the plugs could be fouled out by now. I just bought them maybe last month but they were completely soaked in fuel from the engine flooding constantly, and now soaked again from what the car is currently doing. I know the plugs are pretty much black right now and I will probably order some new ones after this problem is fixed and I don't have to worry about it flooding and fouling out the plugs, since I think these plugs were about $7 a piece and require to be special ordered.