
Rebuilding a Mikuni..?
 06-24-09 | 12:36 PM
#1
Rebuilding a Mikuni..?
I picked up a rebuild kit from wolfracing.com They're actually located right up the block from me and I picked up the kit in person. The fellow I delt with was a pretty cool guy.
Anyways, I have this GSL-SE I been tinkering with whenever I get the chance. It sat literally untouched for 6 years and I've been through everything on this car so far to get her back up and running.
The throttle on the Mikuni was frozen stuck real bad. It took 2-3 months of spraying her with WD-40 and PB-Blaster, before one day out of nowhere, she suprisingly moved.
The gastank was filled with nastyness. Prob a combo of rust, water, dirt, etc. along w/a nasty leak, so I took it to a local radiator / tank shop to have it boiled out and sealed w/this aircraft liner that prevents further corrosion. It's guarenteed to last longer then the tank and only cost $125 for the entire once over.
I replaced some shoddy old rusty fuel pump w/a Holley Blue I had collecting dust. Replaced all the fuel lines to 1/2" aluminum feed, and 3/8" aluminum return, and added a fuel pressure gauge at the Holley regulator right before the carb feed. I have come to find the carb likes what the guage is reading to be 3.5 psi. Anything over that and the carb drips and floods.
Anyway's after the quick / not so quick summary... the problem I'm having after putting the carb back on with only a quick cleaning is this:
When I press the accelerator the car has this giant dead spot................... and then goes.
My father along with the guy from wolfcreek both said Accelerator pump...
So I was wondering, should I just do the entire rebuild or change what I think would solve my problem for now..?
The kit seems to have alot of little o-rings and gaskets, and the last carb rebuild I did, (nikki) didn't work out so good. I don't want to screw with the carb tooo much b/c it actually runs, starts, idles decent enough for me, well at least for now, and I'm thinking if I did a partial rebuild I could actually learn what each portion of the carb does and how it works.
I love making threads like this. I'll prob read over it again sometime next year out of boredom and laugh at myself for being such a coffeed' up over-typing nooob.
06-24-09 | 02:01 PM
#2
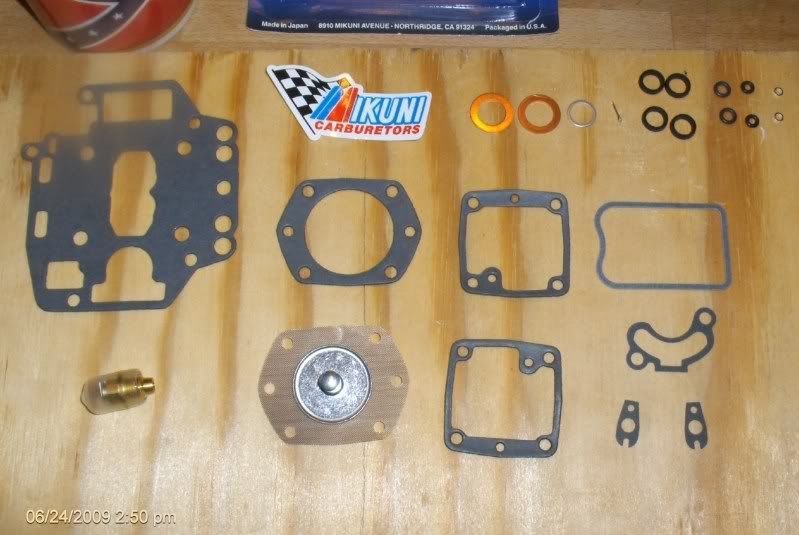
So after thinking out loud with the above post... I've come to my own conclusion that the rebuild *shouldn't be that hard*.
24 pieces total and it doesn't look like any of the parts could be mixed up for one another at all.
24 pieces total and it doesn't look like any of the parts could be mixed up for one another at all.
06-29-09 | 10:49 PM
#3
Alright, so here's a tip for you 1st time carb rebuilders...
aka non-mechanic as a full time jobbers...
aka searching the forum for a tip to help you threw your rebuild on laymens terms...
USE GOGGLES.... When cleaning with carb cleaner and then compressed air to blow things dry,
The carb cleaner WILL spray back at you eventually and get you right in the eye.
Holy **** I thought I was going to go blind for a second.
Thank goodness carb cleaner washes out easily with water...!
Next tip: MAKE SURE YOU HAVE PLENTY OF CARB CLEANER ON HAND.
Nothing worse then taking something apart,
Going to give it the once over cleaning and running out of cleaner...
Then having to goto the parts store to get more carb cleaner,
Only to come back and realize you forgot the order of how you took the last thing apart.
07-02-09 | 04:50 PM
#5
I only used *some* of the rebuild kit. Anything that still looked good I left alone.
Here's what was left over when I was done:
(Everything on the left was replaced, the stuff on the right I did not).
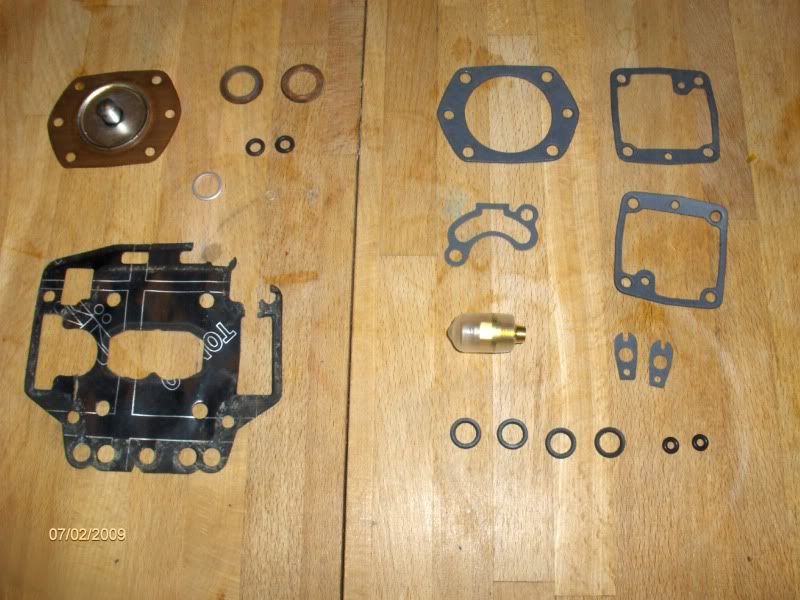
After closely checking out the choke, or what the manual calls the starter...
I can't start her up without this being open and she DEFINATLY won't somewhat idle unless it's open. If I close it I get no idle whatsoever, just dies.
Any ideas...?
Here's what was left over when I was done:
(Everything on the left was replaced, the stuff on the right I did not).
After closely checking out the choke, or what the manual calls the starter...
I can't start her up without this being open and she DEFINATLY won't somewhat idle unless it's open. If I close it I get no idle whatsoever, just dies.
Any ideas...?
07-03-09 | 02:28 AM
#6
Idle mixture screws need to be backed out a bit if you put them in all the way thinking they held some parts together. Sorry if this is kind of basic and insulting, but you must first adress the obvious. Also when cleaning the jets make sure you didn't dislodge and varnish into a narrow jet passageway.
07-03-09 | 09:58 AM
#7
Insulting... ha. Yea right.
I'm having the utmost patience because if there's one thing I have learned is that when you have no clue... you REALLY have no clue.
That is why I'm asking instead of touching things and making matters worse.
Thanks 87...
Edit.. I definatly didn't touch the pilot screws... And whoever adjusted / owned the carb before me put a little dab of gasket maker I guess to hold them in place. I just did another read over the service manual on how to adjust them and the throttle stop screw. Seems pretty straight foward. I'm going to give that a try.
Trending Topics
07-05-09 | 08:52 PM
#9
When the car actually ran before sitting, it supposedly ran pretty good according to my buddy who it actually belongs to. The motor and carb have been paired since. And yes it is a stock 12A, I have no clue what year though. Next time I go into the carb I will jot down the various sizes. Jay you seem the like the man I want to listen to according to your signature...
My pops came over today and helped me with getting this thing to idle. The pilot jets were frozen, but a little PB blaster and soak time got em free. They were actually pretty dirty / varnished. We got it to idle around 750 pretty smoothly with the choke/starter off. Starts right up much easier too.
My pops came over today and helped me with getting this thing to idle. The pilot jets were frozen, but a little PB blaster and soak time got em free. They were actually pretty dirty / varnished. We got it to idle around 750 pretty smoothly with the choke/starter off. Starts right up much easier too.

Thread
Thread Starter
Forum
Replies
Last Post