RE-Speed steering kit! It's here!
#201
Thread Starter
Joined: Sep 2005
Posts: 532
Likes: 1
From: Abilene, TX
Nobody said anything about having AFMs man I plan to get rid of mine almost right away and your right the only thing a carb is good at is High rpm fuel atomization. I rather personally have a wide linear powerband. Some guys like the carb. It doesn't matter how fast you can re tune your carb because an EFI car only has to be tuned once and it's tuned. At the most twice. once in the coldest part of the yearand once in the hottest part of the year. And that's actually overkill. Good tuners can leave enough margin for both seasons to run fine. That mostly only aplies to turbo cars anyways. You might want a bit less boost in the summer compared to winter.
Like I said I agree to disagree.......
What are you using to tune your car anyways? I hope a wideband of some sort. Not trying to start a big debate I just don't believe in using carbs since they are only good at one thing depending on setup and the rest of the tune suffers. I honestly wouldn't have said anything if you didn't first.
#202
Thread Starter
Joined: Sep 2005
Posts: 532
Likes: 1
From: Abilene, TX
I'm sure he can make nicer ones than mine man come on look at the rest of his work. It makes my mounts look like crap. I wish I had a laser cnc machine then it would be much nicer. Oh and a CAD program. I miss working at a place where I could use the mechanical engineer's cad stuff that was cool. Then the CNC mill just cut it for you. Ah.....I like when computers actually make your life simpler.
#205
Yes Skidtron and 82transam have both pioneered the direction that we will eventually head. We have had plans for these but a few other bits on my list are ahead of them.
-billy
#206
Yea I can't wait to see what you come up with Billy.
Skidtron, what are you planning on doing about the AFM? I would like to delete mine as well, but not sure how to go about it...
Skidtron, what are you planning on doing about the AFM? I would like to delete mine as well, but not sure how to go about it...
#207
If you were to make them Billy would they bolt on to the steering kit some of us already have? No way I could afford another kit but it would be nice to have the stock oil return for us turbo guys.
#208
just wish I had a better ETA then.............soon.
-billy
#211
Ya I'd like to see it for sure. I am thinking of adding a bar that connects the bottom of both mount brackets like what you did. It would stiffen everything dramatically. But the oil pan drain plug is in the way on my setup. Not sure what I'm going to do at the end yet still seeing what I'm dealing with.
Here's the driver's side prototype I just finished.
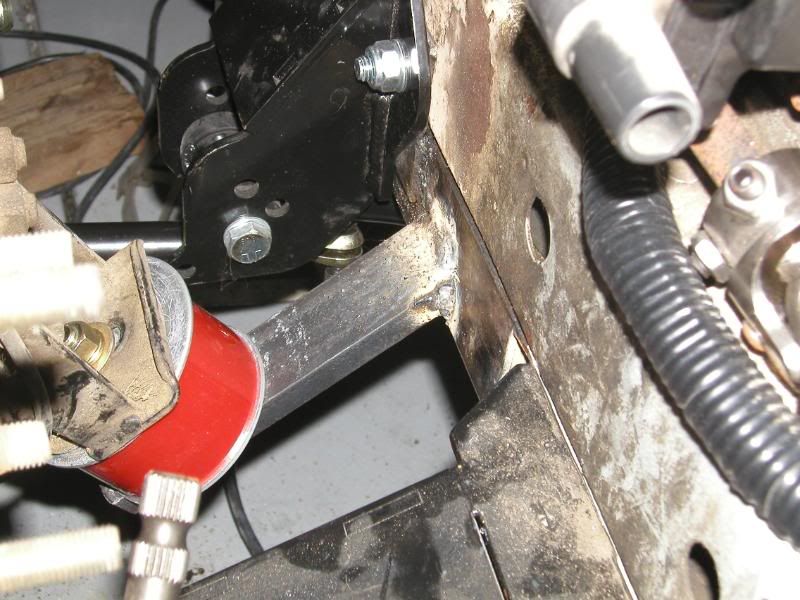
Here's the driver's side prototype I just finished.

Tying the bottom of the two mounts together will restrict rotation of the mounts relative to the point on the frame where they are attached, and without rotation, there is no more bending moment... just the upward forces required to support the weight of the engine/transmission, and the forces of the torque from the transmission (which will still vary between the left and right mounts).
Hope this helps.
#212
I have a good Idea to compliment this, and this cross over piece. Instead of welding a brace on to both piece, take a longer piece and bend it at the angle's you have already on each end. Then you can bend it horizontal again to tie it into the sub frame. If it interferes with the drain plug, cut out a whole for it big enough to get a socket on it. Yes its basically re-making the whole thing but its putting a few step forward too.
#213
I believe its his intent to connect both sides, thats what I did, I welded a piece of square tube between teh two brackets, making it basically a small "cradle" for teh engine to sit on. It seems solid enough, only time will tell though....
#214
Thread Starter
Joined: Sep 2005
Posts: 532
Likes: 1
From: Abilene, TX
I appreciate all the input from you guys. I think tieing across is definetely the way to go and there are plans. Like I said prototype. I am going to do a whole new set here shortly. I just gotta catch up on some customer cars I've been putting off. There are a few things I'm not satisfied with for obvious reasons like it's the first time I've done this. I've changed engine mounts in the past to work with special needs projects but never made any from scratch. But when you just make changes it's easy as all the hard part is done for you. Then you just come in and alter it a bit without compromising anything then you all set. Right now I've got a bar that ties the diagonal piece to the lower control arm bolts on each side to help support the weight a bit but I'm thinking it isn't going to be particularly helpful and I am having a hard time building them in the limited space I have there. The pieces are small and it's hard to get them clamped down in place for welding.
My friend who was originally going to do the welding is encouraging me to use this first set as a test then develop further and so on till the final pieces are very well engineered and look half decent as well. He was asking me if I was going to bring them over so he can weld them or what and I was like man these look like *** dude I don't know if I want you to see them. He said well just redo the stuff your not happy with or proud of and then bring them. I've also been doing a lot of thinking about some different possibilies with this as well. Different ways to attack the same issue that is.
I boxed in the backside of one of the sides and finished welding it myself and ground it down as much as I could to see where I'm at as far as strength goes and have yet to put it back in the car. It's pretty damn strong I can't get it to flex when it's held in the vise and pressure is applied to it not that I can really apply to much force as it's odd shape is hard to hold in the vise and it just comes out eventually. I guess the welds are penetraing well since I can grind all the way down to the original depth and the metal is still bonded. Also i would like to go get some sheilding gas to weld with since it should help to keep from contaminating the welds and make them stronger. Or so I'm told. I am welding indoors with no wind just so you guys know if your wondering. Not sure if that is better or worse I have no idea.
One of the other issues I'm having is that it's hard to get a nice 90 degree ground clean flat surface with only a 4 inch angle grinder. And it's frustrating me a bit as I want it to look as good as it performs. I know there is no way possible for it to be true but it seems like stuff works better when it looks half decent as well. I'm probably just crazy though.
I was pretty shitty feeling the other day looking at the brackets. I guess a bit annoyed at my lack of skill and tools to do it really nicely but I feel better now and am ready to work it out. I don't like being bad at anything I do so it kinda hurts my feelings I guess. It gets better everytime I touch them so I'm learning a lot and it goes faster and faster everytime I make a change. I also am going to claim the title of installed and uninstalled the subframe and rear brackets the most times by anyone other than Billy at this point. Holy crap! I think I've done it like 30+ times or so now. Thats the discouraging part everytime something doesn't work out like I want I have to take apart the whole **** again. Fix it and install it again. that gets old as you can imagine. I'm so fast at ity now I shouldn't even care but I still do
#215
But my idea is to eliminate the welds on both sides. Essentially it's one piece all the way across.
#216
The Shadetree Project
iTrader: (40)
Joined: Jul 2002
Posts: 7,301
Likes: 3
From: District of Columbia
Those mounts look great good job. You might want to consider one of these: https://www.rx7club.com/1st-generation-specific-1979-1985-18/sa-fb-oil-pan-brace-729836/
Since you're mounting your engine FC/FD style you're bound to get the oil pan leak problem that is so common with FC/FD style engine mounting.
Since you're mounting your engine FC/FD style you're bound to get the oil pan leak problem that is so common with FC/FD style engine mounting.
#217
I agree, one piece would be best, but I don't have the tools to do such a thing. Even the stock crossmember is several pieces, would be pretty hard to make the cradle all one piece....
#218
Thread Starter
Joined: Sep 2005
Posts: 532
Likes: 1
From: Abilene, TX
How was your Easter? Mine was good. It was nice to have some time to relax finally. I've been soooooooo busy. Hope you guys all had a good one too!
Alright after much debate with myself over the mounts. I decided to start from scratch and these ones are much better. Also they are built from 3/16th inch steel instead of 1/8th inch. The design has also changed although it follows the same principles. The first couple pics are of the new ones on top and the old ones on the bottom. Some of the first things you'll notice is they appear to be way bigger. They are the same spacially just some of the materials changed. The channel is wider being one of the main things. And there is two angle irons combined to make a "wall against the fram and limit the amount of material to be individually cut. I tried to simplify it a bit. I am trying to eliminate as much extras as possible.

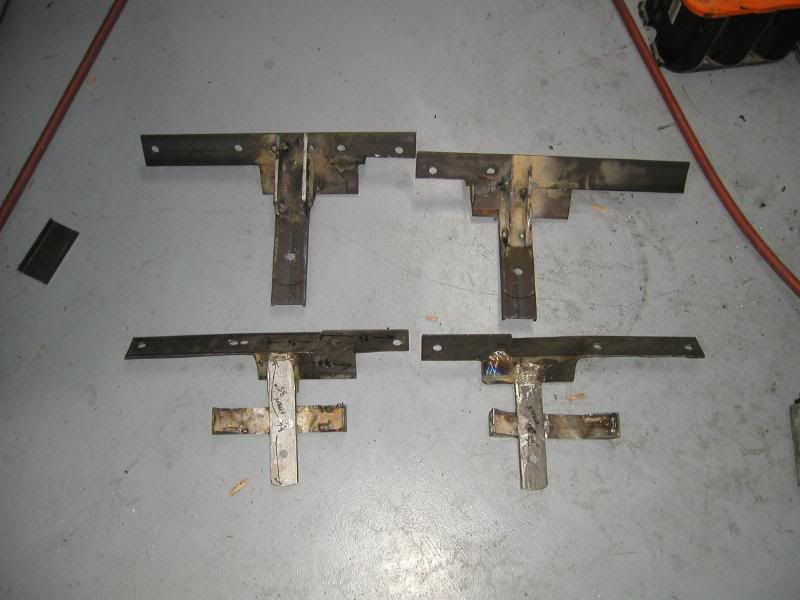
Here's a couple more angles of the new mount brackets
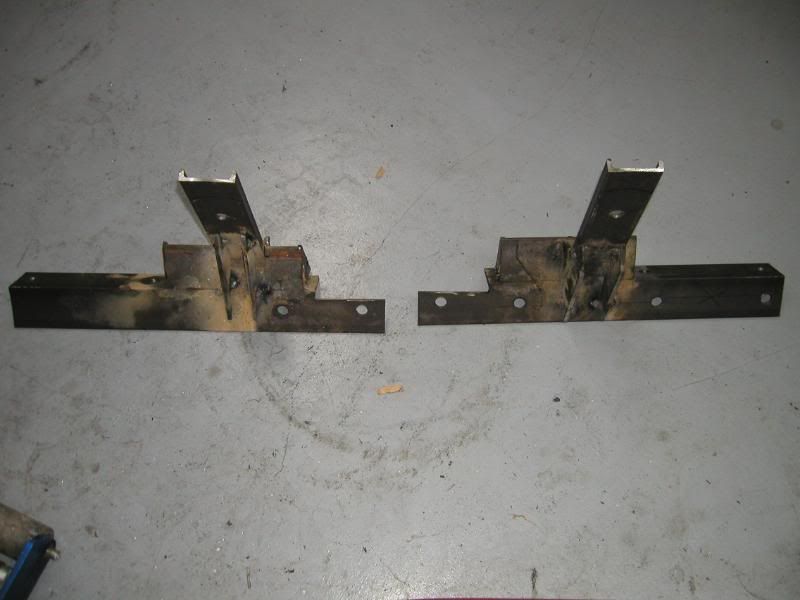
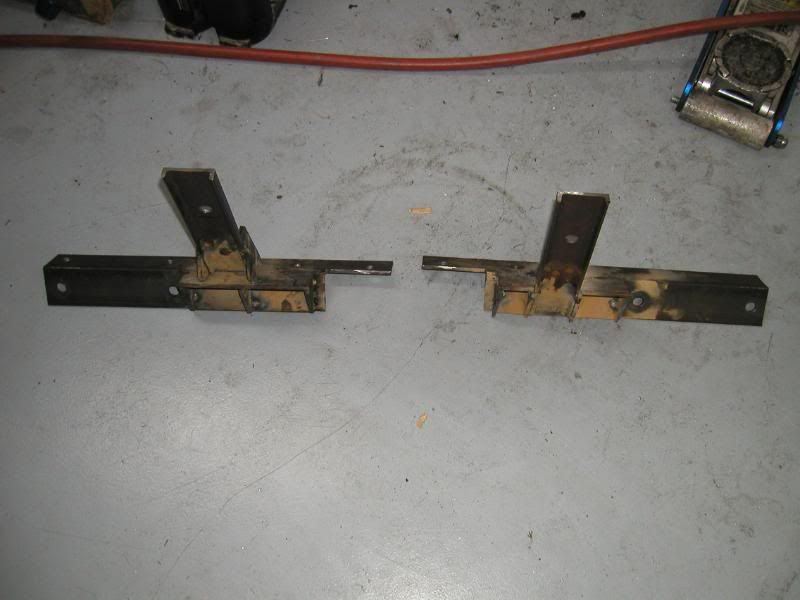
Here's some close ups of the driver's side. As you can see the welding is not complete and there has been almost no clean up done wiith the grinder or anything else for that matter.

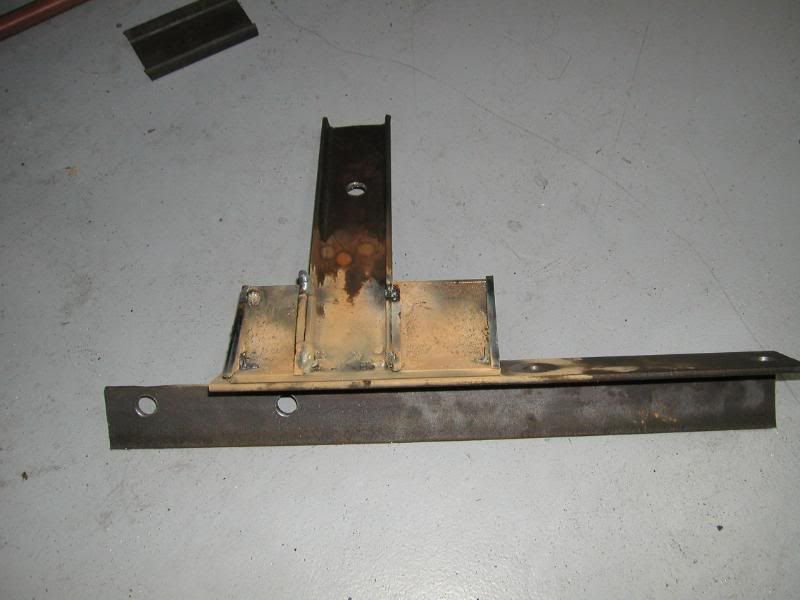
Some close ups of the passenger side
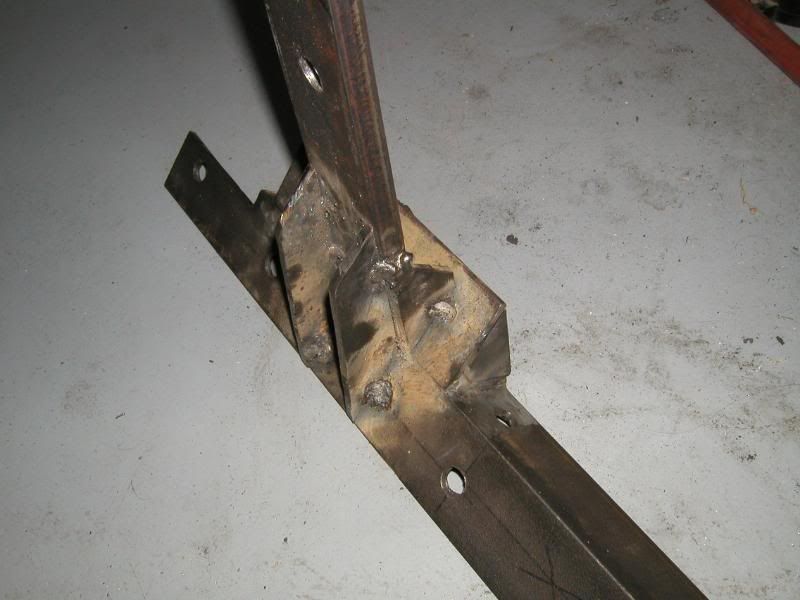
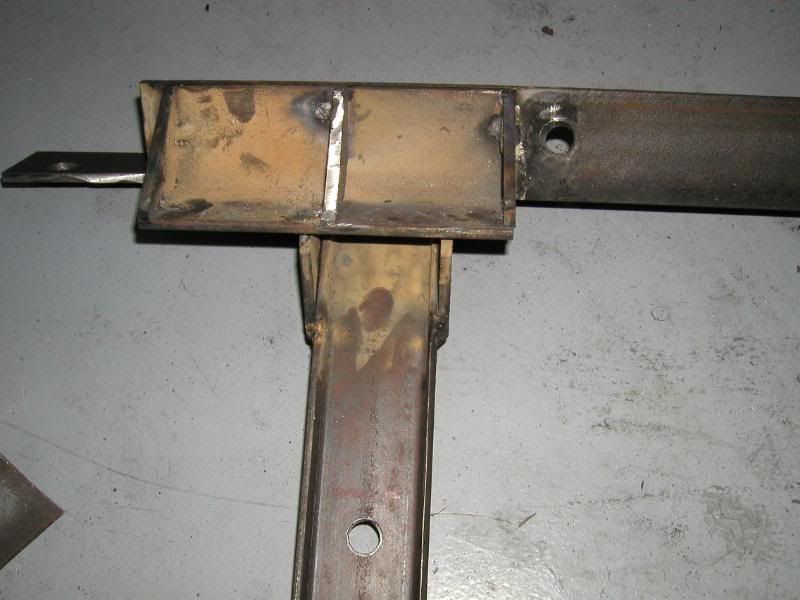
Now I have to take them over to my buddys house to finish the welding and make any changes he believes are to the benefit of the brackets strength or to their asthetics. I think we might have already crossed the asthetically pleasing boundary though lol! There are a couple gussets missing in the pics since other welding needs to be finished first. And of course the bottom part where the mount bushing sits needs to be trimmed to the right length as well.
One theory is that a cross bar connecting the two sides together is not needed since the engine is that bar. just thought I'd throw that out there not saying it's true. If I add one it will be bolt on probably to make it removable to ease working on the bottom of the engine. One definite advantage would be added oil pan protection.
Alright after much debate with myself over the mounts. I decided to start from scratch and these ones are much better. Also they are built from 3/16th inch steel instead of 1/8th inch. The design has also changed although it follows the same principles. The first couple pics are of the new ones on top and the old ones on the bottom. Some of the first things you'll notice is they appear to be way bigger. They are the same spacially just some of the materials changed. The channel is wider being one of the main things. And there is two angle irons combined to make a "wall against the fram and limit the amount of material to be individually cut. I tried to simplify it a bit. I am trying to eliminate as much extras as possible.


Here's a couple more angles of the new mount brackets


Here's some close ups of the driver's side. As you can see the welding is not complete and there has been almost no clean up done wiith the grinder or anything else for that matter.


Some close ups of the passenger side


Now I have to take them over to my buddys house to finish the welding and make any changes he believes are to the benefit of the brackets strength or to their asthetics. I think we might have already crossed the asthetically pleasing boundary though lol! There are a couple gussets missing in the pics since other welding needs to be finished first. And of course the bottom part where the mount bushing sits needs to be trimmed to the right length as well.
One theory is that a cross bar connecting the two sides together is not needed since the engine is that bar. just thought I'd throw that out there not saying it's true. If I add one it will be bolt on probably to make it removable to ease working on the bottom of the engine. One definite advantage would be added oil pan protection.
#219
Thread Starter
Joined: Sep 2005
Posts: 532
Likes: 1
From: Abilene, TX
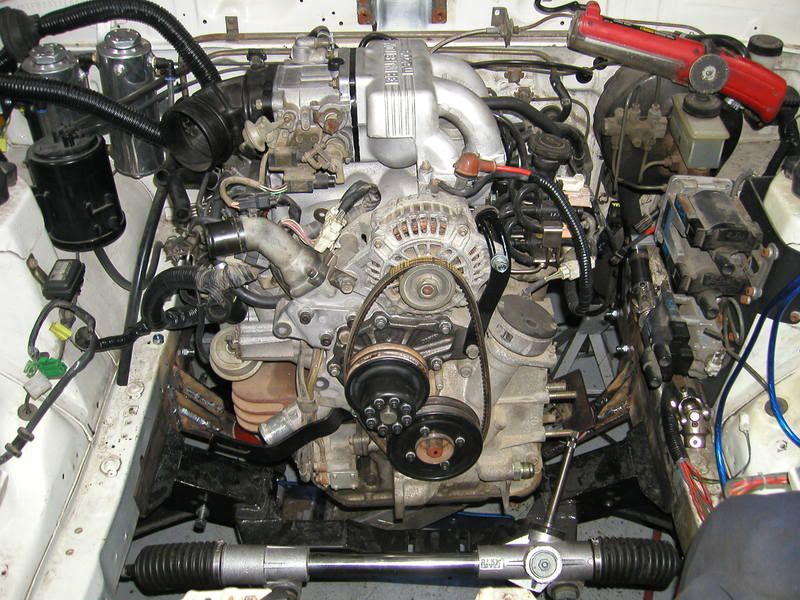
OK! finally made some serious progress. About damn time you are all thinking I'm sure. The new brackets are all welded up and I now see the dramatic difference of using a MIG with sheilding gas. I believed everyone that told me I just didn't want to make the purchase since I don't do a whole lot of welding. Some of it's TIG'd and the rest is MIG'd since it was faster and my buddy was afaid the brackets might shift too much with the extra heat of the TIG proccess. The second bead he laid broke one of my shitty tack welds. I wasn't surprised. Nor was he. The brackets barely shifted.
Now comes the bad news I made a measuring error on the driver's side bracket. I can't figure out how since the passenger side came out cherry but it happened so I'm going to have to have him fix it for me. I just need it shimmed up a 1/2" on the plate the bushing mounts to. At least that's the easiest fix. Of course it would be great to just redo that side gut since it's my own car I will deal with the extra chunk of metal that will be added and be happy I can even put the F-ing engine in. The only other change is a longer bolt on that side for the engine mount. Not a big deal at all.
I know 1/2" is a lot but not considering I got one side perfect and I don't do this kind of work ever. I'm pretty proud of myself. The brackets are rediculously over built I'm sure. They are pretty damn heavy too which is an unfortunate side effect. I'm sure the 60hp increase I'm getting will more than make up for the probably 20lbs added to the car. Not to mention the 40 lbsft. It would be great if billy took these and parred them down to the essentials and I could buy them in the future. Another thing to note is if I wasn't scared to ruin my brand new sub frame the mounts could have easily been added to the frame with a very minimal gain in weight and complexity. In other words it would be very simple to do. I'm just scared to ruin it for obvious reasons. I don't want to buy a new one. And don't know how much it would cost by itself anyways.
Here's a couple pictures of it and on the driver's side you can see the piece of channel I stuffed in there to bring the mount back up to the right height. And btw when this thing is bolted down I can shake the whole car back and forth on the jackstands easily. No flex at all except the bushings. I won't be adding a cross bar as it would be useless and add more weight. Not too mention if I didn't mention it before the FC mount locations are not directly across from one another. Also if you jack the engine up it picks the whole car up right away. Another good sign that there's no flex.
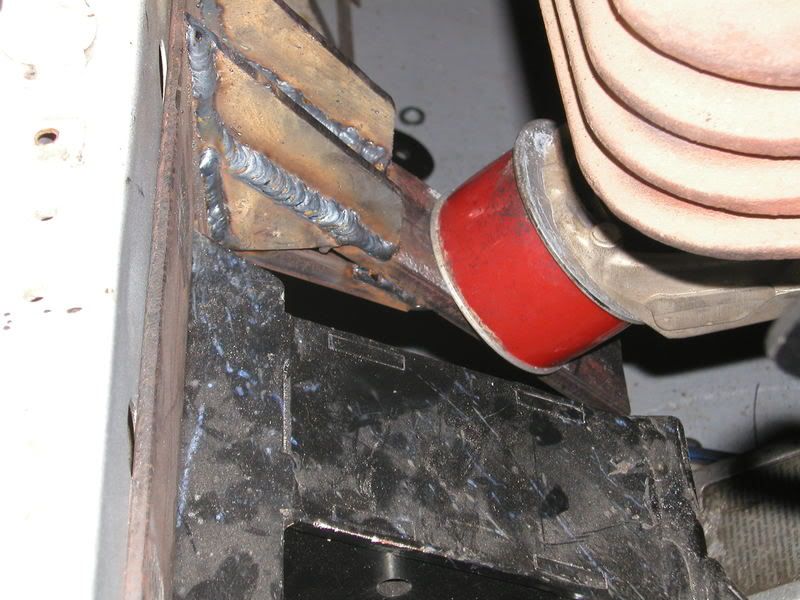
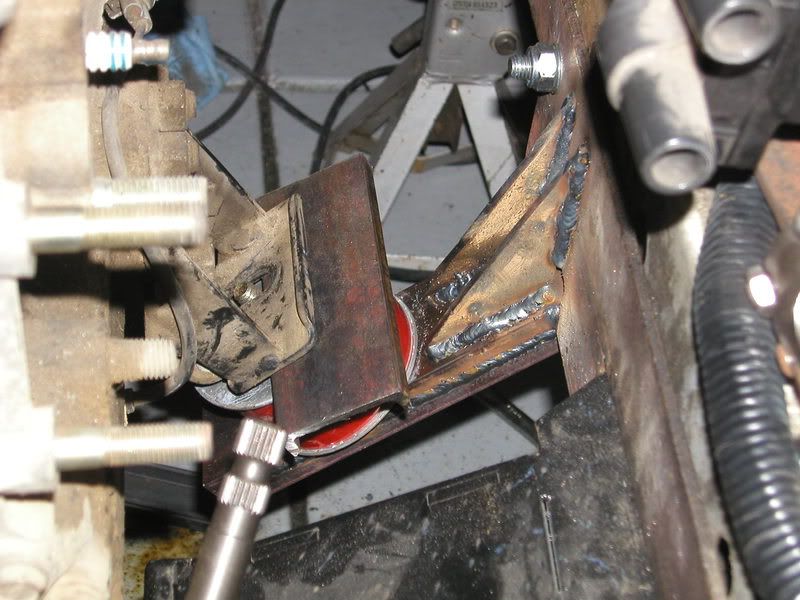


#220
Overbuilt might be an understatement, but they look great and strong as hell! I like them, makes me wanna go back and redo my setup...
But I won't, I just installed my Mazdaspeed comp mounts the other day, and bolted everything together, seems to be nice and solid so i'll leave it for now.
Glad to see your making progress, how much longer until you fire it up?
But I won't, I just installed my Mazdaspeed comp mounts the other day, and bolted everything together, seems to be nice and solid so i'll leave it for now.
Glad to see your making progress, how much longer until you fire it up?
#221
Thread Starter
Joined: Sep 2005
Posts: 532
Likes: 1
From: Abilene, TX
Overbuilt might be an understatement, but they look great and strong as hell! I like them, makes me wanna go back and redo my setup...
But I won't, I just installed my Mazdaspeed comp mounts the other day, and bolted everything together, seems to be nice and solid so i'll leave it for now.
Glad to see your making progress, how much longer until you fire it up?
But I won't, I just installed my Mazdaspeed comp mounts the other day, and bolted everything together, seems to be nice and solid so i'll leave it for now.
Glad to see your making progress, how much longer until you fire it up?
I found one huge problem. How am I going to fit that FC airbox in my engine bay? It's way bigger than I thought I was kinda messing with it yesterday and it takes up a lot of space. I would normally just put a air filter on the airflow meter but I have to referee the car if I want it to be legit. Stupid CA. I'm probably going to have to cheat somehow. Not sure yet. I'm going to call my friend who owns a smog busniess locally here and see if he would smog it as if it were stock and then if I get pulled over with the swap I can say I just did it so he can't get in trouble for smogging the wrong engine. That's up to him though.


