Project De-Rustify: New England 1985 GS Restoration
 02-22-10, 02:32 PM
#1
Junior Member
Thread Starter
iTrader: (1)

Join Date: Feb 2008
Location: CT
Posts: 38
Likes: 0
Received 0 Likes
on
0 Posts
Hey guys, figured a great way to stop trolling for answers to questions and never posting on the board, would be to toss up some pictures of my project 7.
History: the car was my father-in-laws, who bought it in late 1986 from the original owner, and took great care of it, despite driving it in awful new england salt. He passed it on to his son about 8 years ago, who did NOT take good care of it. Needless to say, when they offered to give me the car (rather than send it to the crusher), I jumped at the chance. I like unique cars; my others are my daily driver 99 Saab Viggen, 85 Saab 900 turbo, 88 Merkur XR4Ti, and 88 Thunderbird Turbocoupe.
My dad and I started out by replacing the seized front calipers and rotors. I drove the car a solid 2 miles afterwards, before the rear brakeline blew out on me (good thing the e-brake works well). When we started pulling the rear apart, we saw just how far gone the body was. Holes through to the rear storage bins, rockers completely gone, rollpan gone, holes into the trunk floor, weakened control arm mounting brackets, rusty wheel arches, etc. I made the decision to restore the car regardless - hey, it was free, and it never hurts to get into your father-in-laws good graces, right?
Anyway, over the past two+ years, my dad and I have been working on the car as time allows. Progress has ramped up in the last few weeks, and I hope to be driving the car in May. On to the pictures!
The car as I got it (after a quick polish/wax job) in 2007:


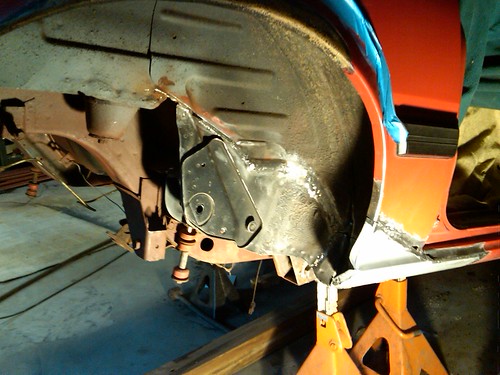
And after the initial rust was cut out/patched in late 2008/early 2009:
Excuse the ugly welds on this one - I was learning!


And finally, where it is today:


Hopefully, in the next week or two, the new gas tank will be going in, along with the refinished control arms and axle. I picked up a set of racing beat springs and tokico blue's to tighten up the car a bit. Appreciate any comments (good or bad!), and I'll do my best to keep this thread updated.
Chris in CT
History: the car was my father-in-laws, who bought it in late 1986 from the original owner, and took great care of it, despite driving it in awful new england salt. He passed it on to his son about 8 years ago, who did NOT take good care of it. Needless to say, when they offered to give me the car (rather than send it to the crusher), I jumped at the chance. I like unique cars; my others are my daily driver 99 Saab Viggen, 85 Saab 900 turbo, 88 Merkur XR4Ti, and 88 Thunderbird Turbocoupe.
My dad and I started out by replacing the seized front calipers and rotors. I drove the car a solid 2 miles afterwards, before the rear brakeline blew out on me (good thing the e-brake works well). When we started pulling the rear apart, we saw just how far gone the body was. Holes through to the rear storage bins, rockers completely gone, rollpan gone, holes into the trunk floor, weakened control arm mounting brackets, rusty wheel arches, etc. I made the decision to restore the car regardless - hey, it was free, and it never hurts to get into your father-in-laws good graces, right?
Anyway, over the past two+ years, my dad and I have been working on the car as time allows. Progress has ramped up in the last few weeks, and I hope to be driving the car in May. On to the pictures!
The car as I got it (after a quick polish/wax job) in 2007:
And after the initial rust was cut out/patched in late 2008/early 2009:
Excuse the ugly welds on this one - I was learning!
And finally, where it is today:
Hopefully, in the next week or two, the new gas tank will be going in, along with the refinished control arms and axle. I picked up a set of racing beat springs and tokico blue's to tighten up the car a bit. Appreciate any comments (good or bad!), and I'll do my best to keep this thread updated.
Chris in CT
 02-22-10, 03:16 PM
#2
Lives on the Forum
Wow, very nice work! I admire your willingness to tackle bad rust. Your car is nearly identical to mine, just missing the rear spoiler.
What are you plans for it? Any chance of racing in your future?
http://www.youtube.com/watch?v=N9cmv1PTd5M
What are you plans for it? Any chance of racing in your future?
http://www.youtube.com/watch?v=N9cmv1PTd5M
02-23-10, 04:33 AM
#4
congrats on sweat-equity into a car most of us would have run away from, screaming...!
Should be a beauty with all this love. Hopefully some rust-protection like POR15 in the replacement spots to keep it all from returning to haunt the next owner in 25 yrs!
Stu Aull
'80GS
Alaska
Should be a beauty with all this love. Hopefully some rust-protection like POR15 in the replacement spots to keep it all from returning to haunt the next owner in 25 yrs!
Stu Aull
'80GS
Alaska
02-23-10, 07:02 AM
#5
Junior Member
Thread Starter
iTrader: (1)
Join Date: Feb 2008
Location: CT
Posts: 38
Likes: 0
Received 0 Likes
on
0 Posts
Thanks for the kind words, guys. Mounting brackets were replaced from a midwest car - same with the rest of the sheetmetal, aside from the small patches which were just cut from a few panels I had lying around. Undercarriage was wire brushed/sanded/ground down etc wherever there was rust. Active rust was coated with rust neutralizer, then etching rust primer, then a topcoat of rustoleum satin black.
Tokico's and RB springs arrived last night, hopefully I can get em in this weekend or next week!
Here's a few more pictures
Refinished axle - will redo the drums and refurb the rear diff once its on the car:

Started stripping one of the wheels. Mostly an experiment with a couple different chemicals, but I'm happy with how much just stripping the clear coat did. Next comes a lot of sanding and polishing...

I'll do my best to keep up to date on the pictures - posting here should help keep up my motivation!
Chris in CT
Tokico's and RB springs arrived last night, hopefully I can get em in this weekend or next week!
Here's a few more pictures
Refinished axle - will redo the drums and refurb the rear diff once its on the car:
Started stripping one of the wheels. Mostly an experiment with a couple different chemicals, but I'm happy with how much just stripping the clear coat did. Next comes a lot of sanding and polishing...
I'll do my best to keep up to date on the pictures - posting here should help keep up my motivation!
Chris in CT

Trending Topics
03-01-10, 08:55 AM
#8
Junior Member
Thread Starter
iTrader: (1)
Join Date: Feb 2008
Location: CT
Posts: 38
Likes: 0
Received 0 Likes
on
0 Posts
New pictures from this weekend - got the rear axle/suspension in and set it back down on the wheels!

Theres nothing else in the back half of the car, no interior/gas tank etc, and the shocks are brand new...but that wheel gap seems extreme. I double checked all of the control arms/watts linkage and everythings in per the book - did I do something wrong, or will this settle after a few miles?

Now just a few spots on the front fenders/wheel wells and a tuneup and I should be back in business!
Chris in CT
Theres nothing else in the back half of the car, no interior/gas tank etc, and the shocks are brand new...but that wheel gap seems extreme. I double checked all of the control arms/watts linkage and everythings in per the book - did I do something wrong, or will this settle after a few miles?
Now just a few spots on the front fenders/wheel wells and a tuneup and I should be back in business!
Chris in CT
03-01-10, 12:02 PM
#9
Junior Member
Join Date: Feb 2010
Location: Miami
Posts: 20
Likes: 0
Received 0 Likes
on
0 Posts
Without the weight of the interior and gas tank pressing down on the springs it is bound to sit higher ESPECIALLY on new springs. Nothing to worry about though, once you drive it around a bit, it'll will settle into to normal ride height.
03-02-10, 12:38 AM
#10
Lives on the Forum
Just make sure that all of the suspension parts receive their final tightening when the weight of the car is on the wheels. Otherwise, funny things can happen.

Thread
Thread Starter
Forum
Replies
Last Post
The1Sun
1st Generation Specific (1979-1985)
0
09-07-15 10:21 PM