Need help on interior lights
#1
Need help on interior lights
Neither of my interior lights work in my car. The dome and the map one or whatever it's called. What lights do I need to change these and any other things I should check? What fuses do I check? Anything else?
#3
...and if you find out that the original bulbs were fine, remove the white plastic lens cover and the two Phillips head screws that hold the rear-view mirror and light assembly in place.
Once you get the light assembly down, you'll see that one of the screws is responsible for grounding the contact coming from the light switches. These contacts normally get broken off through time and use and you'll just need to find a little eyelet (crimp terminal) and replace the ground wire.
Once you get that piece fixed, the lights should once again work without any problems. FYI - all of the lights in the overhead location operate off of this same connection, i.e., the dome light and map lights operate from this.
Give it a try; reply back if problems or questions,
#4
Next, if you open the doors and the lights dont turn on, simply take out the door switch which is 1 philips screw. Take the switch apart and clean the connections. Very easy to do, dremels work great for this.
#6
lol...pulling another thread back from the past to offer some more scenarios why the overhead lights would fail. Fuses OK? Bulb OK? Then, here's something else to consider...the actual clips that hold the bulb are simply riveted in with cheap aluminum rivets...over time, this can happen.
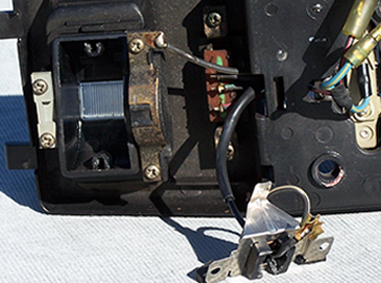
What swung out when I pulled the bulb...arrow indicates where it's supposed to go...

X marks the spot where the busted rivet head is...this is the 'hot' lead into the overhead lamp assembly....
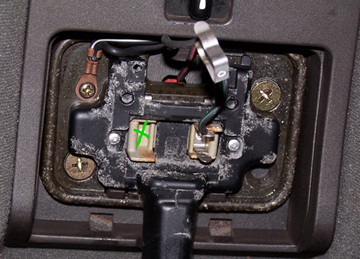
At least my problem was easy to find after I made sure NOT to assume the light bulb was OK because it wasn't dark. A little test lamp grounded to the car found this problem real quick and I purposely pulled the clip all the way out to show why my interior overhead lights no longer work...that particular wire soldered to the clip feeds the swiveling lamp feature as well...tin the rivet head and resolder the clip and I should be set to go!

What swung out when I pulled the bulb...arrow indicates where it's supposed to go...
X marks the spot where the busted rivet head is...this is the 'hot' lead into the overhead lamp assembly....
At least my problem was easy to find after I made sure NOT to assume the light bulb was OK because it wasn't dark. A little test lamp grounded to the car found this problem real quick and I purposely pulled the clip all the way out to show why my interior overhead lights no longer work...that particular wire soldered to the clip feeds the swiveling lamp feature as well...tin the rivet head and resolder the clip and I should be set to go!

Last edited by mar3; 10-17-06 at 10:34 PM.
Trending Topics
#8
This is a very common junkyard part to find...no one takes that stuff...the gasket behind it is a bit trickier....I just cut my own out of gasket material from a roll of gasket paper I keep.


#10
A few more possibly helpful tips from one of my old posts (since this is ALSO and old post  ),
),
"After a couple of PM's about exactly HOW I fixed the interior lights (map, dome, glovebox, and hatch) I realized I should have been more specific. I removed the dome light assembly. It contained two springy clips that hold the dome bulb. One of those springy clips (the left one) was (no longer) riveted to the assembly. I screwed that clip (with a tiny screw) back into the assembly and soldered the screw in place from the back. The glovebox had a dirty/rusted bullet connector and I sanded it clean. The hatch had a visibly perfect bulb but when I removed it, one end cap of the bulb fell off. I replaced the bulb. The dome light bulb is larger than the hatch bulb. For the dome I used a Sylvania DE3175 and the hatch a Sylvania DE3022. A possibly useful tip I learned for testing (while sitting on the couch) bulbs and interior light assemblies is to use a small, square 9 volt battery from what we used to call a "transistor radio"). Yes, wackyracer, I'm an "old fart" too. That way you know everything works before reinstallation."
DD
 ),
),"After a couple of PM's about exactly HOW I fixed the interior lights (map, dome, glovebox, and hatch) I realized I should have been more specific. I removed the dome light assembly. It contained two springy clips that hold the dome bulb. One of those springy clips (the left one) was (no longer) riveted to the assembly. I screwed that clip (with a tiny screw) back into the assembly and soldered the screw in place from the back. The glovebox had a dirty/rusted bullet connector and I sanded it clean. The hatch had a visibly perfect bulb but when I removed it, one end cap of the bulb fell off. I replaced the bulb. The dome light bulb is larger than the hatch bulb. For the dome I used a Sylvania DE3175 and the hatch a Sylvania DE3022. A possibly useful tip I learned for testing (while sitting on the couch) bulbs and interior light assemblies is to use a small, square 9 volt battery from what we used to call a "transistor radio"). Yes, wackyracer, I'm an "old fart" too. That way you know everything works before reinstallation."
DD
#12
Welp, tinning the rivet was not an option since it's aluminum...instead, I drilled out both of the rivets for the lamp clips with a 3/32nds drill bit from the back side. Then I simply used tiny machine screws to screw the clips back in...simple solution and no nuts necesary on the back side.
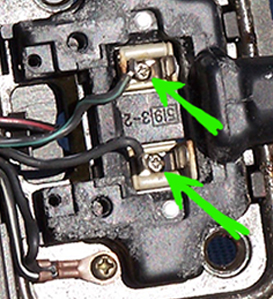
Then came testing...it worked but the swivel light stopped working after a turn or two...the test light showed power going to the light, so I pulled the whole overhead light unit again to take a look...a wire popped out of the back of the swivel part, so my work wasn't done, after all...


Then came testing...it worked but the swivel light stopped working after a turn or two...the test light showed power going to the light, so I pulled the whole overhead light unit again to take a look...a wire popped out of the back of the swivel part, so my work wasn't done, after all...


#13
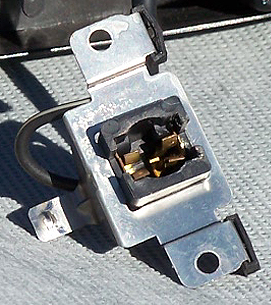
After unscrewing the metal housing from the plastic swivel piece, it became obvious what the problem was...the wires feed into the plastic bulb retainer and are soldered to the brass clips at the base of one of the 'legs' of each clip....the back and forth motion had simply worked one of the small wires brittle and it broke off from the clip. Luckily, the clip still had resin, so soldering wouldn't be a problem. I got some mini-pliers and pulled the side tab of the metal clip to work it out of the plastic bulb holder, losing flesh and blood in the process... ...Here's what the front side of that metal housing looks like with the bulb removed...the two brass clips can clearly be seen here...
Once out, I simply bent the clip ears back and then soldered the wire back onto the clip...
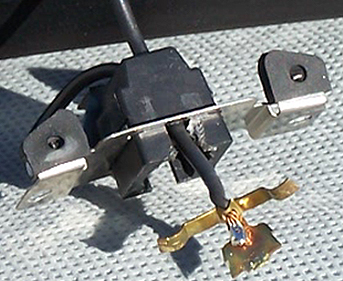
With the ears of the clip bent gently back, it was ready for the fight to get the mess back into the plastic bulb holder. I used a screw driver and some patience for that part to prevent anymore blood loss.
Once done, I bolted it all back in and now it all works again, just like it's supposed to.

 ...Here's what the front side of that metal housing looks like with the bulb removed...the two brass clips can clearly be seen here...
Once out, I simply bent the clip ears back and then soldered the wire back onto the clip...

With the ears of the clip bent gently back, it was ready for the fight to get the mess back into the plastic bulb holder. I used a screw driver and some patience for that part to prevent anymore blood loss.

Once done, I bolted it all back in and now it all works again, just like it's supposed to.


Thread
Thread Starter
Forum
Replies
Last Post
82streetracer
1st Generation Specific (1979-1985)
7
08-23-15 09:28 AM


