Lumpy inconsistent idle
#1
Rotary Enthusiast
Thread Starter
Lumpy inconsistent idle
I’ve been chasing this problem for quite awhile and trying to avoid a carburetor rebuild as I don’t see that going well. My idle varies on any given day from 700 to about 1100 and seems to stumble a bit if it sits at idle for several minutes. All stock 12a, rats nest, cats and all emissions. Things I’ve done, fuel filter, multiple tanks with Seafoam, newish NGK plugs, plug wires, dizzy cap and rotor and coils, all new wires for battery and alt and all new vacuum lines, no leaks. I’ve tweaked the mixture, leading and lagging timing with no changes. Runs great at anything other than idle. The engine has 63k. Thanks
#2
Waffles - hmmm good
iTrader: (1)
Have you sprayed carb cleaner all over the outside and down the carb yet? Sometimes a sticking widget on one of the butterfly or throttle shafts can cause these kinds of goofiness.
Another thing to look at is have a timing light setup and see if it shows some variation of the trigger in conjunction with the stumble at idle. Sometimes dizzy shafts can be loose or wobble and cause things like this as well.
If its not a timing issue, its some sort of mixture issue. I know my idle sits at ~950 rpms and is lumpy, but I think thats because of my hogged out nikki mixture being off at idle (too lean is my guess) and my timing being advanced a bit.
#4
Rotary Enthusiast
Thread Starter
Haven’t tried cleaning the outside of the carb, so I’ll give that a try and lube any moving parts. As far as I can tell no vacuum leaks, all new silicone hoses and i used my butane torch to see if idle would change and it doesn’t.
I’ll have to get the timing light back out this weekend.
I’ll have to get the timing light back out this weekend.
#5
Rotary Enthusiast
Thread Starter
Re-replaced all vacuum lines, checked and lubed all moving parts with no change. I did remove the cap an rotor and found a lot of deposits on the aluminum electrodes. After cleaning them much better, but only for a few days. How many miles should a cap last? And I’ll have to dig into why there’s deposits on them as that doesn’t seem like it should be getting them. Cap only has 6k miles based on my notes . Next steps new spark plugs which also have 6k and look good (light brown haze), but an easy cheap thing to try.
#6
Rotary Enthusiast
Thread Starter
After tweaking and tuning, it ran better than ever. After a week of hard driving, it came back. I pulled the cap and the white crusty stuff is back. I cleaned that and runs great. Any thoughts on how to keep that stuff from accumulating on the aluminum electrodes?
#7
Rotary Enthusiast
The gap between the rotor and cap electrodes gets bigger when you clean them, so maybe new cap and rotor.
But to really fix it, go with a direct fire system. tg_farrell has a great write up listed in his signature. https://www.rx7club.com/1st-generation-specific-1979-1985-18/tfidfis-894669/
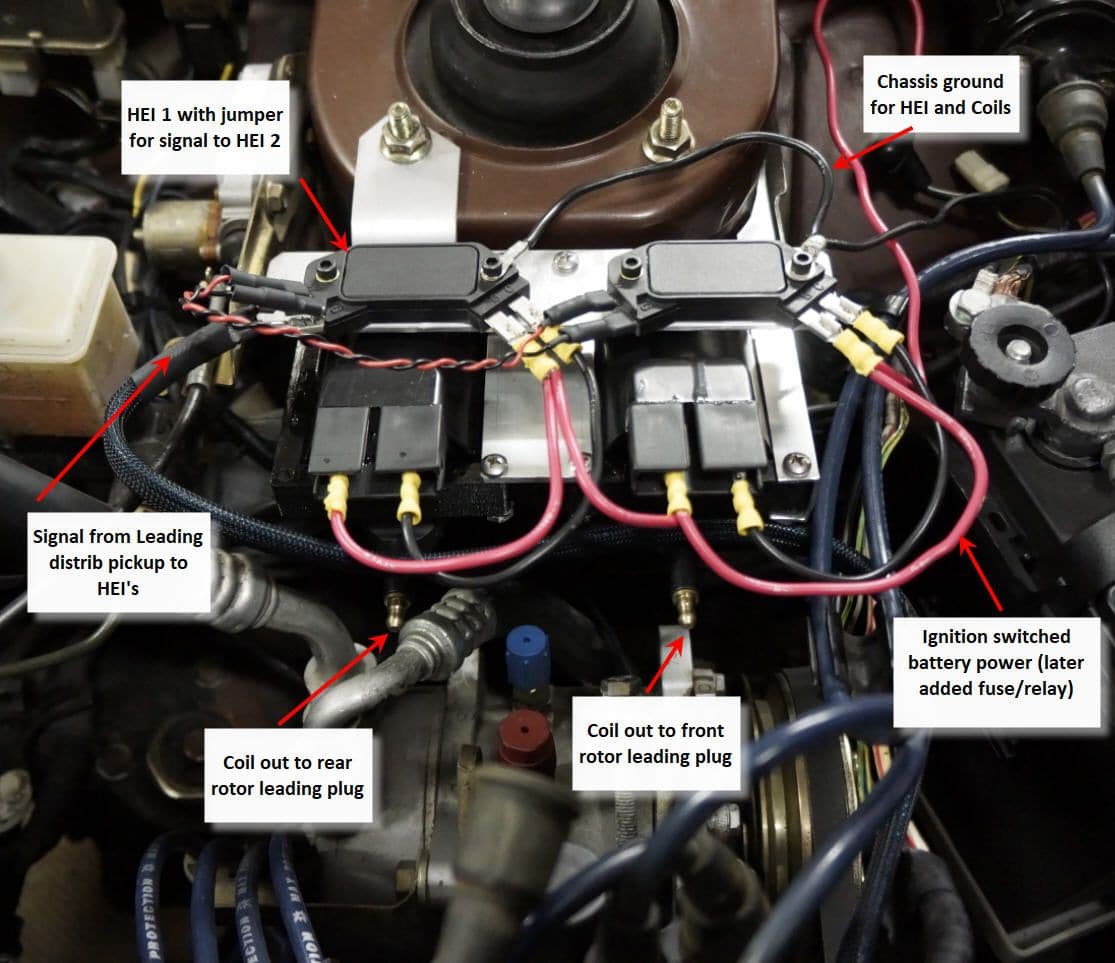
The upshot is that you use the leading ignition signal from the dizzy on a "Y adapter" to fire two HEI's and two dedicated leading coils. Leading coil 1 connects directly to leading plug 1, leading coil 2 connects directly to leading plug 2. This eliminates the cap and rotor for the leading ignition. You can delete trailing ignition or continue to use it through the cap and rotor. Much better spark and you can use readily available and reasonable priced standard ignition stuff.
Trending Topics
#10
Rotary Enthusiast
Thread Starter
I’ve never heard of testing the rats nest. Are you talking about the electric pieces of vacuum or both?
Most caps I’ve seen are aluminum, but will try that.
I’ve seen Tim’s set up and quite honestly that seems very difficult with all the schematics and perhaps too many parts to break. Just seems that there is something causing this beyond the aluminum electrodes as these engines have been around for decades.
#12
Rotary Enthusiast
What year is your FB?
I found this particular post really helpful https://www.rx7club.com/1st-generati.../#post11349977
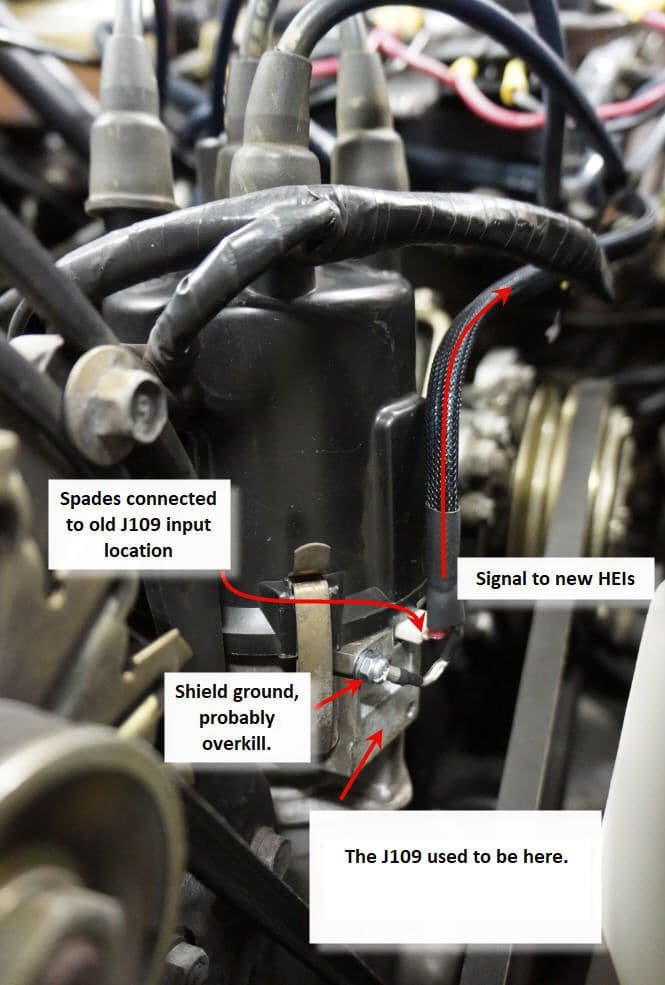
I did it just for the leading and here are a couple of annotated photos.


#13
Waffles - hmmm good
iTrader: (1)
The AL caps are crap. You want to get one that uses copper electrodes if they still make em. Bosch or Beck Arnley I think use copper. You could also see what the Mazda dealer carries.
#15
Check the fuel bowl float solenoid. If it doesn't get 12V w key / ignition in the "ON" position... there's your problem. It'll go back and forth as it pleases w no rhyme or reason if it is not 12V ignition'ed. It's a one wire connector coming off a solenoid directly under the fuel inlet / outlet banjo blot and lines.
Last edited by 85TIIDEVIL; 11-01-17 at 09:20 PM.

