It's paint time!
 06-15-08, 10:33 PM
#1
7less for now!
Thread Starter
Join Date: Oct 2007
Location: eau claire
Posts: 1,372
Likes: 0
Received 0 Likes
on
0 Posts
It's paint time!
Well most of you guys have seen this hunk go from stock to holes in the floor pan repaired, turbo,supercharger lol. Now its time for some paint. I used a ppg roll on urethane primer which went on good. It leaves alot of orange peel behind but hey i need to get away from the kids for some reason. Only thing left to prime is the behind the door and the roof. After this stage i will spray a black satin sealer on, hit it with 1000 grit and spray her beautiful V3. I will update thread as much as i can. Sanding is a bitch and i have been very **** about it. Takes me about three hours a panel making sure everything is like glass which it is!

This is how she look's now!
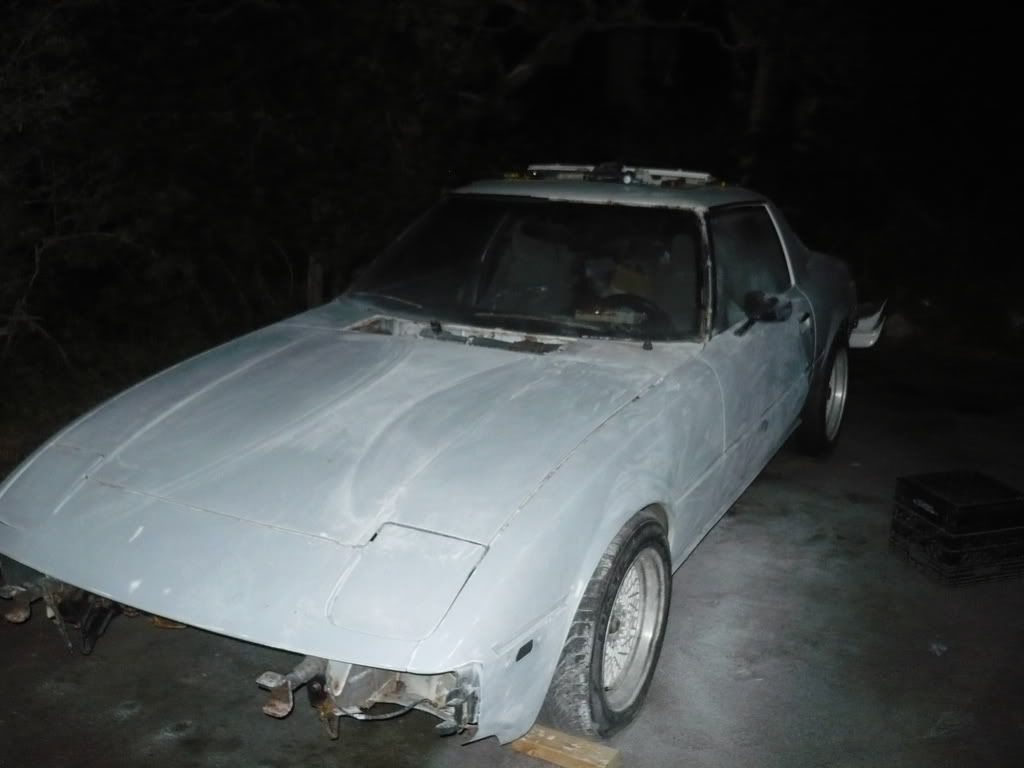
This is how she look's now!
Last edited by yetterben; 06-15-08 at 10:39 PM.
 06-15-08, 10:47 PM
#4
7less for now!
Thread Starter
Join Date: Oct 2007
Location: eau claire
Posts: 1,372
Likes: 0
Received 0 Likes
on
0 Posts
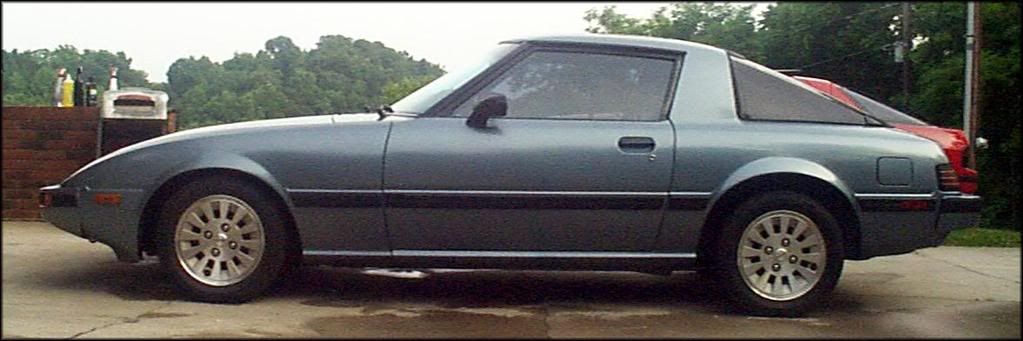
Oh sorry tender blue metallic with clear. One of the most over looked colors on these cars i think, besides solar gold! Stu when you have kids you learn to have patience lol. Anything to get out of the house trust me you will know some day lol!

Trending Topics
06-16-08, 07:58 AM
#8
Hey Ben,
I think that you could make this into a nice tech thread. I think that it would be cool to do a little write-up. Like what you needed to do to prep for primer, how you put on the primer, sanding grits used, etc. Then you could show setting up your booth, painting, etc.
I think that it could be a nice addition since we don't have much for good tech painting threads. Most of the ones we have are rattle can jobs or paint via a roller. It would be nice to have something more along the lines of how a pro would do it, but in terms of DIY. I think that a nice step-by-step w/ pics would be great archive material.
06-16-08, 09:32 AM
#9
7less for now!
Thread Starter
Join Date: Oct 2007
Location: eau claire
Posts: 1,372
Likes: 0
Received 0 Likes
on
0 Posts
1. Before doing anything else, wash the car with soap and water. This removes road salts and bird droppings and other water soluble things that
you don't see. It's pleasant to eat from a clean plate at dinner, but critically important to have a clean surface to paint.
2. Use a wax/grease remover with PAPER TOWELS (which are not a fire hazard when you throw them in the trash ... cloth is a fire hazard ... use paper towels!!!). Commercial removers are wonderful. You can also use liquid charcoal starter or house paint type mineral spirits ... these all work to
remove crayon marks from things the kiddies decorated too ... because they are wax and grease removers ... crayons are wax.
3. Now it's okay to sand something if you need to make it dull. NOTICE THAT SANDING IS STEP #3 AFTER YOU REMOVED THE WAX AND
GREASE- otherwise, you will drive wax and grease into the surface. Use a 320 grit to ruff up surface before primer!
4. Ground the frame of the vehicle. Find the chassis frame under the car or truck and attach any size wire to the frame and the other end to something
grounded (or "earthed" if you're British,) so the static electricity can get around those pesky rubber tires on the car. The static makes the dust jump
up off the floor into the paint job. Dust is quite lazy, so it would rather stay on the floor than jump up if you just get rid of the static.
5.Make certain it is bone dry where you are going to paint. Helpful old souls will tell you to wet the floor down to keep the dust down ... say "Thank
you for that idea," and then, whatever you do, DO NOT WET THE FLOOR IN THE PAINTING AREA. All urethane is moisture-cure material.
Last edited by yetterben; 06-16-08 at 09:45 AM.
06-16-08, 10:11 AM
#10
7less for now!
Thread Starter
Join Date: Oct 2007
Location: eau claire
Posts: 1,372
Likes: 0
Received 0 Likes
on
0 Posts
Those are the mot important steps you can remember when you do this project.
WARNING!!!!!
Stop now if you get bored easily have the tendency to not finish what you start or dont have ocd like qualities :P Sanding sucks the big one and is boring as ****!
I used a PPG Shopline 2k Primer. I also decided to roll this primer on to try out how it worked.
Make sure it's not to humid outside or **** gets tacky quick. In order to roll it i had to buy a 16 pack of expensive high density low build rollers.
Before you even start this last part make sure the whole car is cleaned, trimmed removed you dont want painted and car got a quick sanding with 320.
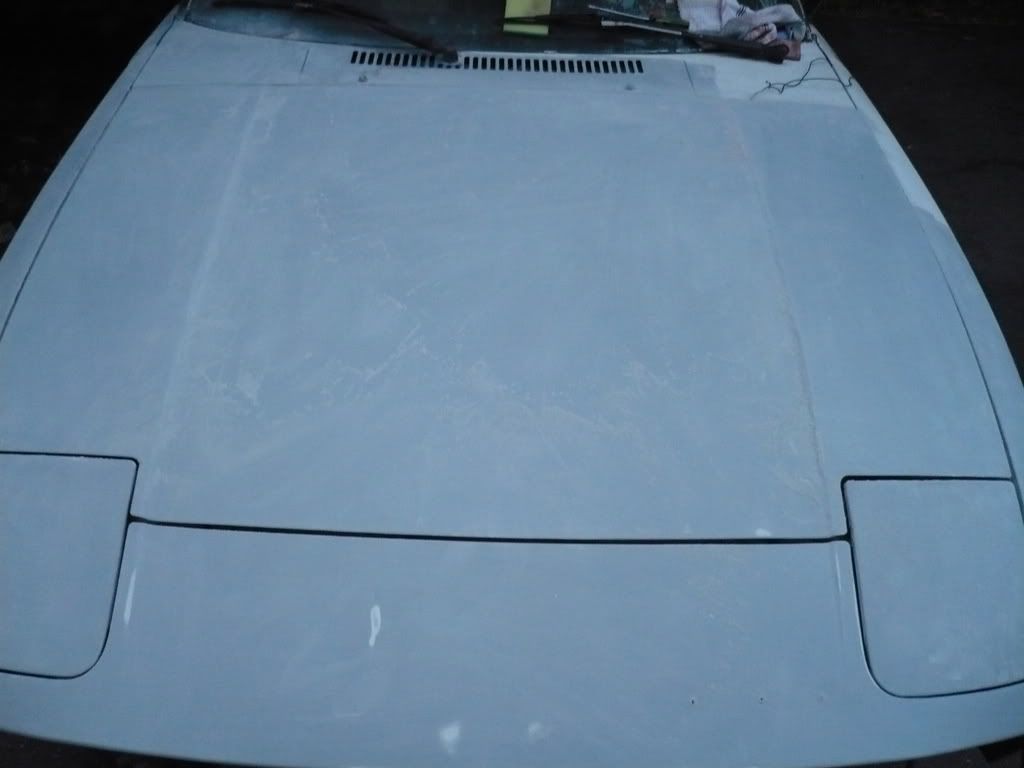
Well here is what it looks like after you roll it on. MEh gonna need lots of sanding
Welp get some sandpaper youre gonna need it and some dust masks **** sticks to your throat for days.
Hit it up with some light sanding with 120 first. Always sand in a cris cross "X" pattern or you will have big ol waves. AFter a few minutes you will begin to see the primer starting to look pretty good. Make sure all the hills are out of the primer. Once you have done that move up to 320 and do the same thing followed buy 600. pay attention to the darker spots in the paint as those are indicators of low spots more on that later.
Here is how a correct panel looks after proper sanding. Notice the orange peel is gone but there is still little nicks in the paint. THat is the next step, trying to fill in all those little buggers.
WARNING!!!!!
Stop now if you get bored easily have the tendency to not finish what you start or dont have ocd like qualities :P Sanding sucks the big one and is boring as ****!
I used a PPG Shopline 2k Primer. I also decided to roll this primer on to try out how it worked.
Make sure it's not to humid outside or **** gets tacky quick. In order to roll it i had to buy a 16 pack of expensive high density low build rollers.
Before you even start this last part make sure the whole car is cleaned, trimmed removed you dont want painted and car got a quick sanding with 320.
Well here is what it looks like after you roll it on. MEh gonna need lots of sanding
Welp get some sandpaper youre gonna need it and some dust masks **** sticks to your throat for days.
Hit it up with some light sanding with 120 first. Always sand in a cris cross "X" pattern or you will have big ol waves. AFter a few minutes you will begin to see the primer starting to look pretty good. Make sure all the hills are out of the primer. Once you have done that move up to 320 and do the same thing followed buy 600. pay attention to the darker spots in the paint as those are indicators of low spots more on that later.
Here is how a correct panel looks after proper sanding. Notice the orange peel is gone but there is still little nicks in the paint. THat is the next step, trying to fill in all those little buggers.
06-16-08, 12:55 PM
#11
Senior Member
iTrader: (4)

Join Date: Mar 2008
Location: live oak,ca,nor cal(near sac)
Posts: 706
Likes: 0
Received 0 Likes
on
0 Posts
nice work yetterben i glad to see ppl do paint projects the right way. btw when u say do not wet the ground... u can do it just make sure not to get it on the car. The primer is a 2k so it cures with solvements and so do the paint and clears. If it was water borne then getting the ground wet would be a bad idea. HOpe ur paint comes out great. keep building up that primer till its straight. If i lived near u i help a hand with the sanding...i like sanding and getting dirty in body filler dust. I also see u hve alot pf minor imperfections with the primer(pitting) i think u should go to a body shop store and buy these areosol charged paint guns that are rechargable. The tip size is big enough to spray epoxy primers and surfacers. All u do is mix ur primer/paint or clear and pour it into a clear plastic bottle under and wa-la! U have a paint gun for only 4 bucks and about 1.45 for a recharge to keep on painting.
06-16-08, 01:41 PM
#12
7less for now!
Thread Starter
Join Date: Oct 2007
Location: eau claire
Posts: 1,372
Likes: 0
Received 0 Likes
on
0 Posts
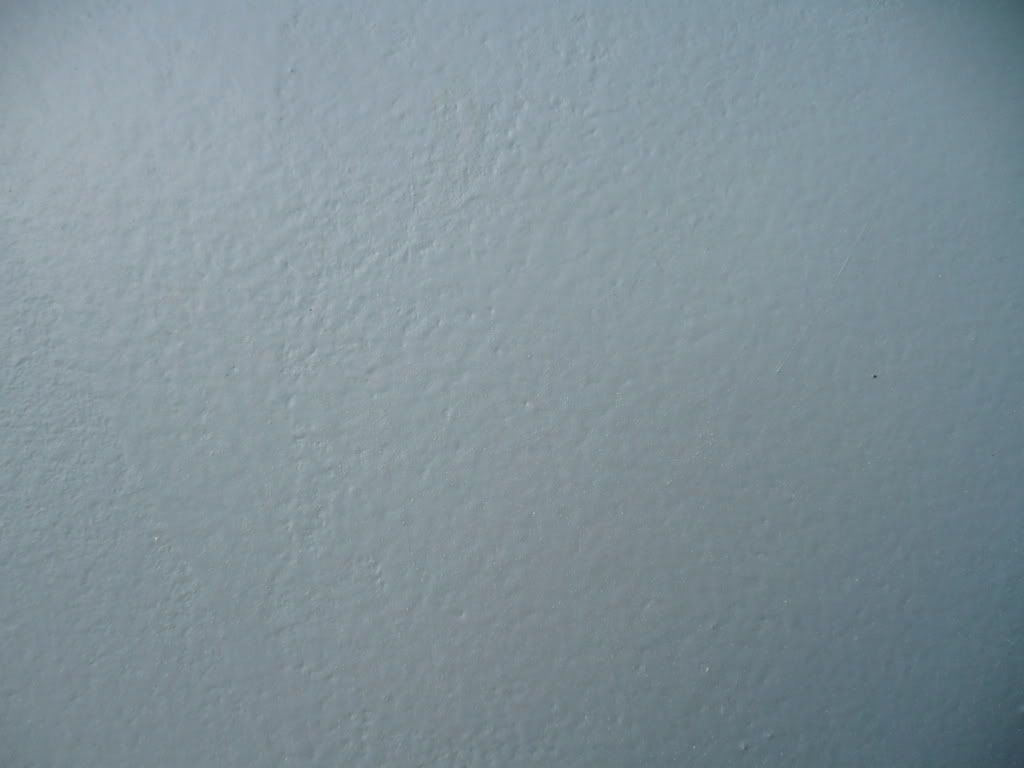
I just called my local auto supply and they do have the Preval system there i will get one. I will try it out on the rest fo the car and maybe with the sealer. Only worry about that is the roller laid it on real thick and i kinda like that gives me something to work with. SO i might roll the rest of the car sand like normal and then just go around the whole thing again with spray to fix the minor pits. Keep in mind that is a 10x zoom on the camera. The spot that is in the pictures is only about 3inch square.
06-16-08, 01:58 PM
#13
wow, that is turning out pretty cool already, i wish i wouldn't of gotten tired of sanding mine lol...i used to be lazy like that and didn't care at all...makes me wanna re do my paint job...hmmm.... ....anyways i'm interested in seeing the final product
  i'm sure it'll turn out great, btw that light metallic blue is what color mine was originally, but when i bought it it had been black primed hence why i painted it dark blue...after sanding off the black prime we realized it was originally light blue, they never took original paint off to black prime it, they just did it on top...lazy ***** lol.
....anyways i'm interested in seeing the final product i'm sure it'll turn out great, btw that light metallic blue is what color mine was originally, but when i bought it it had been black primed hence why i painted it dark blue...after sanding off the black prime we realized it was originally light blue, they never took original paint off to black prime it, they just did it on top...lazy ***** lol.
06-16-08, 10:02 PM
#14
7less for now!
Thread Starter
Join Date: Oct 2007
Location: eau claire
Posts: 1,372
Likes: 0
Received 0 Likes
on
0 Posts
I have a question on epoxy sealers. IS it safe to go over the 2k urethane primer with it. Should it be sanded after application? If so what grit 320 or 600. Also will the urethane ppg paint adhere to the epoxy sealer!
06-16-08, 10:21 PM
#16
7less for now!
Thread Starter
Join Date: Oct 2007
Location: eau claire
Posts: 1,372
Likes: 0
Received 0 Likes
on
0 Posts
There was no bare metal on the outside to speak of i just roughed the **** out of what was all ready there. I did not have the location to strip to bare metal!
This is what i was gonna use! I wanted to use a black sealer to really bring out the color in the final coat!
http://www.tcpglobal.com/KustomShop/...=KUS+KEP506-QT
i just roughed the **** out of what was all ready there. I did not have the location to strip to bare metal!This is what i was gonna use! I wanted to use a black sealer to really bring out the color in the final coat!
http://www.tcpglobal.com/KustomShop/...=KUS+KEP506-QT
Last edited by yetterben; 06-16-08 at 10:27 PM.
06-16-08, 10:26 PM
#17
Senior Member
iTrader: (4)
Join Date: Mar 2008
Location: live oak,ca,nor cal(near sac)
Posts: 706
Likes: 0
Received 0 Likes
on
0 Posts
than u have no need for an expoxy primer. the 2k primer surfacer is ok for blocking and prepping the body. Just get a good urathane primer sealer before u apply the top coat to get a uni form pattern. Its not neccisary but u said earlier u don't want a bad *** show car just a dd. Primer filler is the ****! but cheating. that will fill in even 80 grit sand scratches like a champ. start at 320 then work your way up to 620 or 800. the urathane paint will stick easily.
06-16-08, 10:30 PM
#18
7less for now!
Thread Starter
Join Date: Oct 2007
Location: eau claire
Posts: 1,372
Likes: 0
Received 0 Likes
on
0 Posts
I have not seen anything at the local shop that is primer sealer. They have epoxy primer that can be reduced to use as a sealer and its black. I thought the whole purpose of the black was to make the darker colors stand out more!
06-16-08, 10:42 PM
#19
Senior Member
iTrader: (4)
Join Date: Mar 2008
Location: live oak,ca,nor cal(near sac)
Posts: 706
Likes: 0
Received 0 Likes
on
0 Posts
that can work some epoxys can act as a sealer but there is a primer just for sealing. I t hink where u live doesn't reuire alot urathane products with low voc's unlike cali. we get the least choices for paints and primers. all the good stuff has high voc rating. If ur epoxy a lacquer? nm.... just looked at the web site it has a low voc.
06-16-08, 10:44 PM
#20
7less for now!
Thread Starter
Join Date: Oct 2007
Location: eau claire
Posts: 1,372
Likes: 0
Received 0 Likes
on
0 Posts
So is that **** good then for my app. i just want the paint to be as vibrant as possible. Everything i have read says to use a good black sealer for darker paints! If its a worthless step than i will skip it!
06-16-08, 10:47 PM
#21
Senior Member
iTrader: (4)
Join Date: Mar 2008
Location: live oak,ca,nor cal(near sac)
Posts: 706
Likes: 0
Received 0 Likes
on
0 Posts
yeah its good. Your teal blue will come out looking a little darker than u might want it but once it cures and hardends it should look better. I would have went with a gray primer for the teal blue ur using but it could be darker than the pics show. I would lay ur first coat with a light coat. kinda make it so the primer won't show through. It will make ur first actual coat alot better and the rest from there easy.
06-16-08, 10:52 PM
#23
Senior Member
iTrader: (4)
Join Date: Mar 2008
Location: live oak,ca,nor cal(near sac)
Posts: 706
Likes: 0
Received 0 Likes
on
0 Posts
if u want it to be vibrant as possible than lay 3 coats of base then block it with like 1400 grit then lay abother 2-3 coats then 4 coats of clear then wet sand that and another 3 coats of clear. alot of work and money but damn it will come out like glass and pop like crazy.
06-16-08, 10:54 PM
#24
Senior Member
iTrader: (4)
Join Date: Mar 2008
Location: live oak,ca,nor cal(near sac)
Posts: 706
Likes: 0
Received 0 Likes
on
0 Posts
lol then that sealer is gonna help keep all those funky colors unders. It suck to have an odd color pattern all over the ur paint job. I once seen one guy paint red over a white car and it came out looking almost pinkish hot red.