It's Baaaack
#1
It's Baaaack
After sitting without being started for 6 years.... this week I have:
Put on ss oil cooler lines purchased 7 years ago, put on new starter solenoid, and reveresed electric radiator fan previously blowing the wrong way. I cranked her over for the first time with no hint at fire. No fuel showing in the float bowls. I think all of my fuel has evaporated. I am going to dump 10 gal of hi-test in her tomorrow and try again. Is there any problem with running 10% ethanol in the 12a? Ethanol hadn't been added to gas before I parked her in 04.
Put on ss oil cooler lines purchased 7 years ago, put on new starter solenoid, and reveresed electric radiator fan previously blowing the wrong way. I cranked her over for the first time with no hint at fire. No fuel showing in the float bowls. I think all of my fuel has evaporated. I am going to dump 10 gal of hi-test in her tomorrow and try again. Is there any problem with running 10% ethanol in the 12a? Ethanol hadn't been added to gas before I parked her in 04.
#2
before doing that and potentially mixing good gas with varnish, check operation of the fuel pump and test to make sure you're getting power to the pump. 6 years of sitting can cause some issues with gas turning to varnish and clogging filters and blocking lines. the floats may be stuck in the up position, cutting off any fuel from getting to the carb.
#3
I was bringing back to life a RX-7 that sat for around just as many years. Every possible thing that could of went wrong did. Although the one I was working on sat outside exposed to the elements of weather the entire time. Was yours garaged or outside also..??
I ask because when I say every possible thing that could have went wrong did, I mean literally EVERYTHING. Rotted gastank filled with rust, gas lines rotten through, every hose dry rotted, radiator no good, fuel pump no good, regulator frozen, carb VERY frozen stuck and insides a mess, oil cooler lines leaking, slave & master for clutch no good, all types of brake problems, master no good, wheel cylinders leaking, calipers frozen, frozen lugs, two dowel pin leaks, rear transmission seal leaking, driveshaft no good... etc... etc... etc... etc... etc. In the end, after I had it eventually all sorted out it felt daaaarn good.
Anyways, I don't mean to scare you, but 6 years can be a loong time depepnding how and where it was stored.
Something I'd also do right away is put in a gallon or two of gas and drop it right back out using the drain bolt on the bottom of the tank to see how it looks.
#4
The tank was bone dry with no rust or corrosion. Pulled the plug last night to check. The fuel pump is working. I just put 10 gallons of 92 oct in her and turn on the iginition, fuel pump is running, but bowls are still empty. I do not think the floats are stuck because I drained the bowls when I parked her. I am about to pull the fuel filter and test the flow of the pump. I have a new filter to install, but I wanted to wait until I had put a full tank thruough the car before changing the filter.
#5
if the tank is empty, its EXTREMELY likely that the gas has turned to a tarry substance on the inside and will require the tank being boiled and resealed. case in point, i picked up this seemingly nice GSL-SE gas tank free of charge.
looks decent enough on the outside and appears empty as there is no liquid inside:

but on the inside its nothing but a thick hard layer of gas thats turned into tar:

this may mean that the pump and the filter are clogged as well.
looks decent enough on the outside and appears empty as there is no liquid inside:

but on the inside its nothing but a thick hard layer of gas thats turned into tar:

this may mean that the pump and the filter are clogged as well.
#7
Just replaced the filter which seemd fine, but when I removed the hoses it released a fairly strong vacuum. I blew through the filter which was easy and nice clean gas came out. So, what parts are in between the filter and the pick-up in the tank?? With that much vacuum built-up something seems to be clogged.
Trending Topics
#9
on the end of the pickup wher eit meets the sump, there is a fine screen filter. they are still available from mazda. to properly clean a tank, it should be removed and sent to a rediator shop or equivelant to be boiled and cleaned. i'll post my writeup for removing the tank.
#10
this applies to all years. the only exception would be that pre 1983 (late build), there is no drain plug on the tank. here's some info and my writeup on dropping the tank should you need to do that. others may do it differently, but this is what i've found works. dropping the tank is no big feat. just make sure you drain all of the gas first. it makes a big difference when removing and reinstalling the tank. pop open te filler door and remove the three 8mm bolts holding the filler neck on. push the filler neck through the opening. it may be a little tough at first but the seal will unstick and it will push through.
next, get under the car and remove the three lines ahead of the fuel tank. eaiser to do this now rather than when the tank is coming down. then you'll want to remove the small plastic splash guard in the left wheel well. this will give you access to the sending unit. unplug it. chances are the connector will fight you a bit coming off and will be stiff. be patient with it.
you will then want to remove the two 14mm bolts holding the tank up, move the straps down, and work the tank down. get the tank on the ground and remove the pickup lines and the fuel level sender. you may find the screws for the fuel level sender very rusty and difficult to remove..of course you are in NC so i doubt that thats the case... you can now look in the tank and make a determination of where you want to go from there. when the tank is clean you will want to replace the gasket for the fuel level sender and the gasket for the pickup lines. you may also want to replace the pickup screen that attatches to the pickup lines. this can be clogged or ripped or otherwise in poor condition. the part numbers for replacement parts from mazda are as follows:
pickup/return line gasket: FA54-42-182
fuel level sender gasket: 8871-60-962A
pickp screen: GA97-42-113 (GSL-SE)
fuel tank pad: 8871-42-761
fuel level sender(if yours is bad. new sender comes with gasket): FA54-60-960
i have recently purchased most of these parts for my project and the prices are pretty reasonable from the dealer.
pics to follow with explanations.
#11
here are the instructions with pics for the tank removal:
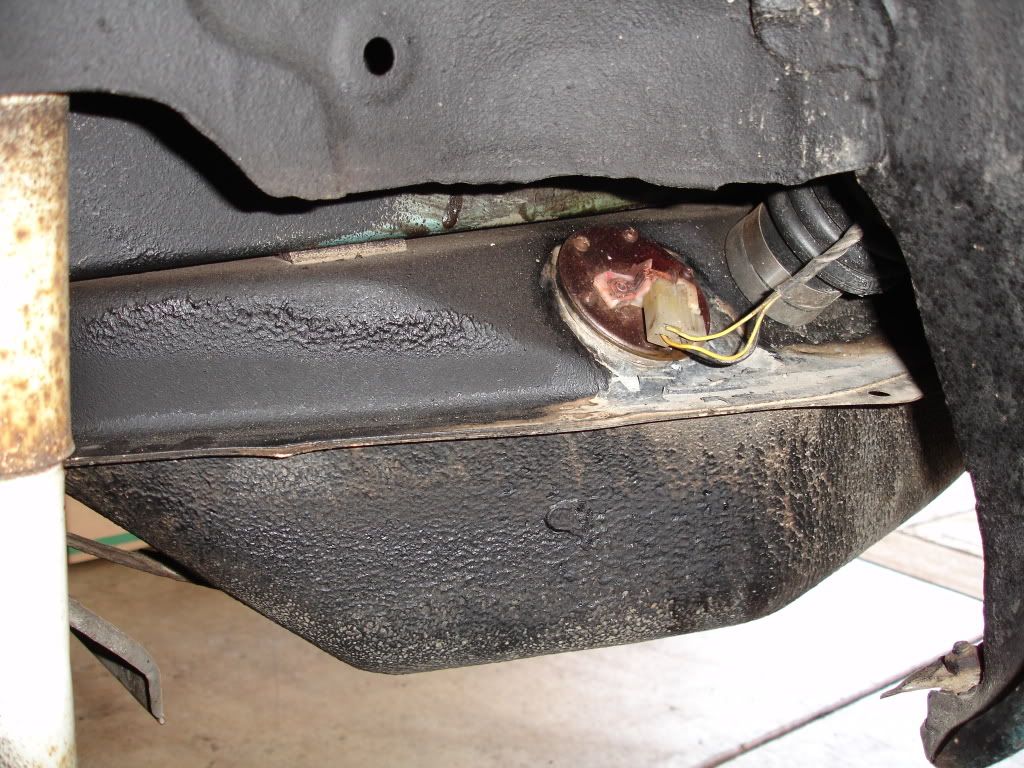
first, jack the car up, put it on stands, remove the left rear wheel, remove the plastic splash shield in the left wheel well. it is held on by two 10mm bolts and a 10mm nut. this will expose the fuel level sender which needs to be unplugged at this step:
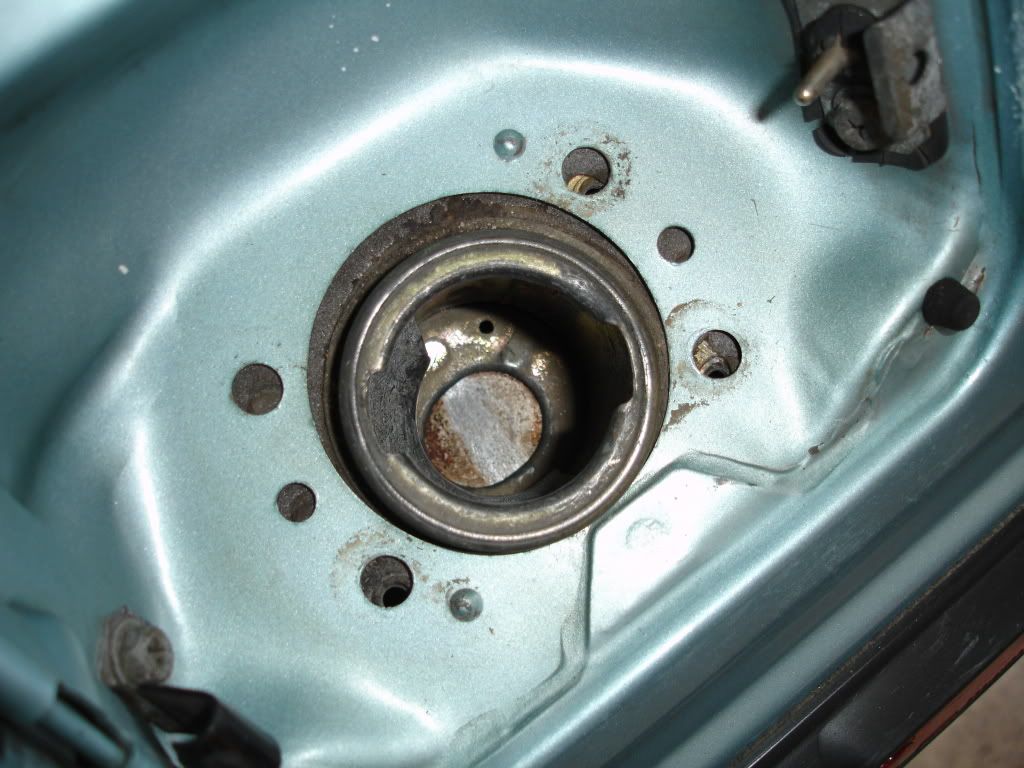
next, open the filler door, remove the gas cap and the three 8mm bolts, lift off the plate and push the neck down until it breaks away from the body:
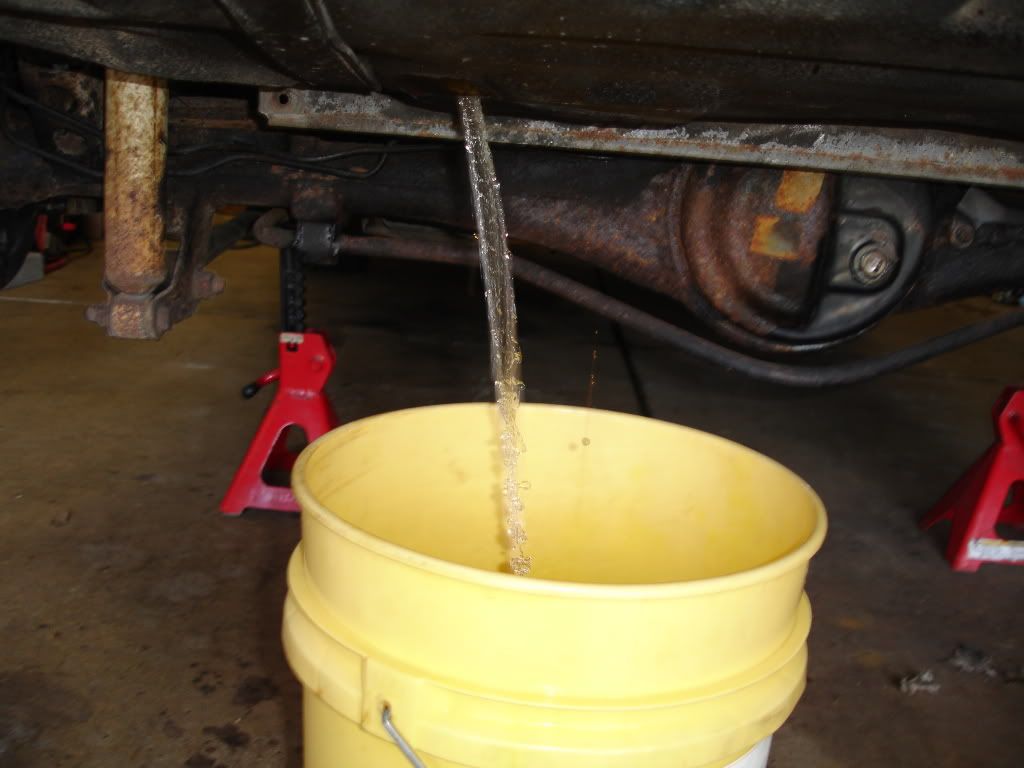
now is a good time to drain the gas. place a suitable bucket under the drain plug and remove the drain plug. a clean 5 gallon bucket works great and you can empty the bucket into a 5 gallon gas can or cans:
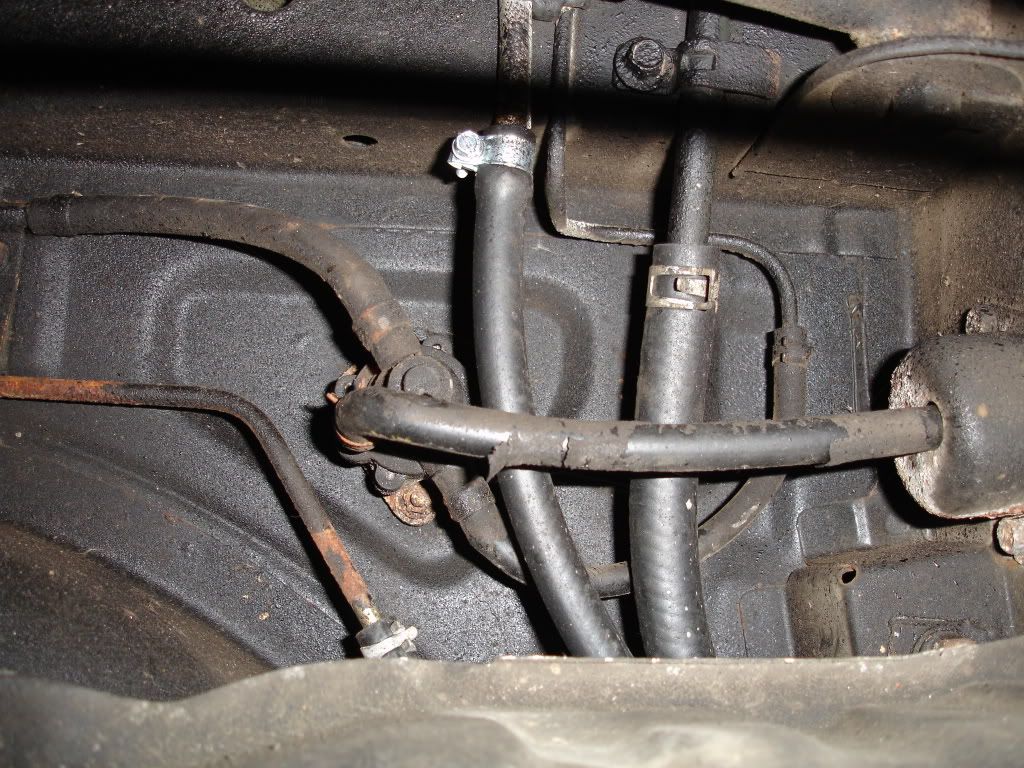
after the tank is drained, reinstall the drain plug and remove the clamps from the feed, return, and vent lines and slide the hoses off:
once thats done, remove the 14mm bolt from from each tank strap, they'll be in the front of the straps towards the rear bumper and you'll want to swing the straps down:
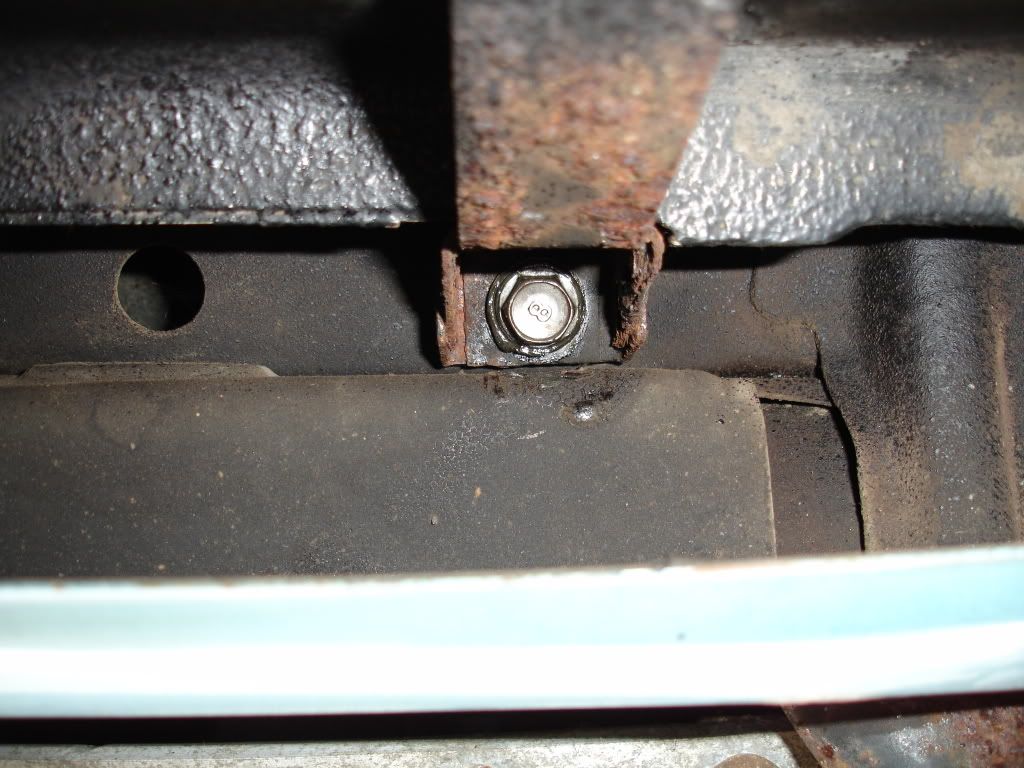
when the tank starts coming down, wiggle the filler neck out of its opening. once you do this, the tank will finish coming down(all the while you are supporting the tank with your leg or suitable support i hope)
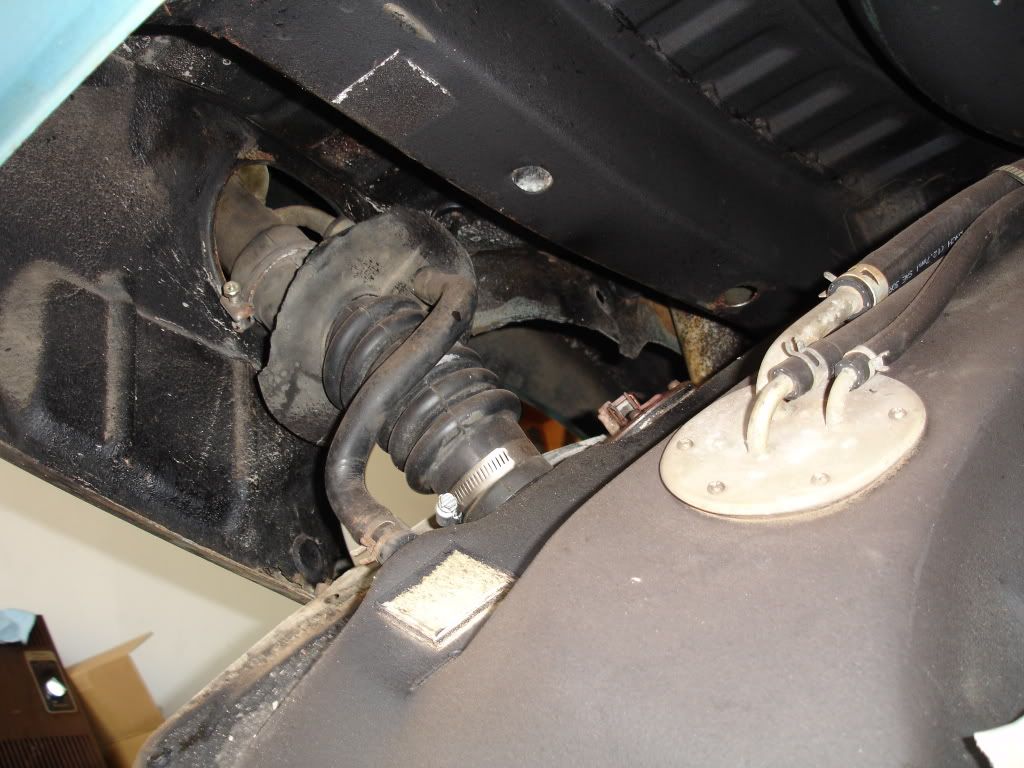
and the tank will be down and ready for service:
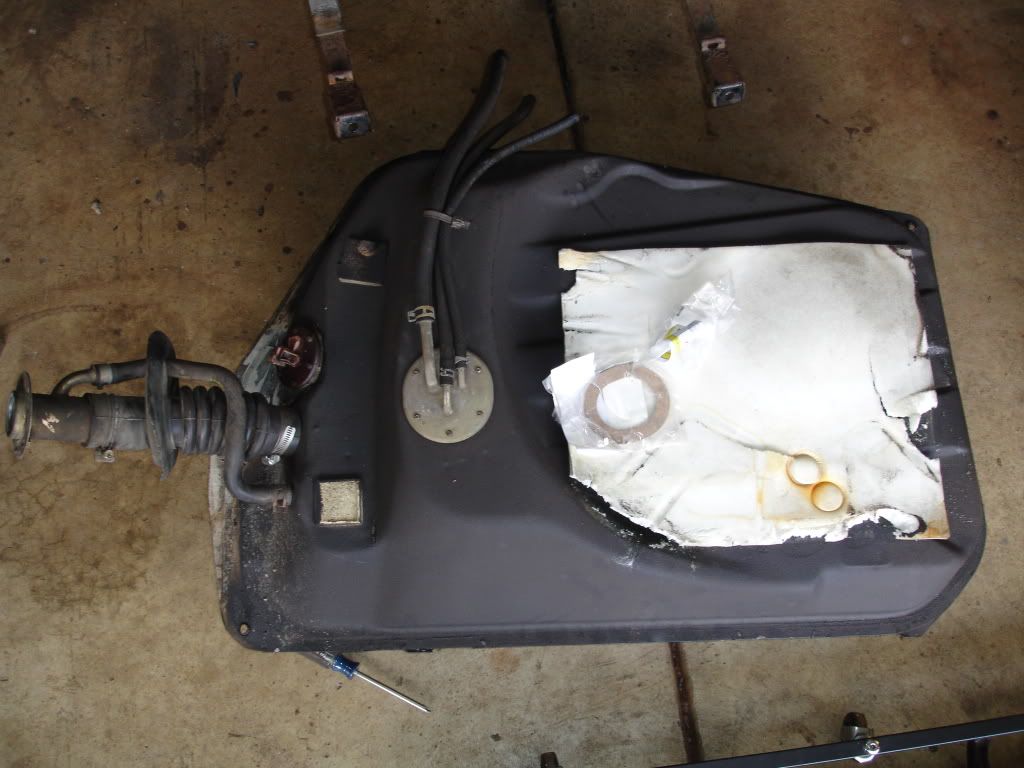
once you are satisfied with the tank, install is the reverse of removal. wiggling the filler neck into its opening while installing the tank at an angle is the toughest part. once everything is set in place, you'll bolt the straps up, install the lines, install the filler hose and cap, connect the sender connector, install the splash shield, install the tire, lower the car down, fill the tank with gas, start, and check for leaks.
here is the new pickup gasket and fuel level sender with screws installed
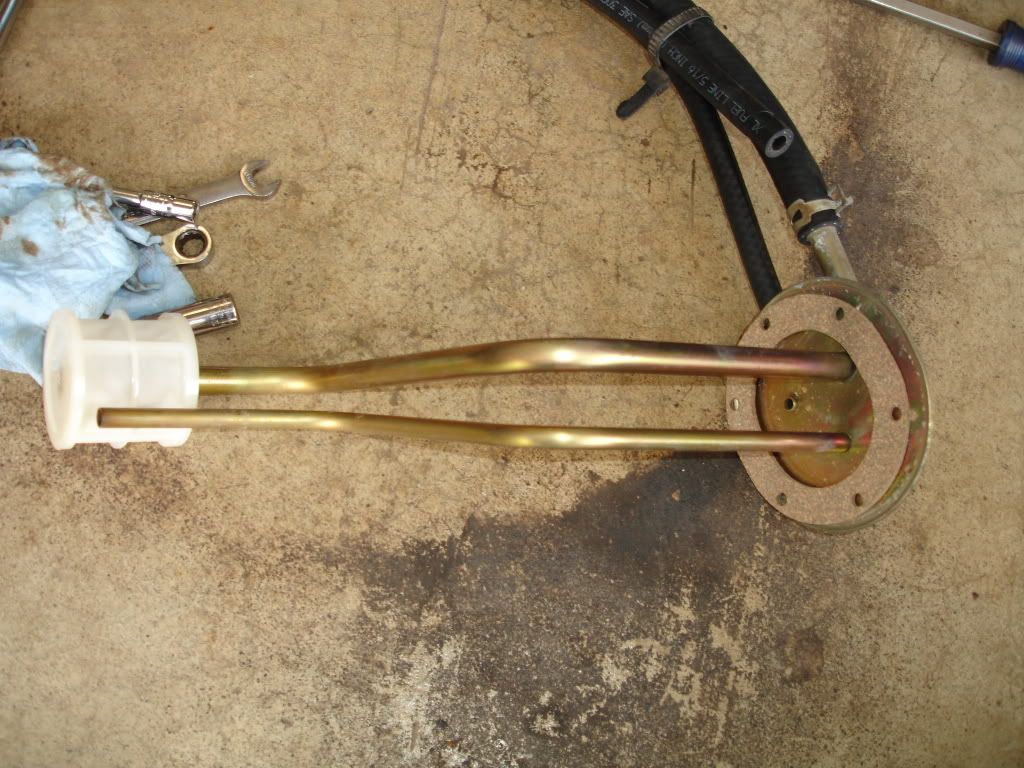
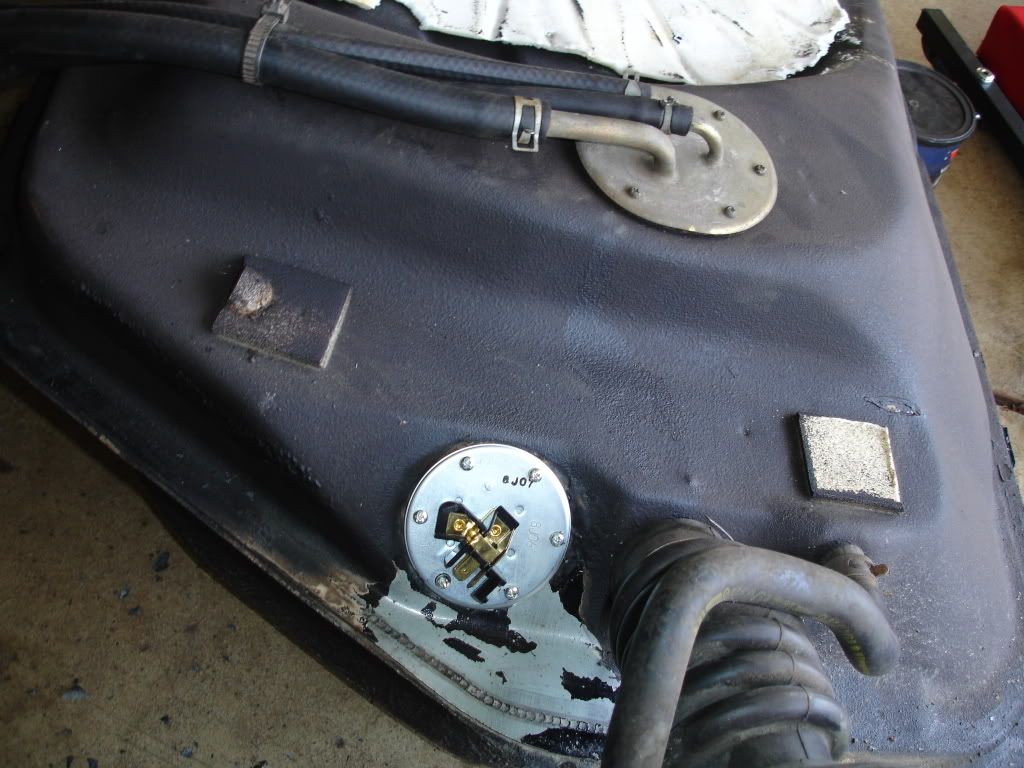
reinstall the tank and add a coat of undercoating to preserve the sender and protect it and the screws from rust. you may also want to clean and undercoat the entire top of the tank while it out to preserve it:
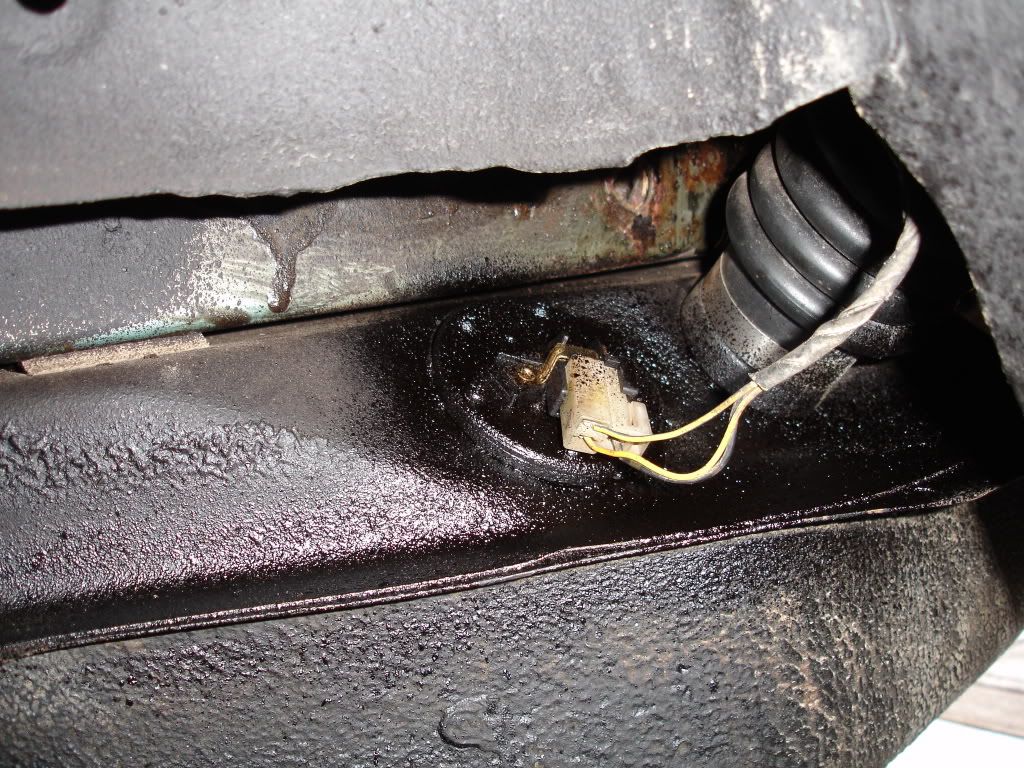
first, jack the car up, put it on stands, remove the left rear wheel, remove the plastic splash shield in the left wheel well. it is held on by two 10mm bolts and a 10mm nut. this will expose the fuel level sender which needs to be unplugged at this step:

next, open the filler door, remove the gas cap and the three 8mm bolts, lift off the plate and push the neck down until it breaks away from the body:

now is a good time to drain the gas. place a suitable bucket under the drain plug and remove the drain plug. a clean 5 gallon bucket works great and you can empty the bucket into a 5 gallon gas can or cans:

after the tank is drained, reinstall the drain plug and remove the clamps from the feed, return, and vent lines and slide the hoses off:

once thats done, remove the 14mm bolt from from each tank strap, they'll be in the front of the straps towards the rear bumper and you'll want to swing the straps down:

when the tank starts coming down, wiggle the filler neck out of its opening. once you do this, the tank will finish coming down(all the while you are supporting the tank with your leg or suitable support i hope)

and the tank will be down and ready for service:

once you are satisfied with the tank, install is the reverse of removal. wiggling the filler neck into its opening while installing the tank at an angle is the toughest part. once everything is set in place, you'll bolt the straps up, install the lines, install the filler hose and cap, connect the sender connector, install the splash shield, install the tire, lower the car down, fill the tank with gas, start, and check for leaks.
here is the new pickup gasket and fuel level sender with screws installed


reinstall the tank and add a coat of undercoating to preserve the sender and protect it and the screws from rust. you may also want to clean and undercoat the entire top of the tank while it out to preserve it:


