DIY: Minitub/4 Link
 04-20-09, 06:44 AM
#251
*** Bless The USA
Thread Starter
iTrader: (8)
Join Date: Jan 2007
Location: Saint Louis / Illinois
Posts: 7,140
Received 0 Likes
on
0 Posts
Yes, I'd have to say that the folks at Jerry Bickel Race Cars are pro's when it comes to Tubs and Sheet Metal .............among other things.
 04-20-09, 09:17 AM
#252
*** Bless The USA
Thread Starter
iTrader: (8)
Join Date: Jan 2007
Location: Saint Louis / Illinois
Posts: 7,140
Received 0 Likes
on
0 Posts
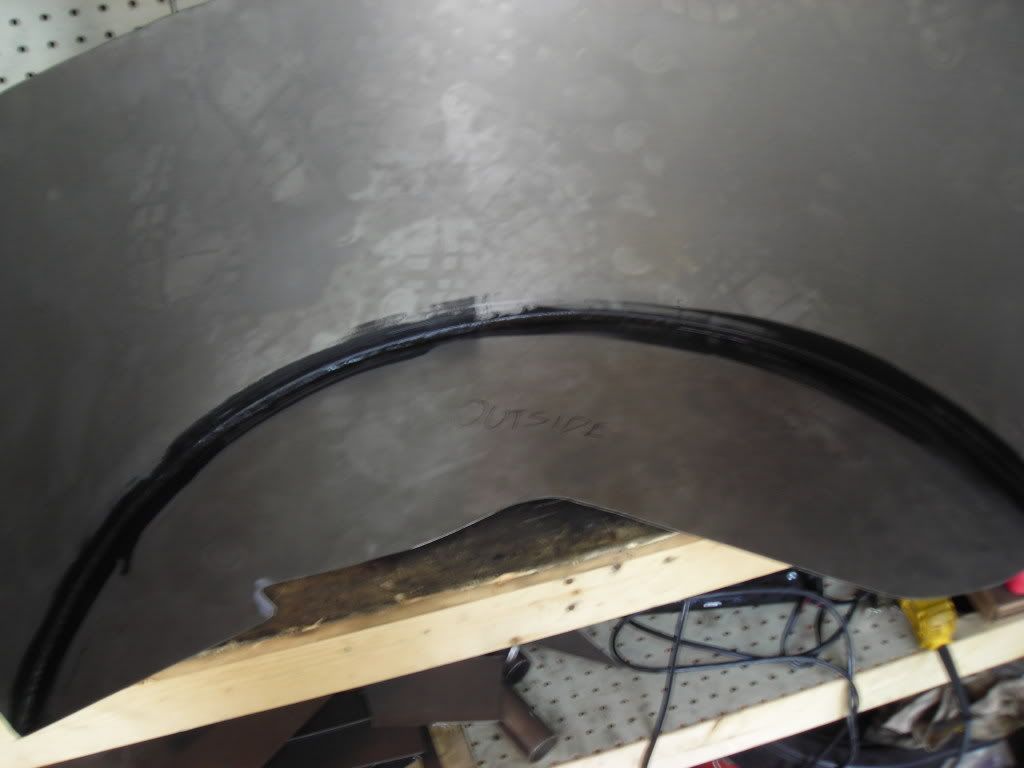
Silicone against the quarter holds very well and allows the tub a little movement. Seam sealant drys alot stiffer and can cause damage to the quarter/paint when the vehicle flexes.
04-20-09, 12:12 PM
#253
Junior Member
Join Date: May 2007
Location: Nebraska
Posts: 44
Likes: 0
Received 0 Likes
on
0 Posts
Awesome buildup. I'm planning to minitub an '83 I have, but my choice for rear and suspension is a little different.
You said there were some things you would have done differently if you did it again, can you briefly sum those up?
You said there were some things you would have done differently if you did it again, can you briefly sum those up?
04-20-09, 11:36 PM
#254
making paper cranes
Join Date: Sep 2008
Location: Ottawa, ON, Canada
Posts: 189
Likes: 0
Received 0 Likes
on
0 Posts
I've seen tubs done many different ways, from using silicone all the way to seam welding it to the quarter. I feel it's a 'schools of thought' issue more than anything else,
 if you don't mind the look of silicone then your better off doing it that way, fibreglass fillers can be a pain if you let them harden to much.
I don't mean to bash your shop in anyway, I just found little information or tools for metalworking on the link. Am I looking in the wrong place? A direct link to some of their work/information would help clear this up for me.

Are you planning on leaving the rest of the rear open? Where I live leaving it open would never pass safety standards for street cars, not to mention ingrain a fear of deep puddles.
04-21-09, 06:51 AM
#255
*** Bless The USA
Thread Starter
iTrader: (8)
Join Date: Jan 2007
Location: Saint Louis / Illinois
Posts: 7,140
Received 0 Likes
on
0 Posts
I can do the math for you on why that wouldn't happen, who told you this was the case?
I've seen tubs done many different ways, from using silicone all the way to seam welding it to the quarter. I feel it's a 'schools of thought' issue more than anything else, if you don't mind the look of silicone then your better off doing it that way, fibreglass fillers can be a pain if you let them harden to much.
I don't mean to bash your shop in anyway, I just found little information or tools for metalworking on the link. Am I looking in the wrong place? A direct link to some of their work/information would help clear this up for me.
Are you planning on leaving the rest of the rear open? Where I live leaving it open would never pass safety standards for street cars, not to mention ingrain a fear of deep puddles.
I've seen tubs done many different ways, from using silicone all the way to seam welding it to the quarter. I feel it's a 'schools of thought' issue more than anything else,
if you don't mind the look of silicone then your better off doing it that way, fibreglass fillers can be a pain if you let them harden to much.I don't mean to bash your shop in anyway, I just found little information or tools for metalworking on the link. Am I looking in the wrong place? A direct link to some of their work/information would help clear this up for me.
Are you planning on leaving the rest of the rear open? Where I live leaving it open would never pass safety standards for street cars, not to mention ingrain a fear of deep puddles.
Jerry Bickel Race Cars, a simple search on good images will net you a ton of pictures of their work.
But, since we're a mazda forum, I'll include a car that they built and shipped to Australia.

 04-21-09, 08:39 AM
#257
Junior Member
Join Date: May 2007
Location: Nebraska
Posts: 44
Likes: 0
Received 0 Likes
on
0 Posts
I can do the math for you on why that wouldn't happen, who told you this was the case?
I've seen tubs done many different ways, from using silicone all the way to seam welding it to the quarter. I feel it's a 'schools of thought' issue more than anything else, if you don't mind the look of silicone then your better off doing it that way, fibreglass fillers can be a pain if you let them harden to much.
I don't mean to bash your shop in anyway, I just found little information or tools for metalworking on the link. Am I looking in the wrong place? A direct link to some of their work/information would help clear this up for me.
Are you planning on leaving the rest of the rear open? Where I live leaving it open would never pass safety standards for street cars, not to mention ingrain a fear of deep puddles.
I've seen tubs done many different ways, from using silicone all the way to seam welding it to the quarter. I feel it's a 'schools of thought' issue more than anything else,
if you don't mind the look of silicone then your better off doing it that way, fibreglass fillers can be a pain if you let them harden to much.I don't mean to bash your shop in anyway, I just found little information or tools for metalworking on the link. Am I looking in the wrong place? A direct link to some of their work/information would help clear this up for me.
Are you planning on leaving the rest of the rear open? Where I live leaving it open would never pass safety standards for street cars, not to mention ingrain a fear of deep puddles.
Now can we drop this and move on to other discussions?
 04-22-09, 11:36 PM
#264
Junior Member
Join Date: May 2007
Location: Nebraska
Posts: 44
Likes: 0
Received 0 Likes
on
0 Posts
Viking Warhammer, you said there were some things you would have done differently if you did it again, what were they?
I'm considering doing a minitub on an '83, would appreciate some insight on the FB minitub.
I'm considering doing a minitub on an '83, would appreciate some insight on the FB minitub.
04-23-09, 10:55 AM
#265
making paper cranes
Join Date: Sep 2008
Location: Ottawa, ON, Canada
Posts: 189
Likes: 0
Received 0 Likes
on
0 Posts
04-24-09, 09:39 PM
#267
*** Bless The USA
Thread Starter
iTrader: (8)
Join Date: Jan 2007
Location: Saint Louis / Illinois
Posts: 7,140
Received 0 Likes
on
0 Posts
But, with the car as low as it is now........ I can't imagine having it any lower for street use.
04-24-09, 09:40 PM
#268
*** Bless The USA
Thread Starter
iTrader: (8)
Join Date: Jan 2007
Location: Saint Louis / Illinois
Posts: 7,140
Received 0 Likes
on
0 Posts
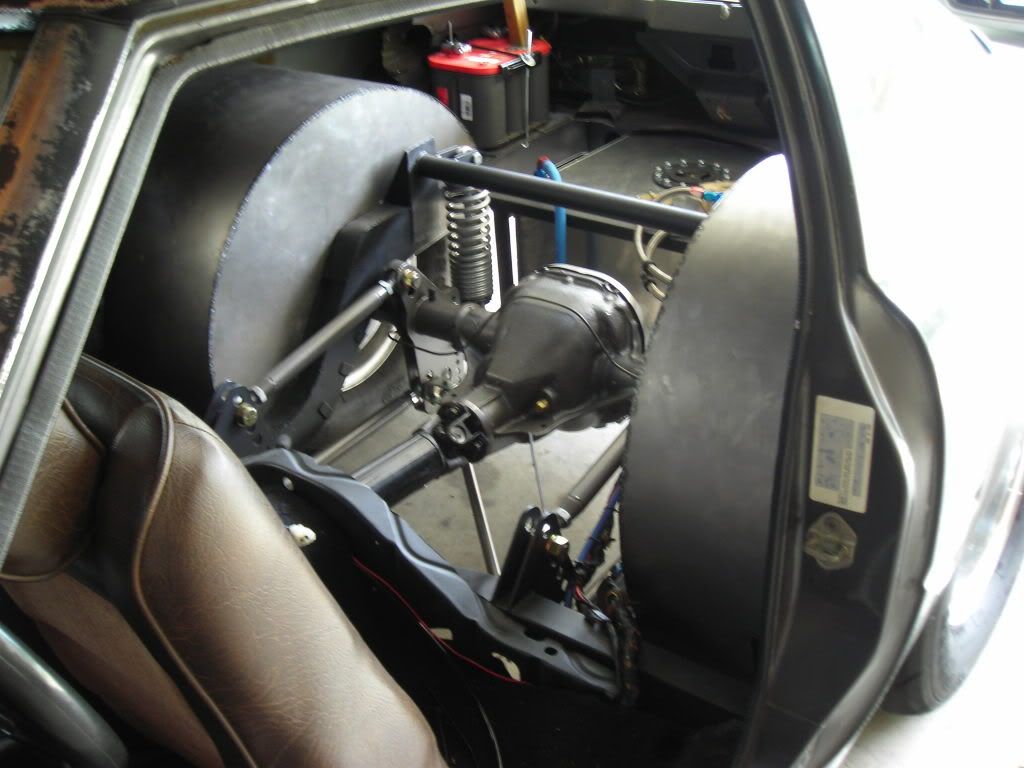
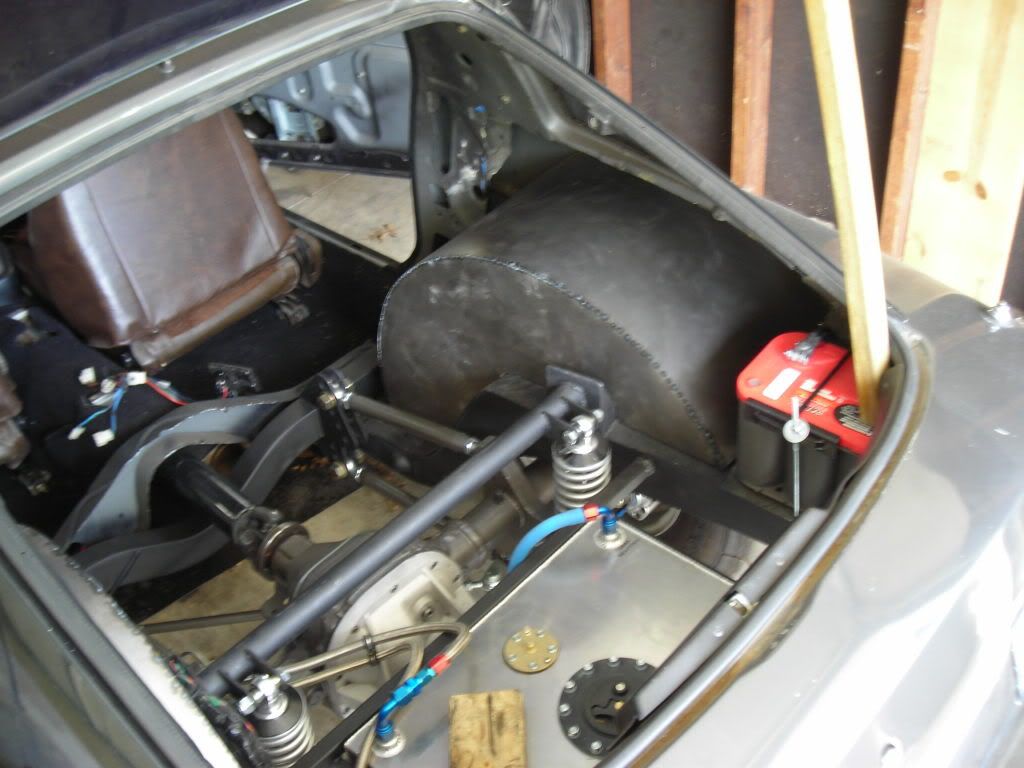
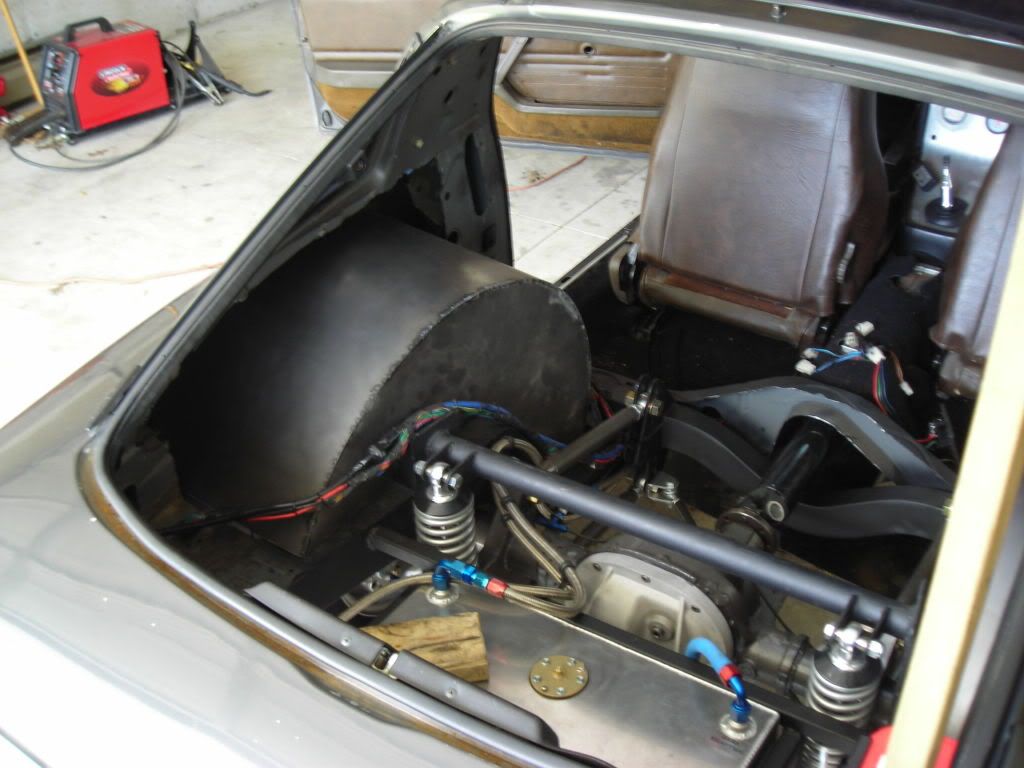
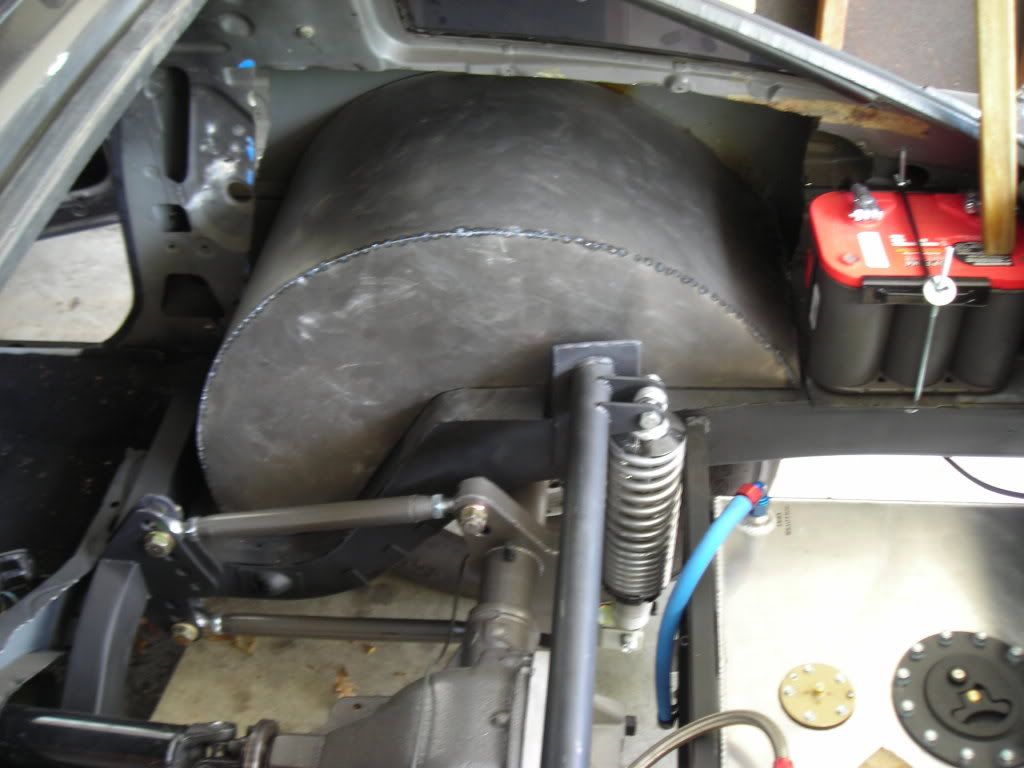
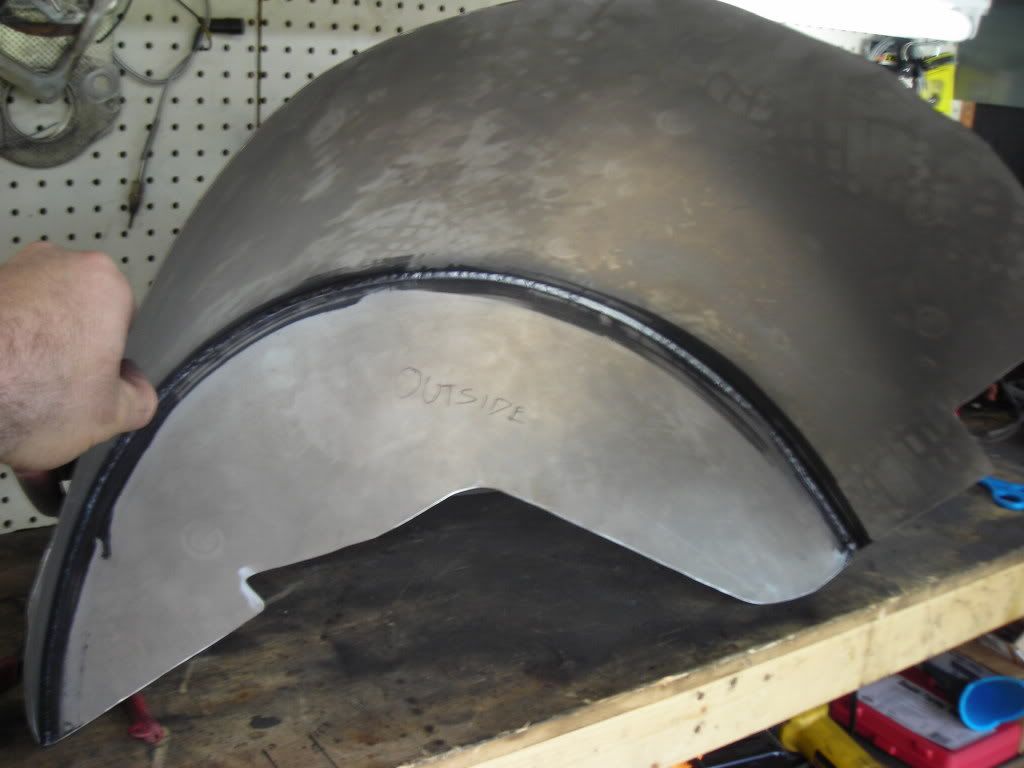
In other news, I picked up some 22 gauge sheet metal today and got my drivers side tub made. It's sitting on the work bench letting the seam sealer cure. Will start the other one tommorow.
04-25-09, 05:48 AM
#269
can't wait to see that...man i read this whole thread from start to end...and this was a HUGE help of info...damn viking you got skills bro...i love the work...
When you say c-notch i assume you cut the top part of the chassis rail running side by side next to eachother and re-inforced it with a thicker guage metal and then welded it close correct?
When you say c-notch i assume you cut the top part of the chassis rail running side by side next to eachother and re-inforced it with a thicker guage metal and then welded it close correct?
04-25-09, 09:03 AM
#270
*** Bless The USA
Thread Starter
iTrader: (8)
Join Date: Jan 2007
Location: Saint Louis / Illinois
Posts: 7,140
Received 0 Likes
on
0 Posts
can't wait to see that...man i read this whole thread from start to end...and this was a HUGE help of info...damn viking you got skills bro...i love the work...
When you say c-notch i assume you cut the top part of the chassis rail running side by side next to eachother and re-inforced it with a thicker guage metal and then welded it close correct?
When you say c-notch i assume you cut the top part of the chassis rail running side by side next to eachother and re-inforced it with a thicker guage metal and then welded it close correct?
You basically cut out a half moon shape from your frame raile and weld or bolt in a peice of metal.
Here is a kit that you can buy for trucks, just to give you a idea.
This would go on each side of the frame rail