Cheap, easy and accurate toe-in alignment
#1
Cheap, easy and accurate toe-in alignment
I know that I've mentioned this in passing in several other discussions, but I want to make it official here by describing the method, with pictures and data that show it is as good or better than you will get at an alignment shop.
First the Method:
1. Park your car on a flat level surface - I just try to eyeball the best flat spot on my gravel driveway.
2. Jack the front end of the car up and loosen up ALL tie rod ends and locking nuts - if you need to make an adjustment you will need to move all these connections at once to get it right. Now put the car back on the ground.
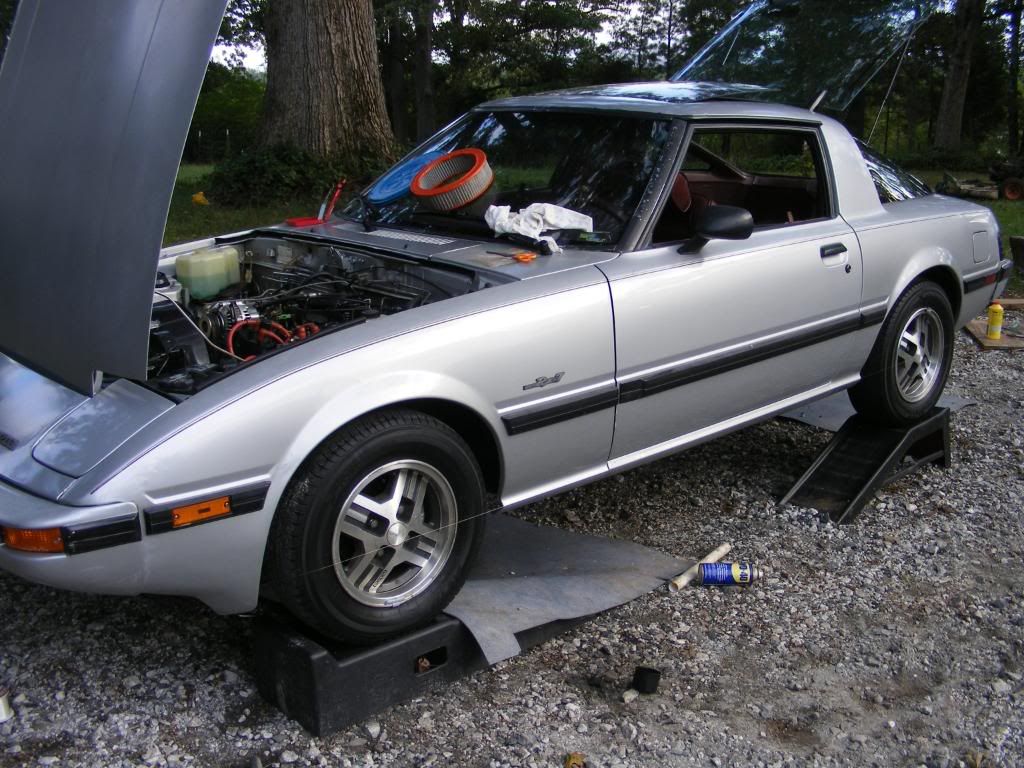
3. Tie a piece of monofilament fishing line to one of your front tow hook, then stretch it around the back of the car, pulling it tight around the back so that the line is even with the mid point of the front and back axles (the center of the wheel). Here's a picture I took doing an initial check when the Silver One was up on ramps:

4. Bring the line forward the same way and tie it to the other tow hook, setting the line along the wheel midlines. Now you have two lines that point straight ahead. Your front wheels (tires) need to do this too!
5. Make sure your steering wheel is centered, then adjust the tie rods to make the wheels point straight ahead, which will be confirmed when the back edge of the front tires just touches the monofilament line.
6. Recheck the steering wheel for centering - it probably will have moved if you have changed a tie rod length. Then go back and make finer adjustments to the toe-in until you get it the way you like it. (I put about 1 mm toe-in on each side - just a touch).
7. IMPORTANT!: Tighten up all your tie rod lock nuts - you're done!
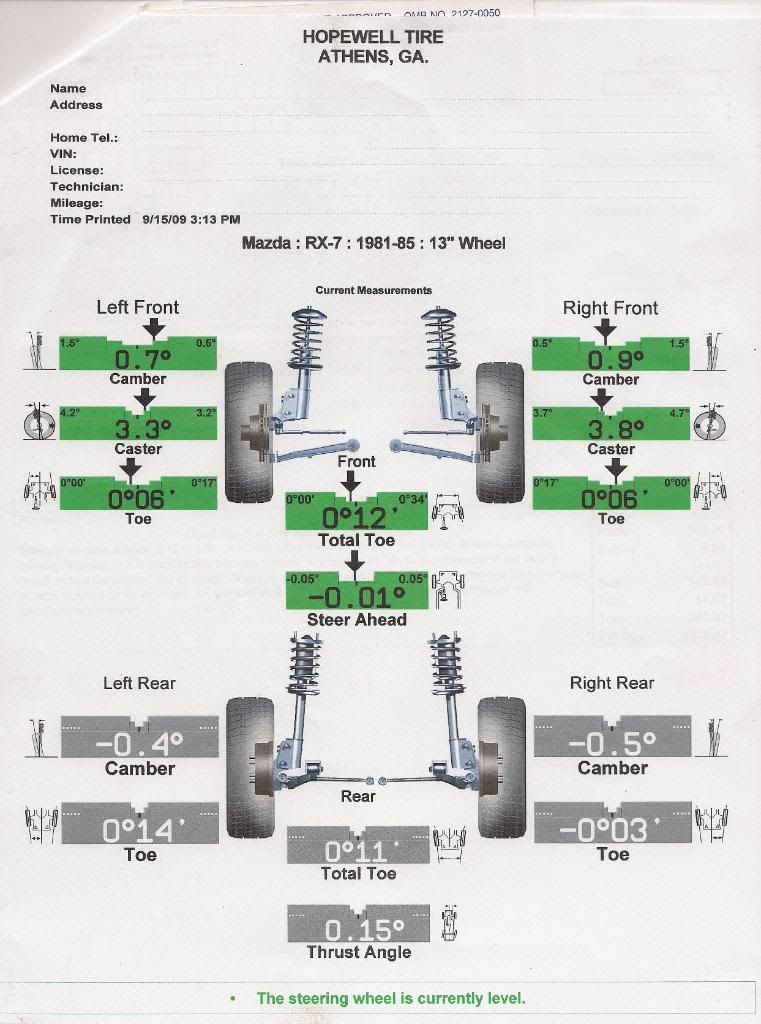
Here's the read out from the alignment check, done today on the string alignment in the Silver One I did a few days ago. They recommended no changes, even though they would have collected another $40 if they had made a change:

First the Method:
1. Park your car on a flat level surface - I just try to eyeball the best flat spot on my gravel driveway.
2. Jack the front end of the car up and loosen up ALL tie rod ends and locking nuts - if you need to make an adjustment you will need to move all these connections at once to get it right. Now put the car back on the ground.
3. Tie a piece of monofilament fishing line to one of your front tow hook, then stretch it around the back of the car, pulling it tight around the back so that the line is even with the mid point of the front and back axles (the center of the wheel). Here's a picture I took doing an initial check when the Silver One was up on ramps:

4. Bring the line forward the same way and tie it to the other tow hook, setting the line along the wheel midlines. Now you have two lines that point straight ahead. Your front wheels (tires) need to do this too!
5. Make sure your steering wheel is centered, then adjust the tie rods to make the wheels point straight ahead, which will be confirmed when the back edge of the front tires just touches the monofilament line.
6. Recheck the steering wheel for centering - it probably will have moved if you have changed a tie rod length. Then go back and make finer adjustments to the toe-in until you get it the way you like it. (I put about 1 mm toe-in on each side - just a touch).
7. IMPORTANT!: Tighten up all your tie rod lock nuts - you're done!
Here's the read out from the alignment check, done today on the string alignment in the Silver One I did a few days ago. They recommended no changes, even though they would have collected another $40 if they had made a change:

#3
They wanted $54.95 for the full alignment check and adjustment. Presumably this would only be toe-in, since camber and caster don't usually need adjustment on our cars.
But they only charged me $20 because it was just a "check", which I had actually prepaid them when they looked at my steering box a few days earlier, they didn't charge for the second look.
Of course they are selling tires and in the business of pleasing a customer. I'm real happy with the tires at $324 complete for a set of Kumho KR21's, I'll go back there for the next set.
#6
This is great information, thanks for posting it Ray. I'll have to try this next spring, after I'm done my GSLSE suspension swap.
#7
Didn't Mazda design all first gens to have a bit of negative camber in the rear? I know when I got my SA aligned at the beginning of the summer, it also had -0.5 camber on the rear.
This is great information, thanks for posting it Ray. I'll have to try this next spring, after I'm done my GSLSE suspension swap.
This is great information, thanks for posting it Ray. I'll have to try this next spring, after I'm done my GSLSE suspension swap.

Trending Topics
#9
Now I'm getting curious. Why DO they have negative camber in the rear???
And why is the toe different from left to right in the rear?
It looks to me like the tire shop didn't take the readings on the rear axle, the readings couldn't all be right on like the read out indicates in the gray boxes. Those numbers for the rear must be what the FSM calls for.
And why is the toe different from left to right in the rear?
It looks to me like the tire shop didn't take the readings on the rear axle, the readings couldn't all be right on like the read out indicates in the gray boxes. Those numbers for the rear must be what the FSM calls for.
#10
i looked it up, and it looks like you can have up to like .75 degrees negative camber on the back. the rear end and axles etc are made of metal, so they can bend a little which would cause some camber
toe.. i'm not really sure about it. maybe its related to the bearings.
grayed out readings means that its "not serviceable", just observed.
not sure why mazda would put negative camber in the rear and positive 1 in the front... I just run -3 in the front
i did notice that my rear end had some negative camber too.
alignment machines tell you what can be changed, and tolerances you have. you then adjust and tighten so that the suspension is within the tolerances.
Last edited by thunkrd; 09-17-09 at 04:04 PM. Reason: adding more information
Thread
Thread Starter
Forum
Replies
Last Post
Turblown
Vendor Classifieds
12
10-17-20 04:25 PM
joel(PA)
Race Car Tech
0
10-01-15 11:25 AM
pfsantos
2nd Generation Specific (1986-1992)
1
09-30-15 02:29 PM


