
(TURBO) The Chronicles of a Turbo II Swap
 01-30-04 | 06:24 PM
#101
Thread Starter
RX-7 Alumni
Joined: Oct 2002
Posts: 1,140
Likes: 1
From: Spacecenter Houston
Originally posted by setzep
Hmm, I have mine spaced 3/4" up from the FB trans mount like you but I have no vibrations.
Hmm, I have mine spaced 3/4" up from the FB trans mount like you but I have no vibrations.
Originally posted by setzep
Could it be a out of balance shaft?
Could it be a out of balance shaft?
Why am I so lucky? Guess I should be thankful this is the only real problem encountered in the swap--could have been alot worse.
Let me know if any of you guys have ideas about this.
Thanks, Scott
01-30-04 | 07:50 PM
#102
Rotary Freak
Joined: Feb 2001
Posts: 2,524
Likes: 0
From: MN
I have a 83 chassis with a 84 gsl-se rear end. Trans is a S4 T2 unit.
You are lucky like you say. With all the work you've done in the past month one little drive shaft problem is a very small bump in the road. Right now I'm heating up my garage (it's -12 deg F here) in order to do some revisions to my setup. First I have to redesign my exhaust manifold wastegate runners then intake fuel pump then different oil cooler setup. I have a couple other small things I'd like to do as well but you get the point.
I was thinking, are your pinion bearings tight or how about the slip yoke, does it have up-down or side to side slop at all in the trans? I remember mine being pretty tight.
02-02-04 | 08:35 PM
#103
Thread Starter
RX-7 Alumni
Joined: Oct 2002
Posts: 1,140
Likes: 1
From: Spacecenter Houston
Starting to post the procedures and drawings so others can easily make the mods. This is one part modified to fit an FB shifter box on a T2 transmission.
No drawing necessary for this one.
T2 Shifter Tube Modification
Goal is to shorten the tube by 2 cm and keep the formed rubber seals on ends intact.
Recommended procedure:
1) Cut ~2cm from center of tube. When cutting, allow for weld tolerances.
2) Weld tube back together, heat soak rubber seal ends to prevent melting.
Note: A little shorter on rod length is better than too long.
02-02-04 | 09:18 PM
#104
Thread Starter
RX-7 Alumni
Joined: Oct 2002
Posts: 1,140
Likes: 1
From: Spacecenter Houston
Shifter Rod Modification
Goal is to move the hole at the end of the rod 3 cm closer to the center of the rod, then remove 3 cm from the end of the rod (see attached drawing).
Very Important: The radial position of the new hole MUST be the same as the existing hole.
Note: This modification is to be performed on the stock S4 shifter rod. The tapping of the hole is to allow use of the FB bolt used on the FB shifter rod. Yes you could do this another way using a dowel pin.
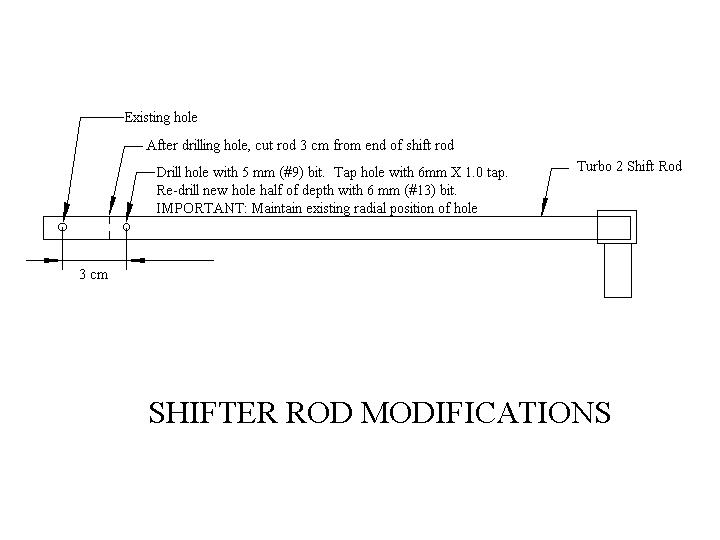
Recommended procedure:
1) Drill new hole 3 cm closer to center of rod from existing hole position--maintain existing radial position of hole. Use 5 mm or #9 drill.
2) Tap hole with 6 mm X 1.0 tap.
3) Drill approximately half of hole depth with 6 mm or #13 drill to allow for bolt shoulder.
4) Cut 3 cm from end of rod.
Very Important: The radial position of the new hole MUST be the same as the existing hole.
Note: This modification is to be performed on the stock S4 shifter rod. The tapping of the hole is to allow use of the FB bolt used on the FB shifter rod. Yes you could do this another way using a dowel pin.
Recommended procedure:
1) Drill new hole 3 cm closer to center of rod from existing hole position--maintain existing radial position of hole. Use 5 mm or #9 drill.
2) Tap hole with 6 mm X 1.0 tap.
3) Drill approximately half of hole depth with 6 mm or #13 drill to allow for bolt shoulder.
4) Cut 3 cm from end of rod.
Last edited by Rex4Life; 02-02-04 at 09:21 PM.
02-03-04 | 12:54 AM
#105
Got Boost?
Joined: Feb 2002
Posts: 1,066
Likes: 1
From: Watertown, MA
So the stock TII exhaust manifold fit without any problem? I've read tons of times that it doesnt work, but if it works, then I'm wondering what everyone else was smoking....
Rex4life, lookin' good. Very clean install. Enjoy, its a pleasure to own a turbo FB
 02-03-04 | 09:44 PM
#106
Thread Starter
RX-7 Alumni
Joined: Oct 2002
Posts: 1,140
Likes: 1
From: Spacecenter Houston
Wiring Connector Breakdowns
Here's a link to the wiring connector breakdowns.
ECU Mapping Files
If you need these files, copy them over to your own location. You never know how long they will be available.
Also, as always, use at you own risk.
Scott
EDIT BY MODERATOR:
I added a couple of files, since the original files
are no longer available.
-DF
ECU Mapping Files
If you need these files, copy them over to your own location. You never know how long they will be available.
Also, as always, use at you own risk.
Scott
EDIT BY MODERATOR:
I added a couple of files, since the original files
are no longer available.
-DF
Last edited by Directfreak; 04-07-07 at 01:57 PM.
02-03-04 | 11:00 PM
#107
Re: Wiring Connector Breakdowns
Originally posted by Rex4Life
Here's a link to the wiring connector breakdowns.
ECU Mapping Files
If you need these files, copy them over to your own location. You never know how long they will be available.
Also, as always, use at you own risk.
Scott
Here's a link to the wiring connector breakdowns.
ECU Mapping Files
If you need these files, copy them over to your own location. You never know how long they will be available.
Also, as always, use at you own risk.
Scott
02-04-04 | 01:38 AM
#108
Postmaster General
Joined: Jan 2004
Posts: 59
Likes: 0
From: Lebanon, OR
do you have any pics and/or write ups on what wires go where for that ECU? im putting an 87 NA into an 83 GSL.. the reason i am having so much trouble is that the best wiring harness i can get around here is a chopped one, so all i really have are the plugs and a few MILES of wire
Thanks
Thanks
02-04-04 | 06:30 AM
#110
Thread Starter
RX-7 Alumni
Joined: Oct 2002
Posts: 1,140
Likes: 1
From: Spacecenter Houston
Originally posted by atlas541
do you have any pics and/or write ups on what wires go where for that ECU?
do you have any pics and/or write ups on what wires go where for that ECU?
The wiring breakdown will help alot but you will need to customize it for your application. Fortunately the 87 NA is like an 88 T2. I don't know how similar the 83 NA is to an 84 FI. I do expect to be putting out the wiring diagrams in a week or two, this will help a little more. I would use my info as a guide to get you 80% of the way there.
Originally posted by atlas541
do you have any pics and/or write ups on what wires go where for that ECU?
do you have any pics and/or write ups on what wires go where for that ECU?
I'll be looking for your new thread.
Scott
02-11-04 | 08:23 PM
#111
Thread Starter
RX-7 Alumni
Joined: Oct 2002
Posts: 1,140
Likes: 1
From: Spacecenter Houston
Tranny Mount Take 2
Well I decided last weekend I was going to try and fix the slight vibration problem--other than that she's running pretty good.
Ended up having several engine/tranny mounting issues:
1) The new left engine mount from Victoria British was about a 1/4" shorter than the stock one. Had to shim it up with washers to get the engine height and angle correct. Don't buy VB parts for critical items.
2) The angle of the tranny output shaft needed to slope down more. Basically the the working angles of the differential pinion and tranny shaft need to be about the same. Ended up shimming the stock mount 3/16" down with two washers and using a rubber muffler strap to isolate vibrations (about 5/16" thick). So that ends up bringing it up about 1/8" from the stock mounting height.
3) The tranny appeared to be installed on a small angle. Re-drilled some new holes and slid the output shaft more towards the drivers side of the car.
Lowering the tranny that much I had to bang the exhaust heat shield down a little more to clear the driveshaft--no big deal.
But guess what, it's still there. So I'm not sure where to go with this now and I'll just have to live with it for a while till I can think it over real good.
Scott
Last edited by Rex4Life; 02-11-04 at 08:25 PM.
 02-12-04 | 09:42 AM
#114
Originally posted by RotaryRevn
Too bad no one sells a tranny mount made for this conversion.....I would buy one (hint, hint anyone)
Too bad no one sells a tranny mount made for this conversion.....I would buy one (hint, hint anyone)
02-12-04 | 10:29 AM
#115
Thread Starter
RX-7 Alumni
Joined: Oct 2002
Posts: 1,140
Likes: 1
From: Spacecenter Houston
Originally posted by RotaryRevn
Too bad no one sells a tranny mount made for this conversion
Too bad no one sells a tranny mount made for this conversion
My differential pinion flange is angled up about 6 degrees. The last adjustment I made I thought I was about matching that 6 deg. Looks like I need to try something else.
Originally posted by
FC Wanna-B
so you work for NASA? your pretty close to where i'm at. hopefuly i'll see your car around in person sometime, it look great and it's one hell of a sleeper.
FC Wanna-B
so you work for NASA? your pretty close to where i'm at. hopefuly i'll see your car around in person sometime, it look great and it's one hell of a sleeper.
Originally posted by
Directfreak
I don't know why, I used the stock tranny mount with NO adapters whatsoever. All I had to do was oval and slot a couple of the holes a liitle larger to fit.
Directfreak
I don't know why, I used the stock tranny mount with NO adapters whatsoever. All I had to do was oval and slot a couple of the holes a liitle larger to fit.
So DF, did you elevate the tranny off the mount and/or use any rubber mountings? If I ever figure this out it will be good for others to know.
Scott
02-12-04 | 05:35 PM
#117
Rotary Freak
Joined: Feb 2001
Posts: 2,524
Likes: 0
From: MN
I don't think it's the angle of your driveline. Mine is the same and I have no issues. If the shaft is out of balance I'm not sure it would only get worse as shaft speed increases. You know when you have a tire out of balance it seems that you can feel it at a certian speed and no other speed? I think that's what happens when a driveshaft is out of balance. Kind of like it goes in and out of bad harmonics. I don't know for sure, just speculating. If it was me I'd take the shaft to a different driveline place and have them put it on their balancer to see if it's off, but that's just me
Good luck and hope all works out well.
Cam
Good luck and hope all works out well.
Cam
02-12-04 | 09:26 PM
#118
Thread Starter
RX-7 Alumni
Joined: Oct 2002
Posts: 1,140
Likes: 1
From: Spacecenter Houston
Originally posted by setzep
If it was me I'd take the shaft to a different driveline place and have them put it on their balancer to see if it's off, but that's just me
If it was me I'd take the shaft to a different driveline place and have them put it on their balancer to see if it's off, but that's just me
Originally posted by estevan62274 Rex4Life How much would you sell that beauty for???
Scott
 02-13-04 | 12:10 AM
#121
Originally posted by 82streetracer
direct freak used a 3/4 in spacer on his, and so am I, although I havent driven it, it looks level with the rear end.
direct freak used a 3/4 in spacer on his, and so am I, although I havent driven it, it looks level with the rear end.
02-14-04 | 08:24 PM
#122
Thread Starter
RX-7 Alumni
Joined: Oct 2002
Posts: 1,140
Likes: 1
From: Spacecenter Houston
Bingo!
Originally posted by setzep
I think that's what happens when a driveshaft is out of balance.
I think that's what happens when a driveshaft is out of balance.
Originally posted by dazdconfsd
Do you think there is room to fit the Racing Beat front strut tower brace that ties in the firewall also?
Do you think there is room to fit the Racing Beat front strut tower brace that ties in the firewall also?
Mods coming up:
1) Walbro 255 fuel pump (and new GSL-SE fuel filter).
2) Corksport 3" downpipe
3) RX7.com high flow cat
4) Hoodscoop for TMIC (but still not 100% sold on this yet).
Scott
02-14-04 | 10:55 PM
#123
Rotary Freak
Joined: Feb 2001
Posts: 2,524
Likes: 0
From: MN
Re: Bingo!
Originally posted by Rex4Life
Man who would of thought a brand new shaft could be out of balance--them guys did a nice job making it and I'm really suprised about it being out of balance.
Mods coming up:
1) Walbro 255 fuel pump (and new GSL-SE fuel filter).
Man who would of thought a brand new shaft could be out of balance--them guys did a nice job making it and I'm really suprised about it being out of balance.
Mods coming up:
1) Walbro 255 fuel pump (and new GSL-SE fuel filter).
Ok now the fuel pump. Does Walbro make a external 255l/hr pump or do you plan on sumping the standard 255?
I have my tank out and am getting ready to order the high pressure internal 255l/hr one. I'm not sure yet how I want to go about putting it into the tank yet though..
Cam
02-15-04 | 08:05 AM
#125
Thread Starter
RX-7 Alumni
Joined: Oct 2002
Posts: 1,140
Likes: 1
From: Spacecenter Houston
Yes there is a Walbro 255 external. Here's one that I found:
LINK
Even more helpful, I found another source that has the flow graphs which shows we need to use the GSL392, the other pumps just don't have enough flow/pressure for our application.
LINK
If you find another model that is better let me know.
They also have a good variety of adapter fittings. I would like to keep the stock SE plumbing and fuel filter. That means I will need to find an adapter to a banjo bolt--though I don't know what size yet.
Scott
LINK
Even more helpful, I found another source that has the flow graphs which shows we need to use the GSL392, the other pumps just don't have enough flow/pressure for our application.
LINK
If you find another model that is better let me know.
They also have a good variety of adapter fittings. I would like to keep the stock SE plumbing and fuel filter. That means I will need to find an adapter to a banjo bolt--though I don't know what size yet.
Scott